What I like about this forum is the knowledge and ideas I gain because others share information.   I try to do my part by posting my experiences.  Toward that end, I think  the most important to share are the failures - what doesn't work: I am removing the “custom built” ‘Streets road I was making from Atlas track.


The whole purpose was to build roads using Atlas track, with 27” and 31” diameters in the curved sections, was so I could have country highways with wider radius turns, both to look a bit more “interstate like” than the sharp  curves of standard'Streets track, and to make it easier for long home-made 18 wheeler tractor trailers to negotiate curves by making those curves less sharp.  I'm posting this foranyone interested but mainly for the folks that were following this work.  For others, this is a link to a posting only a week ago in which I was still enthusiastic about the idea and went over it in detail:


https://ogrforum.com/d...nt/14382474776975661


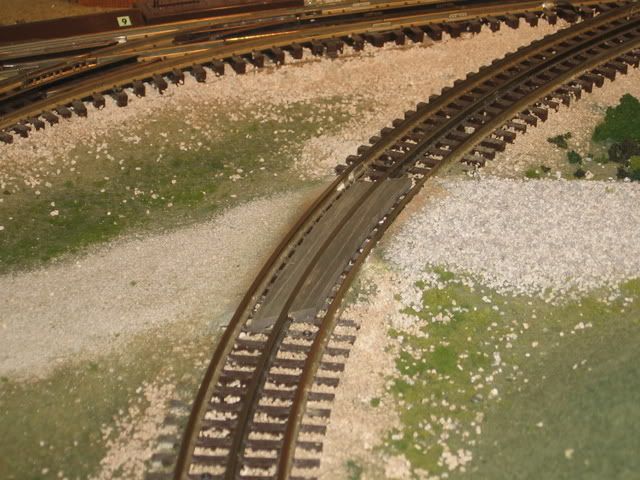
And it does work: ‘Streets vehicles run perfectly on the forty lane-feet I have completed.  But I am convinced it is not going to look that good, ever.


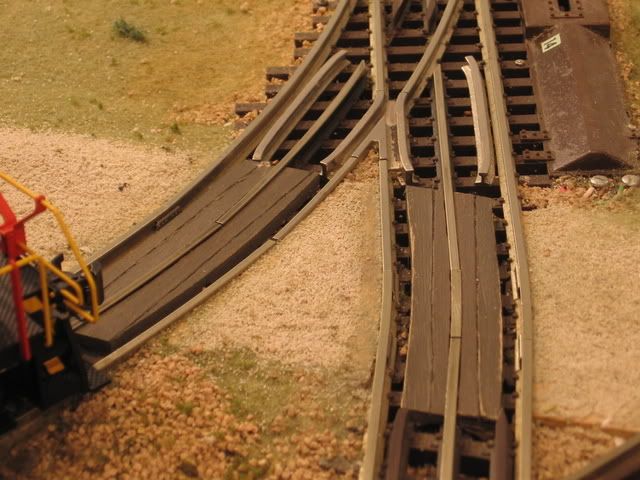
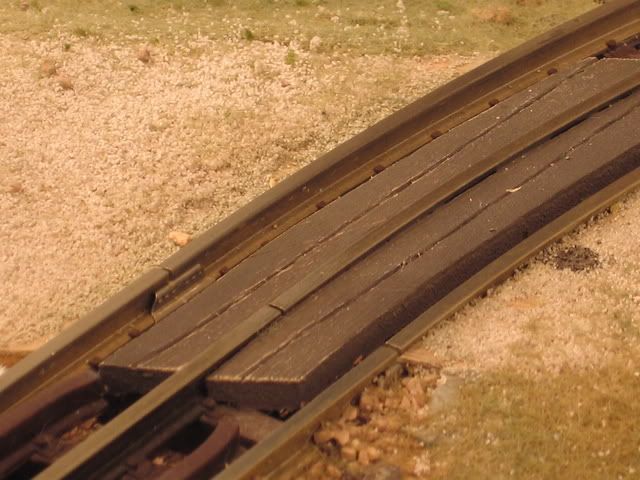
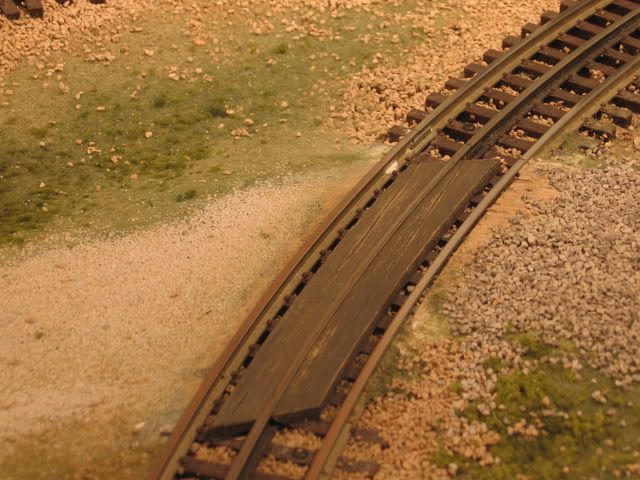
The picture below shows the original idea (see the link above for more details) and a very blown up photo of the problem.   For a variety of reasons, it is practically impossible to get the road inserts perfectly level and even - so they look good – like a road surface should.  Part of this is that it's just very difficult to cut, trim, and bend each insert to fit perfectly – but I did okay there.  

Presentation1

The major problem is that balsa or basswood or Luann plywood or mat-board of foamboard even warps just slightly – not much, and each in their own way maybe (mat-board curls, foamboard “fuzzes” on the edges, but each enough (see the picture of balsa) so it looks bad. No matter what type of glue I try, too.  It's only a tiny bit of warping, curling, or twisting, but that is all it takes. FRom any closer than five of six feet, you can see the unevenness, etc.  My country road is within two feet of the edge of the layout, and worse, opposite -- across a 28" wide aisle, from the downtown area with its 'Streets-builtcity streets right near the layout edge, which look just like, well . . . roads, and thus set a pretty high standard.


Yes, I can use 1/10 inch thick styrene instead – but the wood or foamboard, etc., was desirable because I could sand high spots and fill low spots easily and widen flange groves easily with sandpaper.  Plastic is more difficult to work with. 


I tried an alternative plan: various clays or fillers: the idea here being to press something like a fine clay between the rails, use a roller to push it and smooth it to just below rail level, then as it began to harden, cut narrow groves for the wheel flanges out.  A workable idea and I experimented over the earlier part of this week with seven types of clay on  ten inches of “road” each type.  Playdough doesn’t work (twists, crumbles, won’t cling).  Modeling clay (oil base) doesn’t work either (stays oily, nearly impossible to paint although you can – sort of), nor does papier mache’ or Crayola brand air-dried clay work much better.  But three “clays” did work: Paperclay ( a fine air-drying clay made for sculptors that is maybe half paper or paper mache or Critter Clay (also air dried) as used by taxidermists  and  finally the best of the lot, Apoxie Sculpt,  a two-part mixable epoxy-like modeling/sculpter clay, that does not shrink or crack at all and hardens in three hours  But all three cost quite a bit, and worst, they dry/harden with an uneven surface knobbly surface even if it’s even and smooth when I smooth it out while the clay is still wet or pliable.  And yes, you can sand and fill all three when dried – or fill and sand the warped balsa or bassword for that matter.  So with enough time, effort, filler, sanding, and tedium, just about any of these could be made to work.  But it would take forwever and I am fairly certain the results would not look quite a ssmooth and even as "factory" road.


So, I will re-design my country road to use standard EZ-Streets, and just make sure my home-built ‘Streets tractor trailers, etc., can negotiate D21” curves.   It will work out okay. 


I agree with people who say you learn from your mistakes.  I’ve learned a lot in the last week.

Attachments

Images (1)
  • Presentation1
Last edited by Lee Willis
Original Post

Replies sorted oldest to newest

To over come the warping of wood you could try some recycled wood, the older the better.  This way the wood will be dry all the way through and the humidity of the wood should match the average humidity of your area.  After the wood is cut to size, prime all six sides with Awlgrip 545 epoxy primer.  You can get this at a boat yard that deals with sail boats.  You may choke on the price, but a little goes a long way.

Lee...I am certain you will have an answer for this question but I will ask anyway.....have you considered using a material that is stable and will not warp with variations in humidity and temperature?  What I have in mind is hard Masonite.  I have used it extensively over the years and when glued down like you are doing, it does not warp up or down...or at least I haven't had that problem.  I think your original idea for building the road is still viable if you use an "engineered" material for your fillers.  You may want to experiment with a short section using Masonite and see if you like it before you proceed with plan B.....


Alan

Lee, a long time ago I read an article in Model railroader about a guy that was building a traction layout and he used plaster poured and smoothed over the track to simulate track on city streets. To clear the flanges he built a small dam using balsa strips alongside of the inner surfaces of the outer rails that he removed after the plaster had set . He then sanded and painted to surface to look like asphalt and concrete. I recall it looked pretty good, you might want to give it a try.


Jerry

Thanks all.  


Masonite - could not find it in thin enough sections 3/16 was the thinnest I could get and I need at nomore than 1/8 inch.


Gatorboard (micromart) is the foamboard is used - again, 1/8 inch thick.


The plaster might work.  But I'm going with the standard Streets track.  I can make it look good in curves by spacing curve and straight sections together - I'll get it done.  


Thanks for the interest and encouragement!  I'll post again on this topic when I have some progress (or further "learning experiences") to write about.

Lee, as a cabinetmaker I learned that whatever you do to one side of wood, you have to do the same to the other side.  If you varnish one side and not the other, it will warp.  If you leave one side exposed and not the other, it will warp.  If you weather one side and not the other, it will warp.  If you glue one side and not the other, it will warp.  


Because wood picks up atmospheric moisture on the side that is left porous, and does not on the side that is sealed, so one side expands while the other does not, so it warps.


Even: if you varnish one side one coat and varnish the other side two coats, it will warp - because one side will still be relatively more porous.


Your glue is sealing one side, while the other side is being left porous.  To complicate matters, your balsa wood, being extremely porous, is soaking up moisture from the wet water-based glue, which is making some pieces warp the other way, before the glue hardens and holds it in that position.


Your balsa wood strips would work without warping if you sealed both sides (equally) with some kind of sealer: paint, shellac, polyurethane, BIN, whatever.   Then glue them down.


Wood reacts to atmospheric moisture, which makes it dimensionally unstable, hence perhaps not the best modeling material.  As you point out, other materials have their problems too (different ones).


Well, actually, I sealed them all sides first.  Covered them with spackling paste and sanded to smooth fill the grain - if you look carefully at the detial picture you can see a faint white outline to the cross-section , then two coats of primer pretty thick.  The ends are not painted in the photo because I had sanded them in prep to glue to the next section I would install.  


Even sealed this way, They still warp a bit - it might be the glue (thick gobs of Liquid Nail) expanding or shrinking, not the wood.  And realize that even a single mm of ripple or unevenness looks strange bu comparison to the "streets track literally only three feet away across the aisle - I made it tough for myself here.


I do appreciate the suggestion though.  I keep being tempted to experiment/try/fuss with it some more, but no, I think I will just keep to the decision and start removing it tomorrow.  

Lee,


I always appreciate your posts and sharing sucesses as well as those projects that didn't go as planned is rare but much appreciated. I'm sorry this didn't work out but what you tried is superb. I expect your final road will be as superb if not even better, and along the way we'll learn more about your Streets tractor trailer project! Thank you for sharing! Terry

Thanks.  I'm determined to have my country road, though.  I will stay at it with the "streets and make that work.  And there is a silver lining. I laid out my country road where I had planned it, but once in place it did just not have the right "Shing Phooey" as I call it - it just did not look like I wanted it - not in the right location in my layout or postion relative to everything else.  I want to move it about 16 inches inward and make it undulate more.  Now I can.  

Lee...I found 1/8 inch thick Masonite at Home Depot.  I am currently using it.  It is hard and dimensionally stable because of it being tempered.  It would work if you are willing to consider it instead of giving up on your idea.  Frankly, one of the things I don't like about the E-Z Streets is that they are too perfect...too flat.  In the real world, only a major concrete highway would be close to the that look, but a country road would not likely look that way.  It would have dips, humps...etc.  I honestly believe your idea to custom build the road would look better for the purpose to which it is intended.  You just can't use a porous wood product for your fillers....use a engineered material like Masonite and I bet you would be very happy with the results.  What the heck is it going to hurt to see if it works for you??? 


Alan

Yeah, I'll stop by on the way home at Home Depot - its right across the street from the Lowes that had only 1/4 inch.  It will just take overnight to see. 


I agree that the EZ-Streets looks too perfect at times but that can be handled, too, by deliberately varying angle and twist a bit, and painting it dirty (I paint all my roads to disguise the plastic sheen, eventually).  Anyway, if nothing else, trying to Masonite allows me to put off for a day the big, big job of removeable.

Wood can be problem-atic.  Some of the wood kits I have built would warp and curl when painted.  The trick was to pre-paint ( prime/seal) both side of the material before assembly. One set of instructions even talked about painting the edges.  Something as simple as painting both sides of the wood, you used as a track filler,  may inhibit the curling and warping your experiencing.

I used your method to do simple crossing with pieces luan board, cut on a band saw, and shaped as needed with a disk/belt sander.


Best wishes on your project
Mike CT

Last edited by Mike CT

I can see that you don't mind putting time into your projects. Why not take the rail to the roadbed instead of the roadbed to the rail?

Take the Masonite or plastic and use a Dremel type tool to router a slot for the rail and then remove the rail from the track and slide it into the slot. You could put chalk line chalk on the top of the rail and place upside on the material for the path.

Just my 10 cents (2c adj for inflation)

Hello Lee,

  I like following your topics also.  Your work is phenomenol.  Have you considered sintra board.  Here is a link for it:  http://www.foamboardsource.com...intra-pvc-board.html  This place also sells the gatorboard, but again the thinnest is 3/16".  The masonite that I have is 1/8" which was purchased at Lowes.  Different locations sell different things.  Down here in FL, I can't get QuietBrace where as in other parts of the country they can get it.  Hope you are able to stick with the custom streets.


Jared

Originally Posted by gunrunnerjohn:

I like Don's idea of just using the home built curves and using the SS roadbed for the straight sections.

Don is smart to suggest this and also has the advantage that he has seen this road when it was being installed two weeks ago. 


Since I have 60+ feet of the Atlas in place, I am going to do this in places.  In fact, I have one long section where the altitude (its on the upper level) and angle of viewing means I could have just bushes and shrubs that are a scale 5-6 feet high that would hide the "road surface" from view but allow you to see the trucks - at least most of their upper portions - moving. 

Thanks for the suggestions.


Yes, I know people have filled with putty, plaster, etc.  for crossings, facilities, etc.  It would work.


I really appreciate these and other suggestions.  However,

1) Those examples, were, for the most part, flat: over half of my road is sloped enough that at least wet plaster, maybe other .

2) I have 96 feet of this to do. 

I'd use those techniques on crossings, etc., but not, I think, on 96 lane-feet.


After reviewing this thread, I take it you are making your own superstreets looking track with atlas as your track and applying the streets surround look yourself.  And 96 lineal feet of it.  Not playing hindsight, but I can imagine that being a rough go.  Getting it to lay flat with all those pieces for that long of a run.  With 1/8" thick material in long pieces. Around curves too? I can see more ripples than a pond of bluegills.  Forget 1/8" masonite.  Drywall compound, I love my Durabond 20, but who can lay that worth a darn after 6" in that tight of a space. How about custom order some 1/8" thick Ipe Brazilian hardwood material that is hard as steel and shim your track up to the street.  Or not.  Man, that's a tough one

Actually, I removed the entire thing this afternoon.  There was a wonderful feeling in just taking it all off the benchtop, crushing it up, and throwing it in the trash.  I will start entirely over. 


I tried perhaps 10 or 11 possible methods.  But there must be, how many?  Two dozen of more?  Basically I am tired of experimenting and having every method work well in all but one aspect.  If there is another way I will leave it to someone else to discover and i hope they do. 


 I had a perfect way of making "city streets" and have decided to make my country road with a variation of that.  It will work and I will have fun doing it!


Stay tuned.  I'm going to remove, throw away, and clean up this weekend.  Then start over next week . . .  

If I may ask as delicately as possible, what was the reason not to use the original super streets track and adapt that in as best as possible to your planned terrain.  There are too many pieces and too much lineal footage of track to make your scenario viable from this armchair.  I hope you prove me wrong.  Just have fun.  Cheers 


Post

OGR Publishing, Inc., 1310 Eastside Centre Ct, Ste 6, Mountain Home, AR 72653
800-980-OGRR (6477)
www.ogaugerr.com

×
×
×
×
Link copied to your clipboard.
×
×