@Mark Boyce posted:

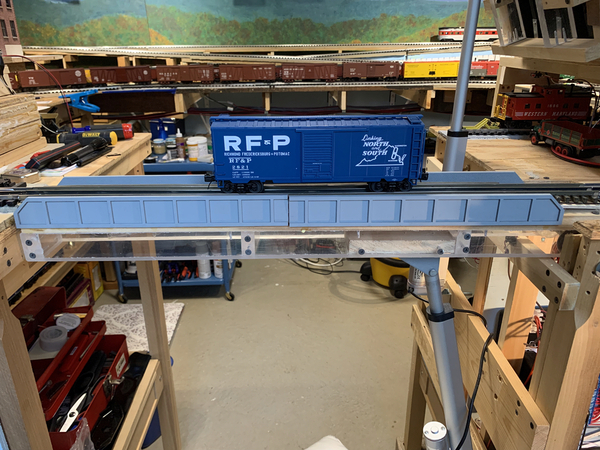
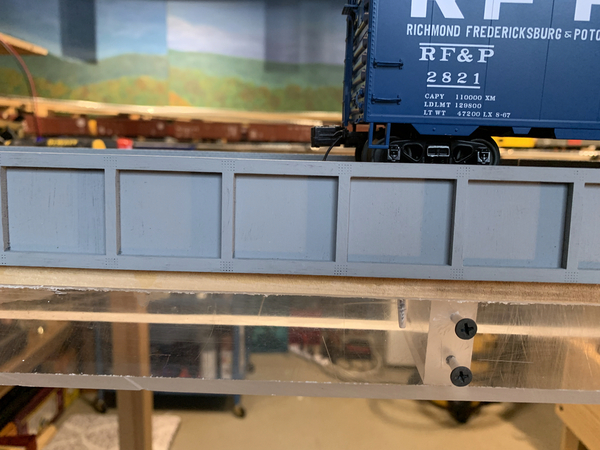
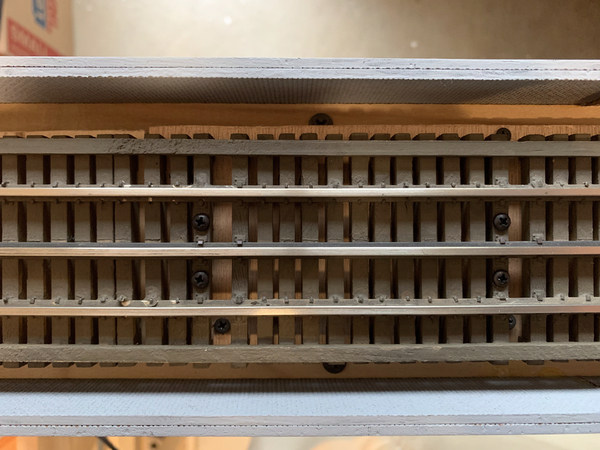
With the Sanky Wanky Coffee Company off the workbench, I decided for a change of pace.  I've been working on my lower lift up bridge the last few days.  I adjusted the pivot point some and it moves freer again.  I completely re-laid the roadbed and track.  I used a section of Atlas track that came with a small Atlas bridge that I crushed inadvertently.    The details are buried on this thread, and I will leave them buried.    I then glued girders on the sides.  I wanted to cover some of the plywood roadbed, but still make it a through girder bridge.   It came out okay.  Actually, I never even pay attention to this bridge when I am running a train or even just looking at the layout.  The big truss bridge totally overshadows it.  While there is still more to do, I'm not going to spend a lot of time on it at this point.

20240511_210939594_iOS

20240511_211010077_iOS

20240511_211033834_iOS

20240511_211212703_iOS

Everything is coming together quickly Mark and looking impressive. You are definitely on a mission.

Jay

@Mark Boyce posted:

Thank you, Mike, Tom!

Mike, you have followed with me for a long time.  Thank you for your assistance on the mechanics of the bridge and your positive support. 👍🏻

Tom, well you have a distance problem helping with your layout.  Fortunately, I can just fall down the stairs to mine. 😄

Mark your more than welcome! It is fun to be ab le to help others, God know I have received a lot of help from you and everyone here!

Thank you, Richie, Mike!

As soon as I took the photographs of the bridge, I wondered how long it would take before someone commented that it needs weathered!    It actually took longer than I thought!  Yes, it does look way too new even for someone like me who can't stand to 'ruin' a beautiful paint job with weathering.  A light gray bridge is an exception however.  I need to smooth and fill the center gap, dab a bit of paint, then figure out how much weathering to give it.

Mike, that's what we are here for; a mutual exchange of ideas.

Leaving the girder bridge final painting and weathering aside while I contemplate that, I got thinking again about a building kit I purchased a couple years ago.  It is the Atlas O - Wheeler's Auto Dealers.  I have seen it on others' layouts here on the forum and like it for it's charm as a substantial brick, mid-century structure with wide open showroom windows.  I got the kit out of the storage chest last winter, and realized it is larger than I had thought.  That is still a common occurrence for me even though I have been modeling in O gauge for 12 years now, after many decades in smaller scales.  I put the kit back in the box and in the storage chest, promptly bought the Sanky Wanky Coffee Company, and started building it.  I got the kit out and have had the 4 outside walls, roof, and foundation sitting on the workbench for a week now.  It looked too big for my limited town real estate.

Today it has been raining, so I mocked up a downtown scene with what I have.  The first thing I had to do was move all the cars and engines out of the yard so I could make a temporary support for the town mockup.  I intend to make one or more sections of town base lift up so I can access the yard tracks when necessary.  In the meantime, a couple of Menards boxes and some leftover pressed wood scraps serve as the base for the buildings.  I arranged them in no particular order, but those who have been following will recognize some buildings that have been sitting on the shelves under the layout for some time.

Here are 3 closeups starting at the left and moving right.

20240517_184336111_iOS

20240517_184340576_iOS

20240517_184343553_iOS

Hmmm...Wheeler's Auto Dealers doesn't look so big next to my other buildings.  Here is an overall photograph.  Where did Wheeler's go??  Oh, there it is between the power substation and the 3-story AmeriTown building.  I guess it doesn't overpower the scene so much after all.

20240517_184350928_iOS

Here is one last view from inside the door to the train room near the Idaho Hotel.  I think it will work out after all. 

20240517_184402803_iOS

This building just begs for a checkered tile floor, two brand new 195_ cars on the showroom floor, a desk, salesman ((did they wear loud, plaid sports jackets in the mid '50s? )), customers, and a few cars outside.  Oh yes, besides interior details, this building needs some roof details as well to break up the monotony.  I'm not sure how fast progress will be this time of year, but I'm glad I have put in a temporary town base to get a better picture of where this area is heading.

I can't resist commenting that I am tempted to name the dealership for one I first saw on West Broad Street, Richmond, Virginia when I went to work for Virginia Power in 1976.

MAD MAN DAPPER DAN The USED CAR MAN

would give them away, but my wife won't let me

All in neon lights.  True story!  Look it up on the always correct Internet! 

As always, all comments and suggestions are welcome.  Thank you for taking a look-see!

Attachments

Images (5)
  • 20240517_184336111_iOS
  • 20240517_184340576_iOS
  • 20240517_184343553_iOS
  • 20240517_184350928_iOS
  • 20240517_184402803_iOS
Last edited by Mark Boyce

Mark, I love the dealership’s look. I agree, it looks fine among other builds big and small. My mind keeps going to those cheap looking used car lot triangular multicolored  strand streamers hung from one end of the lot to the other. lol. You should consider that! It’s going to be a nice downtown scene. I’d go with the name you found in VA. Makes the building mean something above and beyond to you. It’s those things that make building a layout special! Great work, thanks for sharing your ideas.

Mike

Mark, you are the master of using scrap wood. Sure seems to work for you.

The sub-station looks out of place in its current location. Maybe move it to/toward a yard area?  I bought one at a LHS and decided it would not work with my limited space. So I sold it.

Where did your station go? On the other side of the layout? That was another nice build. I have the "Hobby Shop" in the Camaraderie Bar version. That is a nice building, one of my fav's.

Building location can be tough to work out. In my mind buildings need to have similar purposes in order to be next to one another. I'll mix and match until I like the configuration. I was moving buildings all the time on TPRR1.  Looking at its various photos something seems to have been moved every month or so, so nothing needs to be permanent.

Maybe put the 3 story at the end of a cul-du-sac with a green space or fountain in the middle.  Your visitors will be looking at it from the doorway not from the middle of the layout. So looking down a street scene with the 3 story at the end might look pretty impressive. (imagine the 3 story replacing the station in the back of the 1st photo)

Notice the buildings moving around to get the right look.

IMG_2645IMG_2742

I am pretty sure the MTH Station building was off the layout toward the end.

IMG_2783

This last photo was taken Just before I took the layout down for the move. The leaves on the sidewalk really make it look like the town was on its way out - spooky!

IMG_2969

PS:  Move Swanky Wanky 4 to 8 inches right to add room for a long street scene. Looks like you have the room.

Attachments

Images (4)
  • IMG_2645
  • IMG_2742
  • IMG_2783
  • IMG_2969
Last edited by ScoutingDad

Mark- Try moving the dealership to the other end with the firehouse. Maybe it's just the photo, but to me the building overpowers the Ameritown buildings. The dealership needs space for a lot to park cars too.
Put the Hobby shop on the left end the two larger A-T brick buildings side by side.
from L-R- Swanky- street- Hobby- Ameritowns. The smaller of the 2 story A-T's could sit next to the burger shop on the other side of the road.

Main St. could then lead out of town up the hill to the Hotel. You could add a grade crossing with signals on the 2-track main too.

The dealership would make a nice focal point at the end of the road. The sub-station, as much as I like it, should go someplace else. Any corner real estate available on the other side?
And finally, I'm sure some decisions will be driven by how much needs to be removable for access to the tracks below.

Just my $.02.....

Last edited by RSJB18

Thank you, Dave, Jay, Mike, Jeff, George, Gene, Mike!

I asked for ideas, and folks here never fail! 

Yes, Dapper Dan's makes for quite a large sign.  The real Dapper Dan's stretched for a large city block, maybe more.  I did set my only Studebaker by the dealership in the accompanying photographs, though it is a Champion, not a Lark.    Something less than neon lights will be better for a small town.  Time will tell.  I hadn't thought of the strings of triangular flags.

Jeff, I do recall your town on the last layout.  You kept a good photographic record of how you moved buildings around.  The fallen leaves was a good effect before tear down.  I placed a flagpole to represent some sort of park that can be seen in these photographs.  One thing about the Sanky Wanky is that I have to make sure the loading dock isn't too close to the curve in the track.  also, moving it the other way it will be right up against the truss bridge.

20240518_205642487_iOS

The station is on the other side of the truss bridge as it has been since I built it.

20240518_204250641_iOS

Bob, I tried arranging the buildings in the sequence you suggested, though I think the Hot Dog Shop isn't quite so.  I included a couple sections of Masonite that came from a Christmas layout to suggest the road and grade crossing.  I think something like that could work.

20240518_204148773_iOS

Here is more of the town as Bob suggested.  It's a better setup than the first one.

20240518_204153553_iOS

Jeff, here I used the last of my scrap to extend the town plateau over the tracks approaching the yard.  That provided a nice location for the substation, I think.  It also provided room for the car lot.  There's that Studebaker beside the building at the layout edge.

20240518_204158971_iOS

Here's a shot from inside the door.  There's that blond headed Mark 60 years ago peering into the Train Shop!

20240518_204214705_iOS

Mike G, you are right, there is a lot more planning goes into a layout than just track!!

One more thing, the Menards church on the windowsill can be best seen in the last photograph.  It has been there since I bought it a couple years ago.  I have plans to scratch build the church we were married in 40 years ago.  I can't take any photographs since it was demolished 2 years later to build the new larger sanctuary.  One photograph of it exists framed and hanging in our church office.  It is a good 3/4 shot which I have copied and have for reference.  It is a rather simple, boxy brick structure that will be a relatively easy scratch build when the time comes.  I will have to keep it in mind as the town develops, or maybe it should come next after the dealership.

Well, thank you again everyone!  Things will keep changing as I get other ideas and as more suggestions come in.

Attachments

Images (6)
  • 20240518_205642487_iOS
  • 20240518_204250641_iOS
  • 20240518_204148773_iOS
  • 20240518_204153553_iOS
  • 20240518_204158971_iOS
  • 20240518_204214705_iOS
Last edited by Mark Boyce

I like it Mark....not just because I suggested it either.

I've been involved in many projects on our campus over the years (9 buildings, 2 parking garages, 3 athletic fields, and a partridge in a pear tree ......) Over a half-million square feet of new space.
Spent a lot of time with Architect's which has worn off on me.
The building groupings are more in scale with each other. Glad you found a spot for the sub-station too.

I think you are on your way. I like the park idea too- would be a good lift-out section for access below. You could leave an alley between the hobby shop and the others too...could be a fun little spot to model.

My uncle was a Studebaker fan. I remember my cousin driving us around town in her Lark. He had a Avanti that he used to tinker around with too.

Bob

Thank you, Bob, Justin, Mike!

Bob, You are putting experience for your employer to work in making better layout designs.  I did a few architectural drawings in drafting class over 50 years ago, but never anything practical.  After that, the closest thing was electrical panel design.  Not the same thing at all.  Thank you for your suggestions!  Yes, I think it is a good spot for the substation.  Though I have worked in substations in town, most are at the edge of town.

Yes, I do not know how much will be lift up or out, the smaller amount would be more manageable.  Moving buildings off before lifting would be time consuming and accentuated the chance of breaking something.  My aunt had a Studebaker before she got married, but I don't recall what model.  My uncle was strictly GM, so from then on it was only GM products.  The Avanti was a cool design!

Justin, I'm glad our discussion is proving worthwhile to you.  The more folks who are helped, the better.

Mike, Yes, all guard rails must be posts with cables on this layout.  I haven't seen Farmer John here for a while.  He must be out plowing and planting!

I've been looking at the positioning of the buildings for my town for a few days and still like it.  I did some thinking about the construction of the base of the town and what parts to make lift up, in fact yesterday I made a list of materials I need to buy.  Yes, I am going to have to break down and buy some lighter plywood to make the base easier to lift up.  I also need some material for bracing.

Friday morning, I received a call from my not-so-local hobby shop, McCormick's Hardware that my Premier Western Maryland F7 was in.  Some may recall my PS3 upgrade to a ProtoSound F7 that I intended to pair with the F7 on order.  The new one looks and runs great, though I question the 5-horns on an F7.  Here is a photograph.

20240527_225637683_iOS

Here the two are together.

20240527_225631475_iOS

I wondered how well the two would run together when I made the upgrade.  The upgraded one seemed to run slowly at low speed steps at the time.  I performed the Lash up and tried it out.  The upgraded one was pushing the new one.  Separating them, it was obvious that the upgraded one took off very fast.  I deleted the lash up and the older engine.  Then I added it and ran each separately.  It was obvious that the upgraded one was running a little faster than the new one for each speed step, but not much.  I then made the lash up and tried them again a few feet apart.  At step 2, the upgraded one took off much faster.  I did all these steps again, with the same results.  I even reset the upgraded engine, but that didn't help.  Even if I get the lash up to work, the two engines may not match up well enough for a lash up.  I am still wondering why the upgraded one ran much faster once the lash up is completed, than it did before the lash up.  Yes, I'm disappointed to be sure, so I am going to work on another project.  Ina day or two I’ll write a new post for the DCS category.

Thank you for taking a look.

Attachments

Images (2)
  • 20240527_225637683_iOS
  • 20240527_225631475_iOS
Last edited by Mark Boyce

Mark, love the engines, (and anything WM)! Sorry to hear the upgrade is a bit off speed wise. Seems sometimes things in this intricate hobby just don’t work out smoothly. Went down this evening to run trains with my son Anthony, and one of the switches just died on us. Luckily I had a spare. The old section of our layout is made with MTH Realtrax. The switches are, let’s say, less than robust! Oh well, just go off and concentrate on another aspect of the hobby and come back to the other problem later! Best of luck with it. Thanks for sharing!

Mike

@Mark Boyce, You probably know this, but have you checked the Acceleration rate on the faster engine? I try to have all mine set at 1, so they start more realistically,but if for some reason they end up on the inactive list, they reset to 4. That is one reason I never use the Read command. I try to keep them all active, so I don't have to reset all the sound and control settings when they come off the list. Nice work on the town and buildings. i'm enjoying the progress.

Thank you, Mike, John!

Mike, I'm glad you had a spare switch!

John, I have never paid attention to the Acceleration rate!  It probably goes back to me being a person who doesn't always look things over and says, "What's this for"  I have overlooked it for so long, I had to turn on the remote and look for it.  I will certainly check on that!  Thank you for the tip!  Thank you about the town.

I bought some plywood and 1x2s yesterday at Lowes.  This plywood is birch.  Their other stuff was junky looking.  The 1x2s are poplar, which I have used before.  So, I am ready to construct the base for my town.

But first, I needed to get this AA set working properly.  It took some finagling, but I finally got both engines running together.  I first tried John's suggestion.  While the engine did come up with acceleration of 4, changing it to 1 didn't help.  I did some searching on the forum last evening, but didn't come up with a solution then.  After thinking on it this morning, I removed the shell to look at the tach optical sensor.  As I had hoped, it had come out of it's seat.  I put it back, and saw it was a loose fit.  I secured it with a bit of electrical tape, checked the spacing from the tach flywheel, and tested operation.  The tape is really holding the 3 wires going to the sensor more than the little circuit board itself.  If it gives me any more trouble, I'll try some hot glue.

20240529_185336756_iOS

I put the shell back on and tested again.  Here is a video.

Attachments

Images (1)
  • 20240529_185336756_iOS
@Mark Boyce posted:
...snip... though I question the 5-horns on an F7.  Here is a photograph.

20240527_225637683_iOS

...snip... Thank you for taking a look.

Wild Mary #64, #235, and ALCo FA #302 all had the five-tone horns:

ttps://live.staticflickr.com/5455/31300908815_025328b1b7_k.jpg   (add an h to open the link"

I recall one motor that had both horns facing forward; that one always sounded great!

@Mark Boyce posted:

I bought some plywood and 1x2s yesterday at Lowes.  This plywood is birch.  Their other stuff was junky looking.  The 1x2s are poplar, which I have used before.  So, I am ready to construct the base for my town.

But first, I needed to get this AA set working properly.  It took some finagling, but I finally got both engines running together.  I first tried John's suggestion.  While the engine did come up with acceleration of 4, changing it to 1 didn't help.  I did some searching on the forum last evening, but didn't come up with a solution then.  After thinking on it this morning, I removed the shell to look at the tach optical sensor.  As I had hoped, it had come out of it's seat.  I put it back, and saw it was a loose fit.  I secured it with a bit of electrical tape, checked the spacing from the tach flywheel, and tested operation.  The tape is really holding the 3 wires going to the sensor more than the little circuit board itself.  If it gives me any more trouble, I'll try some hot glue.

20240529_185336756_iOS

I put the shell back on and tested again.  Here is a video.

Nicely done Mark and that has to give you a good sense of accomplishment. This hobby really does serve to exercise our brains with the problem solving involved. You have those neuronal networks firing. Thanks for sharing.

Jay

Thank you, Dave, Jay, Jeff!

Dave, thank you for the photograph of the prototype rounding Helmstetter's Curve!!  I am probably too used to looking at model F-units and not prototype engines to have picked up the 5-tone horns.  Or, maybe more probable is that since I know I have already seen the photograph you shared; I just don't pay attention to details. 

Jeff, you do have a point.  Now I need to buy new horns, the single horns on the #52 don't look right.    Not a hiccup is true, and that was the first video I shot of them running!!  I don't know how that happened!  Did you notice the colorful boxcars I added to the front with you in mind?

Jay, for a while I was wondering if I was going to get the #52 working, thinking I must have messed something up on the upgrade that didn't show up right away.  I had a supervisor long ago who said when you can't figure out what is wrong, go get a cup of coffee and forget about it for a few minutes.  I forgot about it overnight.  That must have rejuvenated the neurons that think being retired means sitting on the neurological rocking chair all the time.  You're welcome.  I hope this helps someone else who finds an engine that just starts to run plain loco.  Maybe the pun neurons need to get back to that rocking chair!

Last edited by Mark Boyce

Thank you, Bob!

Yes, I thought the horns look too high from the start.  I’ll run it a while to make sure a problem doesn’t develop, then cut them down someday.

Today I cut some plywood for the lift up for access to the tracks underneath the new town.   I took one photograph, but it doesn’t show much.  I’ll do some more work on it before posting any photographs.

@Mark Boyce posted:

I bought some plywood and 1x2s yesterday at Lowes.  This plywood is birch.  Their other stuff was junky looking.  The 1x2s are poplar, which I have used before.  So, I am ready to construct the base for my town.

But first, I needed to get this AA set working properly.  It took some finagling, but I finally got both engines running together.  I first tried John's suggestion.  While the engine did come up with acceleration of 4, changing it to 1 didn't help.  I did some searching on the forum last evening, but didn't come up with a solution then.  After thinking on it this morning, I removed the shell to look at the tach optical sensor.  As I had hoped, it had come out of its seat.  I put it back, and saw it was a loose fit.  I secured it with a bit of electrical tape, checked the spacing from the tach flywheel, and tested operation.  The tape is really holding the 3 wires going to the sensor more than the little circuit board itself.  If it gives me any more trouble, I'll try some hot glue.


I put the shell back on and tested again.  Here is a video.


Love the video, Mark………good looking engines and consist!

Peter

Thank you, Peter!  I am very pleased with how the AA units turned out.  Since one in fireball and the other in speedletter, I had wondered how it would go.  It's just a nice consist of the #52 not making it to the paint shop yet.   I really like a lot of those boxcars.  The details on some of them are really great!  I just have to be careful with handling them, so I don't break parts off! 

Last edited by Mark Boyce

I finally got the base for the town roughly built.  I decided to make two lift-up sections that are each 2 feet deep.  I decided to do this so I could reach any derailments on the two mainline tracks that are under the upper level.  Even though everything is tested for clearance, something will inevitably  derail and bump into a supporting post.  The deep lift-ups will make it easier to get tough derailments back on track.  Granted, it will be a bit of work removing several buildings and vehicles before I can lift up even one, but I shouldn't have to do that often.

So here are some photographs.  I used new 1/2" birch plywood for the flat bases and poplar 1x2s for the support.  I still need to brace everything more, but here is how it is now.  Even adding some bracing, I will have excellent overhead clearance.

20240607_232924266_iOS

20240607_233010899_iOS

20240607_233031383_iOS

I have not decided what I will do with this small space between the right hand lift-up and the descending track.

20240607_233043322_iOS

Attachments

Images (4)
  • 20240607_232924266_iOS
  • 20240607_233010899_iOS
  • 20240607_233031383_iOS
  • 20240607_233043322_iOS

Thank you, Mike, Dave, Bob!!

Mike, I will be making all structures on the layout removable.  On previous layouts, I fastened them down and destroyed some when it came time to take the layout down.  Your question raises another question; where will I put them when I need to pop up the base?  I have shelf space under the layout that is holding buildings now.  I will have to keep space available of the chance I need to raise the base.  That may be easier said than done. 

Dave, at first I was just going to make the the panels lift off, but it would be awkward to have a place to set one down so I could access the tracks.  Then I remembered these offset hinges from some old cabinet doors.  I forgot to post a photograph of them yesterday.  I was able to slide the long flat section of the hinges underneath the Homasote and that holds quite well.  I will be able to slide them out to install the streets, sidewalks, etc, and then slide them back under the Homasote when done.  I will have to consider how to disguise the seams between the two lift-ups and the sides, but that will come when I move forward on that project.  Here is an overhead shot.

20240608_140939173_iOS

Bob, Yes you have a good point.  I will have to decide if I want that area flat up to the sloping track or slope itself.  Going back to Dave's comment; all along that wall is the area I want to scenic with the river.  I'm going to have some areas with tunnel portals and some where the track just disappears too.  I intend to work on that at the workbench and place sections on the layout nearly fully sceniced.  I have some narrower areas between tracks to figure out how to scenic too.

20240608_142154598_iOS

You are right about the old lumber feeling jealous of the new lumber.    That certainly was traumatic, purchasing new lumber. 

Attachments

Images (2)
  • 20240608_140939173_iOS
  • 20240608_142154598_iOS
Last edited by Mark Boyce

Add Reply

Post
The Track Planning and Layout Design Forum is sponsored by

AN OGR FORUM CHARTER SPONSOR

OGR Publishing, Inc., 1310 Eastside Centre Ct, Ste 6, Mountain Home, AR 72653
800-980-OGRR (6477)
www.ogaugerr.com

×
×
×
×
Link copied to your clipboard.
×
×