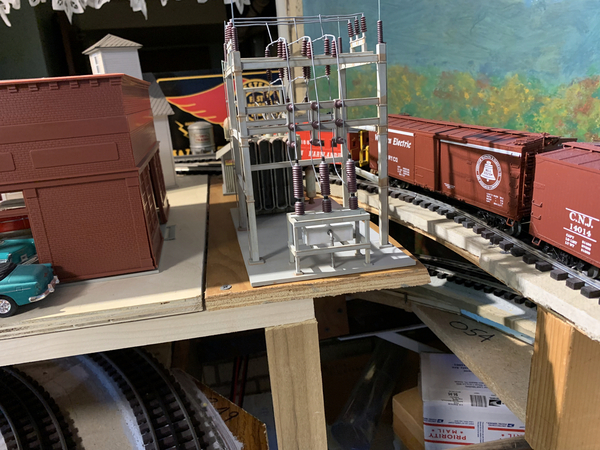
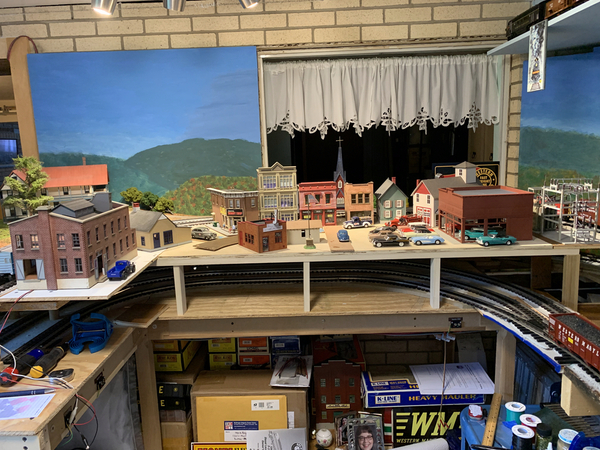
Mark, your work is inspirational. I have yet-to-do lift-out section much like your situation. fwiw: I've already built a lift-out section for access in another part of my layout, and I attached 3 buildings and towers to it (24" x 12") and it is pretty heavy to remove. I have to eat my Wheaties!
You know for sure, that Murphy will be present at all times, and when there is a derailment, it WILL occur under the town. Having the liftups now will insure that they WON'T happen there. I had toyed with making my town liftable, and wish now that I did. It's very difficult to get to buildings in the center. I've wanted to put in more telephone poles, parking meters, etc., but reaching those spots is getting tougher as the years go by.
Thank you, Paul, Myles!
Paul, I'm glad you have already built lift-outs. Yes, they can get heavy very quickly. Also, they seem to get heavier every year even if nothing has been added. We certainly need to eat Wheaties! That's what my dad always ate! Actually, that is why I built these out of new 1/2" plywood and not the old stuff I had on hand that I used for the mockup a couple weeks ago. That old stuff is the pressed "wood?" they use in cheap furniture. Each of the three smaller sections weigh a lot more than the two plywood sections. For removable scenery, I will probably use extruded Styrofoam for less weight.
Myles, you have described two concepts that are certainly true, but science has yet to understand how they work. Murphy, and by taking the precaution ensures nothing will happen!! I am glad I took into account the loss of strength, flexibility, etc. that comes with aging. Since I started building, I have been glad of that. However, there are two spots that are hard to reach, but not worth getting a topside creeper. Actually, I wouldn't be able to get a creeper into the train room if I had one. ![]() In the last 5-1/2 years, I damaged a sciatic nerve that still affects my right leg from the buttocks to the toes, had a knee replacement, and two back surgeries. I wasn't counting on all of that.
In the last 5-1/2 years, I damaged a sciatic nerve that still affects my right leg from the buttocks to the toes, had a knee replacement, and two back surgeries. I wasn't counting on all of that. ![]() I am glad I hadn't planned on building a layout that I would have to climb up on and walk around.
I am glad I hadn't planned on building a layout that I would have to climb up on and walk around. ![]()
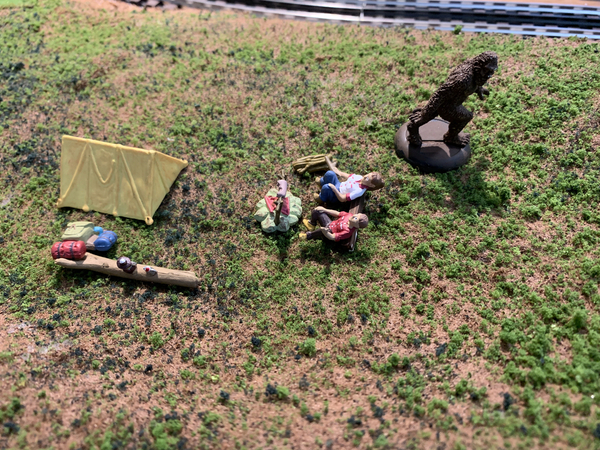
I just noticed after taking the photographs I already posted, that my campers had an accident. Here a sasquatch came by and the campers fell off their log seat!! I hadn't expected that!! ![]()
Squatch must be in the area for the Forest County Bigfoot Festival in nearby Marienville this weekend! It's a real thing! Go look it up!! ![]()
Attachments
Bob, I put in that spot to the right with a piece of the scrap 1/2" plywood from old kitchen cabinets, leaving a small gap for sloping scenery to track level. That was very nice material, nice and level, but I only have a few small scraps left.
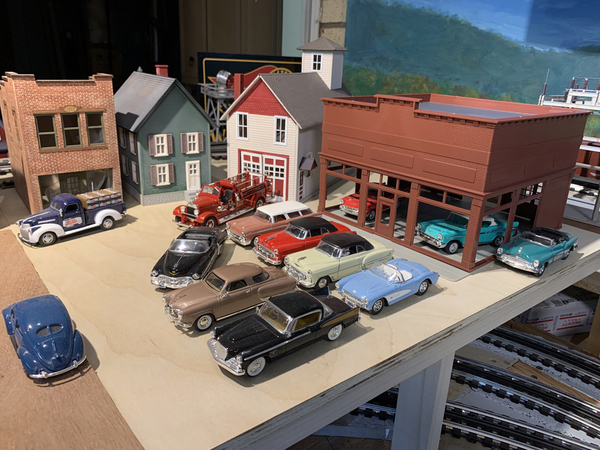
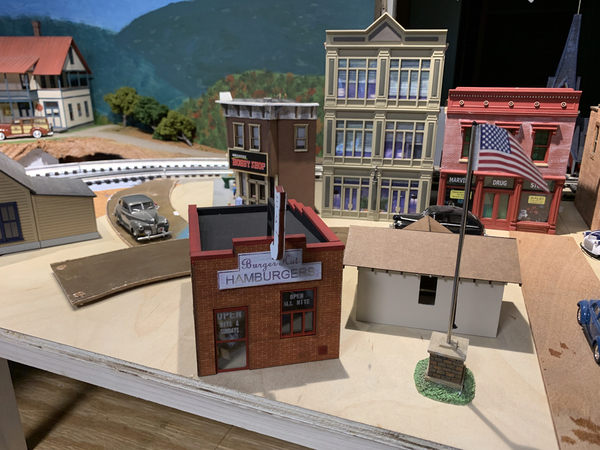
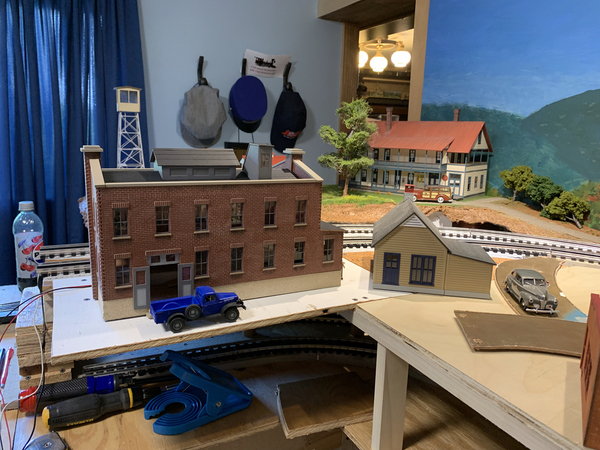
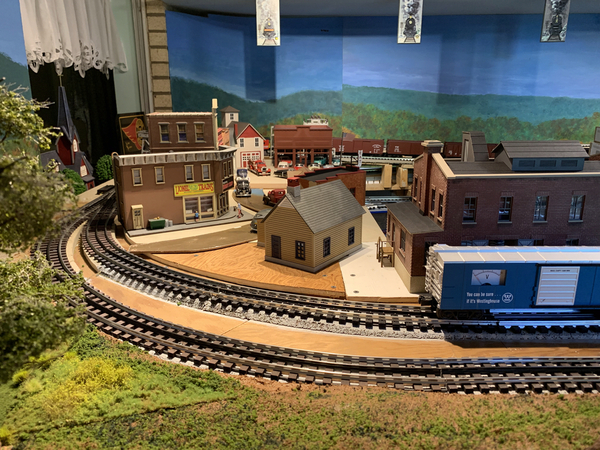
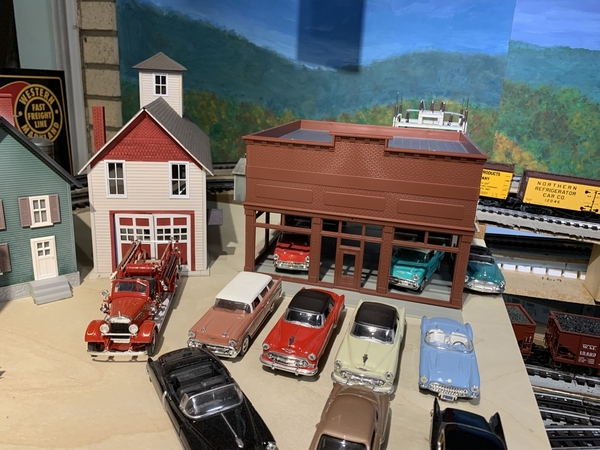
I repopulated the permanent base with the town buildings, cars, and trucks in a little different way. I added a couple "filler" buildings just to get a better idea of how a town could look. The MTH house next to the fire house and single story no-name business next to the Sanky Wanky are the ones I mean.
Here are some closeups. I put down some scraps of Masonite to show roads better.
I did mention a few days ago, I want to scratch build or kitbash the church we were married in. I will have to figure out how big it will be so I can make a place for it before putting in streets and sidewalks. So many projects!! ![]()
Attachments
@Mark Boyce posted:...However, there are two spots that are hard to reach, but not worth getting a topside creeper. Actually, I wouldn't be able to get a creeper into the train room if I had one. ...
You can always get one and assemble it in the train room. In fact, that's probably the only way to do it. Now getting it OUT of the train room is another story.
@Mark Boyce posted:Bob, I put in that spot to the right with a piece of the scrap 1/2" plywood from old kitchen cabinets, leaving a small gap for sloping scenery to track level. That was very nice material, nice and level, but I only have a few small scraps left.
If all you're supporting are buildings and scenery items, 3/8" or even 1/4" plywood should be sufficient.
@Mallard4468 posted:You can always get one and assemble it in the train room. In fact, that's probably the only way to do it. Now getting it OUT of the train room is another story.
If all you're supporting are buildings and scenery items, 3/8" or even 1/4" plywood should be sufficient.
Thank you, Mallard!
Not only would I have to assemble it in the train room, I would have to disassemble and take it out of the train room as soon as I was done using it. ![]() The space in the middle of the layout is 43" x 77". No room to store it there, and all my tools, materials, kits, etc are underneath the layout, so no room to store it there. After navigating the 24" wide aisle where the lift-up bridges are, it would have to go out the door.
The space in the middle of the layout is 43" x 77". No room to store it there, and all my tools, materials, kits, etc are underneath the layout, so no room to store it there. After navigating the 24" wide aisle where the lift-up bridges are, it would have to go out the door. ![]() I have been able to use the two step work platform to reach those two hard to reach spots. It is also handy to reach my Ceiling Central RR in the next room.
I have been able to use the two step work platform to reach those two hard to reach spots. It is also handy to reach my Ceiling Central RR in the next room.
You are right about 3/8" or 1/4" plywood would be sufficient to support buildings and scenery. ![]() I'll keep using scraps, but if I need to buy something, I'll do that. I do have a 2' x 4' section of 1/2" birch plywood left besides the very small scraps.
I'll keep using scraps, but if I need to buy something, I'll do that. I do have a 2' x 4' section of 1/2" birch plywood left besides the very small scraps.
Hi Mark, I am sorry I haven't been around to keep up on your wonderful work, but I am glad I took a break this evening to try and get up to speed on everyone's work. I have to say I think you're doing an amazing job and I love the fact that you finely broke down and bought some new wood!!!! I think this is a first since I started fallowing you many many years ago! I am so proud of you and the Miss for not Lossing her mind over it! LOL Just kidding I really love all the work you're doing and I think your layout is looking great!
I can't wait to see the scratch-built church! Bless you!
Thank you, Mike!
I know you have really been busy with CEO directed tasks. I'm glad you got to take a look the other day. Yes indeed! I almost had a heart attack right there at the local Lowe's loading up that new wood! It was very traumatic! So traumatic, I couldn't get the stinking self-checkout to work. I had to call in the young fellow, and with one finger tap on the exact same spot I was tapping, the transaction went through! ![]() She isn't disturbed at all, since her thoughts are that we had to sign up for medical insurance for her for 11 months until she turns 65. It will cost $770 per month more than we were paying for her insurance. I'll be posting some trains for sale to help ease her paranoia.
She isn't disturbed at all, since her thoughts are that we had to sign up for medical insurance for her for 11 months until she turns 65. It will cost $770 per month more than we were paying for her insurance. I'll be posting some trains for sale to help ease her paranoia. ![]()
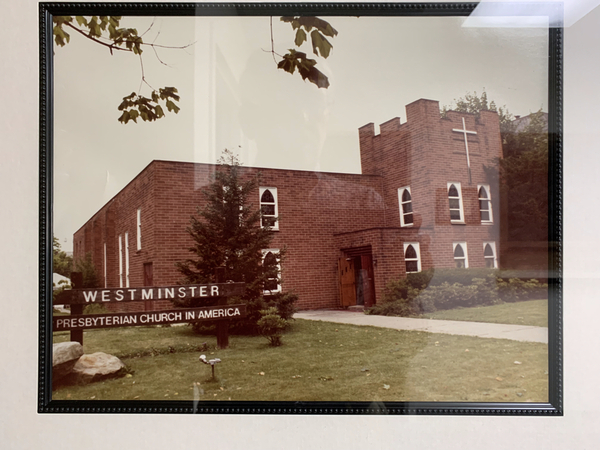
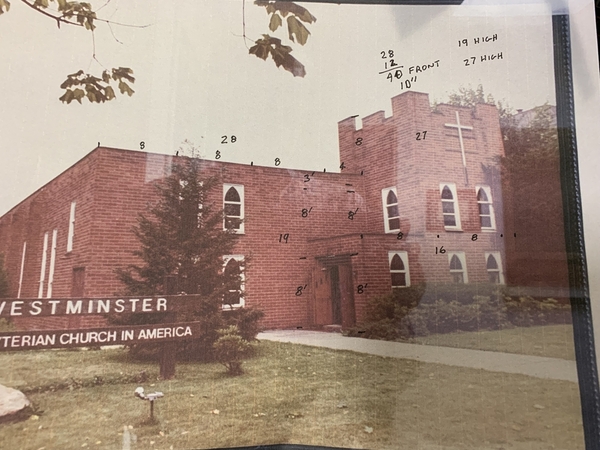
Here is the one photograph of the old church building that is available. It is framed in the front of the church along with one stained glass window that was kept.
I asked before, and there is no known photograph of the right side or the rear. I think it would be safe to say that the right side looks similar to the left side. I do recall a door on either side near the rear of the building. It doesn't matter much since I can remember the interior of the rear, but not the exterior. The rear may not even be visible on the layout.
This should be a relatively simple scratch-build, since there are no odd angles, curves, or pitched roofs. We were married there in 1984, and the building was razed about 3 years later. The new building provides a larger sanctuary, and has larger classrooms and offices. There is a large youth area in the basement. My wife would be very happy to see the original church in model form. ![]()
Attachments
Hey Mark, great work as usual.
As for my layout build - we finally have most of the area cleared and some of the framework wood ready to get placed. It will be 10' x 24'
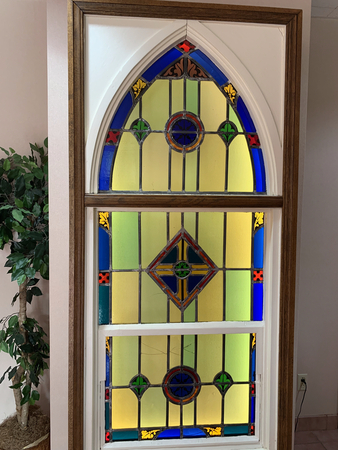
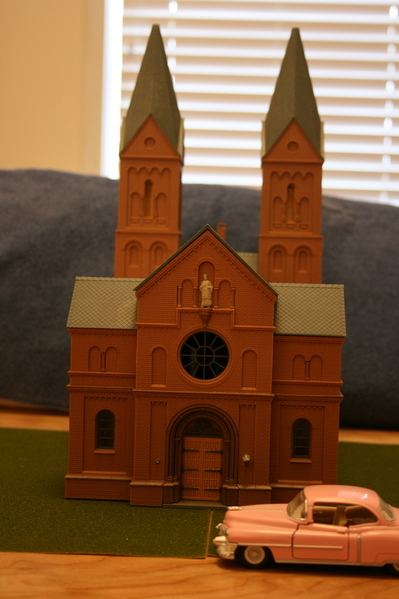
Mark, nice progress on your town! I Love the idea of your church kitbash. Every layout needs a church and yours will have sentimental value. FYI…I did a church a little while back. Kitbashed something I found on the bay for cheap to resemble a church in Johnstown. I did find a good way to make those pesky stain glass windows. If you decide to model those, let me know. I can help you with the process. They look really good when the church is lit. Your wife will be glad to see the church you were married in on your layout. And maybe it will buy you some brownie points to buy more trains?????! Thanks for sharing!
Mike
Thank you, RJ, Mike!
RJ, I'm glad you got your space ready to start building!! I'll be glad to see your progress!
Mike, I can't see the photographs. It is great the model looks like something in Johnstown! I would be glad to see how you made the stained glass windows. I could size my photograph accordingly and print on paper, but they won't look right with light shining from inside.
Mark, I attached the photographs again. 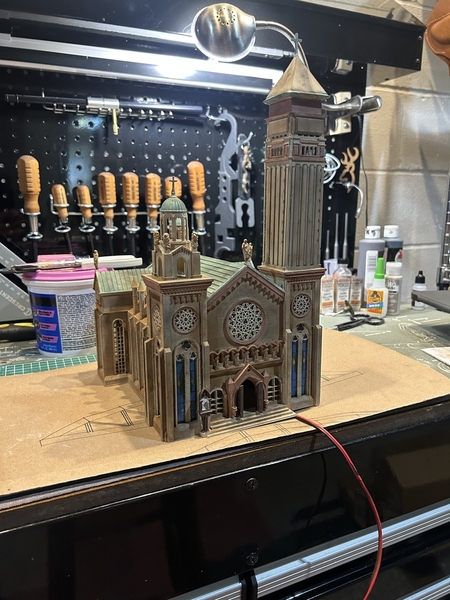
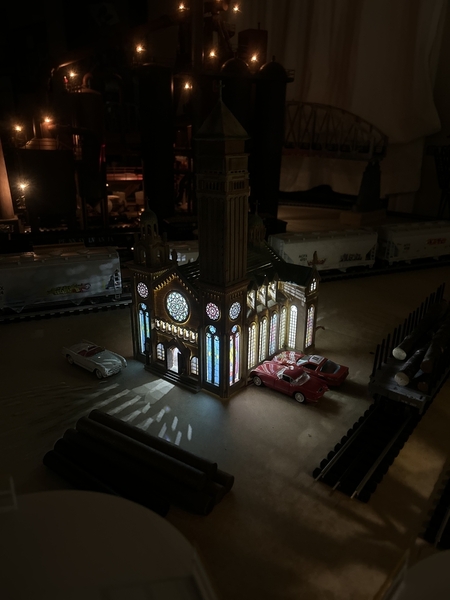
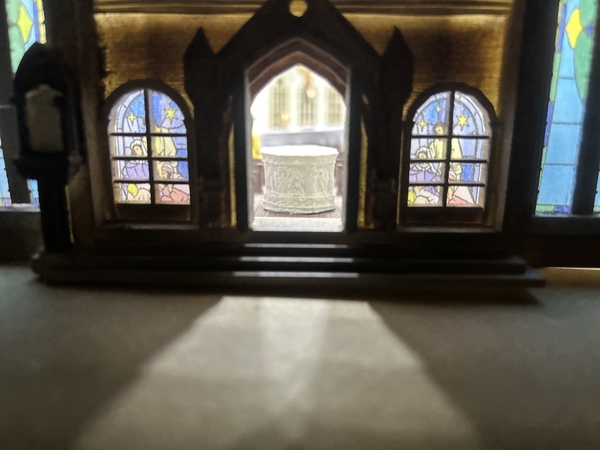
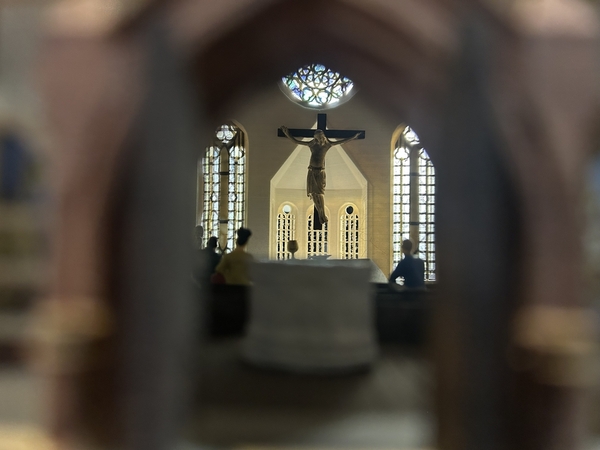
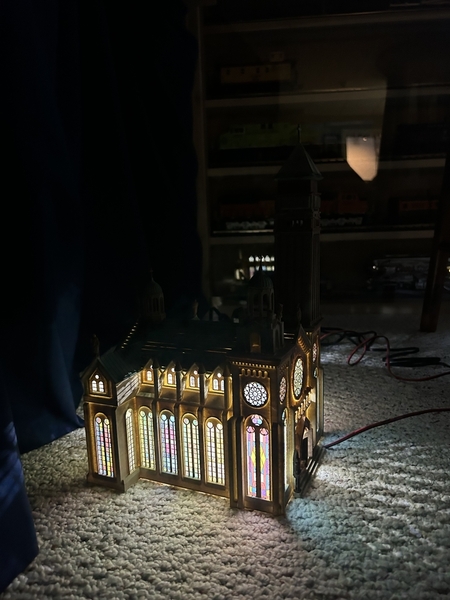 To make the stained glass, I printed the window photos on Vellum paper (from Amazon) with a regular inkjet printer. It will take you some practice sizing the window photos correctly. I’d test print on regular paper until you get the size right then print on vellum. After printing and drying overnight, I put a light coat of clear gloss acrylic (from hobby store) over the prints with a brush. That gives a glossy look like real reflective glass. Once dry, I glued to inside of window frames with tacky glue. Hope that helps.
Mike
Attachments
Thank you, Mike!
Your church is beautiful inside as well as outside. It is just a bit more elaborate than the one I will be building! ![]() It's great!
It's great!
Yes, vellum would work! That takes me back to my drafting days over 40 years ago. We used nothing but vellum in high school drafting class in the early '70s. (Did I say early '70s? Ouch!) At work, we used both vellum and mylar. I will get some for the printer.
@LT1Poncho Thanks for posting the church build. Really great idea on making the stained glass windows. I used a heavy vellum to repair my Marantz tuner when I replaced the tuner lights with LEDs. As I recall there are several different weights available at Hobby Lobby among others. Nice build. Jeff
@LT1Poncho posted:Mark, I attached the photographs again.
To make the stained glass, I printed the window photos on Vellum paper (from Amazon) with a regular inkjet printer. It will take you some practice sizing the window photos correctly. I’d test print on regular paper until you get the size right then print on vellum. After printing and drying overnight, I put a light coat of clear gloss acrylic (from hobby store) over the prints with a brush. That gives a glossy look like real reflective glass. Once dry, I glued to inside of window frames with tacky glue. Hope that helps.
Mike
It’s been awhile since posted due to a combination of work, medical issues ( Mark, I truly feel your pain. ). I also haven’t made much layout progress due to the above plus the need to allow access above the layout so that my very dilatory builder can fix some problems he created. But I have to comment on this beautiful church and the outstanding stained glass windows as well as the technique used to create them. Outstanding !
I am encountering one concerning problem. I’ve been running the two loops I created for my grandchildren in conventional using a Z4000. After some time running, at least three of my newer MTH engines have become very erratic. They often won’t start, then they lurch. The whistle and bell all work, but the engines won’t run reliably. I know that the little kids have periodically pushed the program button on the Z4000. If my DCS were set up,!I would try a factory reset but I don’t think I can do that with just the Z. These engines were stellar runners and now they’re not. On the other my KLine and Williams engines, which are TMCC all work well, so the Z seems to be in good working order. The affected locos include the newest PRR G5, L1 and others.
any ideas about what to do would be very appreciated.
Thanks,
Rubin
Afternoon guys,
Mark I am sure you are going to do an amazing job on the future church and with the ideas that Mike has given you things should be even easier! ![]()
Mike that is one amazing church and what a great job on the windows and thanks for sharing on how you did it! It goes to show that no matter what page you go to here on the forum your probably going to learn something!
Jeff, Rubin, Mike G, I agree with everything all of you have said about Pancho Mike's church!! It is outstanding.
Jeff, Marantz tuner! I haven't heard of that name in years.
Rubin, I'm sorry you haven't posted for a while. I'm glad you are getting a handle on your medical issues. I know another person who has replied to this thread int he last few days has had to get some medical issues taken care of. I guess we can expect these things at our age.
I don't know what to think about the problem you are having running your engines conventionally with the Z4000. You could make a post on the MTH forum in the Directory in the upper left corner of the OGR main page. I just did that with a Lionel question, and received a number of comments which aided me in correcting my problem. Write a descriptive title and describe your problem in the initial post. Here is my example. https://ogrforum.com/topic/tmcc-f3-a-a-set-erratic-speed-control?reply=184720406410395328#184720406410395328
I started laying out the base for this town only to see if I could fit the Wheeler's Auto Dealers kit and it wouldn't overpower the town. That decided, I got thinking about my future church scratch build project. Now I realize I had better figure out how much space the church will take before I move ahead with anything in the town. I have a photograph with doors that can give me a dimension to start with. From that, I will come up with a reasonable guess at the rough overall dimensions of the prototype. That will probably be bigger than I want, so I will then work on compressing it and make one or more cardboard mock ups to see how it can fit. There is always something new to explore.
Mark, wanted to share a pretty cool material for scratch-building brick buildings. Just used some on my Chemical Industry, very easy to work with, took Red Oxide primer really well, made sure to stay back 16 - 20 inches and do thin coats. Here's some photos of it, along with a photo of the product Name # etc.
I have had this Plastruct Rough brick 1/48 for years, finally got it out and started working with it. Cut's very easily with sharp utility knife etc. Been using some of the E6000 adhesive to permanently adhere it to 1/4 inch luan plywood backing. The cap on top of the wall is some cork road bed, went an purchased a few pieces of either HO or N, pretty sure it's HO so it's thinner than O scale, looks just like concrete after some weathering with Khakhi and Gray Craft paints.
Attachments
@LT1Poncho posted:Mark, I attached the photographs again.
To make the stained glass, I printed the window photos on Vellum paper (from Amazon) with a regular inkjet printer. It will take you some practice sizing the window photos correctly. I’d test print on regular paper until you get the size right then print on vellum. After printing and drying overnight, I put a light coat of clear gloss acrylic (from hobby store) over the prints with a brush. That gives a glossy look like real reflective glass. Once dry, I glued to inside of window frames with tacky glue. Hope that helps.
Mike
I guess these kind of look similar !
Ron
Attachments
The church sounds like a nice project Mark. Don't think I'll ever add ours to a layout. The church we were married in would take me a lifetime to build.

@RubinG- If the engines are MTH PS2 or 3, you should be able to do a reset with the Z4000. Check the manual for either the transformer or locos.
@chris a- I have a few sheets of that brick. Don't have a plan for them yet but good to know it takes paint well.
@LT1Poncho- Beautiful model. The windows and interior look great.
Bob
Attachments
@RSJB18 posted:The church sounds like a nice project Mark. Don't think I'll ever add ours to a layout. The church we were married in would take me a lifetime to build.
@RubinG- If the engines are MTH PS2 or 3, you should be able to do a reset with the Z4000. Check the manual for either the transformer or locos.
@chris a- I have a few sheets of that brick. Don't have a plan for them yet but good to know it takes paint well.
@LT1Poncho- Beautiful model. The windows and interior look great.
Bob
LOL Plus you would need a bigger layout Bob! Probably some cold Malt stuff to help along the way!![]()
Thank you, Chris, Ron, Bob, Mike!
Chris, That is nice brick material. Thank you! I actually have some of that (but N-scale brick size) from 35 years ago when I scratchbuilt my 'Boyce Homestead' diorama. I used it for the brick garage and sunporch. I really forget whether it was easy to use/paint or not since it was a half a lifetime ago. ![]() I see it is still available. Good stuff stays on the market! Nice idea using the cork roadbed for the cap.
I see it is still available. Good stuff stays on the market! Nice idea using the cork roadbed for the cap.
Ron, that's a dandy looking church as well!
Bob, yes that church would be quite a project! Imagine how much space that would take on your small layout! It seems to me it would have take a long time for your bride to walk down the aisle! It is like the chapel at nearby Grove City College, our younger daughter's alma mater. We were guests at a wedding there last year.
Mike, I think Bob would take in quite a few of those cold stuff building a model like that. ![]()
The only thing new here is getting my TMCC B&O F3 A-A set running smoothly. I had to ask for help on the thread I referenced to Rubin. OGR Forum members came through again!
I finally got a chance to guesstimate the front length and height of the prototype church. I used 8’ for the entry height, 6’ 8” door and 1’ 4” for the recessed brick above that. I then projected that across the print. The length of the front is 40’ which is 10” in O scale. The height of the turret is about 7”. Compared to Wheeler’s Dealers, the church would be 1” longer and 1/2” taller. I think I can easily narrow it and look good. I wasn’t too concerned about depth at this time.
Yes, it would definitely be shorter than the peak of the hose drying tower on the firehouse next to the dealership.
Attachments
That’s going to be a showpiece Mark.
Jay
Thank you, Jay! I hope you are right. 😊
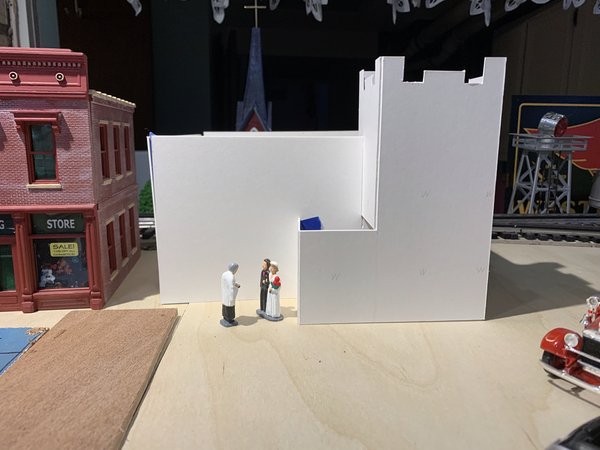
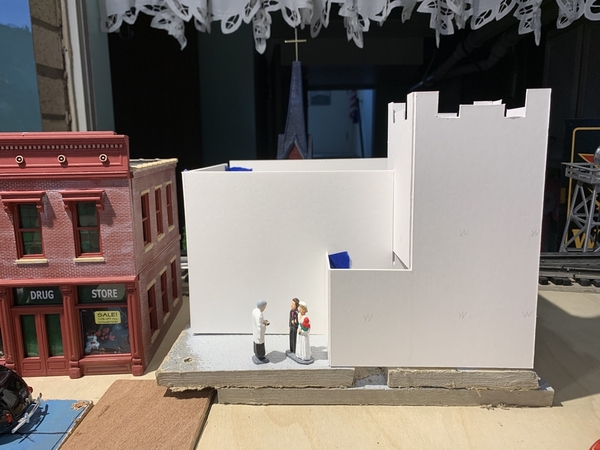
Like so many towns, prime Real Estate is at a premium. I did a very quick mockup of our church to see how it would fit. I made the height about what I had guesstimated, but narrowed the section to the left of the doors to try to fit it in a 9" wide space. I didn't bother drawing in the windows, doors, etc on this preliminary. Not bad for a first try, I think.
Here is the prototype.
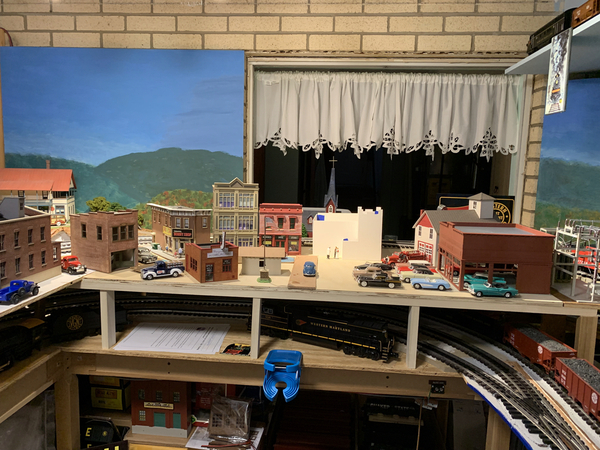
Here is an overall view of the town with the church placed in a prominent spot. I think it will work out, but by no means is this a final placement. In fact, I won't want the church right beside the fire house, but I thought I would put it in close proximity to the fire house and auto dealer just for size comparison. I think the church could be taller, but I don't really want it much wider in this small town. Maybe it will have to be wider to have better proportions to the height. It is pretty short compared to the two-story building to the left of it. What does everyone else think??
Attachments
Mark, the church is gonna be a wonderful addition! Great looking town already.
Mike
Mark,
Every time I get a chance to check your post, I'm always wowed! Everything is coming together nicely and I'm sure with your talents that church is going to be spectacular! You always inspire me to do better work on my layout. Whether it's bridge work or your electrical wiring, when I'm frustrated I take a step back and say to myself "Oh yeah, let me see how Mark did it.".
I have to post a video which I think you'll appreciate of my first train run on the layout, The steam engine and most of the freight cars are Western Maryland. My grandsons was his Thomas the Tank engine.
Tom / The I.B.R.
@Mark Boyce posted:Like so many towns, prime Real Estate is at a premium. I did a very quick mockup of our church to see how it would fit. I made the height about what I had guesstimated, but narrowed the section to the left of the doors to try to fit it in a 9" wide space. I didn't bother drawing in the windows, doors, etc on this preliminary. Not bad for a first try, I think.
Here is the prototype.
... I think the church could be taller, but I don't really want it much wider in this small town. Maybe it will have to be wider to have better proportions to the height. It is pretty short compared to the two-story building to the left of it. What does everyone else think??
Mark, in comparison it to the two-story store, I think you could make the church a little taller, even if it's not wider, and it would look good. Then again, in the prototype photo the two stories on the entry side of the church look like they might not be very high-ceilinged inside, whereas the old store building looks like it might be very high-ceilinged. By that assessment, your mockup of the church is probably spot-on. Either way the church is going to be a great addition.
John
Mark I agree with John. I would make the tower taller and perhaps consider a bell tower. Yeah its not prototypical, but would be a neat feature. Add an audio module and you could have it chime at the appropriate times. : )
Churches were often the tallest structures in a town and what RC church doesn't have bells?
Mark, @Mark Boyce Nice job with the mock up. Personally, to evaluate different heights, I would raise the whole church roughly an inch. You could do this quickly by cutting some 1 inch thick strips and taping them to the bottom of your existing walls, or put some 1 inch styrene insulation under the entire structure.
I had a similar situation with my Chemical Co. kitbash, where I wasn't totally pleased with the elevation views and proportions, and just kept tweaking it till I got what looked best. I found I needed to physically raise sections of the factory and put it in place to really evaluate.
I agree the top of the 2 story walls of the church, not the tower should be closer to the height of the "2 story building" to the left. Once you evaluate the height of the 2 story wall, then you can go back and re-evaluate whether raising the bell tower is needed. Personally I wouldn't worry about increasing the footprint at this point, I am not convinced 1 inch taller walls will ruin your calculated "proportions".
Thank you, Mike, Tom, John, Jeff, Chris!
Mike, there are so many ways to setup a town, that a person could get analysis paralysis even on that part of a layout plan.
Tom, when I was working, once I was complimented here on the Forum, I could go to work and be quickly brought down to size. 😄 Thank you!
I Certainly do want to see your video! How old is your grandson?
John, you have to be right. I can remember part of the setup in the very front of the church. There were stairs up the tower to a low ceiling balcony on the right hand side. The balcony swung around the back of the sanctuary with at least one classroom probably where the upper windows are. I agree, the model needs to be taller.
Jeff, a bell tower extension would be neat. I would have to ponder that. This church was probably the most basic of its era in town, population 13,000. There are others, Protestant, Roman Catholic, and Orthodox that have bells, some even play music. You are great for thinking of more ideas for me! 😊
Chris, I placed some scraps of Homasote under the mockup. It does look better a little taller. I’ll have to work up a modified mockup.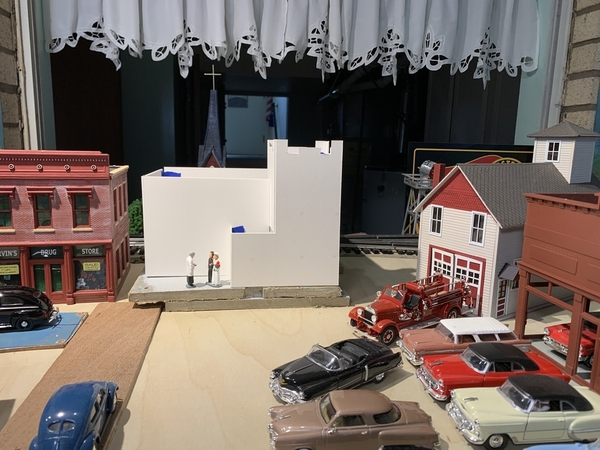
Attachments
Mark, where are the witnesses for the wedding???
Church looks better on the homasote. I would raise the tower - looks a bit stubby even if the prototype has this feature - looks like they ran out of money and made it short.
Mark I think things are looking good and you sure are getting some great advice from all these wonderful people! I would chime in, but really I have nothing new to add! I think no matter what you do it is going to be Outstanding! Just a side note, if you leave the tower as is you can always add some old time guards up there! LOL![]()
Mark, it’s going to be a wonderful addition to your town. I would leave the tower as it is because that’s the reality of what you are replicating.
Jay
Mark, I agree with Jay. I you feel your 1/48 scale measurements are close to the original, then you’ve achieved a base to work with.
Gene
Thank you, Jeff, Mike, Jay, Gene!
Jeff, yes the witnesses! They are inside the door. ![]() Since we were married on December 7th, we got 8 inches of snow. Our sister-in-law wore long johns under her bridesmaid dress; we have a photograph of her lifting the dress a foot to show that. You are right, the tower does look like they ran out of money, and that may have been the case. Another congregation was in the building until they bought property outside of town and now have a pretty big church. Our congregation bought it in the late '70s, so original information is probably lost.
Since we were married on December 7th, we got 8 inches of snow. Our sister-in-law wore long johns under her bridesmaid dress; we have a photograph of her lifting the dress a foot to show that. You are right, the tower does look like they ran out of money, and that may have been the case. Another congregation was in the building until they bought property outside of town and now have a pretty big church. Our congregation bought it in the late '70s, so original information is probably lost.
Mike, I thought of guards. The Frenchman in Monty Python's Holy Grail came to mind. ![]() With the current building, we do have members who have been trained in security, with communications between each other. The congregation wanted to be located in town close to people who don't attend church and minister to needs. The off side of that is that nearly 50 years later, you don't know who is going to show up. Mostly people asking for money.
With the current building, we do have members who have been trained in security, with communications between each other. The congregation wanted to be located in town close to people who don't attend church and minister to needs. The off side of that is that nearly 50 years later, you don't know who is going to show up. Mostly people asking for money.
Jay and Gene, after thought, I agree I want it close to the real church. That's one of the things designing a model from imagination, I don't think of things that are out there in real life.
I didn't accomplish anything more, but I did receive a WiFi Interface Unit WIU from my not quite local hobby shop, McCormick's Hardware down in Zelienople. I haven't opened the box yet. My hands are having more trouble operating the remote, either the MTH or the TMCC variety. I thought I would give it a try after a forum friend about 40 miles away got one and really likes it.
Good luck with the WIFI unit, I bought one before we moved and it's still in the box and will be for a while. It should give you time to learn it so when I need help! LOL
Thank you, Mike!
I am trying to work out one problem with the WIU and the app. I’ll get it sooner or later; sooner than you will be using yours; I hope! 😄


