Great to see the progress, both on the layout and with your mobility!
@Mark Boyce posted:

Attachments
Mark, I am glad your AIU's work and that you were also able to get a back up TIU with remote. Things are really looking good Your power sub station should look wonderful on your layout and your Yard tower turned out great! I am
I am sorry you still have pain and hope it goes away soon, I know what its like getting up at 1 or 2 AM not fun!
Guess I better chime in, For my train room area in the garage it is attached to I have a coffee pot for the morning, micro wave for some warm snacks during the winter, and a small fridge for that nice cold blue mountain Coors Light! LOL
Nice work, Mark, and glad you're feeling a bit better.
Can't wait to see the sub-station completed and installed on your layout.
Thank you, George, Steve, Leandro, Mike, Richie!!
Leandro, back in December of last year on page 41 is where I mounted the devices you circled. They are PSX-1AC solid state circuit breakers. They operate really fast, and have a number of current settings, taps for warning signals, and can be set to automatedly reset or shut power off until the short circuit is removed. I do not know who on the Forum first recommended them, but there is a lively discussion about them starting on page 41 when I installed them.
Mike, two months ago I was up at any hour of the night with that nasty leg and back pain. You may have seen the dorm refrigerator under the layout that one of our daughters no longer needed. It has Mountain Dew for the older couple and Le Croix (yuck) for the younger couple when they come over. Since I haven't been slaving away outside this summer, I keep my diet Pepsi under the basement stairs, as it is cool enough there for me. Our younger daughter has been dipping into the Le Croix (did I say yuck before) each time she is over to mow grass since I shouldn't push the mower yet and the surgeon still won't let me ride the riding mower. When I started it up to run a while on Saturday, I got on the seat and never realized how much those things vibrate. I got back off right away and will wait until my next checkup late this month to see if he says it is okay. ![]()
I need to get a photograph of the signal tower on the layout, not sure where it will end up though.
Mark, I am glad your doing better! As for the Le Croix it seems like a fair price to pay to get your lawn mowed! Plus you get to see your daughter!![]()
Mike, Yes it is more than a fair price.
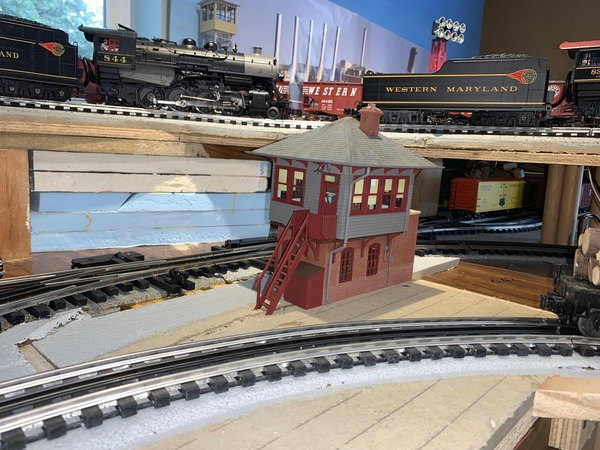
Here is the signal tower in position at the switch leading to the short yard under the enginehouse and wye.
Attachments
Mark, fantastic work. Just caught up from about page 50. Everything looks great. Love the lift bridges and that coal drag rivals the pennsey. Hope your mending well. Most important part of this hobby. Being healthy enough to enjoy it. Lol. Keep up the good work.
The tower looks right at home Mark! Very nice work!
Thank you, Mike!!
Mark, what technique did you use on for the brick mortar? It looks realistic.
Dan, thank you very much!
My preferred method is to first paint the whole brick wall with the brick color with a brush using acrylic craft paint. Next, I dilute a little of the mortar color with water and brush it on enough so it goes in all the areas between bricks. Last, I wipe it off the brick surface leaving the mortar color between the bricks. I have to do that pretty fast or traces of the mortar color won't come off the brick surface.
In the past, I have tried doing the opposite by painting the whole wall the mortar color, then dry brushing the brick surface with the brick color, but I didn't like the results. I have also tried using spackling for the mortar color and wiping most of it off. However, no matter if I dilute the spackle or not, I always ended up with too much spackle covering brick surfaces around raised window and door frames to suit me.
@E-UNIT-79 posted:Mark, fantastic work. Just caught up from about page 50. Everything looks great. Love the lift bridges and that coal drag rivals the pennsey. Hope your mending well. Most important part of this hobby. Being healthy enough to enjoy it. Lol. Keep up the good work.
Thank you! I’m amazed the pages keep adding up. The therapists would like me to have some more time with them, and they requested insurance for more visits past tomorrow. I have been going for 8 weeks now. Progress has been fairly steady, but get really tired fast. They say it can take a year, so I’m glad I’m retired.
I’ve been fiddling with some other engines and cars, but not ready for another video.
Mark, the tower is a Wow, I really like those Atlas O switch tower kits and yours looks fine. The Western Maryland theme is beautiful. I am glad your continually working on your health, physical therapy and simply exercising working on your cool railroad. I am so happy seeing your creativity. Have a great weekend. Page 56, Wow…Happy Railroading Everyone.
Larry, thank you and thank you! I had the HO version of the Atlas tower on my layout growing up. The photograph angle missed a certain Western Maryland GP7 you should recall.
Mark, I’m going to usurp this thread for a moment to issue a big “Thank you!” to you and Mike! Please check out the attached video. I have much work to do, and a thread of my own to start, but I wanted to be certain to recognize your help. I also need to thank my friend Terry for his help with creating the hinge.
Chris
LVHR
Attachments
Chris the bridge looks great in operation. I’m sure I can speak for Mike that we are do glad to have helped!! Next I’ll be looking for a train to rumble across! It is so neat watching a train cross a bridge that is 4 or so feet above the floor!
That goes across a stairwell, so it’s a bit more than 4 feet…
Chris
LVHR
That’s about the height of my high bridge! 50 inches
@Mark Boyce posted:Dan, thank you very much!
My preferred method is to first paint the whole brick wall with the brick color with a brush using acrylic craft paint. Next, I dilute a little of the mortar color with water and brush it on enough so it goes in all the areas between bricks. Last, I wipe it off the brick surface leaving the mortar color between the bricks. I have to do that pretty fast or traces of the mortar color won't come off the brick surface.
In the past, I have tried doing the opposite by painting the whole wall the mortar color, then dry brushing the brick surface with the brick color, but I didn't like the results. I have also tried using spackling for the mortar color and wiping most of it off. However, no matter if I dilute the spackle or not, I always ended up with too much spackle covering brick surfaces around raised window and door frames to suit me.
Hey Mark, Jim Barrett told me once about painting brick. He said the most interesting thing, use water colors. That is the grout. I still haven't worked on the building I bought, but that is how I intend to do it when I work on it.
Dave, I can see how water colors would be a good method. They would deposit the pigment in the mortar crevices. Thank you for sharing that method. I think I will try it next time and see how it works for me!!
@Mark Boyce posted:Dave, I can see how water colors would be a good method. They would deposit the pigment in the mortar crevices. Thank you for sharing that method. I think I will try it next time and see how it works for me!!
Thank the late great Jim Barrett. Before he told me that, we had been joking(him more than me) with Rich. Jim was all smiles, and I just happen to buy the OGR Savings & Loan. I think I said something about the building I bought won't look like what they had built sitting there. Jim offered his advice on the water colors. I also asked about windows, he said don't use glue, use scotch tape. Simple solutions often present themselves, that's what I say. Of course it doesn't hurt to have someone give what you can only call "sage advice".
@Dave NYC Hudson PRR K4 posted:Thank the late great Jim Barrett. Before he told me that, we had been joking(him more than me) with Rich. Jim was all smiles, and I just happen to buy the OGR Savings & Loan. I think I said something about the building I bought won't look like what they had built sitting there. Jim offered his advice on the water colors. I also asked about windows, he said don't use glue, use scotch tape. Simple solutions often present themselves, that's what I say. Of course it doesn't hurt to have someone give what you can only call "sage advice".
Dave, it often helps to comment on you are thinking. It often brings the sage advice in response. I hate trying to glue acetate on window frames. No matter how little glue or how strategically placed I put it, some seems to always find it's way to the visible portion. On my signal tower I just finished recently, I cut the acetate extra large and scotch taped it to the inside of the walls. I really burnished it well to try to get it to stay. I'll see after time whether it stays stuck. ![]()
Mark - use a glue called canopy glue. It dries clear and does not craze the acetate like other adhesives. Saw a link were RC plane modelers use this stuff. For me, if I am using Testor's glue, no matter how careful I am, its all over the place - kind of like tribbles. I even use it to fix vellum to the inside of my buildings so I get a translucent glow but cannot see inside.
Jeff, more and more we train guys should be looking at what the RC plane modelers and military modelers are doing. As I was alluding, I am expecting the tape to start to pull loose over time. Canopy glue sounds like just the ticket! I will get some. Thank you!!
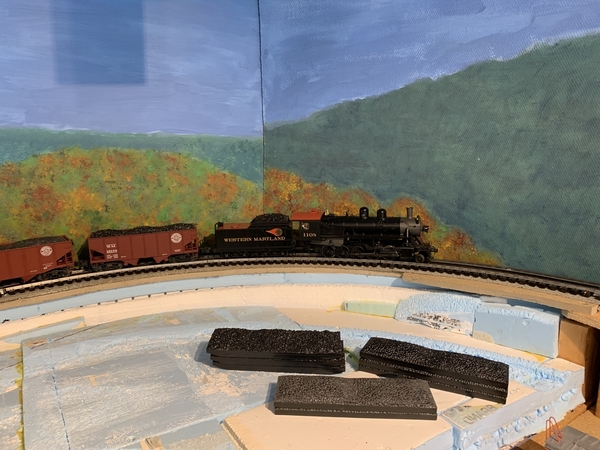
I finally got some time back at the layout. I still have a ways to go, but am able to do some things I haven't been able to since before surgery in May. First of all, I'll mention that I have updated my Western Maryland oxide red 2-bay hopper fleet. I purchased a 6-car set of MTH Premier cars in the round herald scheme and a 6-car set of Lionel cars in the Speedletter scheme. With these, I had enough that I was able to sell 6 beautiful Atlas O die cast cars between two forum members. Those cars made for a lot more weight on my 4% grades. I made up one group of cars with loads and one group of empties. Here they are along with 9 other hoppers of other various road names on the high shelf. The empties are on the foreground siding and the loads are on the downgrade mainline track.
I also changed out engines from the three Consolidations I was running before surgery. I put this great MTH Premier Russian Decapod on the train. I got the Decapod on one of the MTH warehouse auctions. It is absolutely like new with everything intact and working perfectly. It handled a 9-car train upgrade with no sweat. There are the loads I pulled out of the 8 cars for my empties train.
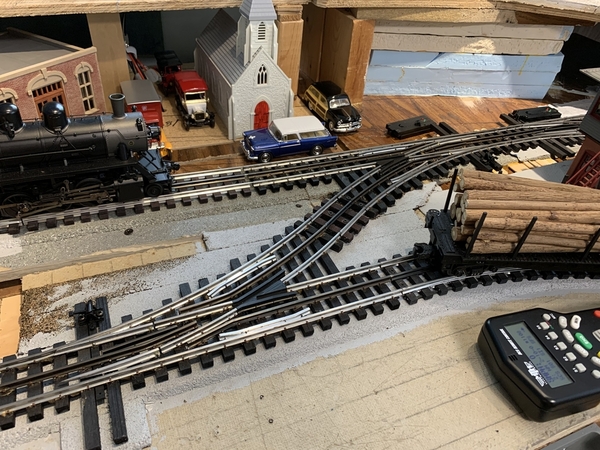
The Decapod lost power on the first trip around due to a lose track pin at the lower bridge. I fixed that easily. Before my surgery, I discovered that engines lost power at my switches to the newest long sidings. Those were not Ross ready, and I assume one of my solder joints was bad. However, while checking power to refresh my memory, it dawned on me that I never connected power feeds to the right hand siding. Oops. I started work on that, but didn't finish. Also, I found another DZ1000 that I sat beside the farther away of the two switches for the sidings ready for installation.
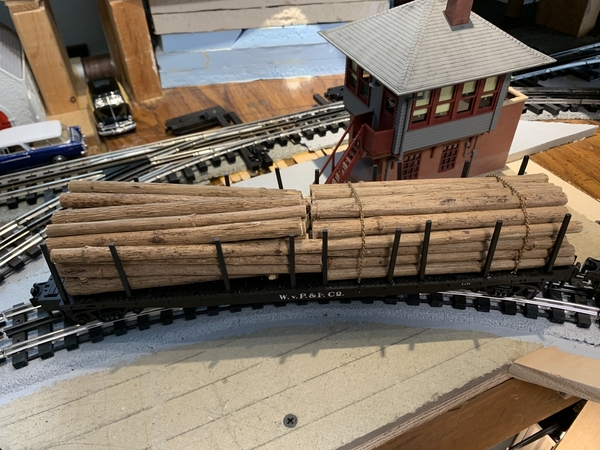
Some of you may have noticed the log car without any chain holding the logs in place. I bought 6 of them from a forum member several months ago. I need a couple more chains for two of the cars. I keep forgetting to stop at the craft or sewing store to get necklace chain. Here is how one of the two cars in need of chains looks.
After these little things I need to mount the two AIUs I bought, run the power fees and switch machines through them and set all that up. That should keep me busy for a while.
Attachments
Glad to hear that you are progressing through PT and getting back to enjoying the layout. Those coal drags will be needed for the upcoming Western PA winter.
I am delighted to hear you are improving enough to get back to the layout. I know how frustrating it can be to have recovery stand between you and your desires.
Re, an orphaned power drop: BTDT, as the saying goes. Ya gotta laugh, though.
Thank you everyone who 'liked' my last post! I appreciate everyone.
Thank you, Jay and Steve! Jay, you are so right about the coal drags. When I worked at Possum Point Power Station in Virginia and Mount Storm Power Station in West Virginia, there were always a long string of coal cars awaiting emptying. At Mount Storm, I was always amazed at the long string of coal trucks awaiting unloading already when we reported for work at 6 am. The coal pile was massive, but it was a huge station as far as generating capacity.
Steve, I did laugh at myself when I realized I had forgotten that power drop connection. I hadn't even drilled holes in the table for the wires to pass through when I drilled for the other siding.
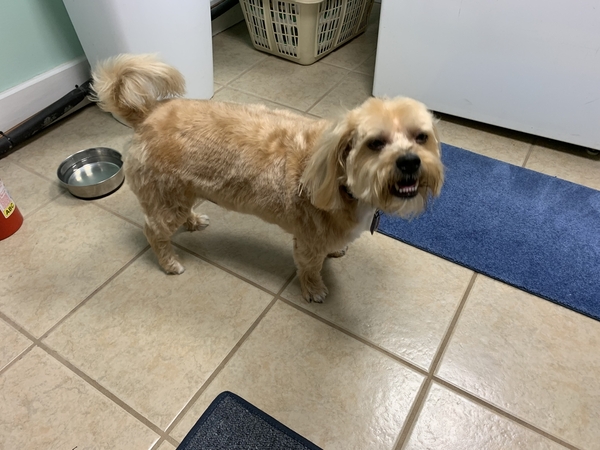
Bentley didn't even bark at me using the drill. The 6-year old rescue we got in March must be getting used to things here. He spent time with me in the train room, but I only thought of taking a photograph when he went to his water dish on the other side of the brick wall.
Attachments
Well done, Mark!
Peter
Welcome back Mark! Well, you never left but glad to see you are back in the train room. ![]()
Those hoppers look great. Perfect size ratio to your layout. I'm sure you are going to find other surprises as you get the layout back up and running. That Decapod is a beauty too!
Bob
@Mark Boyce posted:I finally got some time back at the layout. I still have a ways to go, but am able to do some things I haven't been able to since before surgery in May. First of all, I'll mention that I have updated my Western Maryland oxide red 2-bay hopper fleet. I purchased a 6-car set of MTH Premier cars in the round herald scheme and a 6-car set of Lionel cars in the Speedletter scheme. With these, I had enough that I was able to sell 6 beautiful Atlas O die cast cars between two forum members. Those cars made for a lot more weight on my 4% grades. I made up one group of cars with loads and one group of empties. Here they are along with 9 other hoppers of other various road names on the high shelf. The empties are on the foreground siding and the loads are on the downgrade mainline track.
I also changed out engines from the three Consolidations I was running before surgery. I put this great MTH Premier Russian Decapod on the train. I got the Decapod on one of the MTH warehouse auctions. It is absolutely like new with everything intact and working perfectly. It handled a 9-car train upgrade with no sweat. There are the loads I pulled out of the 8 cars for my empties train.
The Decapod lost power on the first trip around due to a lose track pin at the lower bridge. I fixed that easily. Before my surgery, I discovered that engines lost power at my switches to the newest long sidings. Those were not Ross ready, and I assume one of my solder joints was bad. However, while checking power to refresh my memory, it dawned on me that I never connected power feeds to the right hand siding. Oops. I started work on that, but didn't finish. Also, I found another DZ1000 that I sat beside the farther away of the two switches for the sidings ready for installation.
Some of you may have noticed the log car without any chain holding the logs in place. I bought 6 of them from a forum member several months ago. I need a couple more chains for two of the cars. I keep forgetting to stop at the craft or sewing store to get necklace chain. Here is how one of the two cars in need of chains looks.
After these little things I need to mount the two AIUs I bought, run the power fees and switch machines through them and set all that up. That should keep me busy for a while.
Mark, your layout is coming along very very nicely!!! I like the look of that mountain fall backdrop. Plus very nice with the log cars!!
Good morning Mark, It sure is nice as others have already stated to see you getting back to the train room, even with little steps its still moving forward! The coal car swap out really looks great! It's also nice to see you got an engine that will pull them without needing help! Great move on the Decapod!
I am glad Bentley is getting use to the train room, after the past 3 years Tank is starting to visit me in the train room in the garage!
Thank you everyone for more likes and comments!
Peter, thank you. Maybe the River City 3-Railers offered some inspiration! ![]()
Bob and Mike, you are so right about the 2-bay hoppers being the right size for my layout. That is why I like nothing larger than 40- boxcars and reefers. Bob and Tom, the log cars are a bit long, but I couldn't pass them up. They all have WVP&P Co. lettering (West Virginia Pulp and Paper Co. ie Westvaco) which reminded me of the recently closed paper mill in Luke Maryland on the opposite downgrade from the Blackwater Canyon on the CSX (Western Maryland Rwy.) I do have about a half dozen traditional sized dumping log cars from the '90s that I can run if I want to look more to size. Also from a forum member. (The stuff one accumulates) ![]()
Tom, I bought the backdrop from a forum member and reconfigured it to fit my layout. It needs some additional painting on each end of the layout before I start putting in scenery.
Bob and Mike, I had a Western Maryland Russian Decapod in HO and sold it with he rest of the HO engines and cars. I have wanted an MTH Premier Russian Decapod but never saw a used one in my price range. I made out well bidding on the complete one MTH offered through Cabin Fever Auctions. ![]() I like the tall stack and domes on the Russian Decapods, and the small diameter boiler is a nice contrast to the hefty H9 Consolidations.
I like the tall stack and domes on the Russian Decapods, and the small diameter boiler is a nice contrast to the hefty H9 Consolidations.
I'm glad Tank is back to visiting you in the train room some!! ![]()
Here’s something you might find interesting Mark.
Attachments
Jay, I do find that interesting!! I knew they were making good progress with #1309, but had not seen a prediction of when it may be service ready! We will have to go down to the WMSR next year once it is running. We were there when we lived in Virginia and again when we lived in Keyser, West Virginia; but have never been back since we moved back to Butler in 1996! Boy raising two daughters who aren't interested in trains sure got in the way of train activities! ![]()
I have a model of the H9 #734, GP30 #501, and 6 WMSR passenger cars. I hope they come out with a #1309. I will have to start saving my pennies now! ![]()
@Mark Boyce posted:I finally got some time back at the layout. I still have a ways to go, but am able to do some things I haven't been able to since before surgery in May. First of all, I'll mention that I have updated my Western Maryland oxide red 2-bay hopper fleet. I purchased a 6-car set of MTH Premier cars in the round herald scheme and a 6-car set of Lionel cars in the Speedletter scheme. With these, I had enough that I was able to sell 6 beautiful Atlas O die cast cars between two forum members. Those cars made for a lot more weight on my 4% grades. I made up one group of cars with loads and one group of empties. Here they are along with 9 other hoppers of other various road names on the high shelf. The empties are on the foreground siding and the loads are on the downgrade mainline track.
I also changed out engines from the three Consolidations I was running before surgery. I put this great MTH Premier Russian Decapod on the train. I got the Decapod on one of the MTH warehouse auctions. It is absolutely like new with everything intact and working perfectly. It handled a 9-car train upgrade with no sweat. There are the loads I pulled out of the 8 cars for my empties train.
The Decapod lost power on the first trip around due to a lose track pin at the lower bridge. I fixed that easily. Before my surgery, I discovered that engines lost power at my switches to the newest long sidings. Those were not Ross ready, and I assume one of my solder joints was bad. However, while checking power to refresh my memory, it dawned on me that I never connected power feeds to the right hand siding. Oops. I started work on that, but didn't finish. Also, I found another DZ1000 that I sat beside the farther away of the two switches for the sidings ready for installation.
Some of you may have noticed the log car without any chain holding the logs in place. I bought 6 of them from a forum member several months ago. I need a couple more chains for two of the cars. I keep forgetting to stop at the craft or sewing store to get necklace chain. Here is how one of the two cars in need of chains looks.
After these little things I need to mount the two AIUs I bought, run the power fees and switch machines through them and set all that up. That should keep me busy for a while.
Going with a theme; I love it. I'd like one of those Russian Decapods, but wouldn't fit with my Canadian theme.
Keith, Yes I follow a theme for the most part. Western Maryland, but I do have some B&O since I grew up along the B&O. I do have one PRR GG1 that I can't run on the layout because it takes 072 curves, but I think it is a classic. I also have a NYC J1e Hudson because I think it's a classic also. It can run on the layout if I want to throw theme to the wind. That's about it.
I have seen a list of the railroads that bought the Decapods that had been ordered by Imperial Russia and cancelled after the revolution, and I never saw a Canadian railroad in the bunch.
Mark,
Glad you are feeling well enough to get back on the layout! It looks great as always. The coal drag with the decapod definately looks sharp. Keep up the good work!
Michael
Thank you, Michael!!
Everyone. I got that pesky siding wired in, so it has power. I identified the missing connections on the two switches for the sidings sidings I mentioned. I'll work on that another day.


