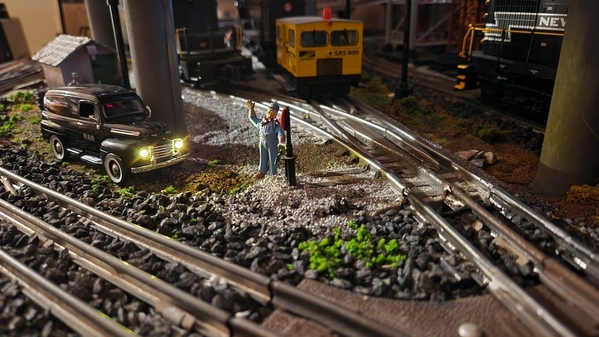
Hi Mark, as you know I have been on the road and have made it to Missouri!

I have to say you are doing an amazing job on your layout and the swanky coffee shop is looking great! I like how you take your time and dont rush things1 i really need to learn that skill! LOL

Well needless to say we are now looking for that wonderful train room with attached home! LOL It is nice to have the trip over and be able to get on my computer to check in!

Take care and I will check in again soon!

Thank you, Mike!  It bears repeating once more, I am glad you made it safely to Joplin!! 

On the Sanky Wanky, I did paint the extra couple parts I had forgotten and installed them.  I don't like how my chimney flues/stacks turned out, so I removed them and will try again.  The weatherman expects several days of rain again, so I hope to get back at it and even work on the new sides for the lower lift-up girder bridge.

Mike, I'm sure it is similar for railroaders as it was for us power and telecom employees.  It's harder to work on electrical equipment in the rain than snow.  You really have to be paying attention to where everything is so the equipment doesn't get wet.  It doesn't matter as much if you do.     Rain, snow, cold, heat, all just makes the given task harder for that day!  I certainly was thankful when I moved into an inside job when I was 51.  51!  Woah!  That was quite a while ago!! 

Mike, thank you!  Yes, besides cosmetics, I need to tweak the lower bridge some.  It has been binding a bit all winter.  Even though I have climate control including a dehumidifier, I'm wondering if it will get worse this summer.  Therefore, I may be doing a bit of an overhaul.  It certainly has worked well using your plan and Plexiglas parts!!!    That deserves a two thumbs up!! 

@Mark Boyce posted:

Mike, I'm sure it is similar for railroaders as it was for us power and telecom employees.  It's harder to work on electrical equipment in the rain than snow.  You really have to be paying attention to where everything is so the equipment doesn't get wet.  It doesn't matter as much if you do.     Rain, snow, cold, heat, all just makes the given task harder for that day!  I certainly was thankful when I moved into an inside job when I was 51.  51!  Woah!  That was quite a while ago!! 

Mike, thank you!  Yes, besides cosmetics, I need to tweak the lower bridge some.  It has been binding a bit all winter.  Even though I have climate control including a dehumidifier, I'm wondering if it will get worse this summer.  Therefore, I may be doing a bit of an overhaul.  It certainly has worked well using your plan and Plexiglas parts!!!    That deserves a two thumbs up!! 

Thanks Mark, I am glad the Plexiglas parts are working for you! The bad news is that the scraps I had left over got left behind in Washington State, I guess I will have to find some new stuff! LOL

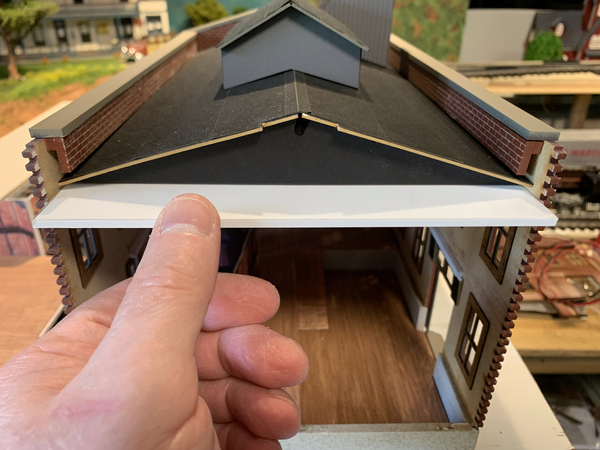
I haven't been totally idle on the Sanky Wanky Coffee Company.  I realized I had glued more parts together than I had wanted to before installing lights, and found the glue held tight enough that I was going to break something trying to get it apart.  This is mainly referring to the roof.  I finally solved the problem by making a slide in ceiling for the second floor like the ceiling/floor I made to separate the two floors.

20240428_212249366_iOS

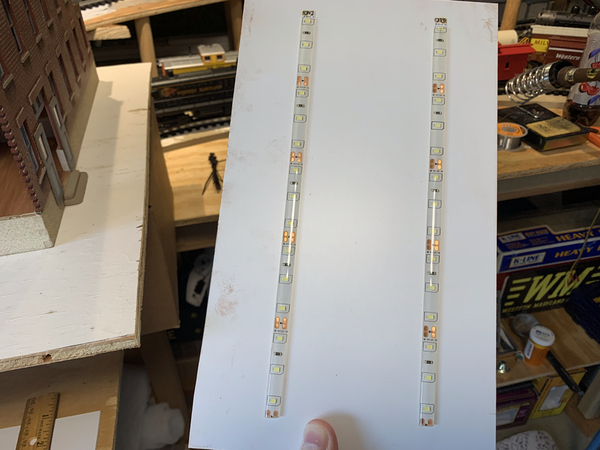
Each ceiling got two strips of LEDs, this shows one before I jumpered the two strips together at the end that is slid in first.

20240428_212306665_iOS

Here I drilled some holes so the wires could be fished down the inside of one chimney.

20240428_212239726_iOS 1

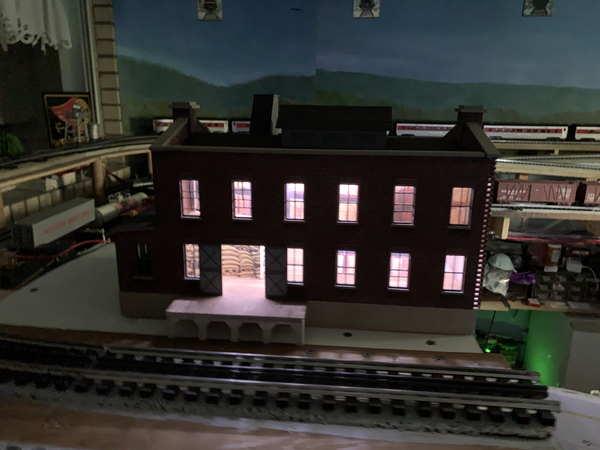
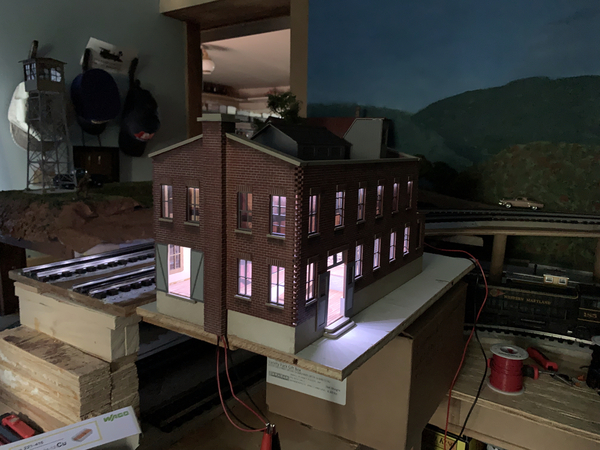
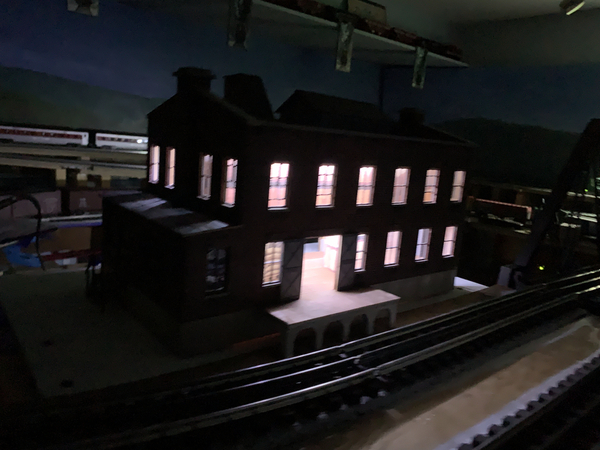
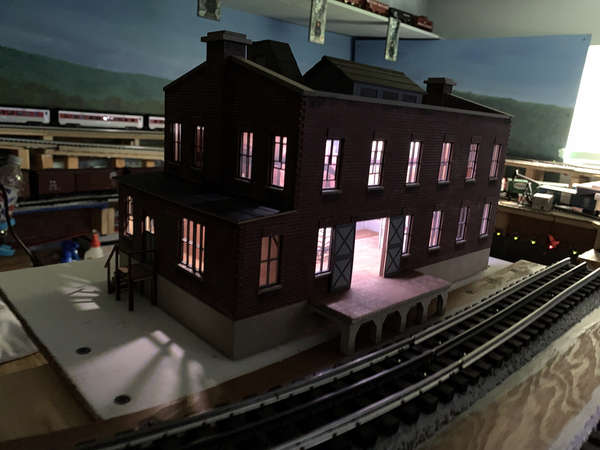
Here I am testing the lighting using one of the LED boards from Rod Stewart for passenger cars.  I have quite a few of them.  Yes there are places where light is leaking out and I haven't addressed the one story office section.  The wiring is still held together with alligator clip leads, but things don't look half bad.

20240428_233748216_iOS

20240428_233758113_iOS

Attachments

Images (5)
  • 20240428_212249366_iOS
  • 20240428_212306665_iOS
  • 20240428_212239726_iOS 1
  • 20240428_233748216_iOS
  • 20240428_233758113_iOS
Last edited by Mark Boyce
@Mark Boyce posted:

I haven't been totally idle on the Sanky Wanky Coffee Company.  I realized I had glued more parts together than I had wanted to before installing lights, and found the glue held tight enough that I was going to break something trying to get it apart.  This is mainly referring to the roof.  I finally solved the problem by making a slide in ceiling for the second floor like the ceiling/floor I made to separate the two floors.

20240428_212249366_iOS

Each ceiling got two strips of LEDs, this shows one before I jumpered the two strips together at the end that is slid in first.

20240428_212306665_iOS

Here I drilled some holes so the wires could be fished down the inside of one chimney.

20240428_212239726_iOS 1

Here I am testing the lighting using one of the LED boards from Rod Stewart for passenger cars.  I have quite a few of them.  Yes there are places where light is leaking out and I haven't addressed the one story office section.  The wiring is still held together with alligator clip leads, but things don't look half bad.

20240428_233748216_iOS

20240428_233758113_iOS

Great Job Mark as always you seem to figure a way out of any corner you get boxed into! As others have said, you will no doubt plug the light leaks and what a great job you will do!

Thank you, Dave, Bob, Mike G, John, Mike Poncho!!

Yes digging out of a jam can be challenging, but rewarding when an idea starts to come together.  I was short on ideas, but couldn't think of a way to describe the issues to ask for help on the Forum.  The way the roof is inserted in this model being actually glued underneath the inner brick work at the top made it a given that I wouldn't be able to make it removable when the model was completed.  Looking back, I think the ceiling was almost necessary to easily install the LED strips.  Otherwise I would have had to support (hang) them on the thin roof trusses.

As I said before, Dennis Brennan did a great job of designing a kit that really mimics Frank Ellison's original, but with modern materials and techniques.  Frank didn't provide an interior, so Dennis didn't either.  I think the kit is great for someone like me who desires a basic building to make a start, and then each builder can add highlights, or additions either interior or exterior as desired.

LT1Poncho Mike, I was thinking of using some kind of tape to seal off the light leaks.  I had some idea of where they would be while I was building, but putting light inside is really necessary to find them all. 

Now that I'm rested from some yard work, I hope to get back at the Sanky Wanky this evening. 

@Mark Boyce posted:

I haven't been totally idle on the Sanky Wanky Coffee Company.  I realized I had glued more parts together than I had wanted to before installing lights, and found the glue held tight enough that I was going to break something trying to get it apart.  This is mainly referring to the roof.  I finally solved the problem by making a slide in ceiling for the second floor like the ceiling/floor I made to separate the two floors.

20240428_212249366_iOS

Each ceiling got two strips of LEDs, this shows one before I jumpered the two strips together at the end that is slid in first.

20240428_212306665_iOS

Here I drilled some holes so the wires could be fished down the inside of one chimney.

20240428_212239726_iOS 1

Here I am testing the lighting using one of the LED boards from Rod Stewart for passenger cars.  I have quite a few of them.  Yes there are places where light is leaking out and I haven't addressed the one story office section.  The wiring is still held together with alligator clip leads, but things don't look half bad.

20240428_233748216_iOS

20240428_233758113_iOS

That’s very impressive Mark and excellent problem solving. That’s an eye catching structure.

Jay

Thank you, Gene, Jay, Myles, Ted, Poconotrain, Peter!

Myles, I like to think that reading your detailed descriptions of problems you have had to work out have helped me think better than I used to. 

Of course there are so many others on the forum who have posted problems and suggestions that have helped me to think through things better.

Ted, the strip LEDs are really handy for lighting the inside of a building, just like lighting a passenger car.  I would have handled it differently if I only wanted certain rooms lit and others dark.  On this building I thought if they are working after dark, then the whole building would be lit, so that made it easy. 

That raises a question.  Should I assume the owner and secretary went home so the single floor office would be dark?  Or am I over analyzing things and should just light everything? 

Leave some areas dark. I always add some light blocks on some floors/spaces that would be more realistic (to me) and a bit less toy-like. In a factory or office building having all spaces lit might be a reality, but a store with apartments over top or a house, all rooms would not be fully lit. For example: my engine house is fully lit, the art gallery is not.

@Mark Boyce posted:


...

As I said before, Dennis Brennan did a great job of designing a kit that really mimics Frank Ellison's original, but with modern materials and techniques.  Frank didn't provide an interior, so Dennis didn't either.  I think the kit is great for someone like me who desires a basic building to make a start, and then each builder can add highlights, or additions either interior or exterior as desired...


Now that I'm rested from some yard work, I hope to get back at the Sanky Wanky this evening. 

Mark, you absolutely nailed my intent. This allows me to provide these kits at a reasonable price, making them available for anybody. I love hearing about what you and others have done with my kits. Tapping into one's creativity is what this hobby is all about!

By the way, routing the wires through the chimney is brilliant. Had I thought of that, I would have predrilled the hole. Kudos, Mark!

Last edited by DennisB

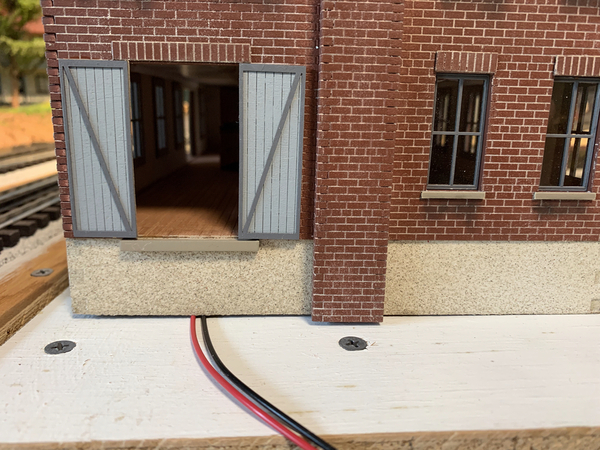
I finished wiring the LEDs permanently.  I drilled a hole in the 'concrete' base at a spot that is covered up by the chimney.  Then I attached the Rod Stewart LED module that converts AC to DC with double sided sticky tape to the under side of a brace for the first floor.  The two wires that come out from underneath will eventually go through a hole in the plywood the building is on and connect to the AC source.  I forgot to take photographs of the hole in the base or the underside showing the module.  I am not flipping the building over again, but this photograph will give a good idea of what I am describing.

20240504_175251156_iOS

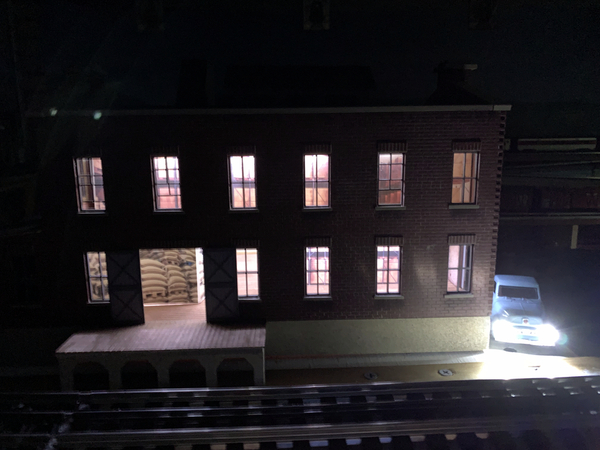
Here are a couple photographs showing no light seeping out.  Tape works wonders.

20240503_234107867_iOS

That's a Menards truck with the high beams on.  I just have it plugged into an adapter for now.  When I place it and a couple others permanently, I'll have to add some resistance. 

20240503_233626445_iOS

The Sanky Wanky Coffee Company is done for now.  The extra kit parts, instructions, and extra 'coffee sacks and crates' cutouts are tucked away in the original box.  I need to do some site work, which isn't much since it will be gravel driveway, some weeds, and then the three dimensional objects as I get those.  Folks have mentioned 3D printing.  I don't have access to a printer and one isn't in the budget, but I will get the objects as time goes on. 

Addendum:  As I was typing I would add another AC feed for a couple LEDs in the office when I get office furniture, it came to me how to wire it using the existing module.  I'll have to flip the building on its side to do it, so I can get to the module.  Keep your fingers crossed I don't break anything in the process!    Tune in again; Same bat time, same bat channel!! 

Attachments

Images (3)
  • 20240504_175251156_iOS
  • 20240503_234107867_iOS
  • 20240503_233626445_iOS

For Pete's sake, Mark!  What was so hard about lighting the office area???  I'm really laughing at myself! 

You know, if I hadn't started writing about it, I may have not seen the easy solution staring me in the face.  That is why I didn't just delete everything in my post before Randy's comment before I even posted it.

So, I did turn the structure on its side and can show you the mess underneath.  It ain't pretty, but By Jove it works!

20240504_193507607_iOS

On the photograph above, I'll start at the bottom.  You can just make out the base of the chimney resting on the old tee- shirt.  I drilled a hole in the base right beside the perpendicular styrene scrap I used as a back for the depressed floor area.  Those two wires are soldered to the input of Rod's module that is attached to that perpendicular with double-sided tape.  The output is wired to the Wago connectors that I taped one on top of the other.  The horizontal and two diagonal floor braces are scrap styrene that wasn't as wide as the kit's bracing.  That was quite handy because it let me put the wires over them without drilling more holes.  In the upper right, I drilled a hole through the floor right at the corner of the singe-story part of the building that I am calling the office.  I put in a three LED section of LED strip taped to the removable roof and soldered two wires to that.  Here is the results.

20240504_195306203_iOS

I can just see a bit of wire in the upper right of the foreground office window.  I'm not fooling with it.  I will be removing the roof someday to put in furniture and a worker or two.

Thank you for taking a look!!!

Attachments

Images (2)
  • 20240504_193507607_iOS
  • 20240504_195306203_iOS
Last edited by Mark Boyce

Mark your lighting looks spectacular; very nice work. Good to know that one of the lighting modules worked well for you. and as you know, you can adjust the output down if you ever decide you need to.

One easy way to tone down the menards truck lights is to build a male-female adapter using the same 2.1/5.5 plugs Menards does, and wire about a 470 ohm resistor in one side of the middle of it. Easy peasy. Sorry I don't have a picture handy to post that shows what I mean, but you probably figured it out.

Rod

Mark, things are looking great, and I really appreciate that you were able to show the bottom and your wiring diagram. I have the same variable voltage regulator Bob is showing and use then to light many of my building from one, I also use it for my Menards cars and anything else I can figure out how to put LED's into!

You must feel great to Have Dennis chime in on your build! I know it shows me that he really cares about his product and how people think about them. Itis enough for me that now I want to buy one once I get back to building a new layout! It might have to wait as I also bought a Millhouse TT for the future layout! The CEO about freaked! LOL

Thank you, Mike!  I have four of the same regulators you and Bob are using, but mine are still sealed in the wrappers.  I thought they were robust enough to control a lot of LEDs.  I have ample old power supplies.  I need to power the leads in the Idaho Hotel across the tracks to see what lights Myles included when he built it.

I have been thrilled that Dennis Brennan has followed and chimed in with helpful comments and compliments.  I think I have gained a feeling for his thoughts and imagine he is glad to see someone sharing how one person has built one of his kits.  

You won’t go wrong purchasing his kits.  This has been educational and fun.  I can see how you may be a bit strapped having purchased a wonderful Millhouse turntable.  I don’t know how you got that by the CEO, but I’m sure Al is glad.  😃 From what I have seen, you will need some help physically installing it, one person above and one underneath the layout!  Congratulations!

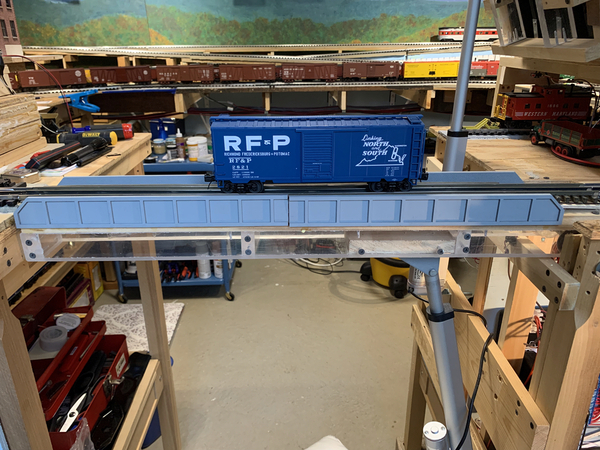
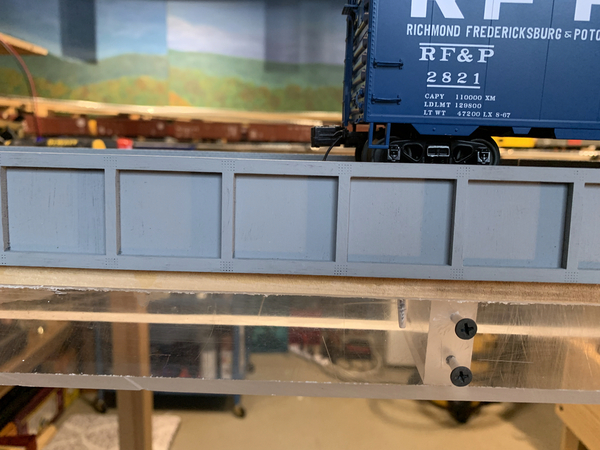
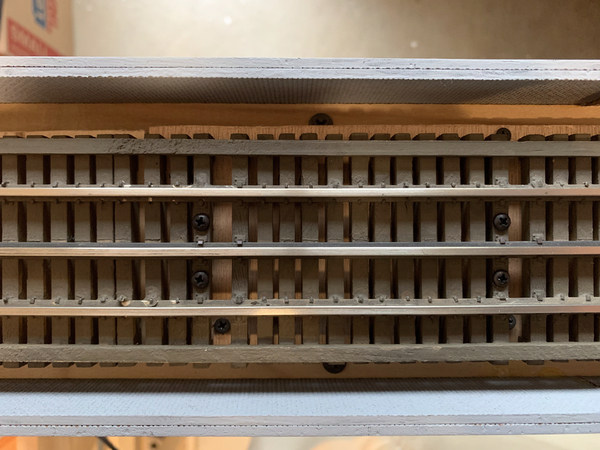
With the Sanky Wanky Coffee Company off the workbench, I decided for a change of pace.  I've been working on my lower lift up bridge the last few days.  I adjusted the pivot point some and it moves freer again.  I completely re-laid the roadbed and track.  I used a section of Atlas track that came with a small Atlas bridge that I crushed inadvertently.    The details are buried on this thread, and I will leave them buried.    I then glued girders on the sides.  I wanted to cover some of the plywood roadbed, but still make it a through girder bridge.   It came out okay.  Actually, I never even pay attention to this bridge when I am running a train or even just looking at the layout.  The big truss bridge totally overshadows it.  While there is still more to do, I'm not going to spend a lot of time on it at this point.

20240511_210939594_iOS

20240511_211010077_iOS

20240511_211033834_iOS

20240511_211212703_iOS

Attachments

Images (4)
  • 20240511_210939594_iOS
  • 20240511_211010077_iOS
  • 20240511_211033834_iOS
  • 20240511_211212703_iOS
Last edited by Mark Boyce
@Mark Boyce posted:

With the Sanky Wanky Coffee Company off the workbench, I decided for a change of pace.  I've been working on my lower lift up bridge the last few days.  I adjusted the pivot point some and it moves freer again.  I completely re-laid the roadbed and track.  I used a section of Atlas track that came with a small Atlas bridge that I crushed inadvertently.    The details are buried on this thread, and I will leave them buried.    I then glued girders on the sides.  I wanted to cover some of the plywood roadbed, but still make it a through girder bridge.   It came out okay.  Actually, I never even pay attention to this bridge when I am running a train or even just looking at the layout.  The big truss bridge totally overshadows it.  While there is still more to do, I'm not going to spend a lot of time on it at this point.

20240511_210939594_iOS

20240511_211010077_iOS

20240511_211033834_iOS

20240511_211212703_iOS

That looks great Mark. Your progress over time is fun to watch.

Add Reply

Post
The Track Planning and Layout Design Forum is sponsored by

AN OGR FORUM CHARTER SPONSOR
×
×
×
×
Link copied to your clipboard.
×
×