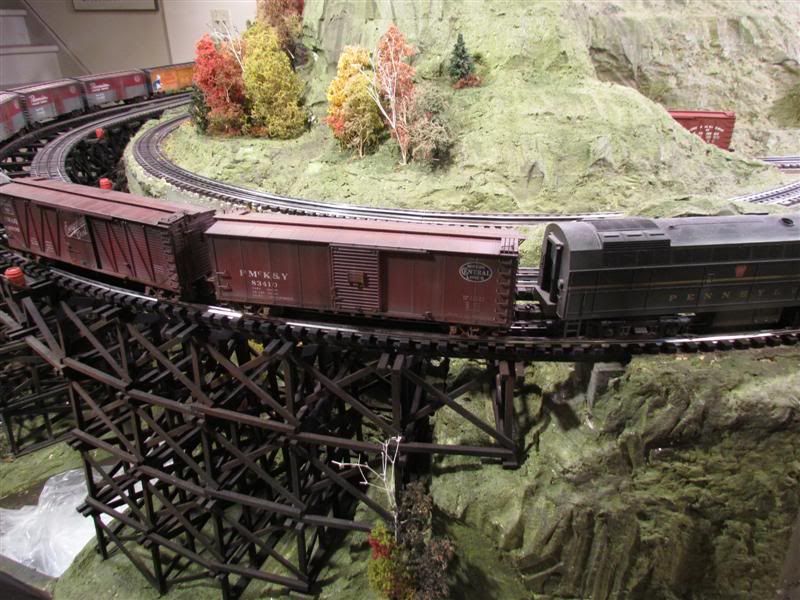
A few weeks back I started a thread questioning the use of this new fangled fiber as opposed to wet chopped paper as a terra-forming medium.

So in response to the creators' replies to my thread I purchased three bags of the newer FUSION FIBER stuff for $55. on sale.

Today I mixed a batch and applied it to my Styrofoam rough-cut surface. First I added 2 oz of Craftsmart Acrylic Paint (golden brown) to the warm water that I purchased from a Hobby Craft store Michaels for $0.33. I also purchased Tan and Suede colors as well two each for a total cost $2.00.

I mixed the Golden Brown in the water and then the fiber. After I had a paste consistency mix; I added some amounts of the other colors but did not mix as well to obtain a variant in the material.

Waiting the proscribed 20 minutes I then spread the fiber across the Styrofoam surfaces. My first impression of the spreading that I did by hand was that it nicely filled the nooks and crannies of the Styrofoam that I had placed with Great Stuff as a glue. I did have some very vertical surfaces that I had previously roughed up with a hot wire cutter so I did not need the drywall sticky tape.

At this point I am supposed to let dry for a few days; On Monday I will report back.
Last edited {1}
Original Post

Replies sorted oldest to newest

Thanks for making effort to try Fusionfiber.

If you want to add ground covers, make a dirt road, etc you should do it while its wet (you can come back later when its dry and rewet it). You have a few days. Add covers and mist with wet water. Once dry they will be set into the fiber. As a note Monday may not be long enough unless it was mixed to a very stiff paste. In winter in my basement it takes at least 72 hrs after adding ground covers for everything to set.

A simple test for mixing is too take a spoonful and hold it vertical. There should be no water dripping and it will stick to spoon. Also turn pail on its side. If any resdiual water collects then add more fiber. If you don't use it all leave it uncovered and let it dry out. You will be able to rehydrate it for use at a later date.


If you add a another color to fusionfiber after it has been mixed it will end up mixing like a marble cake with streaks. You can use this to your advantage. For example if you tinted it golden brown to start, then add more golden brown to mix when you spread it the result is a tonal variation in the spread. Have also done this for vertical cuts.

Hope this is helpful
Bill D
Bill.....you and I have talked quite a bit lately regarding your Modeling Fiber. I am very pleased with the results I am getting. Having said that what is the differance between the standard Modeling Fiber and the new Fussion Fiber? Will the Fussion Fiber replace the previous Modeling Fiber which I am refering to as "standard"?

Thanks for the great product. My layout is in the our living room and this is so much cleaner (less messy) than previous plaster/plaster cloth methods I have used in the past.

Ken
Here it is Sunday and the Fiber is almost dry; I forgot to mention that I keep the layout area under 30% Rel Humidity.

Some of the Styrofoam was not fully covered, I am going to use those as rock outcroppings painting them a combination of acrylic slate gray/ burnt umber/ silver/white.

Near and under the waterfall area I lighten the Fiber color to a suede color. I will be using chromatic green and aquamarine blue. The waterfall is made from thin Plex strips irregularly cut and heat bent to form the falls. Over the Plex I add tinsel strips mired in Mod Podge Gloss.
Okay so the fiber is finally dry....

I purchased some additional Acrylic paints gray and burnt umber(BU).

Recall that I left certain parts of the Styrofoam, the pointy and some flats parts uncovered with the fiber. On those parts, using a very small spatula I applied first the gray and then the BU.

Next I sprayed a section with Wet-water (water with a few drops of detergent) on the surface; then I applied scenic grass and ground cover.

Amazingly the surface came alive!! The resulting texture was not like any others I have tried before as I usually just paint on latex Texture paint and apply the scenic mix to the wet painted surface.

I am thinking I'll spray a black ink wash to the surface as will to give the areas even more definition.

Once I get a chance I will add some photos.
Further, I have used all kinds of scenery and Terra-forming methods, from chicken wire to fine mesh wrapped in strips of paper bags doused in plaster of Paris or texture paint to latex painted Styrofoam; but this fiber is really big jump forward.

I will post pictures after the new forum is up and running; but I have tried various surfaces from flat to vertical and the scenery stuff really sicks well with a spray-shot of water.

FOR ME the true mark of a finely detailed Terra-formed scene is when the mountainous or hilly areas look like they literally spring from concrete floor through to the layout surface as though you built the layout around miniature mountains that just happen to exist in your basement. In this way, your mind tricks you into seeing a truly convincing scene.

Fiber is definitely the way to go. I'm thinking tearing down my exiting non-fibrous areas and replacing it all with fiber.

Thanks True Scene Bill!

Steve C and Bob Delbridge are both very correct....On my layout I have modeled the Bighorn Basin and have used Bragdons resin method and his excellent latex molds and have used a LOT of modeling fibre to tie together formations...its wonderful stuff to use. Ive tried plaster and plaster cloth and its messy, the fibre cleans up easy and even when I drop some on the carpet I don't get in trouble!  


John, no it is not waterproof. Once down and completely dry it can be rewetted and softened.  It absorbs water quite well. Not for outdoor use.


  Note: I have poured a quart of water on flat horizontal section intentionally and did not touch it. It simply redrys without issue. This was called the beer test.


Alan,

You mentioned about adding highlights with ink..This will not give a sharp highlight, rather the ink will be absorbed and spread so the effect is very muted compared to hydracal. This doesn't mean its bad, just different. Very fine flocks or powders gives good highlights.  Drybrushing works , but brush tends to pick up a bit fiber if done with a heavy hand.  Have never tried airbrushing.

Apply powders only on dry fiber.  Once done, very lightly mist to set them.


 BTW donuts are not included with purchase. They are only available in limited quantity on the Saturday of show.


Bill D


Last edited by wsdimenna
Originally Posted by AlanRail:
Okay so the fiber is finally dry....

I purchased some additional Acrylic paints gray and burnt umber(BU).

On paints here may be a tip to save you some money and broaden your color options. HomeDepot in their paint department will mix a small can of any color you want for $3. I took down some clippings of colors off my backdrop and they mixed colors to match so my 'against the wall' scenery matched up right to it. Also being ready to go, makes paint and clean up work easy. Next, in Harbor Freight Tools, you can buy 1" brushes in a box of 36 for about $10. You can use them over and over but the decision as to when to throw one away is easier.

2010-12-10 001

Attachments

Images (1)
  • 2010-12-10 001
Originally Posted by wsdimenna:


Mmmmm...no donuts Bill.....OK...Ill use the remaining fibre I have to make a dozen..they keep tellin me to add fibre to my diet...see the product has many uses besides making really good scenery!


 BTW donuts are not included with purchase. They are only available in limited quantity on the Saturday of show.


Bill D


Post

OGR Publishing, Inc., 1310 Eastside Centre Ct, Ste 6, Mountain Home, AR 72653
800-980-OGRR (6477)
www.ogaugerr.com

×
×
×
×
Link copied to your clipboard.
×
×