
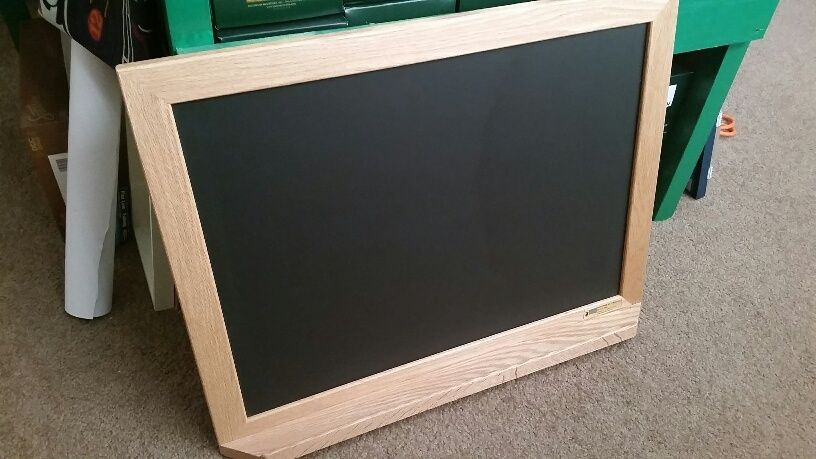
Just got this chalkboard, new. for my train bulletin board:
More on that, here: https://ogrforum.com/t...-in-your-layout-room
My plan is hand-paint the lettering over the weekend.
|
|
Just got this chalkboard, new. for my train bulletin board:
More on that, here: https://ogrforum.com/t...-in-your-layout-room
My plan is hand-paint the lettering over the weekend.
Patrick,
Im glad Tom got the BL2 working correctly!
Thanks so much Mark!!
I ran trains this morning first thing before leaving for work and ran them a bit last night just before bed![]()
Took delivery of the Marx windup train this afternoon! After a bit of oiling, it runs just peachy!
Cute, ain't it?
Mitch

looks great Mitch.
Put the decking on Module #1 of the Corner Switching Layout this evening since the weather cooled off slightly. The material is called "Soundchoice" Sound Board and sells for about $12 for a 4x8 1/2" thick sheet at Home Depot. It cuts with a utility knife and will take screws. It's light weight and because it's thin insulation material, it's not something I'd use as load bearing without a lot of bracing underneath. For what I'm doing with it (supporting buildings) it will do just fine. The track will be supported by the strip of OSB running down the middle.
Before:

After:


After some 4 to 6 months of inactivity on the layout, I went down to run a few trains. What the heck?? Lot's of problems with electrical continuity between the track and the train. Stopping, dropping out of contact, lights flickering, all pointed up that my track was, indeed, dirty. So I've been spending a few days, moving equipment and running my little MTH S-2 switcher (which has four pick-up rollers) pulling my track cleaning car(s) around the layout. What a difference? I guess that you've pretty much got to take care of maintenance, every once in a while.
Paul Fischer
I just finished a partial restore on a Lionel Postwar 2360. Besides getting it running well, I added side herald decals and 5 stripe decals (to replace the original faded ones). Replacing the stripes ended up being more work than I thought it would be, but I'm pleased with the results. If that didn't work out, I was going to send it out for repaint, but that won't be necessary. I also added big chip LEDs behind both headlight lenses (visible in the short video).
Roger


Went for drive to pick up the new Lionel Catalog, 2015 Volume 2
At my LHS (Local Hobby Shop) - Wild Bill's Trains - Clinton Twp., Michigan
Across the street is a White Castle Restaurant, Guess what, order the house special.
No place like this close to my train room.
If I remember correctly, Bert said, "Orders are due in by October 7th"
Also made a purchase, RailKing rolling stock.
Gary - Cheers from The Detroit and Mackinac Railway - Click photo to enlarge.


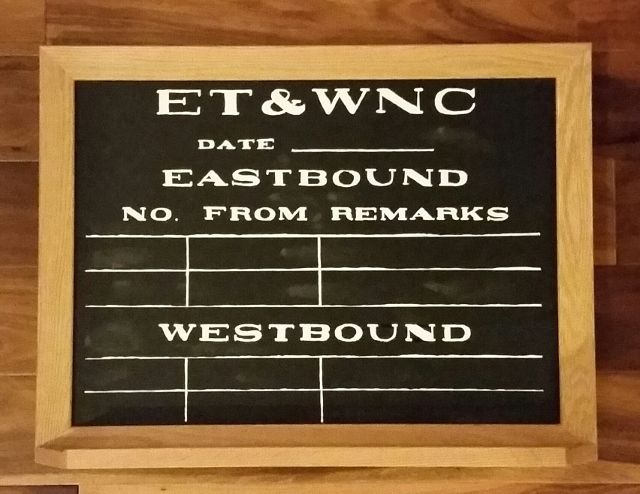
Got my train/crew board finished for the layout room. I hand painted all the lettering...
Today I oiled and greased the engines on the mainlines. Then I just enjoyed running them...........Paul
After the "AGHR Kids" literally ran trains all day, giving the adults a break on a very humid day, AGHRHowie and I did some work cleaning up the farm scene area on the club layout as it has deteriorated over time. Basically, we removed the foam bases and the barn area. For now, the farmhouse is sitting on its foam base (shown sitting on the tracks while we worked), but we're going to construct another one that's more subtle. In the mean time, we put replacement ground cover down. We should get it finished Wednesday evening.


Jon was supposed to come over today, but he had to cancel. Yesterday I was doing some prep work to do more fascia on the upper deck. I've also started cleaning so I can run trains for company tomorrow.
When we built this section of the benchwork, I just grabbed some cutoff pieces with a 48" radius, even though the track is more like 072. I took the saber saw and re-shaped it to follow the track.

While I was there with the drop cloth and the vacuum, I drilled some holes to get the feeder wires from the hump, through the plywood deck.

I removed all the old daisy chain wires from the relay socket strips, and cleared off the table so I can start building the second turnout relay panel. Sitting on the floor to do the first one wasn't that bad, but working at the table should be better.

Finally, I started the reconstruction of the CMR/I - relay power panel by removing a bunch of unnecessary components. In the process, I discovered that I have a couple of smashed capacitors on that small board that will have to be replaced. My problem is I can't read the values, nor have I had any luck finding the parts list. I thought it said .1Z MEXICO. Is that supposed to be .1u?![]()
I'll keep looking. I want to fix it before I hang the panel.

Elliot,
Send a photo of the board to gunrunnerjohn. Where it is and what is around it will help him give you a good guess. Something that small would be used to keep some noise\ripple out of the current.
I tried some Spanish translators, but no luck on finding the electronic symbol reference.
Ordered some 1/8" plugs and sockets; I'm going to rig the Marx layout so that the lights plug in and run from the accessory terminals, rather than run off track power... ![]()
Mitch
Today was spent shuffling boxes around under the table. I opened up the first area where I have a storage door in the wall. One of three. Now had I been smart when I started with the upper mainlines first that is when I should of cut the doors so I could get in there. So now that is what my project is for the week. In the pic I have the line drawn where I will cut across the door. Bought extra hinges to attach to them. Of course while I was working on this I had trains running...............Paul

I'll keep looking. I want to fix it before I hang the panel.
Elliot,
Send a photo of the board to gunrunnerjohn. Where it is and what is around it will help him give you a good guess. Something that small would be used to keep some noise\ripple out of the current.
I tried some Spanish translators, but no luck on finding the electronic symbol reference.
Thanks Carl, but I found out what they are. I was able to go to Chubb's website and see the parts list for a similar card. This card converts RS-232 to RS-422, which is out dated. New ones are 232 to 485, but these capacitors appear to be the same. They are a .1uF 50V monolithic, which is slightly different from a straight ceramic. Chubb is the engineer, I just try to follow the recipe.![]()
So far, I've found some monolithics with the same value, but a different style package. Now that I know what to look for, it's just a simple hunt.
I'm probably going to have to install the panel and just fix these later. I won't need this part for quite a while anyway.
Today was spent shuffling boxes around under the table. I opened up the first area where I have a storage door in the wall. One of three. Now had I been smart when I started with the upper mainlines first that is when I should of cut the doors so I could get in there. So now that is what my project is for the week. In the pic I have the line drawn where I will cut across the door. Bought extra hinges to attach to them. Of course while I was working on this I had trains running...............Paul
Paul, Had to laugh when I saw this......I did the same thing myself......too big of a hurry to run my elevated line. Said to myself....."will have to take care of that tomorrow." Well...kept on working and ignored it till I had t get some stuff out.....did the same thing as you are going to do....cut a dutch door after the fact!
-Pete
Got up this morning. ( Any day I get up on this side of the dirt is a good day![]()
![]()
![]() Went down stairs, made coffee and fixed breakfast. Poured a second cup of coffee and went to Patsburg where I stayed pretty much all day photographing trains. Here is a couple videos I took. I apologize if there is no to little sound, somehow the sound portion did not seem to be at all loud or it did not come thru at all
Went down stairs, made coffee and fixed breakfast. Poured a second cup of coffee and went to Patsburg where I stayed pretty much all day photographing trains. Here is a couple videos I took. I apologize if there is no to little sound, somehow the sound portion did not seem to be at all loud or it did not come thru at all ![]()


I apologize if there is no to little sound, somehow the sound portion did not seem to be at all loud or it did not come thru at all ![]()
Sound is loud and clear to me! ![]()
Mitch
I apologize if there is no to little sound, somehow the sound portion did not seem to be at all loud or it did not come thru at all ![]()
Sound is loud and clear to me! ![]()
Mitch
Great to hear! ( no pun intended ) Thanks so much for the feedback Mitch!!
A little progress on details on the Oneida gas electric.....fabricated, installed, and painted the roof racks and mounts for the fuel tanks and bell. Still using filler to
try to get the fuel tanks' shapes right. Also put in a vinyl subframe under the
chassis, and mounted the engine carrier boxes. Picked up queenposts and turnbuckles
for the trussrods at the Indy O scale show, and the subframe will provide a mount for them. I also finished putting all the decal rivets (a lot!) on the buffer plates on the
front of the rail car.
I added a grain elevator.

Finished my iron ore load upgrades.

Got a few holes drilled for a saw blade and the hinge screwed on. Tomorrow I'll cut the door and that should take care of that one. I may have gotten distracted a few times running trains.................Paul
September has been pretty slow so far, I've taken a bunch of days off. Couldn't sleep last night, so I got busy on the second turnout relay panel.
This is how it looked when I started this morning.

And here's how it looks now.

All of my helpers have been busy, so it's just me working. Maybe Patrick on Friday. Fingers crossed.![]()
Clean up only......my wife has 2 dinner parties coming up and the layout and the should not look like an endless "work in progress".....I want to show off what I have accomplished so far.
I am not starting any new projects on the layout. I have my notebook out and am doing planning......uncouplers and control rail hook up is next.....along with a few more accessories. I have some building that are half done....that could be finished.
I picked 2 trains to run on the mains.....My MTH N&W Pocohantas and a military consist pulled by Legacy Geeps. The 2 subway trains will be running.
Peter
Peter, I feel your pain. Story of my layout too.![]()
Lubed my MTH B&O docksider and put it back in service on the Mountain Division. Changed the train on the Mountain Division to a vat car and White Apple Juice reffer ... since its now almost fall and the crops are being harvested up there in the hills![]()
Ran freight trains on the lower level mains adding and subtracting cars here and there. Organized some of my tools and took a few minutes to organized some items in the train room.
I just love running my trains!!!![]() .... they are way cool!!
.... they are way cool!!![]()
Installed a Lionel soundboard and speaker into my K-Line powered RDC!
Had to mount the board on the ceiling of the car using mounting tape, but I'm used to putting the good ol' 600-81-52050 boards into unlikely spots where they really have no place being. ![]() The speaker's magnet was sufficiently massive to hold itself in place atop the sheet metal weight.
The speaker's magnet was sufficiently massive to hold itself in place atop the sheet metal weight.

It did occur to me, afterwards, that I coulda mounted the horn in one of the trailer cars, but, oh well... ![]()

For some obscure reason, this car has the red leads going to ground and the black leads going to the third rail. Thinking like this is probably what put K-Line into receivership in the first place. Since I'm not a big fan of running the horn off the bell button, I had to reopen and resolder:

Naturally, no repair is complete without Shop Supervisor Norma Bates Kitteh, aka "Inspected By Number 12"...


Norma has learned to close her eyes when the camera is pointed at her, not wanting to be dazzled by the flash:

And here's the finished RDC, happily honking about my layout!
Mitch

BTW: Does anyone have a spare pair of K-Line RDC horns knocking about? I really can't justify spending $7 apiece plus postage online... ![]()
Mitch
Got one door done today to the storage spaces in the attic. How amazing it is with 11 or 12 years passing the human body does not want conform to small working areas anymore. Now I'll rest on my laurels or better yet sore muscles. Tomorrow I'll vacuum the area out and store things in there. I will make sure to write down what I put in there. Pics of progress. I had never been in that cubicle before. Guess the people before us left stuff in there. A couple of pics............Paul


The Great Northeastern Railway (GNR) announces that the foundation for its 7 stall, to-be-scratch-built roundhouse house has been cut and temporarily fitted to is final resting place. This will be the main shops and storage for the GNR's impressive fleet of steam locomotives. In addition to the seven stalls, there will be 4 outdoor stub tracks for engine storage plus two additional tracks for the sanding tower and coaling tower. Until construction of the round house is finished, all steam engine storage will be outdoors. More photos will follow as progress is made.

Got one door done today to the storage spaces in the attic. How amazing it is with 11 or 12 years passing the human body does not want conform to small working areas anymore. Now I'll rest on my laurels or better yet sore muscles. Tomorrow I'll vacuum the area out and store things in there. I will make sure to write down what I put in there. Pics of progress. I had never been in that cubicle before. Guess the people before us left stuff in there. A couple of pics............Paul
By the time I had finished filling a similar storage area, there was a strong temptation to just nail all access permanently shut. Out of sight and eventually out of mind. ![]()
The Great Northeastern Railway (GNR) announces that the foundation for its 7 stall, to-be-scratch-built roundhouse house has been cut and temporarily fitted to is final resting place. This will be the main shops and storage for the GNR's impressive fleet of steam locomotives. In addition to the seven stalls, there will be 4 outdoor stub tracks for engine storage plus two additional tracks for the sanding tower and coaling tower. Until construction of the round house is finished, all steam engine storage will be outdoors. More photos will follow as progress is made.
Looks great Randy!! Congratulations on the progress!! I can't wait to see the completed roundhouse!!
OK.... the roof contractors finished up today after almost two weeks work. Have to admit, the Spanish tile style roof compliments the stonework of our house. I was able to find time for working on the layout, did a little on extension and cleared off two mainlines for running. Warmed up the Atlas Erie Built St Fe ABA #90-92, the MTH Big Boy I rebuilt with ERR TMCC/RS 4.0, the Lionel/K Line SD75 with Digital Dynamics TMCC/RS 4.0 I installed, K Line Rock Island E8 AA with TMCC/RS and K Line Union Pacific E8 ABA with TMCC/RS. It has been a couple months since I ran anything, being busy with taking care of storm damages... still. Glad I did. Found a problem with a K Line Super Track 072 RH turnout, need to find rebuild instructions for the 2001 model ZW on the loose handles and low wattage output. Post A only had 15 w and D post only 13-14 watts. I remember they published rebuild instructions to tighten them up, just to find them and go from there. Using two 180 bricks, each split between two circuits. Do have 4 135 bricks, but only 2 reverse polarity adapters for the miss-wired
brick plug female receivers on the ZW. Something else I need to work on when taking the ZW apart.
On another note, moving boxes around today under the layout and found two clockwork trains I was looking for. One is an American Flyer Prewar set, the other a 50/60s Marx "mechanical train" as the set box calls it.


Almost, except maybe for touch-up, have the roof with its bell, fuel tanks, and green
"glass" clerestory windows done. Also have queenposts, truss roads, and turnbuckles,
and a brake cylinder in place and painted under the frame. Paint is drying on the body, and I went through my castings stash looking for appropriate gas electric pilots,
which are going to be difficult with the large couplers on the power chassis. Body will
have to be decalled, dull-coated, and have windows installed.
here is what I have done over the past few weeks not a lot of time to work on it or finish the scenes but got them in there places.


I have had something else taking up my time. when I was 17 still in high school I worked for a boat company building sunsation boats well I have always wanted to buy one that I had built as a kid so I was on the hunt for one for awhile I didn't want a loan to get it either so it had to be in a good price range. and living in ga I knew there was going to be a road trip involved since not many are in ga. so I found one in Michigan and bought it did a 26hr marathon drive to Michigan left Friday night at 8pm drove to Michigan arrived at the boat at 7:45 the guy met us at 8:15 bought the boat and had breakfast and drove back to Ga. was home again at 10pm on Saturday night.
I knew the motor was bad the guy said oil came out the dipstick tube and it seized up. well when I got it home removed the engine. tore it down yea he ran it with no oil. 6 out of 8 rods were spun main are not in great shape either so block, crank and rods are out getting reworked. should have the parts back by this weekend.


![20150907_173736[1]](https://ogrforum.com/fileSendAction/fcType/0/fcOid/12129987997660671/filePointer/44088306247274833/fodoid/44088306247274826/imageType/LARGE/inlineImage/true/20150907_173736%255B1%255D.jpg "20150907_173736[1]")


![20150907_173736[1]](https://ogrforum.com/fileSendAction/fcType/0/fcOid/12129987997660671/filePointer/44088306247274833/fodoid/44088306247274826/imageType/LARGE/inlineImage/true/20150907_173736%5B1%5D.jpg "20150907_173736[1]")
Access to this requires an OGR Forum Supporting Membership


