Which aluminum shelves are better/nicer? They need to handle heavy standard gauge trains. I'm looking for 6' lengths. Are there any others?
Replies sorted oldest to newest
I have RailRax for O gauge and as far as I know Glenn Synder offers the same aluminum extrusions (plus of extra bits to keep trains from rolling off the end). My feeling was that the attachment of the shelve to the wall (studs) was going to be most likely failure point. Shelves 2,3,5,6 counting from the bottom are RailRax.
The top,middle and bottom shelves in this photo are different extrusions (lost track/record of the gentleman selling them) that allow for sliding plexiglass doors, needed in earthquake country.
Attachments
I just purchased and installed several 6' lengths of Glen Snyder's shelves, both G and O. I'm very happy with them. Installation was a breeze (as long as the wall is straight). I was able to install them solo. If I had more room, I'd buy more. Prices seemed reasonable.
Ron
Isn't RailRax out of business?
Doug
I have railrax. I was told Glenn Snyder has a slightly different finish. I'm going to try Glenns next time. If the wall isn't straight I use washers between the shelf and the wall.
Tom
We have the Glen Snyder shelves at our club and they were easy to install and dress up the wall areas.
Don
Boothe Memorial Railway Society - Stratford, CT
I have both. One is shinier than the other.
Jon ![]()
My vote goes to Glenn Snyder. I have know him and his family for a long time and they are very nice people to deal with. I bought my first aluminum shelving from Glenn back in 1984.
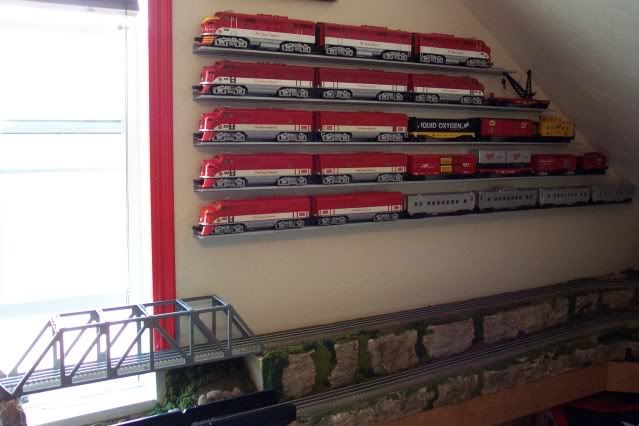
TEX
Steve
No difference in design. Snyder's is a satin finish where R.R. is shiney They both will hold a ton if you use a good size screw and go into a stud at 16" on center. You can save oin shipping if you buy Snyder's as he will bring it to York if you order in advance. He usually does not have a lot extra to sell at York, just previous orders. Great stuff. easy to install and clean.
Paul Edgar
I used a shower door manufacturer from Langhorne, Pa. The shower tracks were shiny and worked great and paid $25 for 12 foot sections and cut then in halves no charge. Just can't remember the name of the place-it was about 10 years ago.
I purchased 2 lengths of Trainshelf at the Allentown show this past fall. It looks like a comparable product to the other products available
I prefer Dechants [mrtrain.com] aluminum shelves , which have grooves rather than rails.
With a groove shelf you can place a steam engine on the shelf with one hand.
I think the groove make knocking car or engine more difficult.
The screw holes can be set lower and easier because there is no interference from the rails.
the only other consideration is they come in four foot lenghts
Have both .. like railrax better .. IMO looks richer and nice people to deal with...
I have some of the Dechant product,about 12 feet. It has held up very well over the last six years or so.
We are doing a little remodeling and I may put this up for sale if that happens.
Norm
If you're looking for something to keep the dust off the trains then Showcase Express makes fully enclosed shelving. You can light it and it has optional scenic or mirrored background. Expensive but you never have to dust!
Chris
I have fifteen of Glen Snyder's beautiful satin shelves. I use them exclusively for O Gauge. I have had several visitors to my home who have commented quite favorably on them. I found them very easy to install.
I have two 8' walls and one 12' adorned with Glenn's shelves. A key to keeping the shelves from pulling up and becoming "humped when on a crooked wall is to shim by placing fender washers in "valleys" or depressions behind the flange when attaching.
Where I had to fit joints---add 2' to 6'=8' and 6'+6' for the 12' side, I used very small mending plates in the channel and fastened with 1/8"x3/8"L. machine bolts to enable a good even fit of the rails.
I've been very pleased with the Glen Snyder Shelves. I like the way they look and perform. My wife liked the way he could cut them to different sizes to allow us to break up the display pattern to add signs and other memorabilia to create an interesting display.
Steve Tapper
I needed almost 1400 feet to display sets in my 40 x 45 foot train room. I just used a local aluminum extruded to make my own design. Tracks for "O", "S" and "HO".
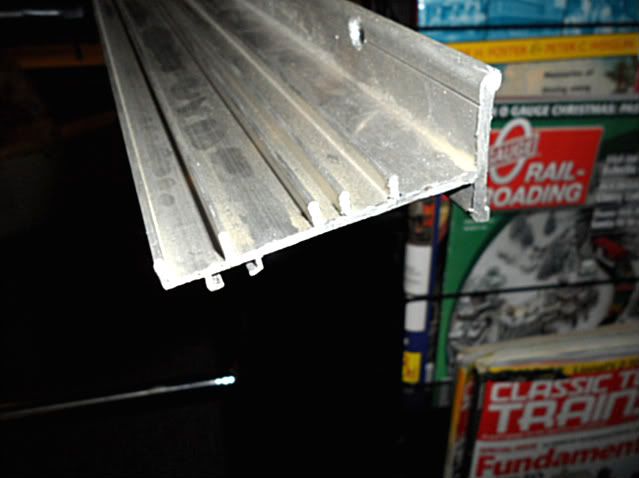
My extra operating engine storage shelves are installed up side down so constant removing and storing engines does not require putting wheels on the tracks.
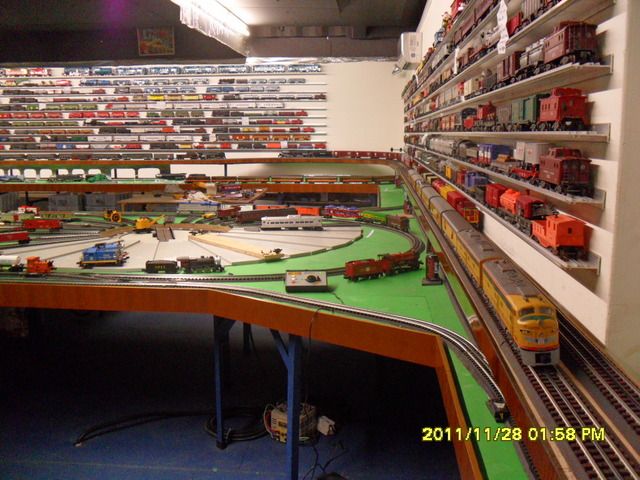
I needed almost 1400 feet to display sets in my 40 x 45 foot train room. I just used a local aluminum extruded to make my own design. Tracks for "O", "S" and "HO".

My extra operating engine storage shelves are installed up side down so constant removing and storing engines does not require putting wheels on the tracks.

That looks like the bottom track from a double sliding glass door. Would that be correct?
Thomas
Just installed Glenn Snyder shelving - O Gauge on one wall and Standard Gauge on another. They look great and aren't going anywhere when installed as directed. Very happy with them.
Mike
I made mine like John did except i took the easy way out by buying pre-routered molding that I stained and coated with polyurethane from Home Depot...


The trucks fit the grooves perfectly, it's almost too easy.
Paul
It was nice to have them cut to fit. for $1 per cut.
The installation instructions from the Glenn Snyder Website. A 6 ft shelf unit would require a minimum of (4) #10 X 1 1/2" screws.
Glenn Snyder Display Systems are easy to install. You will need the following tools: An electric drill, 1/8" and 3/16" drill bits, a level, #10 x 1-1/2" round head, pan head or truss head sheet metal screws for each stud and spacing blocks. Spacing blocks should be as high as the distance between the shelves, generally between 5-1/2" or 6" for O gauge. Studs are usually located 16" or 24" apart on center. Electrical outlets are generally attached to the side of a stud, which is the easiest way to locate one, or may be found with a magnetic stud finder.
Installation Instructions: Using the level, draw a line where you would like the bottom shelf to be located. Locate the studs along this line. Mark the stud spacing and transfer the marks to the back of the shelf. Using the 3/16"drill bit, drill clearance holes in the shelf from the back, using the groove to locate the tip of the drill bit. Using the 1/8" drill bit, drill pilot holes in the studs and fasten your shelf with the #10x1-1/2" long sheet metal screws. (We use them instead of wood screws as they are threaded to the top of the screw giving them more fastening power.) Once the bottom shelf is fastened, place the spacing blocks on the top of the rails, equal distance apart. Place the next shelf on top of the blocks and mark where each fastener hole is to be drilled. Remove the shelf, drill the holes in the shelf and in the studs and attach the second shelf. Continue installing the shelving by using the spacing blocks until installation is complete.
Use of Connecting Pins: On walls where longer shelves are needed or uneven areas, use the connecting pins that are supplied. Tap ends of pins open with a center punch or similar tool. Slide one end onto a rail and gently tap it with a hammer until the pin is all the way on the rail. Take the second shelf and locate the open end of the pin on the corresponding rail. Tap the pin half way back until the two shelves meet, then fasten the shelf to the wall. If your walls are uneven, place screws through washers where needed between the shelf and the wall until the shelving remains straight when the screws are tightened.

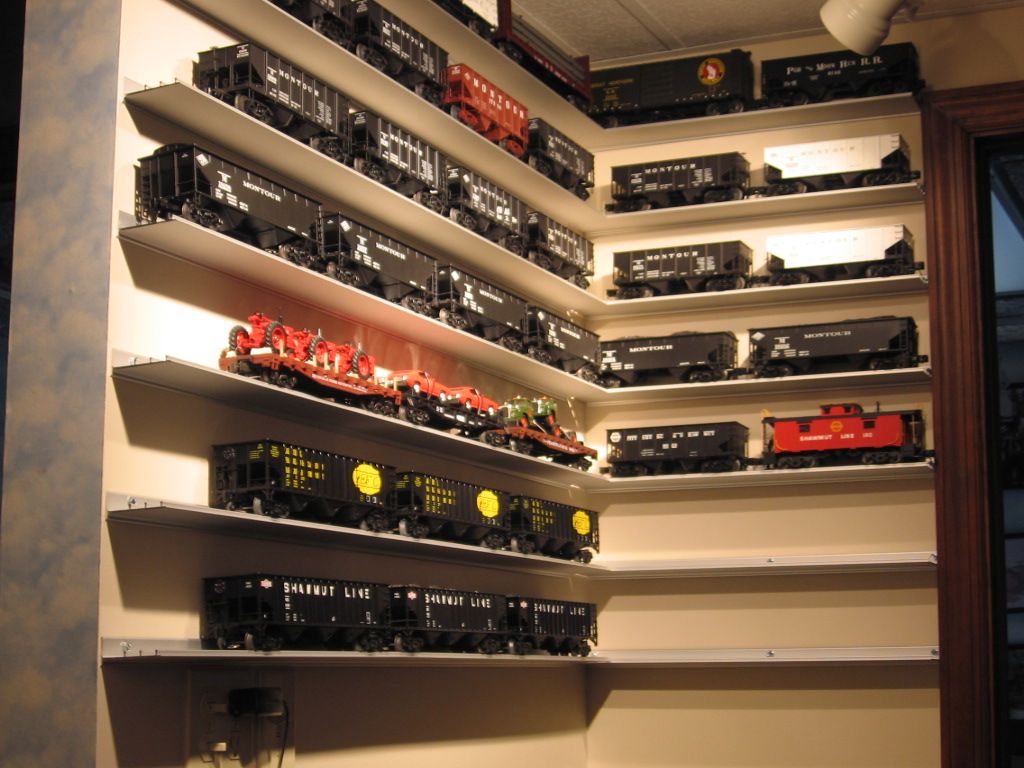
I made my own shelves using 1 x 6 with O gauge track. I routed over the edge and finished the wood with Puritan Pine stain and polyurethane. The shelves are 10 feet long and can hold an entire passenger train with 4 Madison cars and an A-A unit. I also have Glenn Snyder shelves for engines and rolling stock. Glenn Snyder was great to deal with and the shelves were easily installed.
Glenn synder shelfing by far... which reminds me i need to order more... if i remember later when i get home form work i'll put up a picture..
what spacing do your normally use between shelfs? i was using 6 inchs to clear the pantographs of my electrics, but may be alittle over kill..
I needed almost 1400 feet to display sets in my 40 x 45 foot train room. I just used a local aluminum extruded to make my own design. Tracks for "O", "S" and "HO".

My extra operating engine storage shelves are installed up side down so constant removing and storing engines does not require putting wheels on the tracks.

That looks like the bottom track from a double sliding glass door. Would that be correct?
Thomas
Thomas.
No, I drew up a plan and the extruder made a die. I can make more anytime but their is a minimum meld, about 100 24' sections. Still have some left from the first run.
Excellent product and service from Glenn Snyder......


