Title says it, what do you guys use?


Seems like every time I have a spraying job I always have small parts like hatch covers, windshield wiper blades, and small screws.  The blast coming from the airbrush is enough to move them around on the piece of cardboard box I usually use to sit stuff on to paint.


I've poked holes in the cardboard, I've used tweezers to try keeping them still, but nothing seems to be the best method.  Seems like I always have to re-position them to get complete coverage, which usually ends up with more paint on the model than I would like.


Let's hear some ideas!


Also, anyone use 91% alcohol to thin acrylic paint?  I'm using Model Master on this job and don't have any of their Universal Acrylic Thinner on hand, but I do have a quart of 91% alcohol and I've read where some folks use it (I Googled it and found things other than trains).

Original Post

Replies sorted oldest to newest

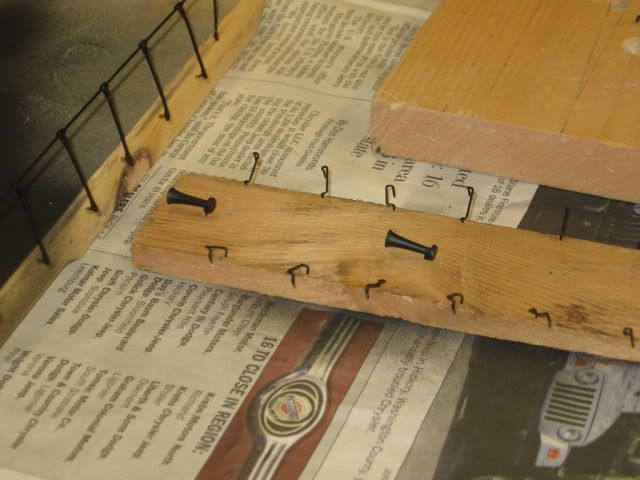
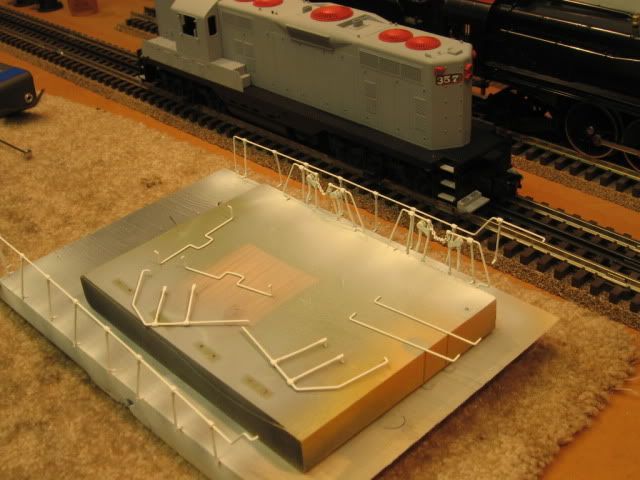
I use a block of sheeting board and then drill small holes with a pin vise.  Note the lift rings far right.

Painted white, these longer pieces, lift bars and detail parts had their own hole. Usually it works well, on occasion I loose a part to the wind of the air brush. The block of wood can be moved/repositioned for a better look, better angle. IMO.  I also use a latex glove on the hand that holds the block, been known to paint my hand.  Mike

Atlas GP-7.

Last edited by Mike CT

Thanks guys for the quick replies!


Mike, I've been using cardboard instead of wood, but I can see where holes in the wood would last longer than those in cardboard.


Matt, I have all the stuff mentioned, so I'll give them a try.  I've actually been using a rubbermaid turntable, just need to pull out the blue tape.


Dave, that bar looks just like the Styrofoam my wife has for ornamental flowers, should work fine.

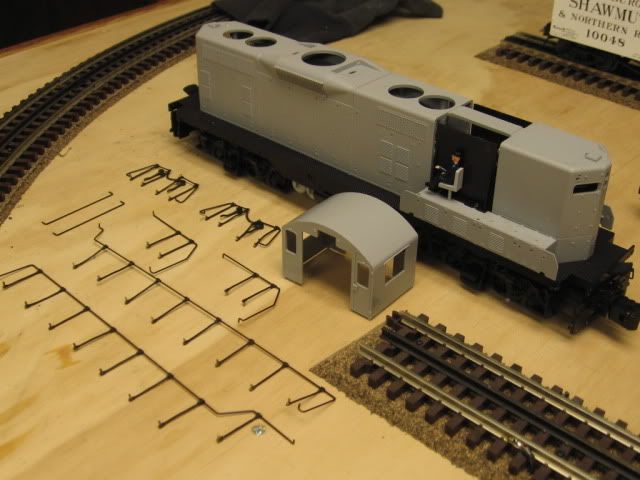
Here's an example of what I did when I painted some of the detail parts that I added to the Lionel GP30. 


IMG_0080


It's a 2x4 with masking tape sticky side up, with the strip of tape secured at each end with another piece of tape. Use regular masking tape because it has more tack than painters tape so the parts stick better.

Attachments

Images (1)
  • IMG_0080

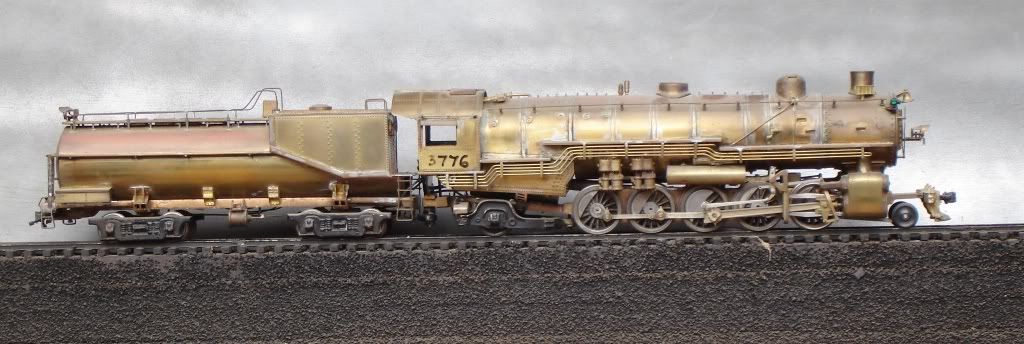
I usually just stick everything together and paint as a unit.  Tomorrow the 2-10-2 goes in the bead blaster, then gets a coat of primer.  Even the class lamps are stuck on there, but I masked them to avoid losing the gloss on the jewels.  They will get a touch- up when I do the graphite.


Of course I never blast trucks or mechanisms.  Those have been removed, and will be painted while rotating with Floquil Loco Black.  I may take this one to OSW.  Many details have been added since this photo:


Wow, a bunch of good suggestions


Yesterday I was scrounging around in my wife's floral stuff looking for a piece of styrofoam and found a bunch of 3"-4"wooden picks with thin wire wrapped around them:


http://www.amazon.com/Wood-Flo...-Green/dp/B0018N48RO


I found I could thread the wire thru a hole or other small part (like a lift ring) and stick the pick into styrofoam to hold small pieces in place.


I also found you have to plan ahead when painting.  I'm spraying a Lionel Legacy GP9 body and the cab is a separate piece.  I sprayed it while it was sitting on it's bottom side, then realized that if I turn it over it would be resting on the rounded roof, not good when blowing air at it.  Everything turned out good but next time I'll do a little better planning.


I also did a little brush painting prior to spraying, just to make sure the hard to get at areas got covered.  This turned out to be a wise move and didn't have to handle the pieces very much.  When I sprayed the gloss clear (the body was painted using Model Master Zinc Chromate Acrylics (I did use 91% plus a drop of Artista Flow Aid and it sprayed fine).  The Zinc Chromate is a match to the Seaboard Air Line "Jolly Green Giant" paint scheme.


Decals are getting almost impossible to find.  I've been making my own and had made some yellow stripes a while back.  I tried making some more, but when I went to test one I found the decal is too transparent, so I need to print some more up and adjust the color density.  Of course then I have to spray them with an overcoat of clear gloss, so it'll be a day or 2 before I see if they'll be useable.


I'll post some photos once I'm done adding decals and final spray of clear flat.

Originally Posted by Bob Anson:

I use the paint stir sticks you get with a gallon of paint and some masking tape turned sticky side out.  so much easier to handle than 2x4.

It doesn't have to be a 2x4, that's just what I used for that particular project. I don't hold it in my hand while spraying anyway, it's sitting on the bench. The weight of the 2x4 prevents it from blowing around the bench or onto the floor. You can use whatever you want... same results.

Bob,


I had some clear and white decal paper, just couldn't recall which one I used before.


The white paper worked fine (I got it from BelDecal), the decal material is thin yet strong.


I found trying to put 1 long decal stripe on the side of the GP9 wasn't working, so I cut it in half to maneuver it better.  I got both the sides done behind the cab, now I have to work on the nose.  This Seaboard GP9 had curved stripes on the nose, but on the rear the strips ran straight around (according to Warren Calloway and photos I've found).  I need to remove 3-4 handgrabs before I apply the decals but that should be no problem.


Sounds like a job for tomorrow!

Originally Posted by Bob Delbridge:

Let's hear some ideas!


Also, anyone use 91% alcohol to thin acrylic paint?

Bob,


I've got a quantum black hole that I fed positrons into to put a charge on it so I could I keep it in a magnetic bottle under my work bench and focus the gravity field to hold everything in place.


Still working on moving stuff after it's painted.....moving that magnetic bottle is "complicated".


I've never thinned any paint with 91% or any other % alcohol - what kind of alcohol are you referring to anyway?? 

while not as imaginative as mwb's black holes, I hold small parts (and just about everything to be painted) with 3M 410 series double coated tape:


3M Double Coated Paper Tape 410M


http://solutions.3m.com/wps/portal/3M/en_US/Adhesives/Tapes/Products/~/3M-Double-Coated-Paper-Tape-410M?N=5962317+4294861852&rt=rud


Apply to a piece of corrugated cardboard, then remove the top layer and stick on the parts

So far most everything mentioned (except Martin's quantum black hole stuff) I've found around the house.


Martin, I got a quart of 91% isopropyl alcohol at CVS pharmacy the other day, to strip paint (worked real well on the Lionel plastic GP9 carbody).


I was preparing the body for painting and noticed I had run out of Testors Universal Acrylic Thinner, so I Googled for an alternative (didn't want to go all the way to the beach to get another 4oz bottle of the Testors stuff).


I found a lot of people using the 91%, as well as some Liquitex Flow Aid to thin the paint and help keep it flowing.  I mixed it with my Model Masters Acrylic paint and it worked fine in my Badger 750 Crescendo airbrush.


(it also helped heal the small gash I put in my right palm last week, except for the stinging when it first hit the skin)


It also cleans brushed very well.


Next time i think I'll use the double-sided tape as John mentioned.  I have a few rolls of it laying around the house


Right now I'm looking for some yellow numbers that match these on the side of the engine I'm trying to model:


They're 10" numbers, but I can't figure out the font.  I did find that Woodland Scenics makes a rub-on set, MG749, USA Gothic Yellow, that looks close, but they cover 9" (3/16") and 12" (1/4"), not 10".  I tried to make some using the clear decal film I have, but they keep coming out too light and the white decal film will leave a white background.  I might play around with the program I have to see if I can do 2 colors over each other (yellow over white) on the clear decal paper.


Sorry this topic has wandered from holding stuff still to paint and decals, but it's all related (and, it's all good ).

I've never heard of using alcohol to thin acrylic paint. The stuff is water base; if I don't have the correct brand of thinner I just use water and that works fine. I'll have to try the isopropyl for cleaning brushes, though - I've been using plain old dish detergent and water and that works, but if isopropyl is better I'll switch. 


The thing to avoid at all costs is to use a brand of acrylic thinner different from the paint. I made that mistake once, never again. I think it was Polly thinner and Badger paint, but I'm not sure. Whatever it was, it clumped up like crazy and clogged my airbrush. Took me forever to get the airbrush clean, and of course I had to sand and redo the paint job and throw away the batch of thinned paint. 

From what I've read, acrylic paint has an agent in it that acts as a wetting agent.  If you use just water it will thin the paint and allow the paint to pool and not spread as it should.  I've been using Testors FloQuil and Model master and believe the best thing to use is the Universal Acrylic Thinner, but have read that the isopropyl alcohol works and that's what I had on hand, so....


I did find out one thing, DON'T use styrofoam to hold your parts, at least when you apply the clear coats!!!


Just before I started spraying the final flat clear coats I tested it on the styrofoam block I wanted to use, as you would guess it started to eat it.


Those floral picks stuck into a cardboard box worked fine so no damage was done.

I'm sure acrylic paint does, indeed, contain a wetting agent (more commonly known as a detergent). I seriously doubt that the relatively small percentage of water that you would add to thin paint for spraying affects the wetting action enough to matter. If you put in a lot of water, it will impede the paint from sticking - I've noticed that acrylic scenery paints thinned down to a wash to apply to plaster will not stick to a non-porous surface - but I haven't seen any such phenomenon at normal thinning levels. 


Sounds like the isopropyl worked OK for you, except for dissolving the styro. You mentioned Liquitex Flow Aid. I don't know what's in that, but from the name, I would guess that a wetting agent (detergent) is part of it. 


I might give isopropyl a shot for thinning Badger paints, since I don't have any Badger thinner and nobody around here carries it. Badger acrylics have a nasty habit of turning to mud in the bottle, even if tightly capped. I've restored them with plain water, but alcohol might help. 

Originally Posted by Bob Delbridge:

From what I've read, acrylic paint has an agent in it that acts as a wetting agent.  If you use just water it will thin the paint and allow the paint to pool and not spread as it should.  I've been using Testors FloQuil and Model master and believe the best thing to use is the Universal Acrylic Thinner, but have read that the isopropyl alcohol works and that's what I had on hand, so....


I did find out one thing, DON'T use styrofoam to hold your parts, at least when you apply the clear coats!!!


Just before I started spraying the final flat clear coats I tested it on the styrofoam block I wanted to use, as you would guess it started to eat it.


Those floral picks stuck into a cardboard box worked fine so no damage was done.


I use two effective methods that others have mentioned here. 1st, Good old masking tape sticky side up with both ends folded back and taped to whatever is handy. 2nd, I have a 6" piece of 2 X 4 that I've used for drilling and it has numerous and various sizes of holes that little things stay in place while I'm painting them by spray or by brush.

Well,  I finished painting the Lionel GP9, from a Wabash unit to a Seaboard one-of-a-kind.  Here's number 1912 in all its Jolly Green Giant glory:


Seaboard had other engines painted in this color, but this was the only GP9 to get the treatment.


Actually, it isn't quite finished.  I need to find 2 of the magnets (3/16" diameter x 1/16" thick) that hold the panel on top where the volume pot is accessed, I also need to find 2 sets of the air hoses, 1 was broken and the other missing on the rear end.


I also want to redo the number boards, but in order to do that I need to strip it down again, maybe before the end of the year.  Also need to add on the FT square journal boxes.


The 1st and 3rd photos show the color the best, the 2nd photo is too bright, but it is only one of a few spots on the layout that are finished


This is my 1st Legacy engine and I must say the model is a fine rendition of a GP9, as good as the Atlas GP9 I have, the sounds are unbeatable, and the slow speed of this unit can't be beat, even when running via DCS!

Last edited by Bob Delbridge

Thanks!  I wouldn't have thought so a couple of nights ago.


After letting the stripe decals set and adhere REAL GOOD, I saw that one of them was really messed up.  I used too much Micro-Sol (#2) and should have used Micro-Set (#1) before using the "Sol".


Ended up having to take the stripe off, luckily I caught it before I sprayed clear flat over the model or I'd be stripping it all over again.


I think I need to get some long-shank Kadees to replace the regular shanks I have on the engine now.  Adding Kadees and fixed pilots to the Lionel engine was a "special treat" to say the least.  I had to cut the truck blocks and the underframe on both ends so I could remove the shell for any further maintenance.

Unless you have tight curves and NEED the long shank couplers, I wouldn't swap them. The length is good, looks good and keeps everything close as it should be.


Unless you need the trip pin for switching, cut em off with a Dremel and add an air hose. That will help with the close coupling.


I've tried the Micro Set and Sol several times and always go back to Solva-Set from Walthers. Just my preference. I thin it 50/50 with 70% isopropyl for the initial application, and then full strength after they dry to get everything to settle down tight. The 2 application process helps keep those stripes straight until they dry. The full strength solution makes the stripes go hay wire on the 1st application, especially the really thin stripes.


Just my methods from experience.......

Post
×
×
×
×
Link copied to your clipboard.
×
×