I have to say, doing scenery is boring. This is going to take me some time. image

I printed most of the block walls. I need to trim them and glue them in place. 

Here is a picture and video of a dwarf signal wired to the Ross STD gauge switch. This wiring would be the same if you chose to mount custom LEDs or use a lighted switch control.

60585586-9D6E-4953-A395-0225ADCF8068

George

Attachments

Images (2)
  • image
  • 60585586-9D6E-4953-A395-0225ADCF8068
Videos (1)
A69584ED-57D4-4F04-9C13-F295DECAD75E
George S posted:

I have to say, doing scenery is boring. This is going to take me some time. image

I printed most of the block walls. I need to trim them and glue them in place. 

Here is a picture and video of a dwarf signal wired to the Ross STD gauge switch. This wiring would be the same if you chose to mount custom LEDs or use a lighted switch control.

60585586-9D6E-4953-A395-0225ADCF8068George

That looks fantastic! Forgive my ignorance, but what brand/model is that dwarf switch?

asmith1440 posted:
George S posted:

I have to say, doing scenery is boring. This is going to take me some time. 

I printed most of the block walls. I need to trim them and glue them in place. 

Here is a picture and video of a dwarf signal wired to the Ross STD gauge switch. This wiring would be the same if you chose to mount custom LEDs or use a lighted switch control.

George

That looks fantastic! Forgive my ignorance, but what brand/model is that dwarf switch?

That's an ordinary Lionel #148 plastic dwarf signal 6-12883. The switch is a Ross Standard Gauge tinplate 072 switch that comes with an LGB switch machine.

George

I bought one table skirt to test on the layout. I think it will work. It ends up being the perfect length when I attach it under the felt on top of the table.

85E38755-A81E-434F-BA4C-7C4B98765CEF

I also made a lighting rig for my Bilt EZ Lionel building. I used LED strip lights. These were supposed to be warm white. They are nowhere near as "warm" as the picture on the box, but they are not "daylight" either. I wish I could dim them a little. I have read that you can use a PWM dimmer, but I have heard mixed results.

1BA627C7-3ABD-43F4-8837-99117F75A5A7

George

Attachments

Images (2)
  • 85E38755-A81E-434F-BA4C-7C4B98765CEF
  • 1BA627C7-3ABD-43F4-8837-99117F75A5A7
Last edited by George S

George,

I'm in the middle (started in November) of building a multi-level STD/O gauge layout also.  Love your progress and advice.  Didn't see your final verdict on felt vs. indoor/outdoor carpet?  Your 5 rail track doesn't look like the 5 rail Gargraves I have used in the past?  Who makes that all tinplate 5-rail?  May just do the green area in my main STD city/roundhouse area.  I'll post pictures soon of my progress.

SteveMa posted:

George,

I'm in the middle (started in November) of building a multi-level STD/O gauge layout also.  Love your progress and advice.  Didn't see your final verdict on felt vs. indoor/outdoor carpet?  Your 5 rail track doesn't look like the 5 rail Gargraves I have used in the past?  Who makes that all tinplate 5-rail?  May just do the green area in my main STD city/roundhouse area.  I'll post pictures soon of my progress.

The 5-rail track is custom. You need to make it from USA Track standard gauge and Menards O track. Nobody makes it in tubular. 

As for the felt vs. indoor/outdoor carpet, I am very happy with the felt. I easily solved the problem of drilling through it. I use an Exacto knife to cut a slit; I keep my vacuum nearby; I open the slit with needle nose pliers; I drill the hole and then vacuum the sawdust. The felt goes back in place and you can push wires through. The felt was inexpensive and readily available at JoAnn Fabric. It has a sound dampening effect without even adding padding. I tried padding on the upper level. It worked fine but isn't really needed with the felt. The felt cleans up well too. I just vacuum it with a dust-buster or use a small brush attachment on my shop vac. I have only loose laid the felt so far.  I may glue down some areas when I get closer to the finishing stage of the layout. 

George

George S posted:

Started laying out my town. I have lots of space to fill.

BDAD3CF0-26F3-414D-9CD9-6A28F297C9F0

George

George,

Looks good.  I see you have a couple of Dept 56 winter birch trees on your layout.  Trees / shrubbery are an important thing to remember to add, as they make the layout look better.

A friend convinced me to add trees to my layout and it looks much better now.  My friend used a lot of pine trees on his layout, but I did not care for them as much.  I ended up going with a lot of the Dept 56 autumn trees (birch, maple, and a few oaks), as I found that they looked better as one could see the trains through the trees.

Here are some shots without and with trees.

NWL


Nation Wide Lines posted:
George S posted:

Started laying out my town. I have lots of space to fill.


George

George,

Looks good.  I see you have a couple of Dept 56 winter birch trees on your layout.  Trees / shrubbery are an important thing to remember to add, as they make the layout look better.

A friend convinced me to add trees to my layout and it looks much better now.  My friend used a lot of pine trees on his layout, but I did not care for them as much.  I ended up going with a lot of the Dept 56 autumn trees (birch, maple, and a few oaks), as I found that they looked better as one could see the trains through the trees.

Here are some shots without and with trees.


NWL


I like the autumn ones you have. Now that I have a layout, I'll need to add more trees to the budget.

George

I received the glue I needed to glue my printed wall on the cardboard structure I built. I started with Titebond Premium Wood Glue, but the setup time was slow and the water content was high, causing wrinkles. It looked fine once dry, but I decided it was not the right product. After research, I decided that Best-Test Paper Cement was the right product. Photographers mounting pictures to cardboard swore by it online.

BEF35938-B836-4A30-81DD-A380F4B16381

I used this paper...162C6CA1-D142-495F-AED5-E8E59E05A709

to print these photos of the block wall.

4A5DED13-8770-4B60-9EBB-3CAB4A033D55

My dad loaned my this old cutter to trim the white edges of my photos.

BCE28AA6-FA87-4DCE-B473-63D3EA3349C3

Here is the start of progress on the wall.

B1AECB2A-E16E-4A60-BD3D-E3AA6C5F85A4E942E11D-222E-4D4E-912C-19C31B8FDB08

George

Attachments

Images (6)
  • BEF35938-B836-4A30-81DD-A380F4B16381
  • 162C6CA1-D142-495F-AED5-E8E59E05A709
  • 4A5DED13-8770-4B60-9EBB-3CAB4A033D55
  • BCE28AA6-FA87-4DCE-B473-63D3EA3349C3
  • B1AECB2A-E16E-4A60-BD3D-E3AA6C5F85A4
  • E942E11D-222E-4D4E-912C-19C31B8FDB08

Hi George , I just wanted to pass along one of my project ideas  on trees. Once made , one can spray paint them to spring , summer or fall colors . As for me , I did mine in mid summer colors.  I used two slightly different greens on the same tree.  These trees are easy to make and are basically free except for the spray paint .  They are made from end of season dried hydrangea blooms . I was able to  get mine from a friends yard .  To make some trees more fuller than others , I taped two stalks together with masking tape , then added some wood glue and sprinkled saw dust on them to resemble bark. Once everything was dry I spray painted the trunk brown and the flower part green . As you can see from the photos I used some scrap wood for the bases with a sanded edge and appropriate size hole for the trunk . As for having scrap wood lying around and saw dust and the tool for sanding the base edge , I am a carpenter by trade .  My trees vary in size and height , the tallest being  15 inches tall .  I hope this gives you another option to think about for when you are ready to start planting trees on your great layout . Cheers . IMG_2374IMG_2370IMG_2372IMG_2373

Attachments

Images (3)
  • IMG_2370
  • IMG_2372
  • IMG_2373
Last edited by JohnnieWalker
JohnnieWalker posted:

Hi George , I just wanted to pass along one of my project ideas  on trees. Once made , one can spray paint them to spring , summer or fall colors . As for me , I did mine in mid summer colors.  I used two slightly different greens on the same tree.  These trees are easy to make and are basically free except for the spray paint .  They are made from end of season dried hydrangea blooms . I was able to  get mine from a friends yard .  To make some trees more fuller than others , I taped two stalks together with masking tape , then added some wood glue and sprinkled saw dust on them to resemble bark. Once everything was dry I spray painted the trunk brown and the flower part green . As you can see from the photos I used some scrap wood for the bases with a sanded edge and appropriate size hole for the trunk . As for having scrap wood lying around and saw dust and the tool for sanding the base edge , I am a carpenter by trade .  My trees vary in size and height , the tallest being  15 inches tall .  I hope this gives you another option to think about for when you are ready to start planting trees on your great layout . Cheers . IMG_2374IMG_2370IMG_2372IMG_2373

Those are really nice! Great idea!

I can't see the first picture. You may need to repost it.

Thanks!

George

Richie C. posted:

Hah !  Still used in my office - none better.CUTTER

Yours is in great condition compared to my dad's. I was worried that it was dirty and rusty. I wiped the wood down with a damp paper towel and used furniture polish on it. I used WD-40 on the blade and also an abrasive pad. I also ran an edge sharpener on it. It is sharp and working and not leaving any rust marks on my prints. Oh, it looks like you have a safety lock on yours. Mine doesn't have that. When I first picked it up, I almost cut my finger off!

George

Last edited by George S
George S posted:

E942E11D-222E-4D4E-912C-19C31B8FDB08

George

The "rock face" above the tunnel portal above is painted rigid pink foam shaped to look like a rock. I needed to extend the portal from the upper level, because the track entered at an angle. I used some leftover paint I had. Unfortunately, it was gloss paint, and you can really see the shine on it. I think I will need to address that with some of my Woodland scenics paints this weekend.

George

This is a the bulb that burned out in my power station.

B35CD57F-F474-4B2B-8D66-F6D59D53AB8D

I was going to ask what kind it was, and then I realized it was printed right on it. I looked it up, and it is an appliance bulb. I bought an LED version online and installed it. It’s warm white.

916D70ED-532F-4F0A-AB7C-7C6AB62BFC36

I also got a PWM dimmer for my rope lights in my Bilt EZ building. I was going to take a picture but realized the rope lights are falling down. I’ll need to fix that and take a picture later.

George

Attachments

Images (2)
  • B35CD57F-F474-4B2B-8D66-F6D59D53AB8D
  • 916D70ED-532F-4F0A-AB7C-7C6AB62BFC36
Steve "Papa" Eastman posted:
Greg J. Turinetti posted:
George S posted:

Some lighting is done but lots to do still.F56C56AC-91DE-4DA0-AA2F-FCBD10D68333DDD7B381-5EAE-4911-87BE-B40266B7390E

George

George,

Please remind me who the maker is of this train shed.

Thanks,

Greg

Looks like one of the Darstad ones.

The lithographed one is the double, extended Darstaed replica of the Hornby shed. It's not a true replica; it's its own beast.

The plastic engine shed is Atlas. I used Minwax stain on the doors to give them a true wood look. I painted the roof with Rustoleum Lagoon and applied a gloss coat. The brick mortar is a wash of drywall topping compound that I wiped off the brick to leave the mortar.

George

Steamer posted:

George an 1156 bulb is/was commonly used in automobiles for the back up lights  or any single contact light. 1157s are used for tail/brake/turn signals.

Yep, but the base became a standard that is used in microwaves and landscape lights. The 1156 cross references to a BA15s bayonet base. I don't think I would have got the selection I did and the ability to buy a warm white LED if it wasn't used in the landscape lights. (I had to buy a 5 pack of course. So if anyone needs one, let me know.)

George

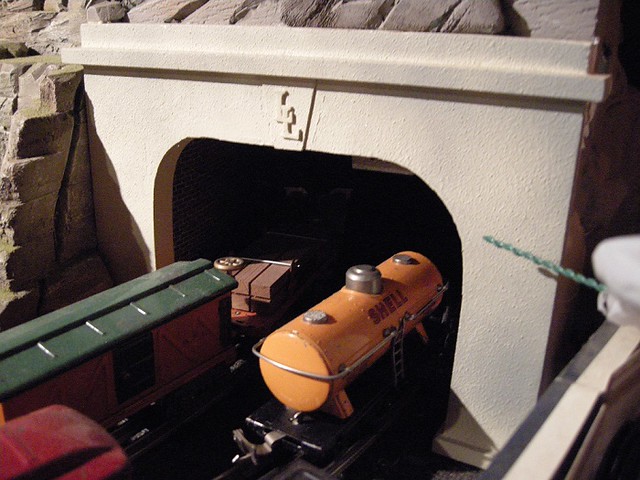
George - My layout is a wreck right now, but I snapped this pic of one of the tunnel portals I hand made from a bit of 1x8 white pine and some basswood:

I painted it with some textured spray-paint, than an over-spray of what I thought looked about right for fresh concrete. The little "LL" Lionel Lines keystone I fashioned from a couple of foam letters I stole from my wife's craft-box. The tunnel-lining is brick-paper from the web, pasted onto cereal box cardboard. It works, but it could stand some weathering.

PD 

pd posted:

George - My layout is a wreck right now, but I snapped this pic of one of the tunnel portals I hand made from a bit of 1x8 white pine and some basswood:

I painted it with some textured spray-paint, than an over-spray of what I thought looked about right for fresh concrete. The little "LL" Lionel Lines keystone I fashioned from a couple of foam letters I stole from my wife's craft-box. The tunnel-lining is brick-paper from the web, pasted onto cereal box cardboard. It works, but it could stand some weathering.

PD 

Very nice! I used some plastic Lionel portals I had, but I painted them to get rid of the plastic gray color.

George

George S posted:

The stone walls and tunnel portals are installed.

CBE25EA7-849E-4353-9EAB-93DB24B3921B4C3A95A4-5210-4032-B255-83BC2FA1BC81945AE79B-6D48-434E-8AB5-BEF32E320FA6102E0A3E-6ADE-4F11-BAEB-0A6189B7D0C1

Next step is lighting.

George

George, I can't tell you enough that this is looking fantastic.  I am envious of your progress and taking serious mental notes of your work.

I really am not a fan of fast track but it looks nice in this application.  The fact that you also have the oft overlooked background work done is a huge plus too.  Ie. walls painted, generally good lighting, skirts applied already.  All these things make your work and your collection look even better.

Bravo sir!

jhz563 posted:
George S posted:

The stone walls and tunnel portals are installed.

CBE25EA7-849E-4353-9EAB-93DB24B3921B4C3A95A4-5210-4032-B255-83BC2FA1BC81945AE79B-6D48-434E-8AB5-BEF32E320FA6102E0A3E-6ADE-4F11-BAEB-0A6189B7D0C1

Next step is lighting.

George

George, I can't tell you enough that this is looking fantastic.  I am envious of your progress and taking serious mental notes of your work.

I really am not a fan of fast track but it looks nice in this application.  The fact that you also have the oft overlooked background work done is a huge plus too.  Ie. walls painted, generally good lighting, skirts applied already.  All these things make your work and your collection look even better.

Bravo sir!

Thank you. I will eventually replace the Fastrack. You can see that I adapted it to tubular for now. I'm not replacing it for its looks, but it is really noisy. I have a decibel meter on my phone. I'll take some measurements for you guys. Unfortunately, it's a budget thing. It's probably a $250 worth of Menards track to buy to replace it, and the utility isn't there right now. 

For the walls, yes, I painted them and am happy with it, even though I didn't do the full drywall finish approach. I do plan to add some sky background and think I just determined the approach to mount it. Look for that to come soon.

George

Since you are just starting with the lighting I'd like to offer the following suggestions. 

1. For the LED stick with the warm white - the cool white comes out light blue when you photograph it.

2. Wire the lights for the houses with as many separate circuits as possible and install potentiometers in the lighting circuits.  You will want to make sure the pots you get can take the current draw otherwise you will have a lot of interesting smoke coming from your control panel.  With pots in the circuits you can adjust the light levels independently.  Among the many things this will allow is low light photography (still or motion) of your layout with the street lights looking like streetlights instead of small atomic bombs and your house/factory interior lights looking like interior lights instead of giving the impression that the house/factory is on fire.

Add Reply

Post
×
×
×
×
Link copied to your clipboard.
×
×