
I just got my 6" 2 crossbar set of poles from Weaver. Nice looking. I will be using them in country and industrial settings. Is there a spacing distance between poles that would be close to scale? Do any of you use poles and if so, do you wire them? If you have any time-saving tips for putting them up or for making them look authentic, I would appreciate them. MilwRdPaul

Original Post

Replies sorted oldest to newest

Spacing depends where you're putting them, and in most instances the spacing will have to be compressed a little. For simulated wires i use EZ LINE from Berkshire Junction Models (black seems to look most realistic along highways and streets while green - oxidized copper - seems better along RR right of ways. i attach it to the insulators using a tiny drop of ACC.

If you need more of these, i have an unopened package of them (#P740) that i'll send you for $20 shipped.

jackson

CEO the Not-So-Great Eastern R.R. aka the Never Done Lines

Division of the Southern Adirondack Railway Cartel


http://www.youtube.com/watch?v...&feature=channel

Between wooden crossarm poles like this, no more than a scale 200 feet even in clear country, often far less. In cities, there is no rule, utilities have to put the poles where they can and you will often see them less than 25 feet apart in places. 

With 6" poles, I generally go with about 24 - 28 inches(scale 96 - 112) and no more than 18 inches (about 75 feet) in my town.

Paul:  I think that spacing older style telephone/power poles, on a model RR layout, look a bit better if they are spaced a bit closer than actual prototype.  I place mine at about 18" intervals, which would be a scale 72'.   Following around a curve, you would want them even closer, say 15" or so.


As to the wires, I've heard discussion about not using actual wire but rather thread or fish line.  The reason is that the wire tends to show kinks which would make your efforts look incorrect.  Real wire is heavy enough, in real life, to hang out straight but model wire would be difficult to keep straight.


In any case, I would recommend not installing wires or fish line until you are completely done with the scene.  You don't want to knock things out of alignment while you are installing something, doing track work or moving tools in and out of the area.


Paul Fischer

I use thread for the lines.  I have used cotton but prefer polyester or synthetic - less fuzz.  I string the line allowing just a little play (they sag a bit in the real world), then use a mixture of water, white glue (not yellow) with a bit of gray/silver or green copper tint, and saturate the wire carefully with a paintbrush and that mixture.  It paints the line a realistic color.  More important, a really wetted down line - soaked - sags fully to a very realistic shape, then the glue dries leaving it just stiff enough to retain shape.  Less wet - just a trace and the thread does not "sag out" fully but only a bit and retains a bit of a memory of being perhaps a bit kinked, as shorter sections do in the real world, like these very slightly still-stiff but sagging a bit service lines going from a Lionel pole to this garage.

Service to Doolins

Attachments

Images (1)
  • Service to Doolins

I work for the power company here in Nevada and have even done design for new services.  I can tell you a bit about how overhead is built.


Primary: The wires on top of the poles.  Currently made of bare aluminum stranded wire twisted.  Looks very shiny silver when new.  Turns grey with age.  Can be up to an inch & a half thick each.  Older stuff was stranded copper, and even solid copper.  This has a green/brown color to it.  Short slack spans of primary, where the weight of the wire is not significant enough to stretch it, can have lots of kinks.  This is prototypical.


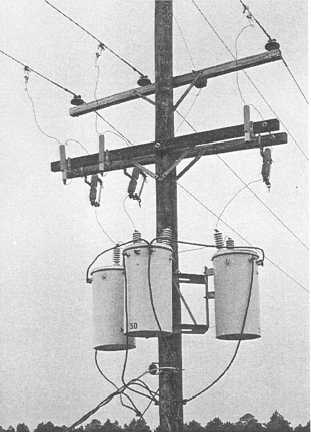
Secondary wire: This is lower voltage wire, after the transformer, that is strung between poles.  Sometimes secondary can stretch for several spans to cover more homes/businesses.  Currently they install Triplex or (1 phase - 1 transformer) Quadraplex (3 phase = 2 or 3 transformers wired together).  Triplex has 2 black jacketed hot conductors twisted around 1 bare aluminum neutral conductor.  Quadraplex has 3 black jacketed hot conductors twisted around 1 bare aluminum neutral conductor.  In some cases you have open wire or weather-proof wire secondary as shown in that photo above.  The 3 or 4 wires will be strung separately and spaced apart.  Open wire is aluminum or copper.  Weather-proof wire is jacketed aluminum or copper.


Service wire:  This is the wire that attaches directly to the weatherhead at the meter panel.  You will have triplex and quadraplex, same as secondary (no open wire).  These services can drop straight from the pole to the weather head, or they can drop from any point along a secondary span (called a midspan tap).


1ph vs 3ph: Typically Commercial properties are 3 phase while residential are single phase.  Model your transformers accordingly. 1 phase has 1 transformer on the pole.  3 phase has 2 or 3 transformers on the pole.  Keep in mind it's normal to run single phase (triplex) secondary or service out of a 3 phase bank though.  In this case you would make 1 of the cans in your transformer bank slightly larger (called the "lighter pot") than the others.


Guy wires: Tension spans always require a guy-wire at the end of a straight run of poles.  This keeps tension on the total run and keeps the pole from bending.  There will be guy wires for secondary as well as primary.  Wherever tensioned wire dead-ends on a pole.


Dead end poles: Were wire terminates (dead-ends), insulators are placed on the face of the cross arm....not the top.  A guy wire will stretch from where the cross arm is bolted to the pole down to the ground.  The cross arm is bolted on the opposite side of the pole so the tension span is pulling the arm into the pole (instead of ripping it off).


Double dead end pole.  Where wire terminates on both sides of pole.  You will have two cross arms (one on each side) and insulators are bolted through both cross arms on opposite faces (not on top).  In this case, there will be a jumper over the top of the cross arm that connects the conductors on either side.  This jumper can be removed to open the circuit or isolate two separate circuits.  This is done lots of times to keep guy wires out of the street.  The tension span will end one span early and get terminated with a guy wire.  Then to bridge the final span to the corner pole, they will use a slack-span.  Slack spans typically don't require a guy.


FYI: Tensioned wire is still very heavy and will sag considerably.  Don't pull your model conductors tight or it will look silly.  Also wire sags a lot more in the summer. And slack spans sag a lot more, and short slack spans have some kinks to them.

Here are my home made poles. I used the stretchy craft string found in the bead section for making bracelets. I used two different thicknesses...one to represent power lines and the other for telephone cable. I probably made the wires look a bit taught, but since it is stretchy string, I figured over time it might sag naturally.


1

2

3

4

5

Attachments

Images (5)
  • 1
  • 2
  • 3
  • 4
  • 5

FYI: real poles aren't straight, nor do they have the same cross section top and bottom.  They tapper down narrower the higher you go, and always have some small amount of curve to them (remember they are a tree trunk).  They are usually arranged so every pair of poles leans towards one another.  That is every other pole bends the opposite direction.  The taller a pole is, the thicker around it will be at the base.  Poles are made in length increments of 5' with 35' being one of the shortest.  Keep in mind some of that length gets buried (typically 10% length + 2').


There should also be a builders mark branded onto the concave side of the pole at roughly chest height.  Real poles are also typically tagged with their pole number.  Older tags are stamped metal.  Newer ones have interchangeable plastic or metal alphanumerics.


pole brand:


pole tags:


Last edited by SB..

Paul, a question if I my.  Are you replicating utility line poles or rail road signaling poles?  I ask because I thought that the Weaver poles/kits were signaling poles not utility poles.  The signaling poles are setup with each cross buck carrying 5-pairs (ten) wires.  These run along the RR right of away.

Originally Posted by ALCO Fan:

SB:


Like most folks, I see telephone & electric poles daily but don't know much about them.

It can be a curse if you know too much about them.  I laid out power distribuiton circuits and specified pokes and etc for the first eight years of my career and supervised or have been around people who do ever since.  so while I know all the details, I have trouble building electric lines on my layout because it irks me no end if even the tinest detail is out of place - if a crossarm mounted lightning arrestor is wired wrong, etc.  I had a friend who ran a stockyard and I recall he said one thing he would never have on his layout was a stockyard because: "I could never model it to my satsifaction - I know to  much of the tiny detials you could never get right."

Speaking of telephone/utility poles:  I just picked up a set of telephone/utility poles from none other than Lionel.  There are six of these poles, 7" tall and equipped with two ground lights or area lights on each pole.  When I spotted them I immediately thought of my engine yard with it's turntable and roundhouse, diesel engine shop, water tank and stand pipe and my coaling tower.  "Hey", I thought; "the guys working on my engines, hostling them around the yard and preparing them for their important runs, need some light if they're working at night."  So I just bought them and will be installing them over the next few days.


Thought some of you might have similar uses for lights and poles in your work areas, so I'd mention it here.  Lionel's P/N is: 6-37995 and they cost about $30 to $35 for the set of six.  Very nice looking with small, "grain of wheat" type bulbs with a little shade, located on bracket arms about 2/3 of the way up the pole.  Check your latest Lionel catalog for some photos. 


Paul Fischer

Originally Posted by fisch330:

Speaking of telephone/utility poles:  I just picked up a set of telephone/utility poles from none other than Lionel.  There are six of these poles, 7" tall and equipped with two ground lights or area lights on each pole.  When I spotted them I immediately thought of my engine yard with it's turntable and roundhouse, diesel engine shop, water tank and stand pipe and my coaling tower.  "Hey", I thought; "the guys working on my engines, hostling them around the yard and preparing them for their important runs, need some light if they're working at night."  So I just bought them and will be installing them over the next few days.


Thought some of you might have similar uses for lights and poles in your work areas, so I'd mention it here.  Lionel's P/N is: 6-37995 and they cost about $30 to $35 for the set of six.  Very nice looking with small, "grain of wheat" type bulbs with a little shade, located on bracket arms about 2/3 of the way up the pole.  Check your latest Lionel catalog for some photos. 


Paul Fischer

These are great poles.  I have a set and love them.

I picked up some nice poles Lionel sells.  they have the insulators and the climbing stakes on the poles.  they look nice.  assorted lighted and different tiered ones.  Price I got them for 20 at a show.


http://www.lionel.com/Products/Finder/SearchResults.cfm?doAction=search&Keywords=telephone+poles&CategoryID=&Gauge=&RailLineID=&CatalogID=&CollectionID=&searchWithin=Current

Post

OGR Publishing, Inc., 1310 Eastside Centre Ct, Ste 6, Mountain Home, AR 72653
800-980-OGRR (6477)
www.ogaugerr.com

×
×
×
×
Link copied to your clipboard.
×
×