I did create the girders myself.

Thanks;

idea-thinker

They really look great!  I have a section of upper level track that is a turnback loop about 10 or 12 feet long that is temporarily supported by a set of K-Line plastic log piers.  What you did is along the lines of what I was thinking of for a permanent trestle.  Can you tell us about the materials you used?

@Mark Boyce posted:

They really look great!  I have a section of upper level track that is a turnback loop about 10 or 12 feet long that is temporarily supported by a set of K-Line plastic log piers.  What you did is along the lines of what I was thinking of for a permanent trestle.  Can you tell us about the materials you used?

Mark;

       I use 1/8" Hard Board/Masonite and I cut it with a Laser cutter. I then use Super Glue to assemble it. It surprisingly strong when you turn the Masonite on end and use other pieces to keep it from flexing. I have a number of Girders and or Trusses that are 4 foot long with only supports at the ends. Beyond 4 feet I use an aluminum bar on the sides for support.


Thanks;

idea-thinker

Received an eBay purchase last week of two Weaver 3 bay hoppers so I'm continuing to reassign rolling stock to the DM&IRR. The process required amputation of the end peaks and a wash away of the C&O markings. Cars are completed now but are awaiting a Dullcote finish. It has been too cold to set up a spray booth in the garage. I’m still hoping to begin the weathering chapter in my train life but until then, it’s great to follow all the progress posts.   

Cheers to all!  Dave

IMG_0969IMG_5696IMG_5697IMG_5698IMG_5725

Attachments

Images (5)
  • IMG_0969
  • IMG_5696
  • IMG_5697
  • IMG_5698
  • IMG_5725

I finally finished my elevated platform that's going to hold my Lionel #129 terrace. It was a bigger job than I expected, but I'm pleased with the results. The billboards on the wall under the platform were my bride's idea, and I'm very glad I took her advice. This accessory takes up a lot of real estate, so having it above the 3 mainlines will allow space for a 6-track passenger yard.

20220213_192752

Attachments

Images (1)
  • 20220213_192752
Last edited by BlueComet400
@radar493 posted:

Cleaned up workbench area. Had to relocate one row of shelves to put up peg board. Running out of room. CEO says can't lease anymore space😁.

Ralph;

You obviously still have the air rights for that wall, so maybe you can replace the shelves with ones twice as deep and then you can use the current shelves as a step up at the back of the wider shelves giving you two levels of display

Mark;

       I use 1/8" Hard Board/Masonite and I cut it with a Laser cutter. I then use Super Glue to assemble it. It surprisingly strong when you turn the Masonite on end and use other pieces to keep it from flexing. I have a number of Girders and or Trusses that are 4 foot long with only supports at the ends. Beyond 4 feet I use an aluminum bar on the sides for support.


Thanks;

idea-thinker

I thought I saw some Masonite.  I also wondered about the nice cutting.  Laser would do it.  Thank you so much!!!!

@darlander posted:

Received an eBay purchase last week of two Weaver 3 bay hoppers so I'm continuing to reassign rolling stock to the DM&IRR. The process required amputation of the end peaks and a wash away of the C&O markings. Cars are completed now but are awaiting a Dullcote finish. It has been too cold to set up a spray booth in the garage. I’m still hoping to begin the weathering chapter in my train life but until then, it’s great to follow all the progress posts.   

Cheers to all!  Dave

IMG_0969IMG_5696IMG_5697IMG_5698IMG_5725

Excellent work Dave! What process did you use to wash away the C&O markings?

Andy

Decided to use the day off I took for my wife's birthday (yes, her birthday is on Valentine's day) to install my new ZW-L Transformer I picked up this weekend.  Of course, that led to me ripping out the solid wire I had wired some of my lines with and I replaced it with proper stranded wire.  Amazing how much better the trains run with proper gauge stranded wire.

3 hours later I'm all done!  Not 100% happy with the new set up but once my son is home from school he might have some other ideas to try.

20220214_11370620220214_11540420220214_131636

Attachments

Images (3)
  • 20220214_113706
  • 20220214_115404
  • 20220214_131636

Decided to use the day off I took for my wife's birthday (yes, her birthday is on Valentine's day) to install my new ZW-L Transformer I picked up this weekend.  Of course, that led to me ripping out the solid wire I had wired some of my lines with and I replaced it with proper stranded wire.  Amazing how much better the trains run with proper gauge stranded wire.

3 hours later I'm all done!  Not 100% happy with the new set up but once my son is home from school he might have some other ideas to try.

20220214_131636

That ZW-L is a beast next to the old ZW.

Looks like Papa Bear, Mama Bear, and Baby Bear sitting there.

FIREWORKS FOR VALENTINES DAY!   lol

I added some more lighting and sounds to the recently released Sgt Stumpy's Fireworks building.  

The building was hardly noticeable under the lighting of my train room so that lead me to these modifications. The addition of the multicolored leds on the building make the fireworks burst effects of the building more noticeable. Also, I should note that when I first hooked it up, I powered the building with 12v which resulted in anemic smoke flow, so my advice to anyone else using this building is to use 14+ voltes.

My iPhone dorked up the colors and contrast a bit.  I like the guy saying "Am I a good demo man? If I weren't a good demo man, then I wouldn't be standing here, would I?" LOL.  The music came to mind as soon as I saw the fireworks in action.  

Overall its a really fun piece. I put it on a timer-relay that can be triggered from the remote as well.

Attachments

Videos (1)
fireworks building

Lots of excellent projects everyone.  I started back in on my scenery bases.  This Styrofoam is much nicer to work with than some of what I had before.  Each of these three sections in the three photographs will be removable to work on without leaning over the track.  Instead of gouging out the channel for the river near the rear track that goes up to the right as I did on the first try, I cut the foam so the basic channel is already there.  I think it will be easier and not as messy.

2022-02-13 20.06.452022-02-13 20.06.392022-02-13 20.06.33

Attachments

Images (3)
  • 2022-02-13 20.06.45
  • 2022-02-13 20.06.39
  • 2022-02-13 20.06.33

Hi guys, as Mark said some really great projects getting done here! I took the time to write a comment on everyone's projects but that was before I was a page and a half behind and if I write everyone down there won't be room for my stuff! LOL

But I do want to call out a couple folks! I did hand out a ton of likes for all you guys and the great work your doing!

@Lionelski John, outstanding idea for an old soup can! It really turned out great!

@chris a Chris, the paving looks wonderful Thanks for the detailed explanation on how you did it as I have a few track crossings to do and will be a lot easier your way!

@idea-thinker, WOW That looks AMAZING! Your skills are just outstanding! I was going to ask the same questions that everyone else asked and was hoping your answer was going to be a kit! LOL

@darlander Dave, the 3 bay hoppers look great! I never heard of wash away. Thanks for sharing the information.

Well guys I didnt do anything in the train room yesterday or the day before as the son was here visiting. I figure I better get out there today as the daughter and grandkids are coming tomorrow

Well I worked on some more parking and a elevated road between the 2 upper bridges. I also reused the foam rock wall I carved when I first started, I will probably change it out down the road when I get better at stuff like that! LOL Here are a couple photos for you guys.

IMG_20220214_140755IMG_20220214_140804

I hope to get a little time in the morning to try and work on the sides for the upper loop and the new parking lot area. I don't know when I will get to the road going over the door opening.

I hope you all had a great day and found time to have fun with your layout and trains!

Attachments

Images (2)
  • IMG_20220214_140755
  • IMG_20220214_140804
@RSJB18 posted:

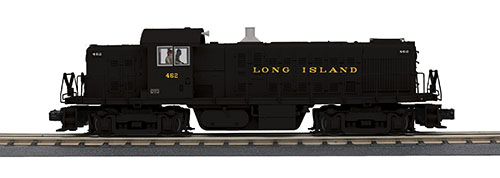
Just got a call from Trainworld that my LIRR RS-1 (MTH PS-3) pre-order has arrived. I'll pick it up in Lynbrook soon.


Love those calls, Bob!  I just received a call from Nassau Hobbies letting me know my Fish belly hoppers came in -

https://nassauhobby.com/produc...opper-car-pre-order/


Happy days, Indeed!


Edit:  Even happier!  Trainworld just sent me an email letting me know that the Nathan's woodsided reefers are in and shipping!

Last edited by Strap Hanger

Those pictures from idea thinker of the bridges and towers are really fantastic.

I have not done anything on the layout proper but have been doing heavy maintenance on the collection of trains I received from a friend. I just finished a tender 2046W-50. It needed deep cleaned, some rewiring, and coupler spring replacement. Fortunately, there was no damage to the body and prior repairs did no harm! I attached a few pictures, It soundsbare spliced wireBroken wire and broken coupler springCommutator before cleaningDissasembled and new wires soldered onTrucks installedRe-Assembley2046W-50 Maintenance Complete pretty good now, not perfect but pretty good. I am also working on the 736 Berkshire. I have a lot of parts on order for that one.

Attachments

Images (7)
  • bare spliced wire
  • Broken wire and broken coupler spring
  • Commutator before cleaning
  • Dissasembled and new wires soldered on
  • Trucks installed
  • Re-Assembley
  • 2046W-50 Maintenance Complete
@darlander posted:

Would like to learn more about your girders & elevated track construction:   Kit bash, 3-D printed, plastic/metal, other???    They look great and would like to have you share more details.  Thanks!

Cheers, Curious Dave

Dave;

       I use 1/8 Hard Board/Masonite for the material. I design the pieces in Solidworks CAD software and then I convert the files and send them to my Laser Cutter Software. A little bit later I have a bunch of pieces and then I Glue them to together with Super Glue. All of the things I print have square holes in them and the adjoining part has pegs that fit into the square holes. I glue the pegs in place. It is amazing how strong the the finish item is. The longest bridge I have done to date is 10 Feet long. It is a dual track bridge with no supports under it other than the two ends.

Thanks;

idea-thinker

@M. Mitchell Marmel Great little video!

@RSJB18 Great looking engine, it's like Christmas again!

@Victor Bertolina Looks good and its nice your able to work on them, I have a friend giving me an old Lionel engine that needs new brushes, and he has them also! So, I hope it will be an easy fix!

Well guys not much from me today, I started on the sides for my upper loop, and I am trying to do something rustic, so I am using unsanded and unfinished wood. I have to make 24' of it, 12' per side and I only have enough clamps to do an 8' section at a time. I am trying to glue all 12' together on the bench as to make it bend seamlessly. Here is a photo of what I have so far.

IMG_20220215_132824

I hope you all had a great day and fun!

Attachments

Images (1)
  • IMG_20220215_132824
@chris a posted:

Almost done with the paving, got an acrylic wash coat on the window frames and doors, and I received my new LED light strips in the mail, so progress can continue.   

DSC00444DSC00446

Chris, that looks Amazing! I really enjoy seeing what you're doing, it give's one so many ideas to try! Thanks for the photos and I will keep fallowing! I hope you get a lot done before the weather changes and the Vett comes out and takes over your free time again!

Mike, I had a long work bench like that once.  Every time I would clean off a space to do something on it, I would come home from work and find it covered with 'junque'.  It is amazing what the pixie could find to put there.  I finally gave up, and that is why I am now using a metal cart and folding table that is put away after every use.  sigh! 

Chris, you have really accomplished a lot on that scene quickly.  It is looking great!

Scott ( Western Pacific)

sorry I haven’t been on the forum for a few days. The epoxy floor in the basement was there when I bought the house. I put an epoxy floor in the garage. This is the second epoxy floor I’ve done in my houses. I used Rustoleom both times. The key is you need to really degrease the floor. I do it twice. Then I use a pressure washer to rinse it off. Then I concrete etch it twice and use the pressure washer again. Then I blow it off with a leaf blower and let it dry for two-three days with a dehumidifier running. Then roll it out heavy and I’ve never had a problem. Here’s pictures of both garages.

it’s definitely a lot of work but we’ll worth it when it’s done.

Mike R

Attachments

Images (2)
  • 19995265-8FB2-4EA5-BBDE-1C67AD46EF86
  • 11DB5C2F-3358-485A-B276-B5EE5B342F05

Mike, the way this winter is progressing the Corvette won't be coming out for a while.  First day at the race track for 2022  isn't till end of April, so I should keep making some notable progress for while longer.   I like the way your laminating that wood together it will make for a very smooth curve when you install it.   I am not sure whether I mentioned it in this thread or the Sunday Scenic Showcase, but I found the best way to cut the cork (for the thin strips between the rails) was to run it through the table saw, with the smaller 7 1/4 inch 60 tooth blade and some 1/4 inch plywood clamped to the fence to keep the cork down on the table.  My other Ah Hah moment was when I taped my curved templates down on the cork for cutting.  The paper didn't want to stay put once I started cutting. Then the light bulb went on, and I realized if I used clear scotch tape to secure the "cutting edge" I could keep the template secured but still see through the scotch tape to follow the template. 

Mark, thanks.   It feels like this project is taking me a really long time to bring to fruition.  Been putting in some long days, and on a few occasions, I didn't like the result, scrapped it and started over, but then again, it's right in the front and center of the layout room, so it's worth taking the time to make it "right".

Wish I could blame the horrendous condition of my work benches on someone, but I am the only one here !!!.  Took several hours the other day to just clean up and re-organize, as it was getting embarrassing.   After reading your post, I realize  I need to clean up and re-organize my roll around tool cart and get back to using it as I intended to when I purchased it. 

Add Reply

Post

OGR Publishing, Inc., 1310 Eastside Centre Ct, Ste 6, Mountain Home, AR 72653
800-980-OGRR (6477)
CONTACT US
www.ogaugerr.com

×
×
×
×
Link copied to your clipboard.
×
×