
Originally Posted by SAL9000:

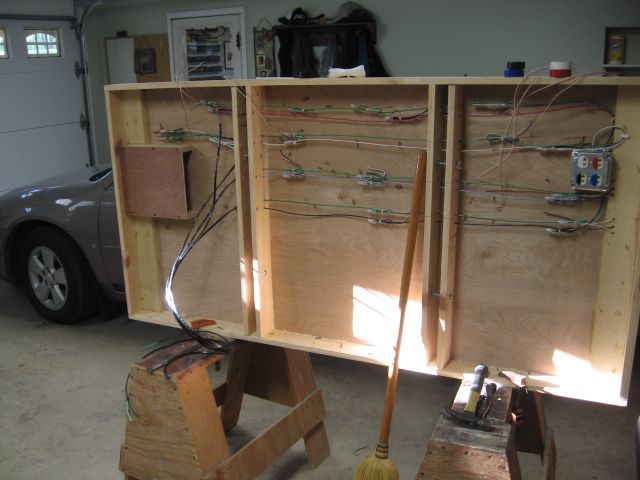
Nothing compared to many layouts here but I built an elevated track around the top of my (small, 11' x 11') train room. I wanted it to look good, so of course it took 10x more time and effort than I had intended. I used tube track thinking I'd need to bend and contort to get things to work (plus, most all my locos have magnetraction).


Tonight I loaded it up with ~20 postwar cars and the 'big' dual motor magnetraction locos (GG1, Train Master, F3) pulled 'em just fine. Pictured is a 1950 issue 773 and despite a single motor it pulled 'em fine too (albeit it's geared very very low) though current draw is fairly high (~4+ amps) so probably don't want to do it for too long.


IMG_2981[1]

The overhead layout looks very nice.  What did you use for the corner shelf portions?  You say you used tube track.  What diameter curves are in the corners?  I ask, because I have one partially built in a room about the same dimensions, but I haven't finished the corners to my satisfaction.  Also, I have GarGraves track just laying up there now, not fastened down.  I forget what curves I have, I think 054, at least they are fairly broad.  I may change and use tubular because I have a magnetraction engine I will want to run there.

Thank you!!

I used O72. For the corners I used a single triangle - two equilateral straight legs and then the O72 curve. Connecting the four corners are ~4.5' straight pieces. I used 3/8" plywood to get maximum vertical space for o gauge. It's a bit flimsy and even more challenging, not very flat. If I had to do it over again I'd shoehorn in 1/2" plywood as it is typically much flatter. I have decently heavy stuff, including a kit-bashed, brass-laden ~10 pound postwar GG1, and with enough supports and brackets it works fine.


The challenge I had is trim above the window and closet. I had to get a bit creative with the joints and cutouts to make the pieces fit. In the picture above, not visible, are small metal angle brackets on the top side that screw into the window trim. It's actually a fairly clean look. I had to redo some pieces and each piece had a lot of trial-n-error to get it to fit.


IMG_2982


Clearance for the door:


IMG_2984


Lastly, I live in the sorta earthquake-prone Seattle area so I installed a ~4" x 4' acrylic fence. I "park" the locomotive here when done.


IMG_2983

Attachments

Images (3)
  • IMG_2982
  • IMG_2984
  • IMG_2983

SAL9000,

Thank you very much for the aditional information and photos!  I think you solved the problems very well.  Everything looks very nice.  I have the same problem in a small downstairs family room with low ceilings.  I used metal brackets, brown like the masonite wall paneling, but had to use brackets above the door frames like you did.  I used pre cut and finished shelving from Lowes, but need something different for the corners.  I just have the shelving temporarily in place up to the corners.  I did not get to work on it at all last winter due to two surgeries, so I hope to finish it this coming winter.


Here are a couple of photos, but remember, mine is still a work in progress.


Lionel and MTH Freight

MTH Hudson with Passenger Cars at Station

MTH Hudson with Passenger Cars

Patrick Station 3

Attachments

Images (4)
  • Lionel and MTH Freight
  • MTH Hudson with Passenger Cars at Station
  • MTH Hudson with Passenger Cars
  • Patrick Station 3
Last edited by Mark Boyce
Originally Posted by SAL9000:

Looks good. I thought about going deeper as you have in order to have more than just track but I'm still just getting into the hobby - there's always next time (hopefully)!

I have been in the hobby for years, but only 3 years in O gauge.  I started this overhead at my wife's suggestion, because at the time, I literally had no spase for an O gauge layout. my idea was to make it wide enough to have 2 tracks, or 1 track with some room for buildings.  As I was sidetracked from the project needing surgery, one of our two daughters got married and moved out.  My wife gave me room for a 4x8 in our daughter's old room along with her old furniture, some sewing stuff and storage.  I worked on a simple layout there this past winter, as I wasn't up to finishing the ceiling layout.  Now that I have some space for a traditional layout, and when our other daughter moves out, I'll gain a whole room, I may just go with the double track and no buildings.  I could run my lighter weight post waar trains in two directions there and run the heavier modern steam era trains on the traditional layout.  As with you, only time will tell how it will all work out.  It really doesn't matter, I can have fun with trains no matter where, except I have given up on crawling on the floor as too painful.  ;-)

Had a problem with my MTH Milwaukee Road Box-cabs.  I have all four units, all in black and together they make a very impressive looking locomotive.  But when we tried to add the fourth unit, a dummy with a 2-B-B wheel arrangement, it just wouldn't connect.  We tried to plug the MU connector from the B-B dummy unit in it, but it just wouldn't go.  Finally I removed the whole unit and brought it to the workbench to try to figure out the problem, and it became apparent that we had bigger problems.


Sometime or another, this extra dummy unit must have taken an unscheduled trip to the floor.  Not only was the female MU plug bent on one side and also had some bent connectors, but two of the wheel sets, one axle with the large drive wheels and one axle with the small pilot wheels had bent axles.


I never recall dropping this (or any other) engine so I suspect that while this unit was sitting on a lower shelf, idle, while the other three units were operating on the layout itself, someone, like maybe the grandkids, knocked the unit off the shelf.  No accusations here, just a mystery.


Well, I'm please to say that I was able to straighten out the MU plug by rebuilding the outside case and also straightening three of the contact pins, inside.  Then I removed the trucks from the frame, made a jig for the vise to protect and align the wheels, and pressed the wheels back into a straight position.  Then bent the axle of the pilot truck until those wheels were straight, too.


Probably took about three hours to accomplish all of this, including examination and testing, but it was a good feeling to get it done.  My eyes aren't what they used to be and I had to use lots of close up bright lights as well as my Magni-Focuser eye shade in order to even see what damage had been done.  But now, the huge, four unit locomotive has been returned to full service and I can look for the next project.


Paul Fischer

Now that I have caught up on the chores after returning from Florida  I decided toward on the tinplate layout before getting back to the new layout construction.  On one loop the train would slow down at a particular area of the track.  I got out my voltmeter and was surprised to see a constant voltage all around the 12 x 28 loop.  A puzzlement.  Spent a 1/2 hour with no breakthrough.  The I took off my postwar 2360 GG1 and put on my new LionChief Plus engine.  Problem fixed!  Why?  I have not a clue.  checked the rest of the layout and everything worked fine except for the siding holding the cattle car and milk.  I found no cause and vowed to come back the next day to get everything ready for my 3.5 year old grandson - a true train nut.

.  

Al, You might have a weak connection. The voltage should be read under load really. A meter wont pull a load, and a load is needed to know if the connection can pass the amperage used.  You may not be able to pass the amps the PW GG1 needs. An LC+ uses much less amperage. I bet a "pin squeeze" is over due.


Mark, I had to put a hold on my shelf layout for a few years from health issues too.

That's how I ended up with two tables, plus  the ceiling layout.

The ceiling started with shelves from large die cast VW bugs and buses, & toys.

One day I set my childhood train up there to display it 

Soon after, I realized I was one wall away from a ceiling layout.

The rest is history. And so is the Bug collection


 I also added small angle brackets to the topside after I figured the weight of a die cast engine, and die cast cars, was a moving twenty pounds on and off each shelf with every loop it made. And I have two lines.


I was moving some of my elderly aunt's things she couldn't take with her to the assisted living apartment.  I put some of the things under the train table.  One was a CD changer/player-tape player she had me pick out for her a few years ago.  I hooked it up, and checked to see if there were any CDs in it.  The first was Glenn Miller, so I started playing it. I fired up the NYC Hudson pulling some heavyweights, and the B&O Atlntic pulling a string of steam era freight cars.  Thinking of Nick's Ready to be Thunderstruck topic earlier this week, I thought how fitting, Steam and Glenn Miller.  Just then the second song came on; Chatanooga Choo Choo!  I ran the trains a while with the music playing, and thought maybe I'll make a video with music playing.  It won't be done very well, just trains with the CD playing in the background.


Heritage Units = AC/DC

Steam era = Glenn Miller

My 3.5 year old grandson was over today.  I showed him the Lion Chief Plus engine and he had a great time using the remote, blowing the whistle, ringing the bell.  The cattle car milk car siding that was not working yesterday was suddenly working perfectly today.  The cattle car worked better than ever.  One problem my 3461 log car did not work in front of the 164 log loader but the 3469 coal car did so we put logs in the coal car and played on. Strangely the 3461 worked fine with the 364 lumber loader on a different track.

Today I reviewed what I could use to power a Walthers' gas electric kit.  I had an

RMT RDC and an Industrial Rail trolley apart, and decided the trucks look better on

the trolley, and that it would be an easier modification, since the chasses need to

be stretched on either, even with the shorty kit  (Walthers made these kits in two

lengths, scale and "tinplate").  No work on it or anything else accomplished.

Originally Posted by Mark Boyce:

I was moving some of my elderly aunt's things she couldn't take with her to the assisted living apartment.  I put some of the things under the train table.  One was a CD changer/player-tape player she had me pick out for her a few years ago.  I hooked it up, and checked to see if there were any CDs in it.  The first was Glenn Miller, so I started playing it. I fired up the NYC Hudson pulling some heavyweights, and the B&O Atlntic pulling a string of steam era freight cars.  Thinking of Nick's Ready to be Thunderstruck topic earlier this week, I thought how fitting, Steam and Glenn Miller.  Just then the second song came on; Chatanooga Choo Choo!  I ran the trains a while with the music playing, and thought maybe I'll make a video with music playing.  It won't be done very well, just trains with the CD playing in the background.


Heritage Units = AC/DC

Steam era = Glenn Miller

Mark - I say go for it!  Make that video with all the great music playing!!!  Can't wait to see it!!

Originally Posted by SAL9000:

I used O72. For the corners I used a single triangle - two equilateral straight legs and then the O72 curve. Connecting the four corners are ~4.5' straight pieces. I used 3/8" plywood to get maximum vertical space for o gauge. It's a bit flimsy and even more challenging, not very flat. If I had to do it over again I'd shoehorn in 1/2" plywood as it is typically much flatter. I have decently heavy stuff, including a kit-bashed, brass-laden ~10 pound postwar GG1, and with enough supports and brackets it works fine.


The challenge I had is trim above the window and closet. I had to get a bit creative with the joints and cutouts to make the pieces fit. In the picture above, not visible, are small metal angle brackets on the top side that screw into the window trim. It's actually a fairly clean look. I had to redo some pieces and each piece had a lot of trial-n-error to get it to fit.


IMG_2982


Clearance for the door:


IMG_2984


Lastly, I live in the sorta earthquake-prone Seattle area so I installed a ~4" x 4' acrylic fence. I "park" the locomotive here when done.


IMG_2983

Your ceiling shelf layout looks great!!!

Originally Posted by colorado hirailer:

Today I reviewed what I could use to power a Walthers' gas electric kit.  I had an

RMT RDC and an Industrial Rail trolley apart, and decided the trucks look better on

the trolley, and that it would be an easier modification, since the chasses need to

be stretched on either, even with the shorty kit  (Walthers made these kits in two

lengths, scale and "tinplate").  No work on it or anything else accomplished.

FWIW, here's a Walthers coach that someone converted into a SP/PE "Blimp" that I picked up on eBay a few years back:

GEDC1473

GEDC1475

GEDC1476

GEDC1477

GEDC1478

Note the Lionel switcher trucks and how they're mounted...


The toggle switch above will operate the E-unit when I get around to installing one. 


Hope this helps! 


Mitch

Attachments

Images (5)
  • GEDC1473
  • GEDC1475
  • GEDC1476
  • GEDC1477
  • GEDC1478
Last edited by M. Mitchell Marmel

Its been awhile nothing big, so here goes.


Not pictured 90% of rolling stock now converted to Kadees 


Experimenting with backdrops from esqueddesigns  Create a Scene. Didn't cost much so why not. At least I not looking at a bare wall.


 1-DSCF3048

2-DSCF3050

3-DSCF3051

4-DSCF3052

1-DSCF3072

 Replaced the 3R pilots on my 3rd Rail CB&Q and GN FTs with 2R pilots


1-DSCF3042

1-DSCF3043

2-DSCF3044

3-DSCF3045

4-DSCF3046


 Started purchasing track for my new layout

 1-DSCF3053


2-DSCF3054

1-DSCF3055


 Installed a rock wall around SC House and experimenting with street light placement 


1-DSCF3073

2-DSCF3074

3-DSCF3075

4-DSCF3076

5-DSCF3077


Attachments

Images (18)
  • 1-DSCF3042
  • 1-DSCF3043
  • 2-DSCF3044
  • 3-DSCF3045
  • 4-DSCF3046
  • 1-DSCF3048
  • 1-DSCF3072
  • 2-DSCF3050
  • 3-DSCF3051
  • 4-DSCF3052
  • 1-DSCF3073
  • 2-DSCF3074
  • 3-DSCF3075
  • 4-DSCF3076
  • 5-DSCF3077
  • 1-DSCF3053
  • 1-DSCF3055
  • 2-DSCF3054
Last edited by suzukovich

I attacked and started cutting up the Industrial Rail trolley, removing the bump/return

mechanism, cutting off part of the front of the frame so the Walthers gas electric

sides would be in the correct location with regard to the trucks per the Walthers

instructions, cut the frame in two to extend it, and then had to go out for some thin

wire to extend all the wiring to bridge the increased length. Using the shorty Walthers

sides for a shorter car, but it is still maybe double the length of the trolley.  Thought about cutting the Walthers sides down, taking out sections,  and resoldering (have done that before) for an Edwards car, but decided against it, as I didn't want to give up the RPO section (although I could take out a few passenger windows, instead). 

Edwards cars are very clean and simplistic, without the radiators and all sorts of

other appliances on the roofs, or front ends, as many gas electrics,  so I might give another thought to that.

Hi Everybody--  I decided to bring out a handful of Traction equipment and put it on display!  "Mitch" will probably get excited too.  The orange interurbans are CSS&SB and the red interurbans are Pacific Electric "Blimps".  Boy these four cars are LONG !

There are about another dozen trolleys yet to make an appearance!


A Greyhound and a Trailways bus are waiting for passengers at the local Bus Depot. Eventually I want to also get a "Peerless Stages" bus.


Sunday the 7th-- I drive over to "House of Trains" in Hoodsport, WA.  'Ray' is going to give me personal training on repairing O-gauge switches.  022 and 072.  Should be really interesting !


Enjoy the photos !


KRK

100_0636

100_0637

100_0638

100_0639

100_0640

100_0641

100_0642

100_0643

100_0644

100_0645

100_0646

Attachments

Images (11)
  • 100_0636
  • 100_0637
  • 100_0638
  • 100_0639
  • 100_0640
  • 100_0641
  • 100_0642
  • 100_0643
  • 100_0644
  • 100_0645
  • 100_0646

I got the last cliff in. After setting in place I decided to take my longest cars. A scale Hy-cube and an  auto rack and run them past the new cliffs. Well auto scraped and stopped the train. So in one of the pics is a white area I had to carve out. Also I'll have to fill in the gap between the two cliffs and blend in the colors. So that was it for today on the layout. I spent time getting tickets for the 765 going from Buffalo to Corning........Paul

DSCN1829

DSCN1830

DSCN1831

Attachments

Images (3)
  • DSCN1829
  • DSCN1830
  • DSCN1831

This is a waterfall test I recently made, just playing around with some scenery I had left over. I just used a few different woodland scenics water products. It's not realistic- the water isn't coming from anywhere. But I'm still gonna use it on my layout. And because I'm going to use it on my layout, I'll have to cover up the cardboard base with other scenery...

IMG_0335

Attachments

Images (1)
  • IMG_0335

Keith,

 There are plenty of spots in the mountains where the water comes out from rock formation just like yours. No "openings", it seeps out of the cracks, and crevices.


 Pull on your parents sleeves and ask for a vacation to the Appalachian or even the Alleghany mountains.(and blame me for your bugging them)

  I know t sounds boring now, but you will remember it for the rest of your life. Pictures don't do it justice You have to see it to understand.

Especially the Blue Ridge.


Mark....& Miller

Gonna buy me one.


buymeamercCru-u-uise up and down this railroad.


Mitch, Ken

 I have a love hate thing for any like "Bud Cars".

I love the concept, but hate how plain they look.

Bright, solid color paints and "real" roofs have shifted the balance.

The pantographs didn't hurt either

This may be the first time ever I choose paint over raw shiny metal.   

Attachments

Images (1)
  • buymeamerc
Originally Posted by Adriatic:

Keith,

 There are plenty of spots in the mountains where the water comes out from rock formation just like yours. No "openings", it seeps out of the cracks, and crevices.


 Pull on your parents sleeves and ask for a vacation to the Appalachian or even the Alleghany mountains.(and blame me for your bugging them)

  I know t sounds boring now, but you will remember it for the rest of your life. Pictures don't do it justice You have to see it to understand.

Especially the Blue Ridge.

I actually pass the Alleghenies when I go on vacation every year, so I could probably convince them to stop for a bit. 


The rocks were made to look wet, so I guess the "water" could be "seeping" out from the rocks. But I did over-exaggerate the water. It looks like it's flowing pretty fast, so it would be difficult to flow that fast from cracks in the rock. Sorry this picture is a bit blurry; I was rushing, so it didn't focus well. And I'm still working on it, so I could always easily modify it...

IMG_0336

Attachments

Images (1)
  • IMG_0336
Last edited by Keith6700

It looks fine! That little gap there is plenty, I swear.

Another interesting thing, they are so big it is common for it to be raining on the mountain above you (above & to the side really, remember the hill slope).

Those little streams can be dry, or at a trickle, then suddenly start gushing water like someone opened a valve. Even though everything is dry and sunny around you.

 You also might have to stop driving if you run into a low cloud. No joke.

Sometimes you can watch low clouds crash into the hillsides and see them split, go over, or just hang there awhile.


Originally Posted by Adriatic:

It looks fine! That little gap there is plenty, I swear.

Another interesting thing, they are so big it is common for it to be raining on the mountain above you (above & to the side really, remember the hill slope).

Those little streams can be dry, or at a trickle, then suddenly start gushing water like someone opened a valve. Even though everything is dry and sunny around you.

 You also might have to stop driving if you run into a low cloud. No joke.

Sometimes you can watch low clouds crash into the hillsides and see them split, go over, or just hang there awhile.


Thanks. Yah, I'll defiantly try to see the Alleghenies; it sounds really cool!

I extended the frame on this Industrial Rail streetcar, and added bracing down the sides, styrene beams.  And then I went into no man's land, soldering again.  I had two

gas electric bodies out of a junkbox, one scratched and one a kitbashed American

Standard, that I considered restoring and using for a gas electric body on this IR frame, but decided to use the sides out of a shorty Walthers doodlebug kit.  To shorten the sides, I took out 3 5/8", one RPO window and 3 windows out of the passenger compartment, leaving a one window RPO and four window pass. compartments.

I tinsnipped the sides, and then soldered them together, and soldered in the baggage

door.  It took a while, but I got 'er done.  I've done this before with other Walthers

car sides, to rearrange doors and windows or change the length of cars, but it is nothing I am good at.

Add Reply

Post

OGR Publishing, Inc., 1310 Eastside Centre Ct, Ste 6, Mountain Home, AR 72653
800-980-OGRR (6477)
www.ogaugerr.com

×
×
×
×
Link copied to your clipboard.
×
×