
I finally started working on the station area. Spent a couple of days getting the clearance correct for the platforms. I hope I have it right.![]()

|
|
I finished the wire drops on the outside loop yesterday. Today we drove up to Whippany New Jersey and took a ride in a caboose. This evening I dug out a transformer and connected a couple sets of wires just twisting them together and ran a GP35 pulling a bulkhead flat and a caboose to check for final clearance.
Matt and Jon were here today.
Matt continued working on locomotives and got 3 more into the fleet. One was a simple replacement board on a Williams Genesis. The Digital Dynamics board that I put in it, had given up the ghost. Here are the other two, both Rail Kings, now with TMCC.
Jon and I started by clearing the last of the junk from the upper deck on the south wall.
Jon does his best Wilson (from Home Improvement) impression, as he looks for the stud to mount the bracket which will support the last 2x4 for the lighting.
With the 2x4 in place, Matt grabs the camera, as Jon and I plot our next move.
I cut and bent the conduit, and Jon hung and wired it.
Jon also hung 42' of track lighting. This side of the room is so close to being done!
Looks like Patrick will be back tomorrow. I'm thinking we can do some backdrop and finish the last of the benchwork.![]()


Your making some real headway, Elliot. I'm excited to see what you and Patrick accomplish tomorrow.
worked a little on the transfer table again finally adding the opposite side tracks got 3 down but need to cut custom size tracks to get it as tight as I can to the wallhad to remove the upper track to get to it also decided to remove my homemade bridge and add the lionel trestle Bridge. and make brick wall abruptments . also worked alittle on the fuel storage area. here are the photos I feel I went backwards alittle today but sometime you have to go backwards to go forwards. also waiting on the tanks so I can finish final placement of the tanks


OK, I have not posted about my layout for a very long time because for personal reason I have been away from it for a couple of years. But, for the last few weeks I have been back into it when ever I have free time.
Today I fixed a switch at the top of my viaduct. The switch was fine but because I did not mount the motor properly it would cause issues from time to time. Today I cut an access hole so as to get at it and better see what I am doing. I also did some work on the viaduct so it will except mounting screws. I don't wont to tell you how I rigged it up before, trying to avoid the obviously needed work because I already called myself a dumb *** in a number of ways and I really don't need to read from you.![]() Well all is good now.
Well all is good now.
I even washed and waxed my car so as to get it ready for this winters snow/ rock salt. All said and done it was a wonderful day!![]()
Nothing complicated, just good fun running trains.
It's nice to finally see Elliot in a layout update
Another busy day...
Patrick and I started off by finishing the last section of the upper deck along the south wall.
We had to shim up the plywood in order to make the transition to the fiber board. Just as well that I have ruled out switching to Kadees, I don't think they could handle the vertical curve. We did everything we could to minimize it. The "lobster claws" should do just fine. I love 3 rail trains. They're more forgiving. ![]()

Then it was on to backdrops again. The first piece took a bit of work with a notch at the top to allow for the 2x4s, as well as the two openings for the wye.
The second curve also took some extra work to fit.
The wye openings close up. I'll try and get the tracks through there this week.
After that Patrick was off to the races, all the way down the wall...
Until we ran out of Masonite.
Patrick took this shot looking down the wall from inside the helix.
The Ross double slip that ordered last week showed up today.
It always feels strange taking something brand new, and cutting into it, even if it was only the tips of a couple of ties.
I seem to work harder when the guys come over. My pedometer tends to confirm that. I should sleep well tonight. The plan is to lay more track tomorrow.


Nothing today. Waiting for the weekend.
Nice progress, you guys got a lot done.
I'm wondering if Patrick found the graffiti?
Needed some storage for my now growing (yet still young) collection. Came up with a simple design thanks to the forum. Still need to cut the plastic for the doors.

I'm going to have to build another. I still have 17 freight cars, a diesel and caboose sitting on the layout.
I'm proud of how it turned out. Good first attempt.![]()

Thanks Jon.
Yup, but I never saw it.
Thanks Jon.
Yup, but I never saw it.
I didn't figure that you would. ![]() You have your hands full now with laying track. The double slip looks great, nice solution.
You have your hands full now with laying track. The double slip looks great, nice solution.
redesigned the ramp between levels to give more room to the transfer table and still kept the same incline. so I tore it all out today. then decided to put decals on a MTH rugged rails F3 it looks like a yellow bonnet without any graphics it is a Ronald McDonald House engine. need to pick up decal paper and resize and print a blue nose decal. but here it is in it's current state.


I'm wondering if Patrick found the graffiti?
Nope, never saw, was too busy focused on backdrops work.
I'm wondering if Patrick found the graffiti?
Nope, never saw, was too busy focused on backdrops work.
Well, you covered one, but there's still another. Look for it when you paint.
Yesterday while running some trains I looked at a section that I had left open because I was leaning toward putting in some scenic express flexible walls. I had done that further up the grade. Well I changed my mind and instead I added more pink board in that area and got the plaster wrap on it last night. So today once I get home from running some errands I'll put the coat of plaster on and maybe by tonight will be able to start coloring it........Paul
Got both the turntable pits assembled, painted and weathered. I just did both of them to look pretty much the same way as this one photo:
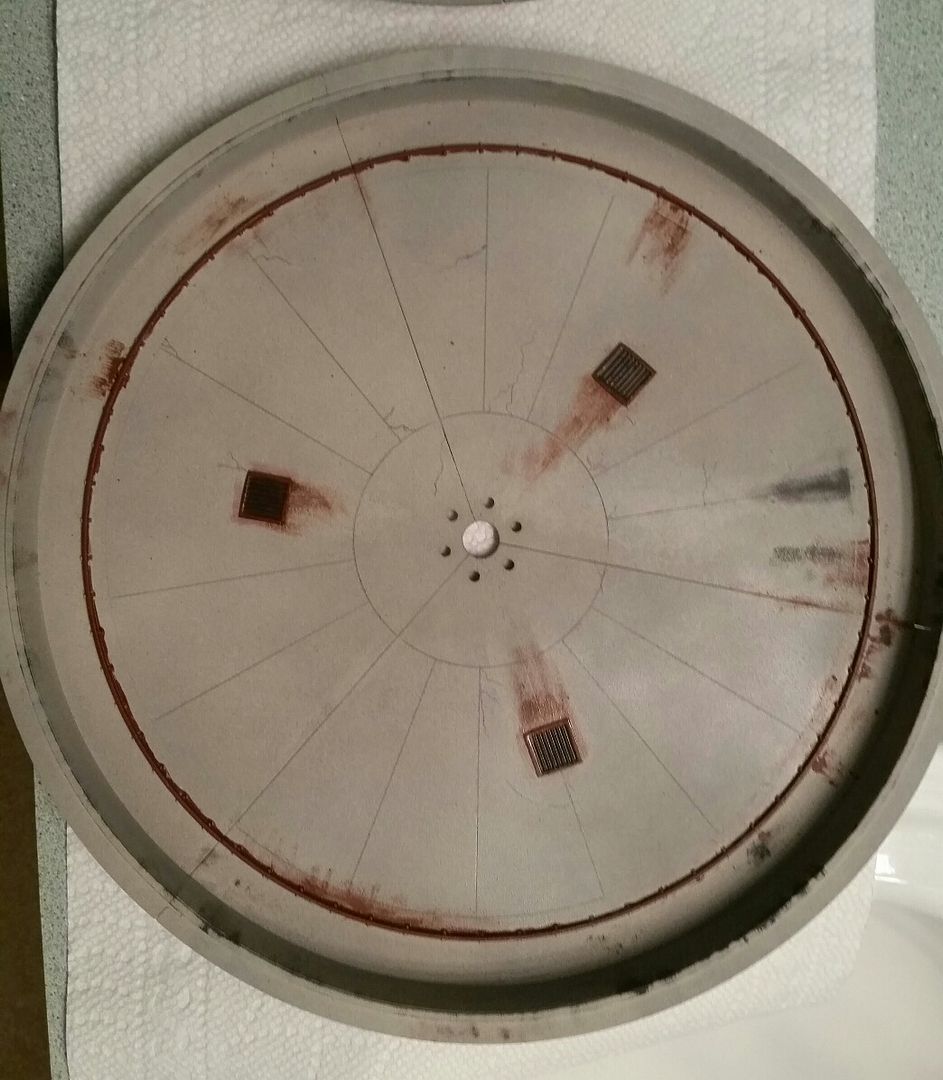
I painted them with alternating layers of grey primer (for a ‘pebble’ looking finish to appear as rough concrete) and light tan spray paint. The rest was dry-brushed with various hobby paints. The bridges will be started tonight.
At least I saw it. Working on the Streets book, website, etc., there have been days when I didn't. I ran a track cleaned car, rotated the four locos on the layout to a new set, etc., tested that everything ran fine, and now am taking a lunch break.
Got the yard office ready to put on the layout. My Dad built it and I added the LEDs, and we both did some weathering on it. Gotta find the "appropriate" spot to put it on the layout now. Actually we don't have a "yard" so it will be the engine facility office.


Threw a rear traction tire on my MTH Aerotrain over the weekend. You know what a bear that is to replace! Fortunately I had some Bullfrog Snot. Followed directions using a small paint brush, put on a layer Tuesday morning, followed by another layer Wednesday morning. It rolled on and dried as advertised. This afternoon I ran the Aerotrain with no hiccups! I would have rather installed another traction tire, but the Bullfrog Snot stuff worked.
The only thing I don't like about the SNOT, is when you leave the engine sit, it will get flat spots very easily.
Thanks! I'll have to watch out for that. So, right now it's back in the cradle. Don't know what will happen long term. Will let everyone know!
Finished the bridges for my two On30 turntables last night. Going to wash them with detergent and warm water tonight, dry them overnight, and paint them tomorrow.
tried my hand at making a backdrop and painting one. my wife is selling a few of my trains so this will work for that for photo's ![]()
my replacement mth car showed up for the broken one then I figured I would try to fix the old one and I was able to with a little heat and superglue. third is the stripped down layout for the ramp rebuild . and forth is the tank farm I got today it was broken when it arrived but superglue fixed what I could.


Well I made it out to the garage today & I pulled some wire to the breezeway of my house. Then I went to shoot some photos of the real trains. And as I type I can hear the trains running. But today was a no show for the trains Well there is always tomorrow.
Very nice scenery, Jerry!
I finally bit the bullet and painted my ceiling black. I also installed black track lighting with 5000K LED flood lights on dimmers. Started putting the layout back together.
Now I have to learn how to have my camera take night shots that actually look like night!
Chris
LVHR


I finally bit the bullet and painted my ceiling black. I also installed black track lighting with 5000K LED flood lights on dimmers. Started putting the layout back together.
Now I have to learn how to have my camera take night shots that actually look like night!
Chris
LVHR
Chris,
The ceiling and lights look great! I like the clouds on your backdrop also. Nice and wispy looking. It will be fun doing night photography, looking forward seeing your results.
I've been working on the track almost every day this week.
The crossover is in and I've started 3 out of the 4 curves.

The double slip is in, and the yard is started.
The bypass track is done.
Side view
Looking the other way.
I'll be back at it again tomorrow.![]()


Elliott,
Look good!![]()
Elliott,
Look good!![]()
Thanks Patrick. I should have this side mostly done by the time you come over.
Elliot, it does the heart good to know that your in your element and laying track. incredible progress, considering this is what it looked like several weeks ago.

Keep going, buddy.
Gee Jon, how far back did you dig for that shot? July maybe?
Telltale signs:
Got the yard office ready to put on the layout. My Dad built it and I added the LEDs, and we both did some weathering on it. Gotta find the "appropriate" spot to put it on the layout now. Actually we don't have a "yard" so it will be the engine facility office.
That building has a dignity about it which is charming. It seems to stand there proud and tall, ready for its purpose.
FrankM.
Access to this requires an OGR Forum Supporting Membership


