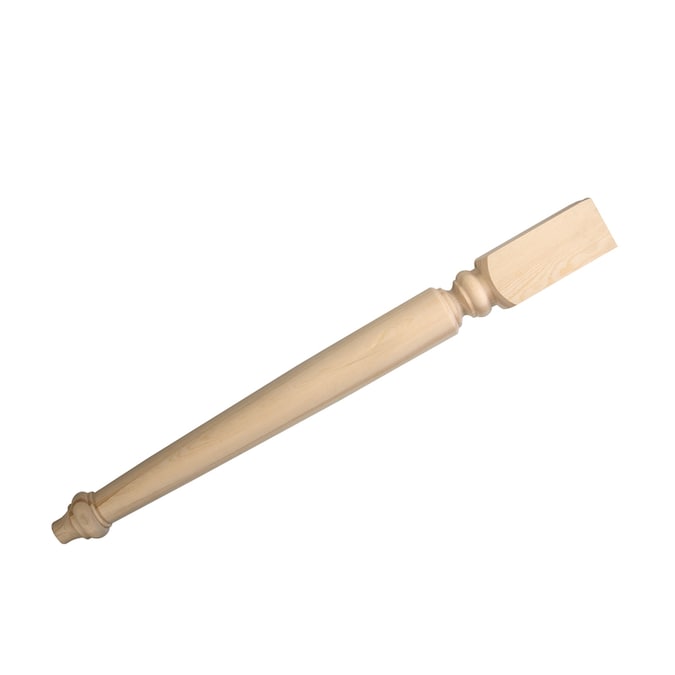
I've noticed on some of the layouts and many of the replica display layouts the green ground cover doesn't seem to be a "standard" shade you would normally find available from say Woodland Scenics or the venerable Life-Like grass that I grew up using. Is it a blend the builders make or is there some other supplier I'm not knowledgeable of out there? Faller perhaps? I'm thinking about a Lionel display type of layout using a 36" door slab and framing it with 1x4 edging and I found some really nice butcher block table style legs at Lowes...

https://mobileimages.lowes.com/product/converted/038453/038453197374.jpg?size=pdhi

I'm thinking about painting the legs and frame with a semi-gloss cream paint and running a strip of this galley moulding around it like a fence in the same color...

This should give it a store display layout look to it.


Jerry

Great idea! I’m curious because I’m not really carpenter savvy, but on a hollow door, how would you attach legs?

So I’m new to building any sort of bench work, usually carpet running or banquet table. But Jerry’s idea of a 36” door on legs is intriguing.

I have a request: if you are building a 48 from the ground up, would you consider sharing your construction techniques? I’d love to see how folks are going to do it and learn from that. I’ll be watching Jerry’s progress with great interest, and would love to see others.

Thanks in advance.

May the for——-ty eight be with you!

@pdxtrains posted:

Great idea! I’m curious because I’m not really carpenter savvy, but on a hollow door, how would you attach legs?

My plan is to build a frame with 1x6s and attach the legs inside that...

door(not to scale)

And the cross brace it with with either 1x3s or rip a 1x4 down to 3" for the braces and use screws and glue to hold the frame together and just drop the door panel into the top .  If you don't want all that carpentry I have in the past glued a couple strips of 1x4 across the bottom of the door and screwed folding table legs to that. Only down side to wooden legs it kind of makes taking it down problematic, but if you have a dedicated space for it go for it.

1. BYIENGST
2. Whit M
3. GMan-24
4. Engineer Bob
5. lehighline
6. Eric in Houston
7. Scott R


Jerry

Attachments

Images (1)
  • door
Last edited by baltimoretrainworks

After having reached the Charter Membership goal of 48 on 3/22 we are announcing the formation of the Century Club. It will be open to the first 100 new members who sign on to the 48 Club.

48century

After much discussion on an old post by fellow forumite Amfleet25124 about the trials and tribulations of those of our brethren who for one reason or another have embraced the model railroad world of the 4x8 sheet of plywood I am announcing the formation of The 48 Club. Much like the Brotherhood Of The Crappy Basement Layout it is some what informal, no dues, no officers, no meetings or the other nonsense that comes from being in a formal organization.


The requirements for inclusion are very simple...

A. The layout can be no larger than a 4x8 sheet of plywood or what can configured from a single sheet

     1. Hollow core door slab layouts are definitely allowed

B. It can be permanent or seasonal since many 4x8s are set up during the Christmas season

C. In keeping with its seasonal origins the main focus will be S and O gauge, however if yours is one of the other gauges you are still welcome to join.

Now to get a bit of club business out of the way...

For providing the inspiration for this club the titles of Founding Member, Honorary Member and Charter Member are given to:

    Amfleet25124

There are 4 forumites who are conferred with the title of Honorary Members for with out them this forum would not exist:

    Alan Arnold

    Allen Miller

    Rich Melvin

    Ed Boyle

If I've left anyone out please let me know.

In addition the first 48 forumites who join will be considered Charter Members, currently from the original post Amfleet started they are following:

   RSJB18

   Conductor Earl

   bptBill

   CA John         ( his love of keilbasa and kishka gets him in on that alone LOL, you're a braver man than I john when it comes to kishka!  )

So let's see what you have done with the venerable ol' sheet of plywood or post track plans you've come up with that will fit the bill. To get the ball rolling here's one I've been working on in SCARM.

It uses 4 12"x96" strips of plywood to create a 9'x9' layout, I know it begs the question if I have room for 9x9 why am I just using a single sheet but one of the reasons many go with a 4x8 is the cost or work involved in a larger layout. This one allows you to have long runs while keeping scenery and buildings to a minimum. Besides I'm from the school of go big or go home and I'm pretty sure someone out there can come up with something even larger given the same constraints.


Jerry

Hi, how do we display the 48 Club banner?

Thanks!

John

WP

My plan is to build a frame with 1x6s and attach the legs inside that...

door(not to scale)

And the cross brace it with with either 1x3s or rip a 1x4 down to 3" for the braces and use screws and glue to hold the frame together and just drop the door panel into the top .  If you don't want all that carpentry I have in the past glued a couple strips of 1x4 across the bottom of the door and screwed folding table legs to that. Only down side to wooden legs it kind of makes taking it down problematic, but if you have a dedicated space for it go for it.

1. BYIENGST
2. Whit M
3. GMan-24
4. Engineer Bob
5. lehighline
6. Eric in Houston
7. Scott R


Jerry

Thanks for the diagram, Jerry!

Do you think carriage bolts would work with the legs into frame so it could be disassembled?

Last edited by pdxtrains

Jerry are you still planning on incorporating the gallery molding, which is a very nice detail?

Not sure if I'm going to use the rail if I go with a black paint scheme. If I do it would be mounted on top of the edging with some sort of "fence and corner posts" like you would see in some of the more ornate bridge details from back in the day.


Jerry

@pdxtrains posted:

Thanks for the diagram, Jerry!

Do you think carriage bolts would work with the legs into frame so it could be disassembled?

Carriage bolts would work fine. The only downside to them is they're kinda ugly, I've yet to come up with a way to make them look like they are part of the esthetics of the frame other than using a skirt of some sort to cover them. If anyone out there has come up with a way to disguise them let us know.

You could try connector nuts and bolts, they have a more finished appearance than carriage bolts...

https://www.rockler.com/media/catalog/product/cache/5c5edcf249a74e99ece620285918bb9b/4/8/48570-01-1000.jpg   https://www.rockler.com/media/catalog/product/cache/5c5edcf249a74e99ece620285918bb9b/3/1/31815-02-1000.jpg

Rockler has them in 4 3/4" lengths but if you use just the nuts along with a regular bolt from the inside you can probably take care of any thickness you might encounter.


Jerry

Attachments

Images (1)
  • mceclip0

Not sure if I'm going to use the rail if I go with a black paint scheme. If I do it would be mounted on top of the edging with some sort of "fence and corner posts" like you would see in some of the more ornate bridge details from back in the day.


Jerry

If I may suggest using decorative metal panels one would use in making old radiator covers ?  I’ve made fencing and railings using the stuff . It’s not too hard to cut and depending on how much you want to do I’m sure you can get at least 12’ out of one panel , maybe more .  I’m sure there are even more to choose from than the ones I posted .  Hope this helps you .  Cheers ! 6C6CE3C6-E1A2-4A54-B505-386ADF885A7B81306588-C34C-48F0-820F-B95CCA56D198A6EB6F3A-AF0A-4267-8C73-0DD715B8C9199CFA1DF1-3471-49E3-953F-FEC3185919D48943600A-4E8B-4117-8F97-C80FD71CDBF9DC100BB5-A1ED-42A6-B930-7ACBB56CAAEB160CB6C4-7737-4C71-B513-25DF5288207C26CD139B-02A4-4EFF-9529-8D7650011781

Attachments

Images (8)
  • A6EB6F3A-AF0A-4267-8C73-0DD715B8C919
  • 9CFA1DF1-3471-49E3-953F-FEC3185919D4
  • 8943600A-4E8B-4117-8F97-C80FD71CDBF9
  • DC100BB5-A1ED-42A6-B930-7ACBB56CAAEB
  • 160CB6C4-7737-4C71-B513-25DF5288207C
  • 26CD139B-02A4-4EFF-9529-8D7650011781
  • 6C6CE3C6-E1A2-4A54-B505-386ADF885A7B
  • 81306588-C34C-48F0-820F-B95CCA56D198

Been working on an improved version of the Charter Membership certificate . This design theoretically will fit in a honors/document frame

48cert4

I found a border I like a lot better than the original one I had and since I didn't keep very good track of who joined when the default date of March 1st when I made the announcement is going to be used. I also had to slightly modify the logo so it would play nice with my printer and not look slightly out of focus.

My next question is when anyone wants one should we use their real name or forum handle? Should I indicate somewhere on it their number status as shown on the roster? I'm thinking CM148, CM248... up to CM4848 some where on it.

I have drawn up a similar one for the Century Club members...

48cencert

I still need to fix the date on that one but you get the idea. Their membership numbers would be CC148, CC248.... up to CC10048.

And lastly the regular membership certificate...

48certreg

And similarly their numbers would be FE148, FE248, FE348 and so on and so on...

Now this only works if we get another 100 people to sign on board with us along with the 50some we now have but who knows, maybe somewhere down the road people will be complaining on the Forum about the "stupid" rules our group has in place for our big train meet!

If anyone has any ideas or suggestions feel free to throw them against the wall and see what sticks. I'm still trying to find a place that makes all black coffee mugs that don't require a pound of flesh and my first born male to get one made and I've pretty much given up on travel mugs.


Jerry

Attachments

Images (3)
  • 48cert4
  • 48cencert
  • 48certreg

My next question is when anyone wants one should we use their real name or forum handle? Should I indicate somewhere on it their number status as shown on the roster? I'm thinking CM148, CM248... up to CM4848 some where on it.

...

Now this only works if we get another 100 people to sign on board with us along with the 50some we now have but who knows, maybe somewhere down the road people will be complaining on the Forum about the "stupid" rules our group has in place for our big train meet!

...

If anyone has any ideas or suggestions feel free to throw them against the wall and see what sticks. I'm still trying to find a place that makes all black coffee mugs that don't require a pound of flesh and my first born male to get one made and I've pretty much given up on travel mugs.

1. I think real name would be appropriate.
2. If people don't like the rules, they can start their own group!
3. They can have my kid.  He's kinda lazy and eats a ton, but I'm sure they'll find something for him to do!

Another vote for real name on the certificate.

The certificate designs look great. Your design elements continue to "take it up a notch".

Thought: do you want to include the club motto on the certificate: "We build small but we dream big"

Actually, I have been working on translating the motto into Latin for use in my esig (inspired by a few forumites with Latin quotes, and you did suggest classical names Prometheus and Aurora for your Hudson). In addition, I sort of felt obligated, since I took many years of Latin many years ago. But i forgot declensions and the like, so i sought out an expert. So here it is:

“Aedificamus parva magna desideramus”

a lot of old clubs used to have mottoes in Latin. and the old MGM movies used to have "ars gratia artis" around the lion.   Too stuffy?

(ok; y'all can wake up now and get back to the fun stuff)

speaking of which, and looping back to prior posts: should we be thinking about the official club greeting, club password and club handshake? (ala LOOTWB)  Whether or not they should be secret is up to the Grand Poobah.......

Mark

@Mark Boyce posted:

Jerry, All the certificates look great!  As far as the name goes, I will decline comment since I use my personal name for my forum name.

I'm with Mark on this one .  I love the certificates and I too use my personal name on the forum . As for your numbering system , it is nice but in my opinion not needed . The Charter Member says it all for me .  Soon I will have the logo tagged to my name and profile , I'm not the best when it comes to using a computer .  Cheers .

I'm writing all this out so I can mentally check myself to be sure that I'm checking the boxes of what I really want. This will most likely be my only "built" layout, so I need to be certain it's gonna work for me.

Being carpenterially challenged, I believe I'm going to go with Mianne Benchwork (although they have yet to answer my emails--must be a boom time!) Their work is beautiful, and I would like a set up where I can run my limited wiring under the table, which is very hard to do on banquet tables. What I need is a pretty, green carpet colored table, able to be disassembled and able to roll. Something practical, attractive, and where I can set up temporary track layouts and easily change them.

Sealing the Mianne deal for me is the locking self leveling casters, and the separate rolling transformer cart. The whole deal is just beautiful to look at.

What I'm not sure of is size: I'm torn between 4 x 8, and 5 x 6. The 5 x6 gets me 048 Fastrack, but the fit in my garage might be too much.

Since I do temporary layouts, with lots of plasticville and other toy scenery, I think I could also design into the 1/2 inch ply and homasote  carpet colored top, a series of small "portals" for wiring to drop down below. Remember--the layout will constantly change. It is temporary, by design.

On a 4 x 8, I'll be able to run an outer 036 and an inner 031, with room later for switches if I want. Although I tend to dislike switches because I have so many different kinds of locos--PW, MTH, Lionel--and it seems there's almost always a problem with some of them. Plus, with two trains running, I don't care if they go round and round. What's important to me is not realistic railroading, but toy train running and having the capacity for at least two trains to run at once on separate loops. I run limited DCS, LionChief and Lionchief +, and PW conventionally.

I think I'll set up the two banquet tables to be sure I can fit 5x6 comfortably, and then actually call Mianne with either an order for 4 x 8 or 5 x 6.

So that's the earth shattering news. Stop the press, remake page one.

Over the next few weeks I'll post pics of the temporary test banquet layout.

I'm anxious to get this 48 rolling.

I've noticed on some of the layouts and many of the replica display layouts the green ground cover doesn't seem to be a "standard" shade you would normally find available from say Woodland Scenics or the venerable Life-Like grass that I grew up using. Is it a blend the builders make or is there some other supplier I'm not knowledgeable of out there? Faller perhaps? I'm thinking about a Lionel display type of layout using a 36" door slab and framing it with 1x4 edging and I found some really nice butcher block table style legs at Lowes...

I'm thinking about painting the legs and frame with a semi-gloss cream paint and running a strip of this galley moulding around it like a fence in the same color...

This should give it a store display layout look to it.


Jerry

Jerry, I made my own using the individual spindles you can get at a craft store. The closer spacing makes it look more like a balustrade and less like a gallery rail.  Here it is before painting:

IMG_0704

Attachments

Images (1)
  • IMG_0704

If I may suggest using decorative metal panels one would use in making old radiator covers ?  I’ve made fencing and railings using the stuff . It’s not too hard to cut and depending on how much you want to do I’m sure you can get at least 12’ out of one panel , maybe more .  I’m sure there are even more to choose from than the ones I posted 9CFA1DF1-3471-49E3-953F-FEC3185919D4

Johnny, you are giving me ideas again!! That pattern looks very familiar! Check out the terrace.

H2651-L80108625

I wish I had seen this before I made my layout fence, but I may use this as well.

Attachments

Images (1)
  • H2651-L80108625

I am pleased to present the first (I think) piece of actual model rolling stock in 48 Club Livery!

GEDC2208

"Bessie" (named after a fictional insect of my acquaintance) originally appeared here:

https://ogrforum.com/...cab-for-only-pennies

I had been pondering Frisco lettering, but this is more appropos, I think... 

Mitch

Attachments

Images (1)
  • GEDC2208
Last edited by M. Mitchell Marmel
@Will posted:

Johnny, you are giving me ideas again!! That pattern looks very familiar! Check out the terrace.

H2651-L80108625

I wish I had seen this before I made my layout fence, but I may use this as well.

More Ideas , again !!  LOL. That's what these forums are all about , sharing information and ideas . Showing others what you've done and maybe inspiring others to do the same or a variation of what one has done .  It's all fun for me . Keep us posted on what you are doing .

Last edited by JohnnieWalker

More Ideas , again !!  LOL. That's what these forums are all about , sharing information and ideas . Showing others what you've done and maybe inspiring others to do the same or a variation of what one has done .  It's all fun for me . Keep us posted on what you are doing .

Did you use any of that union jack pattern? The one I reposted? I am wondering the size of the pattern to see if it is worth ordering a piece.

@Will posted:

Did you use any of that union jack pattern? The one I reposted? I am wondering the size of the pattern to see if it is worth ordering a piece.

Sorry to report Will I haven’t used it .   I used the small club pattern because it was leftover from a job I was working on.  I did get it at one of the Big Box lumber stores in the area .  There were a few patterns to choose from, and if my memory serves me right , the pattern you are interested in was available,  my client wanted the small club pattern for the project.  So maybe a trip to one or the other or both lumber stores will help you.  I will look tomorrow if I stop and if they have it I will let you know . Cheers

@Nucci posted:

Another vote for real name on the certificate.

The certificate designs look great. Your design elements continue to "take it up a notch".

Thought: do you want to include the club motto on the certificate: "We build small but we dream big"

Actually, I have been working on translating the motto into Latin for use in my esig (inspired by a few forumites with Latin quotes, and you did suggest classical names Prometheus and Aurora for your Hudson). In addition, I sort of felt obligated, since I took many years of Latin many years ago. But i forgot declensions and the like, so i sought out an expert. So here it is:

“Aedificamus parva magna desideramus”

a lot of old clubs used to have mottoes in Latin. and the old MGM movies used to have "ars gratia artis" around the lion.   Too stuffy?

(ok; y'all can wake up now and get back to the fun stuff)

speaking of which, and looping back to prior posts: should we be thinking about the official club greeting, club password and club handshake? (ala LOOTWB)  Whether or not they should be secret is up to the Grand Poobah.......

Mark

My vote is for: "Illa mea principia, et si tibi non placet eis... euge, habeo alios."

Groucho said,,"Those are my principles, and if you don't like them... well, I have others."

Last edited by Miggy
@pdxtrains posted:

I'm writing all this out so I can mentally check myself to be sure that I'm checking the boxes of what I really want. This will most likely be my only "built" layout, so I need to be certain it's gonna work for me.

Being carpenterially challenged, I believe I'm going to go with Mianne Benchwork (although they have yet to answer my emails--must be a boom time!) Their work is beautiful, and I would like a set up where I can run my limited wiring under the table, which is very hard to do on banquet tables. What I need is a pretty, green carpet colored table, able to be disassembled and able to roll. Something practical, attractive, and where I can set up temporary track layouts and easily change them.

Sealing the Mianne deal for me is the locking self leveling casters, and the separate rolling transformer cart. The whole deal is just beautiful to look at.


I'm anxious to get this 48 rolling.

Hi, I have found it true what other Forum members have told me about Mianne.  Tim Foley doesn't keep up with emails well, but will answer your phone call and get right on top of it.  Once I called him to buy one of his standard kits, he got it out to me quickly. The same thing happened when I changed the design a little bit.  I called and gave him the short list of what I wanted, and he had it to me pronto.  Of course if you want something custom, then it takes a while, but it sounds like you will want standard kits.

@pdxtrains posted:

I'm writing all this out so I can mentally check myself to be sure that I'm checking the boxes of what I really want. This will most likely be my only "built" layout, so I need to be certain it's gonna work for me.

Being carpenterially challenged, I believe I'm going to go with Mianne Benchwork (although they have yet to answer my emails--must be a boom time!) Their work is beautiful, and I would like a set up where I can run my limited wiring under the table, which is very hard to do on banquet tables. What I need is a pretty, green carpet colored table, able to be disassembled and able to roll. Something practical, attractive, and where I can set up temporary track layouts and easily change them.

Sealing the Mianne deal for me is the locking self leveling casters, and the separate rolling transformer cart. The whole deal is just beautiful to look at.


I haven't used the Mianne product, as I prefer to build benchwork myself, but I've seen it at York - looks very good, and reviews have been positive.

One issue I've encountered when trying to correspond via email with smaller companies is that messages can land in their spam bucket for no apparent reason, and most folks don't check it.  If you haven't received a reply in a reasonable time, I suggest a phone call.

@Will posted:

Jerry, I made my own using the individual spindles you can get at a craft store. The closer spacing makes it look more like a balustrade and less like a gallery rail.  Here it is before painting:

IMG_0704

That is exactly the look I'm going for! Even the mouldings are spot on! I think painted a semi-gloss cream would give it the perfect old school display layout look. I would make the posts square and top them with a ball for an even more ornate look.

As for a Latin motto I've been kicking around a few on an English/Latin translator...

Land Of the Wooden Empire     Terra Lignea Imperii   (This one is my personal favorite)

Four Eight Empire    Quatuor Octo Imperii

Land Of Four Eight        Terra Quatuor Octo

World Of Four Eight    Mundi Quatuor Octo

World Of The Four Eight Empire    Mundus De Quatuor Octo Imperii  (too wordy)

I've no idea as to the accuracy of these since I took French back in HS but this has reminded me of the Monty Python Latin graffiti bit In Life of Brian!

Mitch that steeple cab looks great, I've always wanted to build one but never got around to it. It always seemed like it would be easy because of its small size ( I know I'm wrong on that).  I do have a blank Williams GG1 shell that once I dig it out I am going to start building Prometheus....

48gg1family3

Not sure of which version yet tho, probably #3 on the left, for now I can just swap out the shell with one of the powered units I have and I've been looking at a set of the old K-Line streamline passenger cars for the club consist that has what I think has just the right look but might be a bit too small for the GG1 but since they seem to be a bit on the cheap side on Ebay I might get one just to see.

In this light has anyone out there had any experience getting Staples to print a set of decals for them or do they tend to balk at putting decal stock thru their printers ? I'd like to get a set done on a toner cartridge copier machine since the density of the print would be more than an ink or laser jet.


Jerry

Attachments

Images (1)
  • 48gg1family3

Jerry you have far too much creativity for your own good. Has it ever gotten you into trouble?

I've been silent on many of the posts so here goes:

Name of certificate - since we are each going to have to provide addresses and a few bucks, let each individual have their name appear as they see fit.

Logo on motive power - I agree with the choice of #3 I prefer that pin striping, however I would love to keep a more modest logo. The Milwaukee Road used to have much smaller logos at various places. On little joes they were placed below the engineer's window and were probably a 1/4 as large as what is on the GG1.

I do laser color printing at my local FedEx shop. I put in the paper - they do not get involved unless I ask for help. I also found a guy on the bay who will print what look to me like ink-jet decals - I guess I should ask. He reprinted a couple of larger building sized decals for me. They slide off nicely and have good color and did not bleed.

Membership card - On the back side perhaps drop the "48" as you suggest, but make the "The 48 Club" larger font in the middle. You could gain space by spreading out the text. "and reduce you signature block" but that is getting too personal - its you card design ; )

Motto - Four Eight Empire    Quatuor Octo Imperii   is my vote, Imperial sounds so regal

Lastly - since so many seem to go to shows and are active at clubs, it might be pretty neat /cool to have a patch which could be sewn onto a hat or jacket. Might make for some interesting conversations. From what I understand if someone has one of the fancy sewing machines which can embroider, these are not all that difficult to make. Rans across this guy (know nothing about the business) as just an idea.  https://www.jelsma.com/html/about.html

Lastly Lastly - it would not be that hard to have everyone prepay (thru paypal or others) prior to you doing any significant materials purchase and shipping.

Last edited by ScoutingDad
@ScoutingDad posted:

Jerry you have far too much creativity for your own good. Has it ever gotten you into trouble?

On multiple occasions, more before I got married but the percentage isn't that much different! My life motto is "Go big or go home !" I remember one time in Boy Scouts (I was the Scoutmaster at the time) we were doing model rocketry. Now back then there was a "code of model rocketry" and one of the lines was "I will only build rockets of 16oz. or less and carry no more than 4oz. of propellant". Of course some of  my rockets carried 16oz. or more of propellant, one I built screamed off the pad at lift off leaving its fins on the launch pad and cartwheeled around in the sky before cato-ing after the nose cone was jammed into the body tube from the force of the launch and the ejection charge turned it into a flying shotgun shell ! The kids in the troop thought that was the coolest thing they ever saw, GOOD TIMES!

I have looked into patches, they seem to be almost as problematic as the coffee cups. I can get 10 embroidered patches for $124.00 and this was on the low end, similar to this one a bunch of us on a Facebook Group had made up:

So I'm not holding out to much hope for things like this, but I do remember seeing a table at York in the Utz building someone who did one off custom embroidering but that was several years ago. Vistaprint seems the best option if someone wants something made up, I can send them the logo file and they can go to Vistaprint and have what ever they want made up, shirt, hat, coffee cup, mouse pad, etc.

As for Paypal I have to look into setting that up, right now everything has a small cost to it and as much as I'd like to say to someone  just give me your address I'll send you one gratis  $1 here, 60 cents there, 90 cents here, 20 cents there, postage does add up especially when you are looking at about 50 of them. And until I can be sure of the quality of the things I certainly don't want to charge even just cost to anyone til I can at least guarantee it will look good. One option someone I know did throw at me was just eat the cost and tell whoever gets one just to made a small donation to St. Judes which is my go to charity (even tho I didn't win the trip into space ) but then I'm back to the original problem of me bearing the cost.

I'll check out Ebay for a decal guy, I am sort of a member of the Maker community so I'm pretty sure I could track down someone who could do the decals for me. If you remember who did your decals let me know.


Jerry

Attachments

Images (1)
  • mceclip0

That is exactly the look I'm going for! Even the mouldings are spot on! I think painted a semi-gloss cream would give it the perfect old school display layout look. I would make the posts square and top them with a ball for an even more ornate look

Jerry

Everything but the spindles is poplar from HD cut on the table saw.  Holes for spindles done on drill press to keep then aligned and evenly spaced.

The irony is now I am thinking of replacing them with the metal union jack pattern JohnnieWalker and I have been batting around. If you look at the 106 bridges in the background, you can see that look. I also may paint some of it green. Right now they are all cream and I feel like it's drawing too much focus. IMG_0996

Attachments

Images (1)
  • IMG_0996

Add Reply

Post

OGR Publishing, Inc., 1310 Eastside Centre Ct, Ste 6, Mountain Home, AR 72653
800-980-OGRR (6477)
www.ogaugerr.com

×
×
×
×
Link copied to your clipboard.
×
×