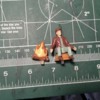
I recently purchased the 18” Pol-Ex Lionel hobo car to add to my set.  I was less than impressed with the hobo figure and camp fire. The hobo measures roughly 9 scale feet tall from my estimate!  Not bad for a moving train, but I preferred something a little more to scale.

B7324D98-690F-4D21-9DFA-1003D19449B6

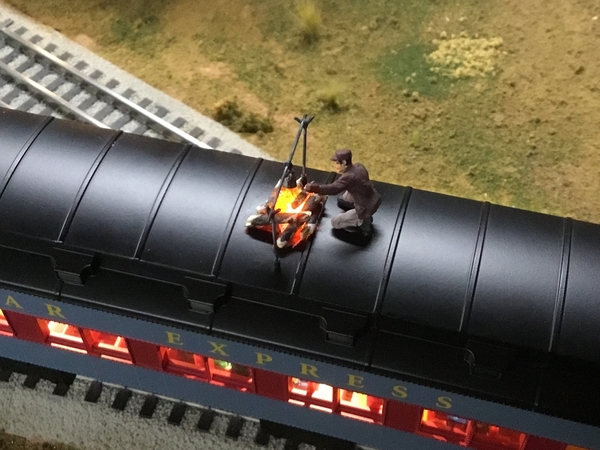
The flickering effect is impressive but I wanted to modify the figure and campfire to look less toy-like.  In searching the web, I saw a few examples where people made their own PE hobo car using Arttista’s kneeling brakeman figure.  I think this figure makes for a good replacement with some painting touch-up to better match the movie hobo.

6F5E7BB2-8FDB-43FA-BB79-D5641FF98F04

I then built a campfire using crumpled up Saran Wrap, painted with Tamiya X24 Clear Yellow.  The firewood is small twigs I broke up and super glued around the fire, and added black acrylic paint to simulate charring.

I then constructed cooking stakes and an ‘S’ hook from thin gauge brass wire formed and soldered together.  I painted it black with a gray wash to give it a used effect.  I did drill two very small holes to mount the stakes, but that is the only modification made to the car itself.

A3CA260B-2B70-4D89-AD6A-C6F415E880CDFD5BA0F0-C7A2-40F3-BA3B-EFF66C9042D8

Lastly, I found an O scale coffee pot on the bay and super glued to the ‘S’ hook with a black wash for the finishing touch.  Here is a video of the completed project with Lionel’s Stationsounds Diner providing the sound clips.

Attachments

Images (4)
  • B7324D98-690F-4D21-9DFA-1003D19449B6
  • 6F5E7BB2-8FDB-43FA-BB79-D5641FF98F04
  • A3CA260B-2B70-4D89-AD6A-C6F415E880CD
  • FD5BA0F0-C7A2-40F3-BA3B-EFF66C9042D8
Videos (1)
IMG_2246
Last edited by rjsmithindy
Original Post

Replies sorted oldest to newest

@rjsmithindy posted:

I recently purchased the 18” Pol-Ex Lionel hobo car to add to my set.  I was less than impressed with the hobo figure and camp fire. The hobo measures roughly 9’ scale feet tall from my estimate!  Not bad for a moving train, but I preferred something a little more to scale.

B7324D98-690F-4D21-9DFA-1003D19449B6

The flickering effect is impressive but I wanted to modify the figure and campfire to look less toy-like.  In searching the web, I saw a few examples where people made their own PE hobo car using Arttista’s kneeling brakeman figure.  I think makes for a good replacement with some painting touch up to better match the movie hobo.

6F5E7BB2-8FDB-43FA-BB79-D5641FF98F04

I then built a campfire using crumpled up Saran Wrap, painted with Tamiya X24 Clear Yellow.  The firewood is small twigs I broke up and super glued around the fire, and added black acrylic paint to simulate charring.

I then constructed cooking stakes and an ‘S’ hook from thin gauge brass wire formed and soldered together.  I painted it black with a gray wash to give it a used effect.  I did drill two very small holes to mount the stakes, but that is the only modification made to the car itself.

A3CA260B-2B70-4D89-AD6A-C6F415E880CDFD5BA0F0-C7A2-40F3-BA3B-EFF66C9042D8

Lastly, I found an O scale coffee pot on the bay and super glued to the ‘S’ hook with a black wash for the finishing touch.  Here is a video of the completed project with Lionel’s Stationsounds Diner providing the sound clips.

Nice Rob.  The only thing missing is the ' HURDY GURDY '

I did one a long time ago before the fire was lit and  I  installed an LED but it doesn't flicker.

@Paul Kallus posted:

By the way rjs, I looked at my hobo car...I don't want to brake it, how did you remove the giant figure? I noticed he sits on a crate, does it simply lift up? Am trying to get the confidence to do something here...though yours is the cat's meow.

Hi Paul, removal is very easy for the hobo.  Mine came right off by pulling straight up.  I didn’t see any evidence of adhesive, just a press fit.  The fire does have a small amount of adhesive but will easily come off by pulling up gently and rocking back and forth. Here is a picture of both removed:

385B6C62-D5D9-4A05-9DF7-8BC3AB829AA6

As you can see, they are held in place by a molded plastic post on the base of each.

Thanks everyone for compliments- I appreciate it!

Attachments

Images (1)
  • 385B6C62-D5D9-4A05-9DF7-8BC3AB829AA6
Last edited by rjsmithindy
@rjsmithindy posted:

I recently purchased the 18” Pol-Ex Lionel hobo car to add to my set.  I was less than impressed with the hobo figure and camp fire. The hobo measures roughly 9’ scale feet tall from my estimate!  Not bad for a moving train, but I preferred something a little more to scale.


The flickering effect is impressive but I wanted to modify the figure and campfire to look less toy-like.  In searching the web, I saw a few examples where people made their own PE hobo car using Arttista’s kneeling brakeman figure.  I think makes for a good replacement with some painting touch up to better match the movie hobo.


I then built a campfire using crumpled up Saran Wrap, painted with Tamiya X24 Clear Yellow.  The firewood is small twigs I broke up and super glued around the fire, and added black acrylic paint to simulate charring.

I then constructed cooking stakes and an ‘S’ hook from thin gauge brass wire formed and soldered together.  I painted it black with a gray wash to give it a used effect.  I did drill two very small holes to mount the stakes, but that is the only modification made to the car itself.


Lastly, I found an O scale coffee pot on the bay and super glued to the ‘S’ hook with a black wash for the finishing touch.  Here is a video of the completed project with Lionel’s Stationsounds Diner providing the sound clips.


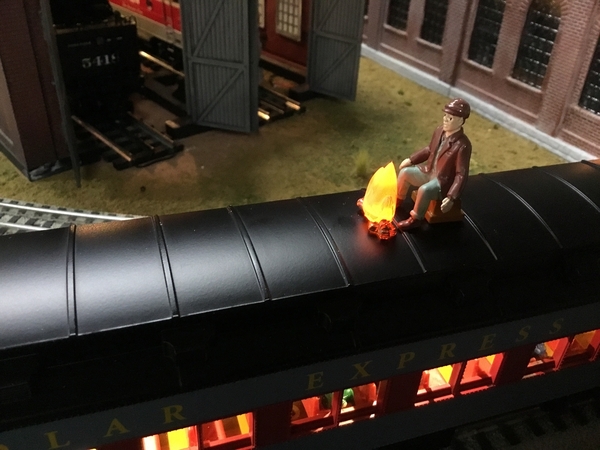
Rob, that looks fantastic! I really like the cooking stakes and coffee pot.

I did a similar mod with my semi scale PE Hobo Car, but not nearly as nice. I used the existing hobo and fire and installed an LED into the fire. One difference between your scale car and my semi scale car is the hobo can be flipped down so the hobo disappears, and I was able to keep that feature. I think after seeing your modification I need to work on the fire and install flickering LED's and a firepit You're right, the hobo is not to scale!

Thanks for sharing that, you've inspired me to take it to the next step.

Scott

Attachments

Images (2)
  • mceclip0
  • mceclip1

Rob, that looks fantastic! I really like the cooking stakes and coffee pot.

I did a similar mod with my semi scale PE Hobo Car, but not nearly as nice. I used the existing hobo and fire and installed an LED into the fire. One difference between your scale car and my semi scale car is the hobo can be flipped down so the hobo disappears, and I was able to keep that feature. I think after seeing your modification I need to work on the fire and install flickering LED's and a firepit You're right, the hobo is not to scale!

Thanks for sharing that, you've inspired me to take it to the next step.

Scott

I like what you did with that Scott.  We have the smaller set too and I always thought the fire should light up.  How did you wire it so that the hobo will ‘disappear’ without the wires getting tangled?  Nice work!

@rjsmithindy posted:

I like what you did with that Scott.  We have the smaller set too and I always thought the fire should light up.  How did you wire it so that the hobo will ‘disappear’ without the wires getting tangled?  Nice work!

On my hobo car Rob, I have the version with the semi transparent windows so I wasn't  worried about seeing any wires from the outside.    I had GRJ's light  module and LED strip also.

All I did was have enough loose wire at the back end of the rotating section.   When I wanted to make the hobo disappear (  I   THINK TWICE  IN  3  YEARS )  I  simply rotate the rotating section from the opposite end  only.

If you have transparent windows this might not be what you want to see.🤔

@rjsmithindy posted:

I like what you did with that Scott.  We have the smaller set too and I always thought the fire should light up.  How did you wire it so that the hobo will ‘disappear’ without the wires getting tangled?  Nice work!

Hi Rob, here's some photos of what I did so the hobo could still disappear.

I had to remove the roof section that flips (4 screws), that's pretty easy. The flipping roof section is a clam shell, that's the hard part 'cause it's glued. I gently pried the clam shell open so I could drill the holes and feed the wire. I used a spare Woodland Scenics micro LED (I'm updating that to a Evan Designs Fire LED set). I also updated the rail car to LED anti flicker interior lights while I was at it, so I utilized the interior LED power supply to power the WS micro LED. In the photo above you can see the LED strip and the power supply upper left for the interior lights.

Photo below in the background are the retaining brackets and 4 screws.

FYI - The fire popped right off of my model. It is lightly glued from the factory.

In the photo below I left enough extra wire lead so the hobo could flip over and disappear. The wire is not a visual problem since the Simi scale model has silhouette windows, you can't see the wire. The hobo flips only one way, so the LED wire is protected from damage.

I'm thinking you can probably do what you did to your scale hobo car to the Semi scale car and still have it flip. Although you might have to shrink the cooking stakes. After seeing your upgrade, I'm thinking the little plastic fire is not up to standard. LoL

Attachments

Images (3)
  • mceclip0
  • mceclip1
  • mceclip2

rjs - "I then built a campfire using crumpled up Saran Wrap, painted with Tamiya X24 Clear Yellow."

Did you then wrap the saran wrap around the plastic fire thing, or just replace the fire thing that comes with the car with the wrap? Also, did you have to cut off the lantern from that brakeman figure's hand? If so, am surmising you used a dremel cut off wheel?

fwiw: I am planning on stopping at Nicholas Smith today on my semi-annual trip to the dentist who is not too far from Broomall and will check out the available hobo and railroad figures. 

Hello Rob, you fully inspired me to upgrade my PE Disappearing Hobo car. Mine may not be as pretty as yours, but it came out okay. I'm working on the cooking stakes, it's fighting me because it has to be so narrow to fit the disappearing roof top door. Here's some photos and a video of the almost finished fire pit. I'm still using the oversized Hobo as he matches the size of the other PE characters.

Just starting out.

Evan Designs Fire LED Kit installed. I made a mess with CA glue, so switched to hot glue for the inside of the clam shell rooftop.

Hobo hiding. The flipping section never did fit perfectly in disappearing mode.

Hobo flipping.

Hobo appears

Video of fire in action.

And the rest of the PE gang, except for the boy in the yellow robe is still in the Observation car.

Once again Rob, thanks for motivating me. I've been wanting to do this for some time. Your ideas helped figure it out based on your scale version.

Scott

Attachments

Images (6)
  • mceclip0
  • mceclip0
  • mceclip1
  • mceclip2
  • mceclip3
  • mceclip4
Last edited by WesternPacific2217
@Paul Kallus posted:

rjs - "I then built a campfire using crumpled up Saran Wrap, painted with Tamiya X24 Clear Yellow."

Did you then wrap the saran wrap around the plastic fire thing, or just replace the fire thing that comes with the car with the wrap? Also, did you have to cut off the lantern from that brakeman figure's hand? If so, am surmising you used a dremel cut off wheel?

fwiw: I am planning on stopping at Nicholas Smith today on my semi-annual trip to the dentist who is not too far from Broomall and will check out the available hobo and railroad figures.

Hi Paul, I replaced the fire with the painted Saran Wrap.  I removed the lantern from the brakeman/hobo with wire cutters and lightly filed the area smooth. Good luck with your project and let me know if you have any other questions, and definitely share a photo once finished.

Well, it's nearly 3 years later and I am finally getting around to Rob's modifications to the scale PE hobo car. I suppose better late than never.

Rob, if you're reading this, did you use a pin vise drill to drill the holes in the roof for the fire stakes? Or did you use a power drill? I searched high and low for my pin vise drill set and couldn't find it; time for a new one. I am worried I'll slip the bit and then disaster. I am contemplating removing the roof and drilling from the underside.

Thanks to everyone for sharing your mods.

Add Reply

Post

OGR Publishing, Inc., 1310 Eastside Centre Ct, Ste 6, Mountain Home, AR 72653
800-980-OGRR (6477)
www.ogaugerr.com

×
×
×
×
Link copied to your clipboard.
×
×