Arnold D. Cribari posted:

Balshis, is Apefinger a member of this Forum?


If he is, I hope his ears are burning.

As promised, here's a quick shot of the reassembled locomotive.  I know it's none too clear, but it was hand-held in available light.  When the whole thing is done, I'll post a better image:

Restored 312-1-21

One thing that has struck me as I've begun working on this locomotive is what a nice model of the real thing it is.  Proportions are good, faithfully capturing the oversized boiler of the real K5.  Detail isn't bad, either.  AC Gilbert was right when they claimed their locomotives were more realistic than their contemporary competition.  The only thing that isn't what it ought to be is the size of the drivers, which I think are too small (I didn't bother measuring them to be certain).

Attachments

Images (1)
  • Restored 312-1-2

Posted this before but it may be interesting to some new members.

My Lionel 158, the before pictures are below.

The 158 had one original dummy headlight and the just the base from the other dummy headlight. Replaced both dummy headlights with originals (hard to find) as reproductions are not the same as they have a shallow draw on the headlight dome part (very noticeable).

The contact assembly was missing one roller. Replaced the contact assembly with new unassembled one (one that had to be riveted together). The reason for this is that I like to use the Lionel badge from the original contact assembly (just looks better especially after you clean the badge). Just a note, I do not like to solder the wire to the contact assembly rivet facing the motor, as a intermittent condition could develop over time between the rivet and the contact plate. What I do is open a hole (that is all ready there) on the fiber plate part of the contact assembly (before I rivet the assembly together). Then I tin the contact plate where the hole would be with solder, making sure that it is completely flat/smooth and will not interfere with the assembly. Once assembled and riveted together I solder a wire to that hole point and install it in the frame.

One wheel had a large chunk out of it and the axles were a bit worn, bearings were still good. Replaced the one broken wheel with a repro and painted all the wheels the same color red, then installed new axles.

Cleaned motor and completely rewired it with a super flex wire (silicone jaclet with about 120 strands per wire fot 22 AWG). During assembly motor was oiled/greased and runs good.

Stripped all the paint from the frame and shell.  Had to bang out some dents and straighten out the frame and ends of the roof. Primed it and painted the frame and shell black. If you notice, you will not see any painted highlights around the window or on the handrails. From my research, the Lionel factory did not apply any paint to these areas with the black engine.

Replaced both couplers and rivets with new/repro’s. Then I rubber stamped the loco in gold (like the original).

I use two fillister screws backed up with a small nylon washer to hold the shell to the frame. The reason for the nylon washer is not to have the screw mess up the paint when tightened.

These are easy prewar loco’s to work with. They will also sharpen up your rebuild skills and when research/hunting for parts you will find a lot of other stuff to use or go to with other projects.


Attachments

Images (1)
  • mceclip0

This should more likely be considered a rejuvenation of a late 1930s 80N  semaphore.  I bought this last year but only recently worked on it and installed on the layout.

Rewired...tweeked and lubed the linkage and we are back in business. 

No need to hide the wires...they look like scale electrical cables.    FendermainIMG_2054IMG_2053

Attachments

Images (2)
  • IMG_2054
  • IMG_2053
Fendermain posted:

This should more likely be considered a rejuvenation of a late 1930s 80N  semaphore.  I bought this last year but only recently worked on it and installed on the layout.

Rewired...tweeked and lubed the linkage and we are back in business. 

No need to hide the wires...they look like scale electrical cables.    FendermainIMG_2054IMG_2053

Looks great. Pl;us your layout looks like fun. How did you make the road ramps on the track?

I did a project on some prewar trains for a coworker. We were talking about trains and he said he had some from when he was a kid but were rusty and junk. I told him I look at them and see what I could do. Turn out it was a 252 freight set. Here's some photos of what I did.

IMG_6480IMG_6491

Repainted frame and cleaned brass

IMG_6581

Somebody used and emory file and made a bracket to hold down brush plate. Must have lost the proper screws

IMG_6541

some strange brushes, that one with the copper strands would have torn up the plates

IMG_6545

Installed proper screws for brush plate and new brushes 

IMG_6554

Of course new wheels I could not find solid ones

IMG_6556

Also new brass gearsIMG_6583

IMG_6575

Attachments

Images (9)
  • IMG_6480
  • IMG_6491
  • IMG_6581
  • IMG_6541
  • IMG_6545
  • IMG_6554
  • IMG_6556
  • IMG_6575
  • IMG_6583
Videos (1)
IMG_6607
franktrain posted:

I did a project on some prewar trains for a coworker. We were talking about trains and he said he had some from when he was a kid but were rusty and junk. I told him I look at them and see what I could do. Turn out it was a 252 freight set. Here's some photos of what I did.

IMG_6480Repainted frame and cleaned brass


Somebody used and emory file and made a bracket to hold down brush plate. Must have lost the proper screws


some strange brushes, that one with the copper strands would have torn up the plates


Installed proper screws for brush plate and new brushes 


Of course new wheels I could not find solid ones


Also new brass gears


Nice Job, was your co-worker happy?

RonH posted:


Cleaned motor and completely rewired it with a super flex wire (silicone jacket with about 120 strands per wire fot 22 AWG). During assembly motor was oiled/greased and runs good.


Ron, what can you tell us about this "super flex" wire?  I'm not familiar with anything like that, but it sounds like something I could really use.

--John

The train layout that my father built for me for Christmas of 1960 was in terrible shape.  After 10 years in a barn in Temecula, it had rodent damage and had been the target of thieves who stole all of the trains and accessories from it (not to mention a great many other trains.

I brought it to Alhambra about two years ago.  Over I two to three month period, I removed the track, bleached the would to remove the rodent stains, painted the board, cleaned/replaced track, extended it by 4 feet, installed wide radius track (modified by Rich Riley), replaced about 90% of the wiring, replaced the missing stolen accessories, installed DCS and TMCC, and got everything working again.

I still need to do a bit more painting and touch up, but I have been running trains pretty much constantly since late spring of last year.


Before and after photos below.


After video:  https://youtu.be/OZFnWJfPvnA


Attachments

Images (3)
  • 20170310_171130
  • 20170310_171215
  • 20170607_134443
Last edited by RAK
Balshis posted:
RonH posted:


Cleaned motor and completely rewired it with a super flex wire (silicone jacket with about 120 strands per wire fot 22 AWG). During assembly motor was oiled/greased and runs good.


Ron, what can you tell us about this "super flex" wire?  I'm not familiar with anything like that, but it sounds like something I could really use.

--John

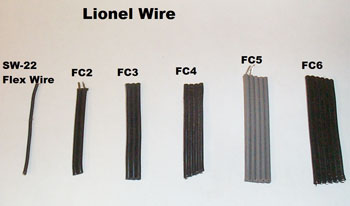
Just looked this up on nasty bay, just search with this. "5 Meters 28/30/24/26/22 AWG Flexible Silicone Wire Super Soft RC Cable UL". I think I used 22 AWG and picked it up at a Model RC show. (you may want to ask for the jacket diameter as some is used for RC batteries with a large diameter jacket.

I use only black on my engines and combine it with heat shrink and screw terminal when needed (do not like to screw bare wire down). I know it is not a Lionel standard on prewar, but I think it is better than originals. So with this my bringing back old prewar engines and car back to life is not a restoration but a rebuild.

With this I will order some for myself

Just ordered two 5 meter lengths of 22 AWG Flex wire.


Last edited by RonH
M. Mitchell Marmel posted:

As a side note,  I use repro Lionel wire from The Train Tender.  He offers black soft jacketed wire:  

SW-22

black super flex wire #22 gauge/ft

0.30


SW-24

black flex wire #24 gauge/ft

0.30

http://www.ttender.com/partslist.html

 How many strands on the 22 AWG? Does it have a silicon jacket? Just curious as the price would be good if it is the same type that I use. I just emailed train tender asking for this information


Sorry to get off topic, just responding to a question, I will get back to Resurrection Monday. 

Last edited by RonH
M. Mitchell Marmel posted:

Ron:  Jeff Kane at the Train Tender should have the information you need.   He's an excellent source for parts and extremely helpful.  

Mitch 

Contacted Jeff today and the wire he has seems to be the same as I have been using. He has  a large spool for a good price and it will be enough for many rebuilds. Thank you all for pointing me to Jeff Kane

RonH posted:
franktrain posted:

I did a project on some prewar trains for a coworker. We were talking about trains and he said he had some from when he was a kid but were rusty and junk. I told him I look at them and see what I could do. Turn out it was a 252 freight set. Here's some photos of what I did.

IMG_6480


Nice Job, was your co-worker happy?

Yes he was very happy and it will go to his grandson. There also was a 229 set and transformer that I cleaned up also. I put it all together for him in an old wooden crate.

I had a great time with this project. 

fullsizeoutput_a94fullsizeoutput_a91fullsizeoutput_a93

fullsizeoutput_a92

fullsizeoutput_a8f

IMG_6858

Attachments

Images (6)
  • fullsizeoutput_a94
  • fullsizeoutput_a91
  • fullsizeoutput_a93
  • fullsizeoutput_a8f
  • IMG_6858
  • fullsizeoutput_a92
Last edited by franktrain
Balshis posted:

I have been posting on the "Buy anything cool lately" thread about my experiences resurrecting the American Flyer 312 I bought at a train show on Nov. 4, so I won't bother repeating all that here.  But I can report on my current progress.

With the reverse unit installed in the tender, I have turned my attention to my least-favorite part of restoration: painting.  I put a coat of Krylon Flat Black on the tender, though it's actually more like Semigloss than flat.  Then I tried to put a "Pennsylvania" dry transfer on it before sealing the whole thing with clear flat finish.  Unfortunately, it seems that my PRR transfer sheet -- which is pretty old -- has dried out, because the lettering won't stick to the tender at all.  I'm going to have to send for some new transfers.  And yes, I know I could use decals, but I don't like decals and have always used dry transfers in the past and that's what I prefer, so I'm going to stick with them (no pun intended).

The locomotive boiler shell itself doesn't need repainting, except for a couple of tiny spots near the rear of the cab that can easily be touched up with a fine brush.  So the only remaining painting to do is the PRR keystone on the boiler front.  My eyes aren't what they used to be, so I've been doing it with a jeweler's loupe.  I finished the red background last night, and will probably do the yellow edging tonight, if I have time.

When the Flyer shoulder screw arrives from The Train Tender, I'll attach the NOS trailing truck that I got from eBay last week to the locomotive frame.  Then I'll wire in the LED headlight and put it all back together (I've already cleaned and polished the rods and valve gear).

Meantime, I'll be ordering some MV lenses for the marker lights on locomotive and tender.

I'm waiting till I get the locomotive reassembled to take any more photos, but here are a couple I took in the early stages of restoration.  This is the tender, just after I installed the reverse unit (the previous owner had ripped the original unit out):

Flyer1

I know the wiring looks pretty sloppy, but I wanted to be sure everything was long enough to reach the locomotive when I put the tender shell back on.

This is the rest of the 312, sitting on a DVD shelf in my basement, waiting for attention.  At this point, I hadn't yet done anything to it, though you can see the new trailing truck sitting just behind the cab:

Flyer2

If this thread survives that long, I'll post updates to this project here.

I just finished one of these up last week for a friend here at work. He didn't want me to removed the years of dirt and crud. Just wanted to get it running so his dad can see it still runs before he passes. Smoke box was disgusting, Someone just kept adding smoke fluid in the hopes of getting it to smoke. Cleaned all that up, replaced some parts, a newer e-unit, so now it chuffs and smokes like a new one.

Last edited by Jayhawk500
franktrain posted:
RonH posted:
franktrain posted:

I did a project on some prewar trains for a coworker. We were talking about trains and he said he had some from when he was a kid but were rusty and junk. I told him I look at them and see what I could do. Turn out it was a 252 freight set. Here's some photos of what I did.

IMG_6480


Nice Job, was your co-worker happy?

Yes he was very happy and it will go to his grandson. There also was a 229 set and transformer that I cleaned up also. I put it all together for him in an old wooden crate.

I had a great time with this project. 

fullsizeoutput_a94fullsizeoutput_a91fullsizeoutput_a93

fullsizeoutput_a92

fullsizeoutput_a8f

IMG_6858

I really like the wood box that you put the set into for him. It really gives the set a greater sense of quality and importance (not that it needed anymore than it already has by itself). It conveys the message that it is an heirloom and should be handled with respect. It’s also neat and clean and begs to be pulled out and played with. Great job!

It's been a busy week for me, but I did manage to squeeze in some time for my ongoing Flyer 312 K5 restoration.  First, I made a new drawbar for the tender.  Apologies that you can't really see it in this photo, but I put three holes in it, for attaching the tender at different degrees of closeness to the locomotive.  The furthest one (which is what's being shown here) is to allow the use of Flyer 20" curves.  The other two are for use on layouts with shallower ruling curves -- or for display, of course.

P1050557-2

The other step was to open up the tender-truck sideframes.

P1050561-2

These are Flyer plastic trucks, of course.  Although, I have, in my time, done the same thing to Lionel cast-metal postwar AAR trucks,  American Flyer metal truck sideframes are so thick that opening them up would have been a major task.

I know some might object to this step, and I understand that.  But in my opinion, it greatly improves the look of an already-excellent locomotive/tender set.  Rather like adding the trailing truck to the locomotive.

As an aside, as I've been working on this project, I've been more and more impressed at the quality of workmanship that Gilbert put into their postwar trains, both in design and execution.

Attachments

Images (2)
  • P1050557-2
  • P1050561-2

Finally, after just a little over a month, I can now post the completion of my American Flyer 312 restoration project:

P1050567-2

Having already finished up the locomotive, it was the tender that required the most restoration work, both cosmetic and mechanical.  Over the past couple of days, I applied Clover House dry transfer lettering, then sealed the PRR banner with Krylon Matte Finish (with which I'm pretty happy, I might add).  After two coats of the Krylon had dried, I put red jewels in the tender marker lights, using black silicone caulking to hold them in place.  I'd have used MV lenses, but after searching everywhere, I couldn't find any red ones available in the right size.

Next, I replaced the tender ladder extension with a repro from The Train Tender.  The original had been broken off by Apefinger long ago, but installing the new one wasn't difficult.

After that, it was time to finish up with the handrails.  Apefinger had let them develop rust, of course, so I went over all of them with fine sandpaper, followed by crocus cloth, to polish them up.  The final step was to shine and protect them with Simi-Chrome metal polish.

I know they're not scale thickness, but they look fine -- with the possible exception of the rearmost railings.  To my eye, the overscale diameter of them really sticks out.  Maybe at some future time I'll replace them with smaller-diameter brass railings; we'll see.

Once the tender shell was ready to go, it was time to screw it back on its frame.  And here, Apefinger still had one final desecration to throw at me.  Of the four self-tapping screws that hold frame to shell, only one was actually functional.  Another was too small and would not tighten, and the remaining two were broken off altogether.  I was able to back one of the broken ones out, but the other one will remain there, alas.  I found proper screws in my parts box to fill the other holes, and the tender was in one piece again, with a working reverse unit:

P1050568-2

That done, it was time to finish up the final touch on the locomotive.  Though I couldn't track down the correct MV red lenses, I was able to secure four green ones for the class lights.  Again, I used black silicone caulking to mount them to the upper fixtures and the ones on the pilot beam:

P1050570-2

You can't see the marker on the far side, but trust me, it's there.  If anyone's still curious about the details, I painted the keystone using a couple of toothpicks, a jeweler's loupe and a lot of patience.  The bell is NOS from eBay, polished with Simi-Chrome (I can't recommend that stuff highly enough; I've been using it for years).

ProTip: hand-held camera for an available-light closeup shot isn't exactly ideal, I know.


Summary:  and so, the very dirty, dingy and much-mucked-with American Flyer K5 that I brought home from a train show on November 4th is now a nice 1/64 model that runs and looks very good indeed. 

Was it worth all the time, work and expense I put into it?  It was for me.  I enjoy doing restorations, and I've always meant to get a Flyer K5 to go with the RDG 302 and NYC 322 that I restored some years ago.  Along with pride of ownership, I now have pride of workmanship, which is important to me.  And I hope that this real-time series of postings will encourage someone else to rescue another forlorn locomotive from oblivion.

For the future:

-- I will be mounting some track on a display board, and when I'm done, the K5 will finally leave my DVD shelf and take up residence on it when it's not actually running.  It'll stand between its brothers, the 302 and 322. 

--I already mentioned the possibility that I could replace the rear handrails with something thinner. 

--And I have a sneaking suspicion that the wires I used for the tender/locomotive tether may be a bit too stiff for heavy layout use.  I've already ordered some more-flexible silicone wire, in case replacement becomes necessary. 

--I'd like to make the builder's plates on the boiler sides a proper bronze color, and I've bought a bottle of metallic paint for the purpose.  But I won't get to that until I pick up a fine-point artist's brush. 

--And of course, there are still some spots on the locomotive that need a bit of black touch-up paint (the pilot is one of them).

Thanks, Arnold, for starting this thread.  I hope some of you have enjoyed this little saga.  I had fun writing it.

--John, 12/8/2018

Attachments

Images (3)
  • P1050567-2: AF 312 and tender
  • P1050568-2: 312 tender view
  • P1050570-2: 312 nose view

I'm not sure tuning an accessory qualifies as a resurrection, but here goes.

The operating forklift can be as big a crowd pleaser as any of the classic postwar accessories. Lately, mine grabs, but does not hold, the piece of wood. It drops the wood before it turns and dumps it.

I spent the last hour trying to figure out the puzzle. There is a spring that might have something to do with it.

Shortly, I will make a video and post it.

Any suggestions on how to get the forklift to hold the wood until it properly turns and dumps it would be most welcome.

Arnold D. Cribari posted:

As I was in the process of making this video of the operating forklift, I made 2 final adjustments. I made the track sit a little deeper in the track holder, I made the accessory as level as possible from back to front, and I slowed down the speed. Take a look:

I fixed it! Hooray!

Super!!  It is indeed satisfying to keep these wonderful creations humming along.

Fendermain

Arnold D. Cribari posted:

As I was in the process of making this video of the operating forklift, I made 2 final adjustments. I made the track sit a little deeper in the track holder, I made the accessory as level as possible from back to front, and I slowed down the speed. Take a look:


I fixed it! Hooray!

Good job  I've never seen one of these in action before.

Since returning from the Westchester Toy and Train Show, where I did my usually scrounging, I've been busy removing bad wires in the 2 passenger cars I bought, soldering new wires in place, and cleaning and lubricating.

Very satisfied with the outcome, and will post pictures tomorrow. Love those classic semi scale passenger cars with the names of cities/towns in NJ. They look so good behind the LC+ Jersey Central Pacific. Arnold

I would call this more of an exorcism rather than resurrection.  Last week my MTH PS2 260E began acting wildly when powered on the track...high speed lurching then a slow resumption...then repeat.  It must be possessed.

I checked the usual...clean wheels and track...has a new BCR2..adequate steady power ...proper lube. 

I use PW transformers so I got my Z1000 floor layout power hooked up to the track and sent a speed control off code...smooth operation then.  Ahhh...I cleaned the speed sensor...no change.

Checked with the MTH board...the expert said I was looking in the right area.

Most of you who know me know I am a pre/post war guy.  This is all new.

I looked at the sensor and it was a tilted up a bit. I tried to move it..no go. I then wedged a small piece of clear plastic behind the mount (see pic). This forced the sensor closer to the flywheel with a better angle. I hope it holds.IMG_2100

BACK IN BUSINESS.  It works like new.

In summation...deductive reasoning...forbearance and just plain luck prevailed.  I feel better now.

Fendermain

Attachments

Images (1)
  • IMG_2100
Last edited by Fendermain
Fendermain posted:

I would call this more of an exorcism rather than resurrection.  Last week my MTH PS2 260E began acting wildly when powered on the track...high speed lurching then a slow resumption...then repeat.  It must be possessed.

I checked the usual...clean wheels and track...has a new BCR2..adequate steady power ...proper lube. 

I use PW transformers so I got my Z1000 floor layout power hooked up to the track and sent a speed control off code...smooth operation then.  Ahhh...I cleaned the speed sensor...no change.

Checked with the MTH board...the expert said I was looking in the right area.

Most of you who know me know I am a pre/post war guy.  This is all new.

I looked at the sensor and it was a tilted up a bit. I tried to move it..no go. I then wedged a small piece of clear plastic behind the mount (see pic). This forced the sensor closer to the flywheel with a better angle. I hope it holds.IMG_2100

BACK IN BUSINESS.  It works like new.

In summation...deductive reasoning...forbearance and just plain luck.  I feel better now.

Fendermain

Yes!  That's the kind of improvisation that model railroad craftsmanship rewards.  Good thinking, Fendermain.

Here's another small resurrection.

Bought 2 scuffed up classic Postwar semi-scale NJ passenger cars (Newark and Elizabeth) at the Sunday train show. Besides cleaning them with Ivory soap, warm water and a soft tooth brush, and lubricating the wheels (only I drop of light oil on the axle on each side of wheel), one of them was missing the passenger silhouettes and had wire with insulation peeling off.  I know such bad wire can cause shorts.

I inserted silhouettes from another duplicate and beat up Hillside observation car and replaced the defective wire for the lights, which is a relatively easy soldering job.

Then I got ambitious and replaced old wires with brittle insulation on a couple of other passenger cars I already had. This was good soldering practice for me.

Here's a short video of 6 of these passenger cars, including Newark and Elizabeth, being pulled by LC+ Jersey Central Pacific steamer, which I think is the perfect engine for these cars with the names of NJ cities and towns.

One more thing, there was a lot of rust on the inside of one of these cars, a little rust in the other, so I sprayed the inside with WD40 and used another old tooth brush and small pieces of paper towels to remove some of the rust. Does WD40 help control such rust?

Next time, I will take before and after pictures.

Also, it occurred to me that I could replace the light bulbs with LEDs. I think Dan mentioned he has done that for some of his train related equipment. Is that a good idea? How does that impact the value? I've never sold any train related item, and probably never will, but my kids will someday sell most of it, probably on E Bay after I'm gone. Nothing I have is mint, and everything is run a lot. For me, it's been purely "an investment in happiness." Arnold

Attachments

Videos (1)
20181211_075634

Nice work, great revitalization process, good addition with the silver NJ passenger fleet  Arnold. Thanks for sharing the video.

The value of a train is proportional to the happiness it makes. In dollars and cents it depends on what it means to the next owner. In well loved or run PW I have always thought that the LEDs are more stable, perhaps brighter with less voltage.  Perhaps a power voltage saving cooler bulb and longer life may be worth it for other reasons. However, the initial cost should be investigated.  My brain perceives the LED light to be cold rather than vintage incandescent warm. I personally like the traditional bulb.

I am of the belief that the interchangeability of bulbs does not impact the value unless you have that $4000+ mint NH Lionel  EP 5 museum piece ! Lol.

Arnold D. Cribari posted:

Here's another small resurrection.

Bought 2 scuffed up classic Postwar semi-scale NJ passenger cars (Newark and Elizabeth) at the Sunday train show. Besides cleaning them with Ivory soap, warm water and a soft tooth brush, and lubricating the wheels (only I drop of light oil on the axle on each side of wheel), one of them was missing the passenger silhouettes and had wire with insulation peeling off.  I know such bad wire can cause shorts.

I inserted silhouettes from another duplicate and beat up Hillside observation car and replaced the defective wire for the lights, which is a relatively easy soldering job.

Then I got ambitious and replaced old wires with brittle insulation on a couple of other passenger cars I already had. This was good soldering practice for me.

Here's a short video of 6 of these passenger cars, including Newark and Elizabeth, being pulled by LC+ Jersey Central Pacific steamer, which I think is the perfect engine for these cars with the names of NJ cities and towns.

One more thing, there was a lot of rust on the inside of one of these cars, a little rust in the other, so I sprayed the inside with WD40 and used another old tooth brush and small pieces of paper towels to remove some of the rust. Does WD40 help control such rust?

Next time, I will take before and after pictures.

Also, it occurred to me that I could replace the light bulbs with LEDs. I think Dan mentioned he has done that for some of his train related equipment. Is that a good idea? How does that impact the value? I've never sold any train related item, and probably never will, but my kids will someday sell most of it, probably on E Bay after I'm gone. Nothing I have is mint, and everything is run a lot. For me, it's been purely "an investment in happiness." Arnold

Nicely done Arnold.

I'm kinda partial to the 027 2400 series passenger cars. I just got done soldering new wires for the lights on four of them.

Bought a Lionel 2321 FM Lacawanna from ebay at a good price and I knew it had battery damage but I took a chance. Otherwise it looked solid.

IMG_4922

When I got it I started the cleanup and opened the top and found the corroded battery but the motors had original tape to hold the wire in place this meant the engine was probably never serviced from 1954.

IMG_4929IMG_4930

Yuck!

IMG_4931

Next step was to get rid of that battery, not an easy task.

IMG_4933IMG_4936IMG_4938

Now that the battery is removed I gave the armatures and axles a little oil and clean the wheels and pickup rollers. Heres a video of the first power.

** Video to be posted


Then did some more cleanup of battery holder area and e-unit. Did not mess with the horn yet.

IMG_4966

IMG_4968IMG_4969IMG_4970

Also cleaned and lubed pinion gears and armatures and brushes this 2321 is ready for duty for another 60 years.

IMG_4972

Now I have my Thunderbird set.


Attachments

Images (12)
  • IMG_4922
  • IMG_4929
  • IMG_4930
  • IMG_4931
  • IMG_4933
  • IMG_4936
  • IMG_4938
  • IMG_4966
  • IMG_4968
  • IMG_4969
  • IMG_4970
  • IMG_4972
Videos (1)
IMG_8226
Last edited by franktrain
Arnold D. Cribari posted:

As I was in the process of making this video of the operating forklift, I made 2 final adjustments. I made the track sit a little deeper in the track holder, I made the accessory as level as possible from back to front, and I slowed down the speed. Take a look:

I fixed it! Hooray!

Nice job Arnold.  My forklift loader works well, but the forklift driver must have had too much coffee that day.....LOL  At 1:01 into the video, the forklift appears.

https://youtu.be/KSRahRI7OWY

franktrain posted:

Bought a Lionel 2321 FM Lackawanna from ebay at a good price and I knew it had battery damage but I took a chance. Otherwise it looked solid.

When I got it I started the cleanup and opened the top and found the corroded battery but the motors had original tape to hold the wire in place this meant the engine was probably never serviced from 1954.

Yuck!

Next step was to get rid of that battery, not an easy task.

Now that the battery is removed I gave the armatures and axles a little oil and clean the wheels and pickup rollers. Heres a video of the first power.

** Video to be posted

Then did some more cleanup of battery holder area and e-unit. Did not mess with the horn yet.


Nice work on cleaning up that ugly battery damage.  I only have one PW diesel, and a mess like that is the reason I always take the battery out when I won't be running it for a while.  Enjoy your FM -- you've earned it!

--John

Add Reply

Post
×
×
×
×
Link copied to your clipboard.
×
×