Originally Posted by John Pignatelli JR.:

Install a waterless urinal in the room. The wife and daughter won't come within 20 feet of the train room, even if you don't use it.

Good idea, a very good idea! and no walls around it!

Truly "exceptional" advice.  Isn't that what Howard Hughes did, though he used jars, I believe. And we all know what a real chick-magnet he wasn't.

FrankM

Finished laying track on one side of the lower table. Powered up the two mains that will run around to the South Side. One of them runs through the lift bridge, so I positioned that wired it up and wired the power cutout for the approach track. In my spare time I downloaded Microsoft's ICE (Image Composite Editor) program. Since I can't find the scene that I want on all the commericial background websites; I am going to try a home cooked version.

Had a beer and ran trains for about an hour after the kids went to bed.  Wife was busy doing her own thing so an hour free for trains was a nice break.


I spent that time switching out a train.  My ten wheeler pulled in a train of mixed box cars for the sprocket factory and my 0-8-0 switched out the train to the cover hoppers and double sheathed box cars to haul grain from the elevator to the big city.  


I really want to focus on operations on the layout.  Once the ferry is here and installed I will have endless possibilities of moving cars on and off the layout.  I also hope to install a 2 track hidden staging yard this summer.


I am thinking of utilizing a modified car/card system for operations.  I will start doing some research on it. 

chuck,  love the setup.  very interesting and busy.  How do you do the hinged track with real trax?  just break off the plastic tabs? lets see more of your layout pics if you have some.  I really like what you have.  Cool! Originally Posted by Chuck B:

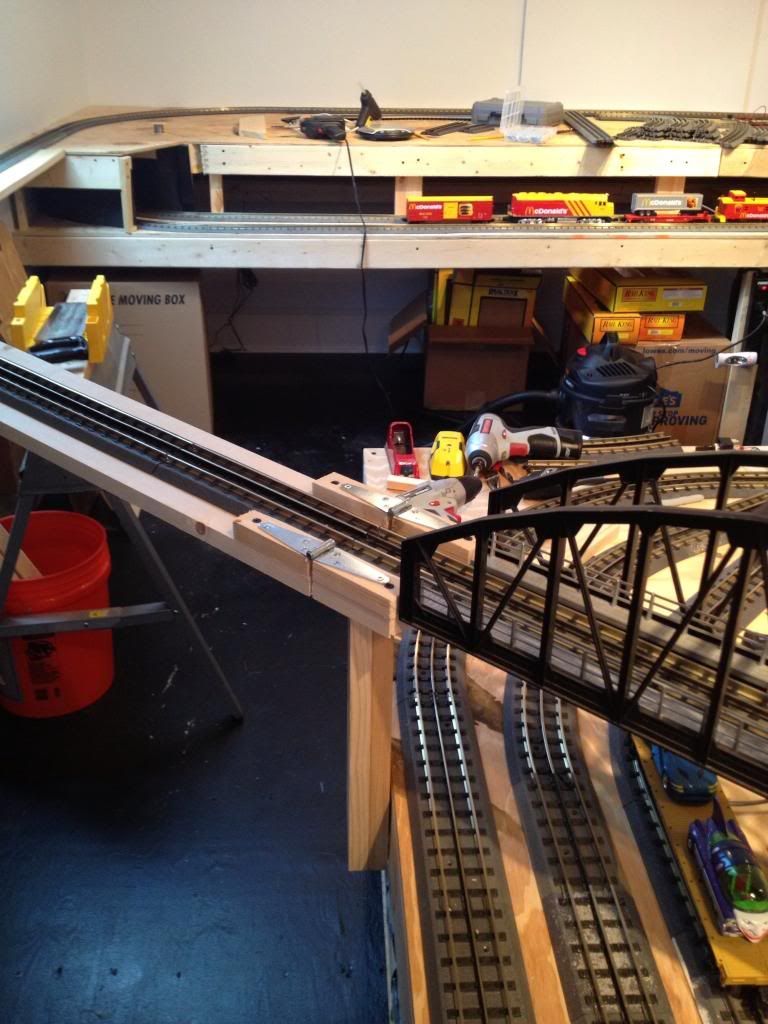
Added a lift-up "bridge" to my new layout.  Seems to work and lines up perfectly:

Now, what to do to cover up those hinges........


That's GREAT, Chris. I also have a bridge like this, but a two-section affair. You solved the rail/crunching problem by raising the hinge on blocks. Wish I had thought of that! My spans fold down not up. Okay, what you can do to camouflage those hinges is - maybe - what I did. Paint the entire bridge and hinges dead black, then construct a black through-trestle around the whole thing (which will also protect your trains). OR construct a (simulated) cut-block stone wall across the entire span, making it a the same profile as the blocks. You can purchase O scale stone block facings made of hard foam from Scenic Express. They are easy to work with. I'm a 2-railer, but your layout looks great! Congrats on a nice job, Chris : )
~Andy
 
Originally Posted by Chris D:
chuck,  love the setup.  very interesting and busy.  How do you do the hinged track with real trax?  just break off the plastic tabs? lets see more of your layout pics if you have some.  I really like what you have.  Cool! Originally Posted by Chuck B:

Added a lift-up "bridge" to my new layout.  Seems to work and lines up perfectly:

Now, what to do to cover up those hinges........


After falling back, went into pell mell retreat and threatened disertion as discovered the

opening door on the big retort won't clear the "corrugated metal" building's doors on the

creosote plant.  So a redesign is in progress, most reluctantly making the building still

larger.  Having scoured LHS'S for nonexistant Plastruct roofing, ordered some in, with

no immediate need, given the mentioned problem.

It's been just over a week since I posted here. I did get a little bit done between Patrick's visits, but working with my right hand and arm in compression bandages makes everything more difficult.

I did get a good start on my lower level lighting. There 8 junction boxes spaced every 4', connected by conduit. Each will have a standard light socket.

IMG_1785

The bulbs have yet to be determined. Maybe CFL, maybe LED, definitely 5000K.

IMG_1786

I'm starting to feel a little guilty that I'm not actually working on trains or track, but this is really the best time to get this stuff done. It only gets better from here.

IMG_1787

So, Patrick was here today, and we did a bunch of things. We started off by moving this row of lights, and then finished installing all of the full tiles. Out in the shop, we installed a brace on the plywood rack, then moved the materials that were delivered a couple weeks ago. This gave us access to the table saw, so we could cut the reflector panels for the lights. Then we installed the panels. Big difference!!!

Here are a couple before and afters.

IMG_1774


IMG_1778

The reflector panels are just melamine coated sheets of hardboard. They really keep the light from being lost above the ceiling. I still need diffuser panels to complete the lights.

IMG_1772


IMG_1783

I'm going to keep working on the lighting. Patrick will be back Wednesday.

Attachments

Images (7)
  • IMG_1785
  • IMG_1786
  • IMG_1787
  • IMG_1774
  • IMG_1778
  • IMG_1772
  • IMG_1783

Just operated the trains and had a blast. My wife's son and his wife visited overnight with us and this was the first time they had seen our renovation project. It was nighttime which I think shows of the layout at it's best with all of the layout lights.


I continue to be very impressed with the operation of the Lionel ATSF 3000. I love the Challengers, Big Boy, Allegheney, and other articulated engines, but this engine is in  a class of it's own.

After having rebuilt the smoke generators in my DD35-A last week, I have decided that I now need to fit a smoke extractor in my train room.

I spent a very happy hour running my trains this morning, but that DD35-A now puts out so much smoke that I can hardly see the far side of my layout, and breathing becomes optional after a while. 

I slightly extended an already far to short siding as far as possible. At least now I may be able to fit more than one small freight car on it. It is currently drying (scenery) before I replant trees and bushes. 


I do have some much needed touch ups to do on the rock cliffs surrounding the outside of the layout that have taken a beating during layout expansion. I plan to get that out of the way this week. 

Today I received an awaited package...I know have 2 locomotives, 2020 steam and tender, 623 Diesel Switcher, 2 Cabooses, Lionel Bay window Safety and the Rescue Unit; 3 Log flat cars, 1 Canister Gondola, one Mild Car with cans and loading dock, 1-86816 Transformer Flat car, 1 6424 Auto Motive FLat Car w/Box, 1-6519 Allis-Chalmers car,and a KW transformer...


Thank you fellow forum member Jim Lawson...tomorrow it track testing day...


Looking forward to incorporating all of these in the layout...


jz

Gregg, I made those on my laser cutter out of bass plywood. Thnx for the comments!
 
Cesar
 
 
Originally Posted by Gregg Laiben:
Cesar - great looking bridge!  If I may ask, what did you use to make it?  Especially the hand railings. Thanks...gregg
 
Originally Posted by FatBoy:

Made a bridge to span the yard.


yardbridge


Cesar


Ran my most finicky engine and cleaned track as needed to make it run smooth.

Opened up an operating car (Signalman boxcar) and posted wiring for another forumite.

Counted up cars by type and determined I need at least one more stock car in a western roadname.

Noted I have more than enough tank cars but at least 4 of them are the old Sonoco cars so they can sit in the yard as surplus.

I also have more reefers than needed so some of them will be yardbirds too.

Well today we did some trouble shooting to determine why the waterfall appeared to have a leak in the reservoir tank...found the refill valve and float assembly were not working properly and removed them...now looking for replacements and took photos to show how much we have accomplished thus far...mind you all of this is outdoors...

IMG_4742

IMG_4743

IMG_4744

IMG_4745

IMG_4746

IMG_4747

IMG_4748

IMG_4749

IMG_4750

IMG_4751

IMG_4752

IMG_4753

IMG_4754

IMG_4755

IMG_4756

IMG_4757

IMG_4758

IMG_4759

IMG_4760

Attachments

Images (19)
  • IMG_4742
  • IMG_4743
  • IMG_4744
  • IMG_4745
  • IMG_4746
  • IMG_4747
  • IMG_4748
  • IMG_4749
  • IMG_4750
  • IMG_4751
  • IMG_4752
  • IMG_4753
  • IMG_4754
  • IMG_4755
  • IMG_4756
  • IMG_4757
  • IMG_4758
  • IMG_4759
  • IMG_4760

I stripped the paint from my Legacy Ten Wheeler today and applied a nice locomotive black paint to it.  I also replaced the rear coupler with a kadee and will be looking for a way to modify the front scale coupler to be a kadee also.   In a few days I will have the decals I need.  I also ordered some Neolube to weather its' running gear.


If I get some time after the kids go to bed I plan to decal a baggage car.   I also plan to strip and repaint 2 more passenger cars for my M&GL RR commuter train that the ten wheeler will pull.   

Started with my 2046 Hudson, and a tmcc metal tender, 2 auto-milkcars, 2 evans autoloaders with 3 diecast autos each, log car loaded, broadway limited passenger car, O-NYC stock, Jessie James, bronx giraffe, nyc gon., Burlington gon, Sunoco 2 dome tanker, Lionel 1 dome tanker, Great Northern, Baby Ruth, and  Wheaties boxcars, followed by a 2257 caboose. 16 cars at 12volt

 Then I answered the phone. When I did, I had a coupler open up between the 2 gondolas! The Hudson, accelerating, made the graded hill, then 0-27 turns on just

 7 wheels , completed the 12x11 square loop and proceeded to plow into the rear of the caboose, de-railing every car at rest ahead of it. Plowing through accordion-ed cars, sending the Burlington gondola, and the passenger car hurling over the ceiling shelf layout "cliff" 9.5 feet down to the floor. Cleared the track of cars till only one remained(Jessie James). WOW! My worst wreck ever. All is well with the fallen cars, not a scratch. And the loco didn't even blink.

 The call? My contact for a G guage Lionel Goldrush porter, and I just bought it. I celebrated my new purchase by re-railing and loading more cars. Now with a total of 24 pieces of PW rolling stock behind the Hudson, filled her full of Pat,s P&P vanilla smoke fluid, and began smoking up the room.

 Life is pretty good sometimes, eh?

Patrick was over yesterday and we worked on whole range of projects.


We finished cutting the reflectors for the lights, then we started hanging the eye bolts for the south half of the ceiling. That process got interrupted when some of my old buildings needed to be moved. So we jumped over to the other side of the room and worked on the layout lighting for a little while. When we had a couple sections of that done, we put a piece of plywood on the upper deck, and moved the buildings out of the way. Then we finished the eye bolts. If you hadn't figured it out already, I have ADD.


I needed more main T's for the ceiling, so we took a field trip to Home Depot where we picked up some more conduit, some Kilz spray primer for the backdrops, and some of those LED daylight bulbs. They are a little spendy, but they look great. Can't wait to get them all installed.


When we got back, there was still some time left, so we went to hang the first T. That's when we noticed that another row of lights was in the wrong place. At that point it was quitting time. I guess that'll be where we pick up on Monday.


Over the last several days I have been waiting for matierial.  Today the roofing came in to finish this creosote plant.  It will take a lot of it....I did get the four walls up for the retort building, which measures 13" (52 scale feet) by 28"(112 scale feet).  Assorted problems with the three retorts and with this building, which had to be widened and raised, to clear a couple of opening doors on the retorts.  Old Holgate and Reynolds plastic brick sheeting does not accept Testor's plastic (red tube) glue very well.  I was using this up for the foundation.  Building is corrugated "metal" with a ribbed "metal" roof.  I will be using a lot of square tube styrene bracing.  All is going

on a board to support the retort structure and other buildings and track to the retorts.

That will have to be scenicked, so nothing is happening fast.

I'll post some photos when done. 


In the past week, I've extended two sidings, done scenery touch-ups and more. My LHS is currently dismantling their layout, a VERY well done Hi-rail layout and one of the best LHS layouts i've ever seen in order to build a new display that better shows new comers to the hobby of the different possibilities in small spaces. The owner plans to have a few different smaller sections with different themes such as basic, grass carpet type, hi rail, toy scenery with blocks, hot wheels, etc. He wants to show the different options and that you don't need a beautiful hi-rail layout to have fun. What does this have to do with my layout? Many of the buildings on the layout are on the chopping block so I picked one up as well as a few other things and added them. Lots of changes going on at my layout over the past few weeks. 

We have had the privilege of having a very good Forum friend and his wife visit us from the Chicago area and yesterday he did a photo shoot of the layout. He is a professional photographer so it was not just a matter of snapping a few photos casually. He brought lights, etc. to do get some beautiful photos.

They say you got to walk before you can run.  Wife gave up the big storage room in the basement 21 x 24 for the smaller one 18 x 10, which was going to be the train room.  So everything had to go from one side of the basement to the other.  Also it had to be organized not just thrown in there.  So the last 2 days have been moving stuff across.  But everything is now in its place and I can start bench work next week.

IMG_2988

IMG_2992

IMG_2994

Attachments

Images (3)
  • IMG_2988: All the Train Stuff
  • IMG_2992: New Layout Room
  • IMG_2994: Old Layout Room all Organized

Add Reply

Post

OGR Publishing, Inc., 1310 Eastside Centre Ct, Ste 6, Mountain Home, AR 72653
800-980-OGRR (6477)
www.ogaugerr.com

×
×
×
×
Link copied to your clipboard.
×
×