carsntrains posted:

Mike are you familiar with these types of cars?   3 of them have ''SKIDS" on the bottom of each truck.  2 of the 3 have copper looking coils on inner end of the couplers.  1 of the 3 has what looks like fiber board with wires running into the couplers??  Are they uncoupling cars?? 

Jim 

Electromagnetic coupler cars.  They use a separate rail; when energized, the couplers open.  

https://books.google.com/books...ctromagnetic+coupler

Mitch 

Today my wife and I vaccuum the center of my layout after completeing some kitchen reno's. Then it took me the better part of 2 hours to reset everything back up. Of course I made changes to the placement of buildings and roadways. I did get to run my train around the track for about an hour. Took some pictures and some videos. I enjoyed running my train and shooting the videos. Hopefully I will be able to download them for everyone to see....... This first one is after vaccuuming......IMG_3783

This second one is before vaccuuming...... Still waiting on my other pics to download.

IMG_3611

Attachments

Images (2)
  • IMG_3783
  • IMG_3611
Videos (1)
IMG_3624
paul 2 posted:

Started painting the grain mill. Painted the planking wood color going through the building and also the wood beams holding up the roof over the track. Then I painted all the outer sides. I decided while that was drying to start painting the Sur Sweet building I had already put together. I had painted it a grey color but since I had the small jars of color from Home Depot I thought I would give it a try. I think I can get both those buildings to work in that area. Pics of work so far.......................Paul

DSCN1382DSCN1383DSCN1386DSCN1388DSCN1389DSCN1390

Looks nice Paul, I have one painted red, I just might have to repaint it! LOL

carsntrains posted:
mike g. posted:
carsntrains posted:

OK try it again.    Here they are!! : )   PRR car pictured twice.   8 cars total. 

Way to go Jim! You got some nice looking cars there! Keep them upright! LOL

Mike are you familiar with these types of cars?   3 of them have ''SKIDS" on the bottom of each truck.  2 of the 3 have copper looking coils on inner end of the couplers.  1 of the 3 has what looks like fiber board with wires running into the couplers??  Are they uncoupling cars?? 

Jim 

Hi Jim, I don't have any, but from researching for couplers for Dave AKA Pin Creek,, they sounds like the old style electric uncouplers . I am talking about the 2 with the copper coils and the 1 with the fiber board! You could take a picture of the bottoms and I am sure someone has the answer here! Heck ask Dave!

M. Mitchell Marmel posted:
carsntrains posted:

Mike are you familiar with these types of cars?   3 of them have ''SKIDS" on the bottom of each truck.  2 of the 3 have copper looking coils on inner end of the couplers.  1 of the 3 has what looks like fiber board with wires running into the couplers??  Are they uncoupling cars?? 

Jim 

Electromagnetic coupler cars.  They use a separate rail; when energized, the couplers open.  

https://books.google.com/books...ctromagnetic+coupler

Mitch 

As I suspected.  Wife had told me it was bedtime (lol) so I didnt get to study on it.  Reckon I might take some tiny zip ties and try to close the contacts in the up position.  Maybe they wont hit the switches.  Dont want the to be shelf queens, but I'm not going to take the pads off either. 

Jim

RSJB18 posted:

Jim- I have swapped out the trucks on some older cars with these electrocouplers. I have had the same problem with the couplers opening when they go over my 5120 series turnouts.

Since these are all original I'm not sure if you want to mess with them. Maybe you could disconnect the wire?

Bob

Bob I didnt have any open.  But one of them got hung on a switch by the "Shoe" sticking down. 

Jim

Mark Boyce,

   Great job on the roll out bench work, I constructed a power station for the old layout in much the same manner but closer to floor level, I used 4" Casters with Ball Barring type wheels from Tractor Supply, and I am glad I did.  Still have the old power station even today, I may us it again on the up coming construction in the new Train Room, we will see.  

PCRR/Dave

DSCN1803

Attachments

Images (1)
  • DSCN1803
Last edited by Pine Creek Railroad
carsntrains posted:
RSJB18 posted:

Jim- I have swapped out the trucks on some older cars with these electrocouplers. I have had the same problem with the couplers opening when they go over my 5120 series turnouts.

Since these are all original I'm not sure if you want to mess with them. Maybe you could disconnect the wire?

Bob

Bob I didnt have any open.  But one of them got hung on a switch by the "Shoe" sticking down. 

Jim

The simplest solution, and one that is easily reversible, is to glue them up with good old Walthers Goo. It will hold the shoes up so they clear turnouts, and it you want to restore the cars to original just pick and peal the dried Goo off with a hobby knife.

Richard Leray 012918 posted:

Good morning folks. Here are the new photo's of my layout. I did change it up a bit. Moved the builds around to make it look better (I hope). I moved the farm over by the railroad crossing. Put down more plywood for roads.

IMG_3857IMG_3856IMG_3855

Nice work!  It all looks great!  I really wanted one of the Legacy Station/ Erics Trains buildings.  But the YOUTUBE logo and the late model engine didnt look very 50s to me lol : )

Jim

Other than reading and occassionally replying on the forum, I have been on a train diet for some time now.  Too busy with buying new SUV, the holidays etc.  But posts about the new Lionel H10 piqued my interest because I have the 2001 version of a PRR consolidation.  So this morning I decided to go off diet and moved a train with my consolidation into the area for switching by a B6 later.  I also tightened 2 screws on a light fixture over the control bench and cleaned 4 feet of track.  Whew! Time for a nap.

carsntrains posted:
mike g. posted:
carsntrains posted:

OK try it again.    Here they are!! : )   PRR car pictured twice.   8 cars total. 

Way to go Jim! You got some nice looking cars there! Keep them upright! LOL

Mike are you familiar with these types of cars?   3 of them have ''SKIDS" on the bottom of each truck.  2 of the 3 have copper looking coils on inner end of the couplers.  1 of the 3 has what looks like fiber board with wires running into the couplers??  Are they uncoupling cars?? 

Jim 

  Uncoupling or operating cars. Some operating cars  use the shoe as well. Following the wires would tell you what they are for.  


Got the second coat on the grain mill and once that is dry I'll repaint the roof, the chimney and the base. When that is all done I'm taking my Dremel and cutting away some of the base. While that was drying I got the first coat on the Sur Sweet building. This one I will be repainting the roof along with the windows. When you try to paint a building already glued together it takes a lot more time to do it. A bit of lunch and back to painting. Pics.............Paul

DSCN1391DSCN1393DSCN1394DSCN1396

Attachments

Images (4)
  • DSCN1391
  • DSCN1393
  • DSCN1394
  • DSCN1396
paul 2 posted:

Got the second coat on the grain mill and once that is dry I'll repaint the roof, the chimney and the base. When that is all done I'm taking my Dremel and cutting away some of the base. While that was drying I got the first coat on the Sur Sweet building. This one I will be repainting the roof along with the windows. When you try to paint a building already glued together it takes a lot more time to do it. A bit of lunch and back to painting. Pics.............Paul

DSCN1391DSCN1393DSCN1394DSCN1396

Now its looking awesome! Can't wait to see it in place and detailed! 

Jim

paul 2 posted:

Mike, the reason I want to cut down some of the base is more for fitting purposes. Especially on the side of the truck ramp. The switch tower over by the pond I cut that down base after it was built to fit in a smaller area. ....Paul

Right Paul! Layout real estate is even harder to manage than REAL real estate !!!!!!!  REALLY !!! LOL

Jim

Slow going but getting there. I got the second coat on the grain mill and a coat of aluminum on the roofs. Holding off on a second coat on the roofs tills it dry but right now I sort of have a two tone look to it so I might just leave it as is. I glued the roof over the track and I want the glue to set good before I move it. Probably start the second coat on the Sur Sweet building next. I think I have to order a couple of 0-42 switches to make the track plan work. Pics.......Paul

DSCN1397DSCN1398DSCN1399

Attachments

Images (3)
  • DSCN1397
  • DSCN1398
  • DSCN1399
Pine Creek Railroad posted:

Mark Boyce,

   Great job on the roll out bench work, I constructed a power station for the old layout in much the same manner but closer to floor level, I used 4" Casters with Ball Barring type wheels from Tractor Supply, and I am glad I did.  Still have the old power station even today, I may us it again on the up coming construction in the new Train Room, we will see.  

PCRR/Dave

DSCN1803

Dave, Thank you.  Your power table looks great.  That is a bit of weight to roll around, but was no problem for you!!

Pine Creek Railroad posted:

Mark Boyce,

   Great job on the roll out bench work, I constructed a power station for the old layout in much the same manner but closer to floor level, I used 4" Casters with Ball Barring type wheels from Tractor Supply, and I am glad I did.  Still have the old power station even today, I may us it again on the up coming construction in the new Train Room, we will see.  

PCRR/Dave

DSCN1803

Yep the roll out looks good!  I think I'm going to get a rolling tool box from Home Depot that will fit under my layout.  And I'm trying to gain info on transformers/power sources.    Three Z4000 should run 8 or 10 trains shouldn't they? I posted questions to Dave Olson.   See if he gives me a good answer about them. 

Jim 

Not much to look at since this is just a single-track loop with a three track yard, but it's where I run the equipment I have in order to test its functionality. I would also make videos of these runs and place them on YouTube. But for the longest time these videos weren't very well-lit because the room as originally configured had no overhead light fixtures. The only days I could shoot video was sunny weekends with sunlight reflecting off the house across the street into the livingroom window. Compounding the situation was the dark brown paneling and wood cabinetry surrounding the yard where I started most of my videos.

Over a period of many weeks I assembled a variety of low-voltage components to add LED light strips to the shelves, but in typical fashion, I didn't want to simply stick the strips under the shelves, so I devised a system where the LED strips are set into corner molding stained outside to match the shelving, and painted white inside to reflect the light. The light shines down and backward from behind the L-shaped molding so the LED's themselves aren't visible, and the light bars are attached with magnets and plugs so they can be removed if necessary. All of them are grouped into two circuits so the lights directly above the tracks can be controlled seperate from the ones on the higher shelves (a provision for a third circuit was made for future expansion to replace a pair of house-current incandescent tubes.

So tonight I finally got all the light bars mounted, wired and connected to the power supply. A switch box will come later, but for demonstration purposes power is temporarily to the terminal strip:

test-track new lighting2

I had pulled out the yard occupants during the work, so I backed the resulting train into the work area to see how it looked:

test-track new lighting3

All that's left now is to clear the work materials, move the displaced bric-a-brac back to their original places, clean the woodwork and resume operations

---PCJ

Attachments

Images (2)
  • test-track new lighting2
  • test-track new lighting3
Last edited by RailRide

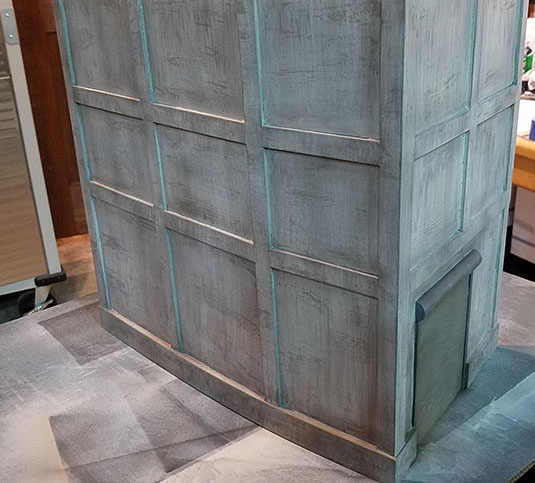
Well, all that is left is to put the roof and details on the building. Tonight I got all the painting and weathering done.

Here is a photo after I sanded the wood filler

Next I masked off the door and gave it a base coat of primer

Then I painted the whole building an old concrete color that we use on our turntables.

After that dried I randomly put rubber cement on top of the concrete colorand let dry.

I then masked off door and painted the door a base coat of red oxide primer and when dry did the salt painting trick. You can see the rubber cement on the concrete paint in the photo of the masked off door.

I then covered the door after salt had dried on door in order to spray the final color on the building, an off white color seen here.

Once dry I then rubbed the paint where the rubber cement was applied to concrete color to reveal the paint below. I did this to simulate how paint flakes off concrete building over time.

Final steps were to unmask door and paint it a siler gray color with some grime and some rusty brownish color. once dry I took a stiff brush and brushed away the salt to give rust spots on the door.

Last step was to weather and give the building a watered down black wash and some air brushing with some grimy black. I also while the wash is wet use a hairdryer to speed drying and use another brush to streak the paint on the wall in the direction of gravity

Here is the ending results.

Today I received a care package form Lionel for my UP 1983 SD70ACe. 2 weeks ago the sound quit. It just made a popping noise most of the time, but now and then you could here the normal rail sounds through the static. I went to the Lionel Store to see about replacement RS boards. The only one still available was the RS power board (universal). I ordered one along with the replacement wheel sets for this engine (replaces the high flange wheels for better travel over switches). So tonight I installed all the parts. Success...short lived on the RS fix. For about 30-45 min the sound was great. Then the static started to come back. I'm not sure what's happening, so I'll reach out on forum for help. The good news is this loco runs over switches with ease now. It use to jump / hop over my FasTrack layout (office shelf)....so not all was lost today.

This is my first attempt...I attached a video of UP 1983 in a 3-engine lash up with UP 8360 and UP 8415.

Attachments

Videos (1)
20180202_191844

No pictures today, but am still making good progress on the layout.  Have begun adding trees to two areas and hope to pour water next week.  My son Jim was over last night and we got the 6 switches roughed in on my fascia that turn the layout power on and off with green indicator lights to show when it's on.  As soon as they are completed, I can finish all my fascia.  Ordered more material for a tree canopy behind the stone arch bridge area.  Brain storming how best to tackle my Spencer Packing Co. scratch build.  Same with my Wonder Bread bakery and Gold Medal flour mill.  Friends operating session this afternoon, so won't be much progress today.

Saw a family of bears eyeing the new woods so I had better get it done.  They looked a little annoyed as they are late on their hibernation plans because of it.  A family is also getting impatient to be able to fish in the river and are pressuring me.

Art

Last edited by Chugman
CSX Al posted:

Well, all that is left is to put the roof and details on the building. Tonight I got all the painting and weathering done.

Here is a photo after I sanded the wood filler

Next I masked off the door and gave it a base coat of primer

Then I painted the whole building an old concrete color that we use on our turntables.

After that dried I randomly put rubber cement on top of the concrete colorand let dry.

I then masked off door and painted the door a base coat of red oxide primer and when dry did the salt painting trick. You can see the rubber cement on the concrete paint in the photo of the masked off door.

I then covered the door after salt had dried on door in order to spray the final color on the building, an off white color seen here.

Once dry I then rubbed the paint where the rubber cement was applied to concrete color to reveal the paint below. I did this to simulate how paint flakes off concrete building over time.

Final steps were to unmask door and paint it a siler gray color with some grime and some rusty brownish color. once dry I took a stiff brush and brushed away the salt to give rust spots on the door.

Last step was to weather and give the building a watered down black wash and some air brushing with some grimy black. I also while the wash is wet use a hairdryer to speed drying and use another brush to streak the paint on the wall in the direction of gravity

Here is the ending results.
Al, thank you for your pics etc on your building project.  Very informative.

I’m interested in what paint/color you used for the concrete look?


Add Reply

Post
×
×
×
×
Link copied to your clipboard.
×
×