After letting the boards set all night I cut some braces and glued and clamped them to the boards. Once the glue has set I'll add screws to the braces for extra strength. I have the rest of the frame glued and screwed. Later I'll get down and make up the legs for the frame. Before I can set the table in place I have to get out to get some spray foam insulation and fill in around where the sewer pipe goes out through the cellar wall. So once I trek out to get it I can then set the table in place, level it and add the Masonite backdrop. Pics................Paul
paul 2 posted:After letting the boards set all night I cut some braces and glued and clamped them to the boards. Once the glue has set I'll add screws to the braces for extra strength. I have the rest of the frame glued and screwed. Later I'll get down and make up the legs for the frame. Before I can set the table in place I have to get out to get some spray foam insulation and fill in around where the sewer pipe goes out through the cellar wall. So once I trek out to get it I can then set the table in place, level it and add the Masonite backdrop. Pics................Paul
Paul looks great! Uh oh I didnt glue none of my bench work. But I did use coated decking screws!!! : ) Really does look good.. I am kind of lost on the gluing two boards together. What they are going to be used for. Of course Ive been a bit scatter brained lately!
Jim
I assembled this Williams Western Maryland Alco FA1 from bits and pieces. Right now it's an un-powered dummy but that may change. Finally got a more prototypical set of horns on top to replace the "tugboat" single note. I really like "loud" paint schemes like this one, Chessie System, etc.
FYI #304 was the only WM FA to get circus paint. (Jack Smith photo)
Old style horns.
Attachments
Ralph M posted:I assembled this Williams Western Maryland Alco FA1 from bits and pieces. Right now it's an un-powered dummy but that may change. Finally got a more prototypical set of horns on top to replace the "tugboat" single note. I really like "loud" paint schemes like this one, Chessie System, etc.
FYI #304 was the only WM FA to get circus paint.
Old style horns.
Nicely done!!! Where did you find the new horns??
Jim, I glued the two boards together to make the front facia for the table. Once I put the frame together and mount the legs I'll cut the front to make the gorge opening. A 1X4 would of been too small and the 1X12 was not quite enough for what I wanted so I got two 1X8's and glued them together...........Paul
Woodson posted:Ralph M posted:I assembled this Williams Western Maryland Alco FA1 from bits and pieces. Right now it's an un-powered dummy but that may change. Finally got a more prototypical set of horns on top to replace the "tugboat" single note. I really like "loud" paint schemes like this one, Chessie System, etc.
FYI #304 was the only WM FA to get circus paint.
Old style horns.
Nicely done!!! Where did you find the new horns??
American Scale Models. They're not a perfect match for the original WM's but they're very close. Close enough. ![]()
Attachments
Ralph M posted:I assembled this Williams Western Maryland Alco FA1 from bits and pieces. Right now it's an un-powered dummy but that may change. Finally got a more prototypical set of horns on top to replace the "tugboat" single note. I really like "loud" paint schemes like this one, Chessie System, etc.
FYI #304 was the only WM FA to get circus paint.
Old style horns.
I model the midwest but love the east coast trains from the 60s -80's. That's a really good looking consist.
I haven't had the chance to do anything yet today but recently I've built and installed custom display shelves. Photos on my Instagram and Facebook accounts.
paul 2 posted:Jim, I glued the two boards together to make the front facia for the table. Once I put the frame together and mount the legs I'll cut the front to make the gorge opening. A 1X4 would of been too small and the 1X12 was not quite enough for what I wanted so I got two 1X8's and glued them together...........Paul
Paul Ok I remember you stating that now. Sorry .. Sounds like a good plan! I'm thinking I will front my layout with 1x6 .. And then stain or paint in. Wont be as in depth as yours. Don't reckon I'll have any ups and downs. Its just flat. Cant wait to see what you do!
I did go ahead and order my track from Georgia. And gosh I couldn't help myself .. I also ordered the Southern Railway Smithsonian car! LOL It will match the Southern Railway 125 year anniversary car that Lionel is making this year!
Im thrilled with the additional room I have now. But its still going to be a challenge figuring out where to put things. Need to get tracks to run into/through Vetters, American power, and next to the feed mill! And leave room for a town and the big Menards station. I have a plan : )
Jim
Kmars00 posted:I haven't had the chance to do anything yet today but recently I've built and installed custom display shelves. Photos on my Instagram and Facebook accounts.
The shelves built under the table look great if that's the ones you've been working on!
Jim
Yes, those are the ones. Thanks!
Jim, I am interested to see if this will come together since I am sort of winging it.......Paul
paul 2 posted:Jim, I am interested to see if this will come together since I am sort of winging it.......Paul
Paul I thought we all were just winging it?? LOL You mean we are supposed to plan this stuff??
Mike G. are you making any progress?? Think I'll dig that big tub of Lionel rolling stock out and go through it. Since I'm waiting on track!
Jim
Attachments
Nice work everyone. Gandydancer1950, I really like that little station.
I got stalled finishing this up until tonight as I had to go out of town to take my son to a college visit to his top choice for schools. I got it painted up prior to leaving. So tonight I finished installing the parts onto it. Gluing the fine chain, onto drive was a total PITA! I can't wait to build the 2nd one. ![]() Anyway, I thought it would be cool if the headlights actually worked. So I installed some pico LED's into the headlight castings. Before I glued them in I used a chrome paint pen on the reflectors. It gave them a mirror like finish. This stuff is the best chrome paint I have ever used. I got that tip from Adam Savage's show tested. They also make refill bottles, which would be great to spray though an airbrush.
Anyway, I thought it would be cool if the headlights actually worked. So I installed some pico LED's into the headlight castings. Before I glued them in I used a chrome paint pen on the reflectors. It gave them a mirror like finish. This stuff is the best chrome paint I have ever used. I got that tip from Adam Savage's show tested. They also make refill bottles, which would be great to spray though an airbrush.
Molotow ONE4ALL Acrylic Paint Pump Marker
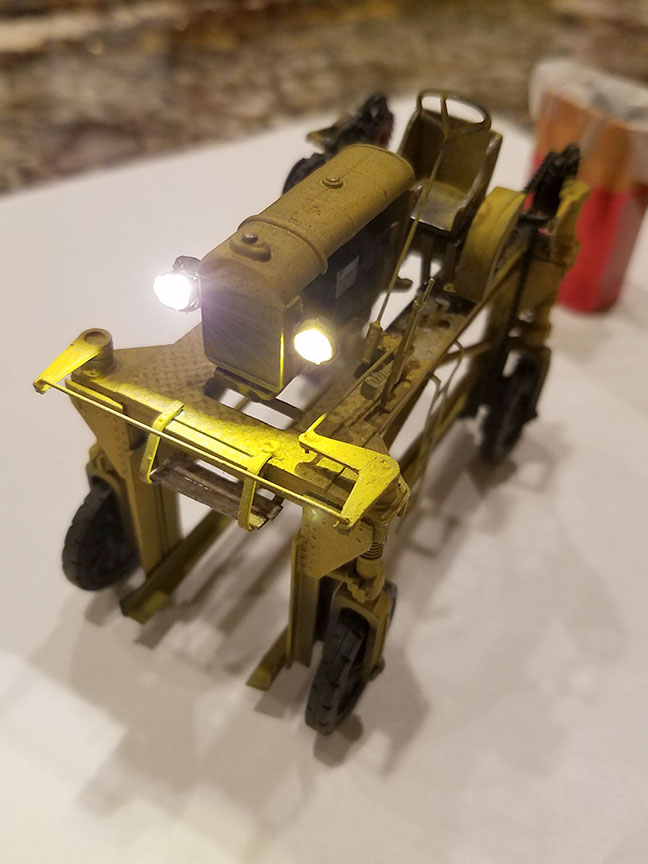
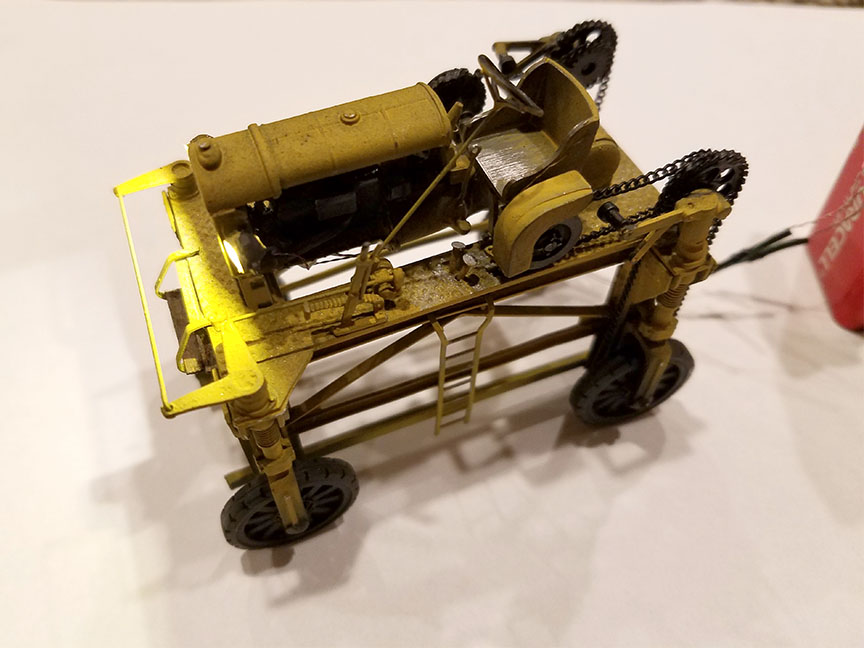
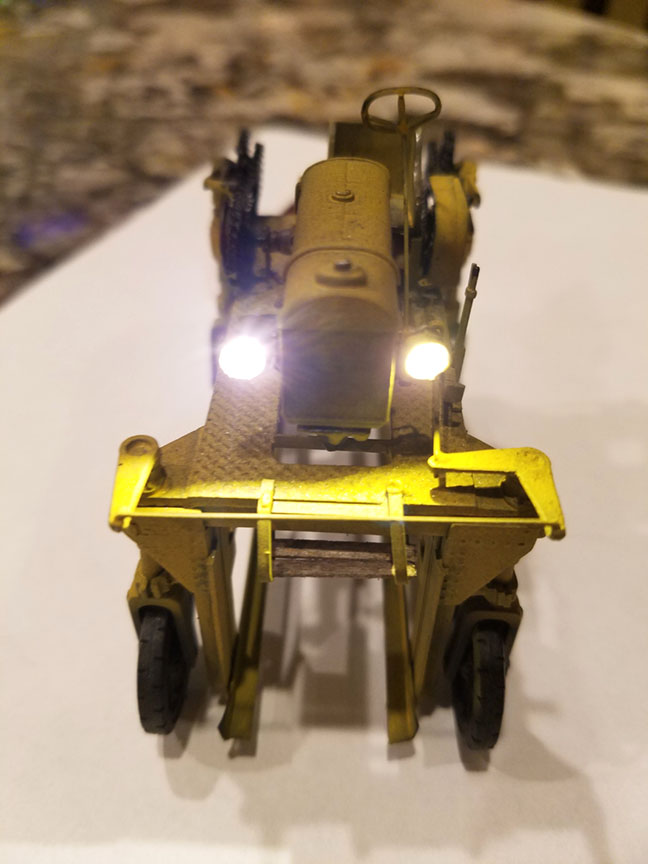
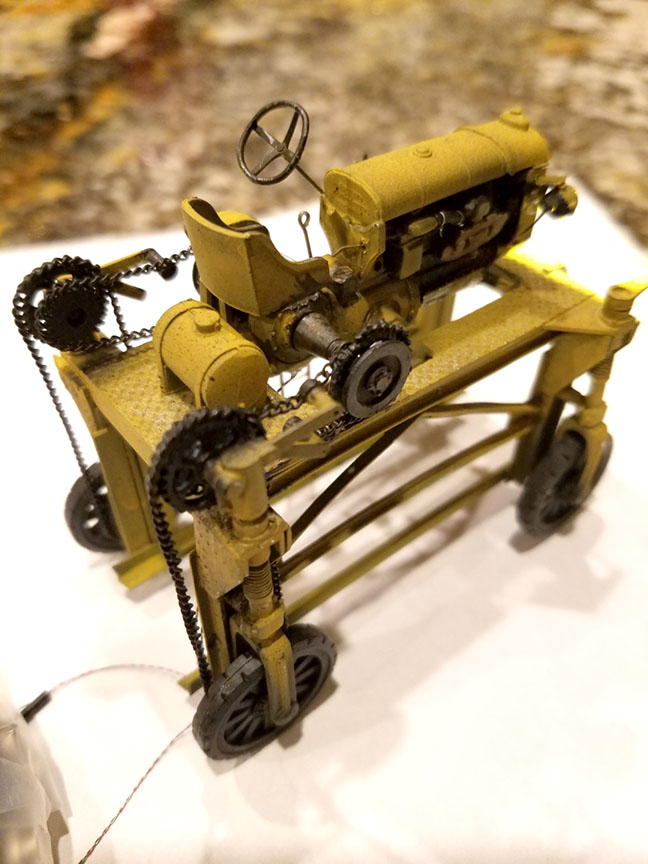
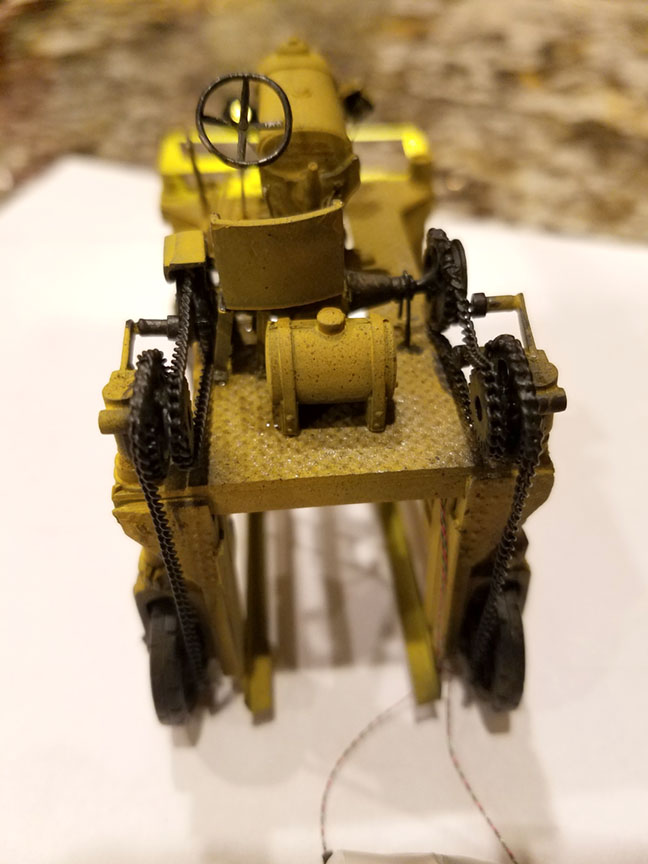
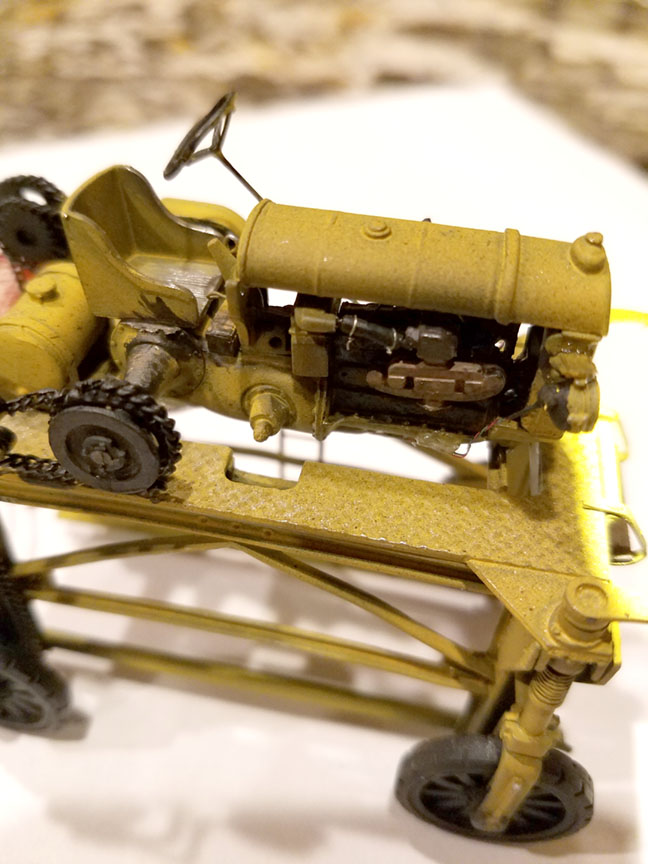
CSX So what would that tractor be used for? Corn?
Very nice job building it!
Jim
carsntrains posted:CSX So what would that tractor be used for? Corn?
Very nice job building it!
Jim
Jim,
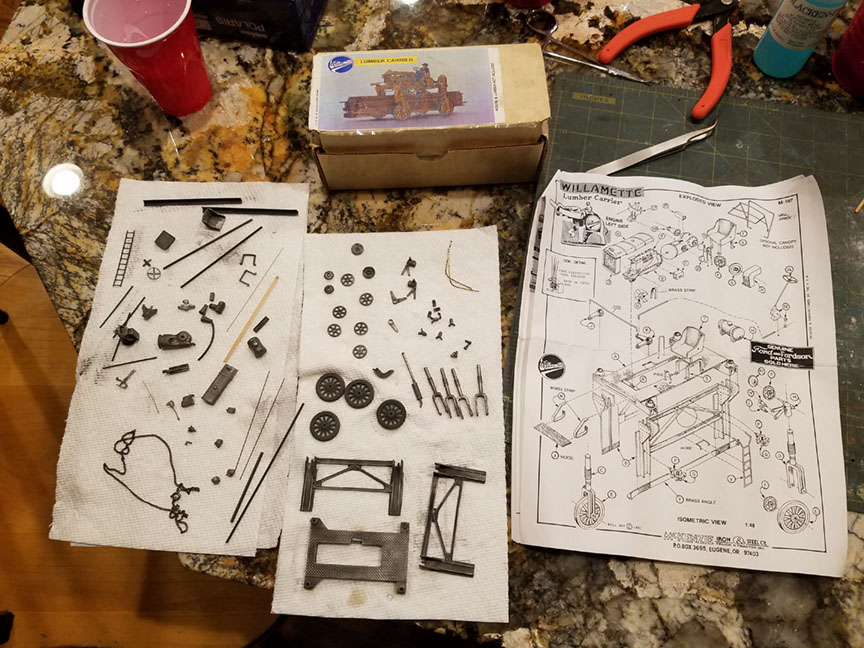
it is a lumber carrier. Used to move stacks of wood around a sawmillor lumber yard. It straddes over the stack and picks it up. That is what the angles are for inside the legs and wheels. See box in photo from earlier in the build process. It shows the lumber load beneath it.
I spent the evening going through 2 tubs of old Lionel rolling stock! I took pictures of them all. Most I had never heard of. must be 60 or more still in their boxes. Plus 10 or more out of boxes. And another smaller tub with more stuff in it. I'm overwhelmed to say the least! And I found a 2015 Christmas car and a Miller beer car I bought a while back!
Jim
CSX Al posted:carsntrains posted:CSX So what would that tractor be used for? Corn?
Very nice job building it!
Jim
Jim,
it is a lumber carrier. Used to move stacks of wood around a sawmillor lumber yard. It straddes over the stack and picks it up. That is what the angles are for inside the legs and wheels.
And that makes good sense to go with that big sawmill!
Jim
CSX Al posted:Nice work everyone. Gandydancer1950, I really like that little station.
I got stalled finishing this up until tonight as I had to go out of town to take my son to a college visit to his top choice for schools. I got it painted up prior to leaving. So tonight I finished installing the parts onto it. Gluing the fine chain, onto drive was a total PITA! I can't wait to build the 2nd one.
Anyway, I thought it would be cool if the headlights actually worked. So I installed some pico LED's into the headlight castings. Before I glued them in I used a chrome paint pen on the reflectors. It gave them a mirror like finish. This stuff is the best chrome paint I have ever used. I got that tip from Adam Savage's show tested. They also make refill bottles, which would be great to spray though an airbrush.
Molotow ONE4ALL Acrylic Paint Pump Marker
Nice work ! Each time I see one of these lumber carriers, which is less frequent these days, it reminds me when I was growing up in Northeast Philly. Our homes were new, just off Roosevelt Boulevard. The neighborhood was still being built. Many times I would see these lumber loaders going down our street delivering a load of new lumber to the homes still under construction. Often times I would think about standing in the street and letting one of these, empty of course, pass over me. Ah, the ignorance of childhood.
Painting People on a Bitter Cold Evening
Just checking in to see the progress on the layouts. I have another 24-pack and 32 figures from China to break the day's tedium.
I have made progress between calls about a new Lionel 6-84257 Santa Fe SD40 #5018 that arrived missing air hoses on the front right. Straightened the bent platform for the antenna on the cab roof. Discovered four loose screws in the box. Talked to Katie at Lionel to see if they had SD40 air hoses. She did not know. The dealer said to send it back, but it is the only one they have. This is three new engines in a row: H-10 #1288 had short in reverse that created a cab blink, H-10 #1773 Coal Hauler Set had dirt painted into the smoke stack, and now this.
I find painting to be relaxing. I should just paint people and forget the trains.
Stay warm. It is good to see the excellent detailing on the many layouts.
Sincerely, John Rowlen
Attachments
I managed not to leave my house today in Chicago, and I felt pretty good about that. Tonight after pizza was delivered I ran some trains for about an hour and made a short video https://youtu.be/oqklZUQZkJ8.
Enjoy.
John


Attachments
mike g. posted:Jim, nice work on the bench!
Mark, little steps add up! Your moving in the right direction!
Lee, wonderful work on the cars!
Larry glad you were able to get all the bumpers done! What's next?
Nick, your layout is looking great! Please keep posting as you go along!
Brian, what a wonderful start to the day! You Rock!
Thanks Mike I think I’m addicted to All Nations Boxcars
Paul, looks good! I see what your doing and think its going to look great on your layout!![]()
Mayor Magoo, Looks like you have a great start!![]()
KMARSOO, the shelves look great, I think I am going to have to go that way so I don't have to get up on the layout to get cars off the wall!![]()
Jim, nothing really, I have been working on a jig for mounting Tortis switch machines. Got the plan from Chris A. I sure hope you have room for all those cars your pulling out of the tubs! LOL![]()
Gandydancer, Very nice work! Will look wonderful on your layout!![]()
CSX AL, great work on the lumber tractor! What detail !![]()
John, I hope you stay warm and happy with all your friends your finding clothes for! LOL![]()
Good morning Brian! More wonderful pictures! Thanks!![]()
Lee, that's ok I am addicted to BN/ BNSF Stuff! LOL![]()
Mike. And not a single Southern car in the mix. Really I dont have room for what I have out already. So I put them all back in the tubs except for the Christmas car!
I sure hope they ship that track soon! Im ready to run some trains!
Jim
Attachments
briansilvermustang posted:
They look SOO lonely !![]()
More boomer action on the Razorback Traction Co. rails. This Frisco U-Boat belongs to the museum, and is in for a tuneup:
Obligatory gi-raffe action:
And for @carsntrains:
From another thread, a diagram explaining how to hook a Marx crossing signal to Fastrack. ![]()
Mitch
Attachments
Put the second coat of paint on and added the foam around the sewer pipe. The mailman brought my package from Scenic Express. I bought the bridge abutements for the double Atlas bridge and enough bridge shoes to do the corners on the two bridges. I took one of the Menards briodges and sat it on the abutement with the briodge shoes. It is going to work. All I have to do is cut down the higher part to be level with the Menards bridge. So with the back part done I'll make up the legs and start putting together the table.....Pics..............Paul
Attachments
Gentlemen,
Starting to disassemble the Living Room Christmas layout today, always hat to take her down.
PCRR/Dave
Attachments
mike g. posted:Good morning Brian! More wonderful pictures! Thanks!
THANKS !!
Lee, that's ok I am addicted to BN/ BNSF Stuff! LOL
here ya go, specially for you Mike... BN... ![]()


Attachments
Looks like with trimming off the top part I can get it flush with the bridge deck. Moving that stuff I made up two legs for the table. The other end I am going to bolt it top the othe table. Frame for the table is done. Once the glue dries I can mount the legs and start putting it into place. I got one brace for the Masonite up on the other table. I wasn't too picky about the wood for the facia. There is one big knot but that will be cut out when I cut for the gorge. Pics.................Paul
Attachments
Paul that bridge looks great! Hope the abutments aren't too hard to cut! Are they plastic? Glad you are making progress on the table! I take it the knot on the facia is on the top? Looks good! I'm still looking for a place to use my Lionel bridge. Hate to give up that room!
Jim
Decided that my MTH Sharks have had less than prototypical horns long enough. So I converted the lead A unit and trailing dummy A unit from single note "tugboat" horns to a single Nathan 3 chime over the engineer's side jsut like the real one: (photo credit R. Craig Rutherford)
While I was at it, I also swapped out the single note horn sound set for a multi chime sound. This is an older, 1st gen Proto2 loco and my choice of sound sets is a bit limited. I found one with a horn sound that I like and non-EMD prime mover sounds. I like it. Yes, I saved the original sound set.
Attachments
Paul, things are looking great! The board for the cut out looks like it will work just fine! The bridge abutment and shoes look right in place!
Dave, sorry it coming down. But just think of the joy of putting it back up next year!
Brian, isn't that a wonderful GREEN color just to dream about !
Jim, why not throw out some ideas of where you might want your bridge and let the group help you out?
Ralph, the new horns look great! Nice work!


