
Pete - Just another reminder about what makes this forum so great, useful tips and ideas about how to do things. Your church looks great.
Art
|
|
Pete - Just another reminder about what makes this forum so great, useful tips and ideas about how to do things. Your church looks great.
Art
Worked on the interior lighting of my Korber background building. I blacked out some windows but not others to attempt to get a realistic appearance. Still needs some fine tuning.

Where did you get the lettering for the "Gilbert Compass" sign?
Hi Randy - I got them from Michael's, but I'm sure any craft place would have them (or something similar). They're just press-on letters.
Today, I worked on my Plasticville Church. I finished painting it and will add lighting and a bell sound chip over the weekend
-Pete
Pete,
The paint really improves the look of the church!
Hi Randy - I got them from Michael's, but I'm sure any craft place would have them (or something similar). They're just press-on letters.
Zeke:
Thank you.
I've been busy for the last couple months and have had little time to work on the layout. I tried to document as much as I could and had trouble locating the camera cord to down load the photo's. I used foam for the raised parts of my layout. Most of the white foam is six inches thick and I was able to get some of it tapered 6to 4, 4 to 2 and 2 to 0. Made a nice ramp. Each of the tapered pieces are 24" X 48" and it was a lot cheaper than the risers from WS. After fitting the track and finalizing the plan I removed the track and used a fiber mesh to cover the foam The product is called FibaTape Crackstop. It's just like the self stick drywall tape, but it is 36" wide. I found this at Home Depot in the Drywall Section. I decided to use this to cover the foam as I have read on hear that sometimes the foam board will not hold stuff that is applied. I mixed up several small batches of Structo-Lite in a five gallon bucket. I put about 8 heaping one cup measuring cups full and about three cups of water. I mixed it with a drill with a paint mixer and a large paint stirrer stick. Ii covered all the flat surfaces with Structo-lite and a trowel. The Structo-Lite is easy to work and blend in the gaps. It takes a couple days to dry in the air condition basement. A fifty pound bag is about $12.00 at Home Depot. I also made a few rock molds using liquid latex from a craft store and a type of Hydro-cal Plaster I purchased from a builders supply for $11.00 a fifty pound bag. This stuff has a very short working time, so everything has to be ready. One of the photo's shows a leak I spotted in my newly installed ceiling I had to fix.
")
")
")
")
")
")
")
")
")
")
")
")
")
")
")
")
")
")
")
")
")
")
")
")
")
")
")
")
")
")
")
")
")
")
Originally posted by jmiller320:
I've been busy for the last couple months and have had little time to work on the layout. I tried to document as much as I could and had trouble locating the camera cord to down load the photo's. I used foam for the raised parts of my layout. Most of the white foam is six inches thick and I was able to get some of it tapered 6to 4, 4 to 2 and 2 to 0. Made a nice ramp. Each of the tapered pieces are 24" X 48" and it was a lot cheaper than the risers from WS. After fitting the track and finalizing the plan I removed the track and used a fiber mesh to cover the foam The product is called FibaTape Crackstop. It's just like the self stick drywall tape, but it is 36" wide. I found this at Home Depot in the Drywall Section. I decided to use this to cover the foam as I have read on hear that sometimes the foam board will not hold stuff that is applied. I mixed up several small batches of Structo-Lite in a five gallon bucket. I put about 8 heaping one cup measuring cups full and about three cups of water. I mixed it with a drill with a paint mixer and a large paint stirrer stick. Ii covered all the flat surfaces with Structo-lite and a trowel. The Structo-Lite is easy to work and blend in the gaps. It takes a couple days to dry in the air condition basement. A fifty pound bag is about $12.00 at Home Depot. I also made a few rock molds using liquid latex from a craft store and a type of Hydro-cal Plaster I purchased from a builders supply for $11.00 a fifty pound bag. This stuff has a very short working time, so everything has to be ready. One of the photo's shows a leak I spotted in my newly installed ceiling I had to fix.
Lour layout is coming along nicely. The big pieces of white foam make a lot of sense over Woodland Scenics. I see the ramps in the distance. I think the FibaTape Crackstop is a very good idea, thank you for telling us about this. The big bridge in the background looks very impressive. What is the manufacturer, and is it ready built or a kit. I also see you are doing this early scenic work with the track pulled back up. Makes a lot of sense so you don't have to cover and maybe clean the track. Great job! You will be running trains soon.
The bridges are MTH Steel Arch Bridges with Girder bridges on each end. I removed the center support and load tested with my Big Boy. I'm using Fastrack and discovered that the track clearance is to wide for a double track bridge, so I used two single track bridges and had to trim the bases so they would fit closer together. I will make the end bridge abutments out of pink foam and paint it to look like concrete.
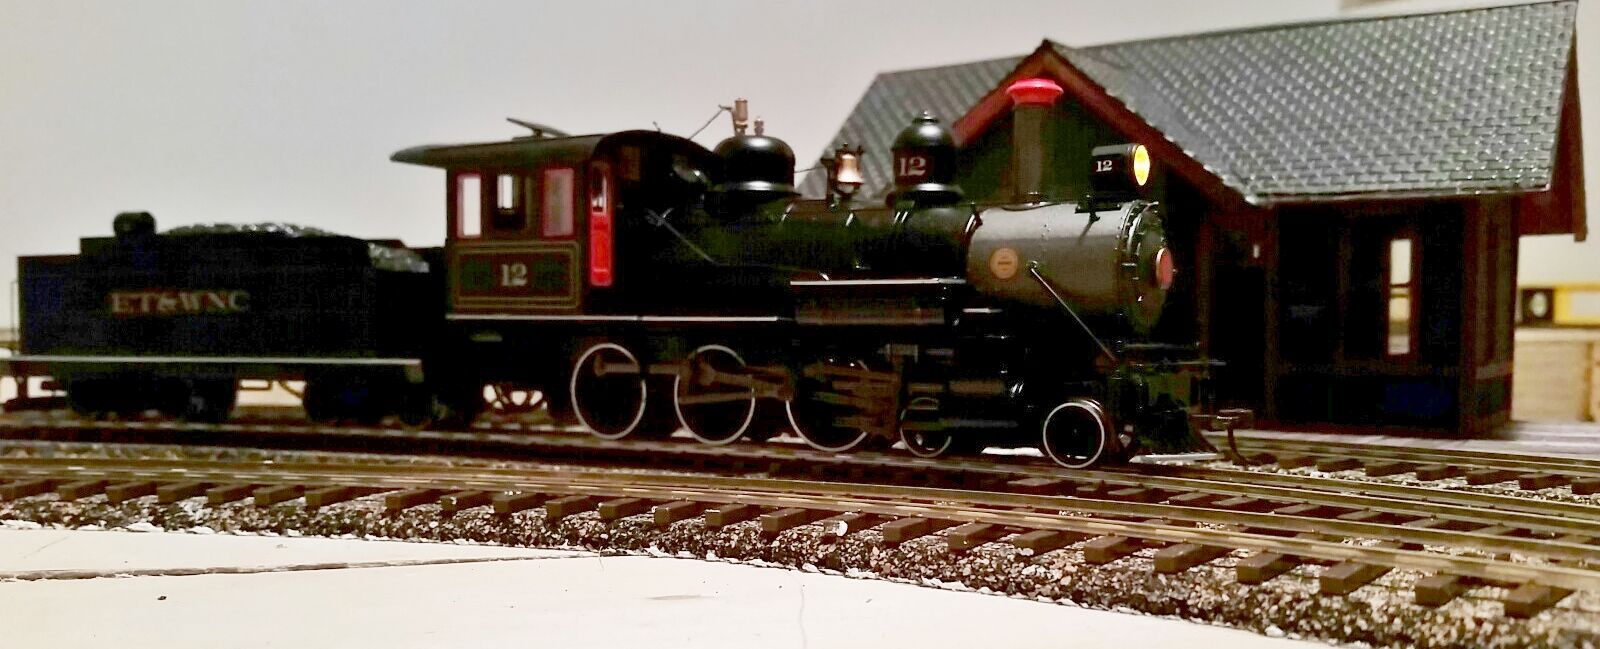
Finally got the engine house weathered and added ballast/groundcover. The engine service area still needs a lot of finishing touches, but I'm moving on to other bear plywood zone. Being fairly new to this hobby, I've gained a much deeper appreciation for the work you folks put in to your layouts.


Finally got the engine house weathered and added ballast/groundcover. The engine service area still needs a lot of finishing touches, but I'm moving on to other bear plywood zone. Being fairly new to this hobby, I've gained a much deeper appreciation for the work you folks put in to your layouts.
Wow that looks awesome! Nice work!
and it looks like realtrax too I really like it explain how you did it.
I've been busy for the last couple months and have had little time to work on the layout. I tried to document as much as I could.......This stuff has a very short working time, so everything has to be ready...
I can see, JMiller, you've decided to invest in yourself, in what you enjoy. The sweep of the emerging landscape suggests to me a man who enjoys and knows how to play - there is a certain playfulness already apparent, IMO, in where the track seems to be headed and where the real estate will add character. This whole creative effort, with which so many of us decide to indulge ourselves, I think, does us a whole lot of good, well beyond eventually being able to run some trains. The work is relaxing, and the play of it is empowering.
All just my opinion, of course.
Enjoy.
FrankM
Frank,
That is a profound commentary on the value or model railroading in general and on JMiller's work in particular. I too see JMiller is doing a great job in pursuit of the hobby's value as a relaxer and something to give satisfaction.
and it looks like realtrax too I really like it explain how you did it.
I second that statement. It really looks great!
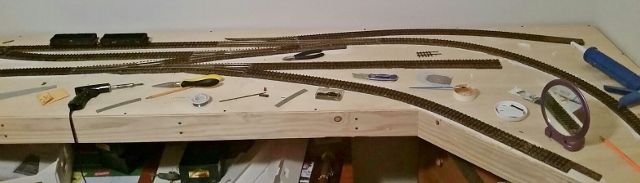
Got more track laid, about halfway now. Got a lot of track wired as well, a feeder to each individual track section and turnout. I have the guy who designed my original track plan (which had to go out the window early on) helping out. He's coming over tonight to pick up where we left off yesterday. I think we should have all the track laid and hopefully wired by the weekend. Once all the track and wiring is in place, I will no longer need any assitance as it's just a matter or starting the scenery at that point. Other than 2 small grandt line depot kits, all my structures have been complete for a while now.
I also got a massive box from Micro Mark 2 days ago, filled with 20 blue point turnout machines, a static grass applicator and several containers of ground foam, flocking and tree materials. I made a huge order through supertrees, should have over 300 trees for the layout when I'm done. For a layout my size, that's a lot of trees, but I think it's hard to go wrong with more trees than you think you'll need. Where I'm modeling was heavily wooded (and still is) in the 40s...
I finished off the last of the 50# bag of Structo-Lite. I spread the mix on another part of the platform. I have another bag in the garage and it's a job just carrying it down the basement steps and back to the train room.
and it looks like realtrax too I really like it explain how you did it.
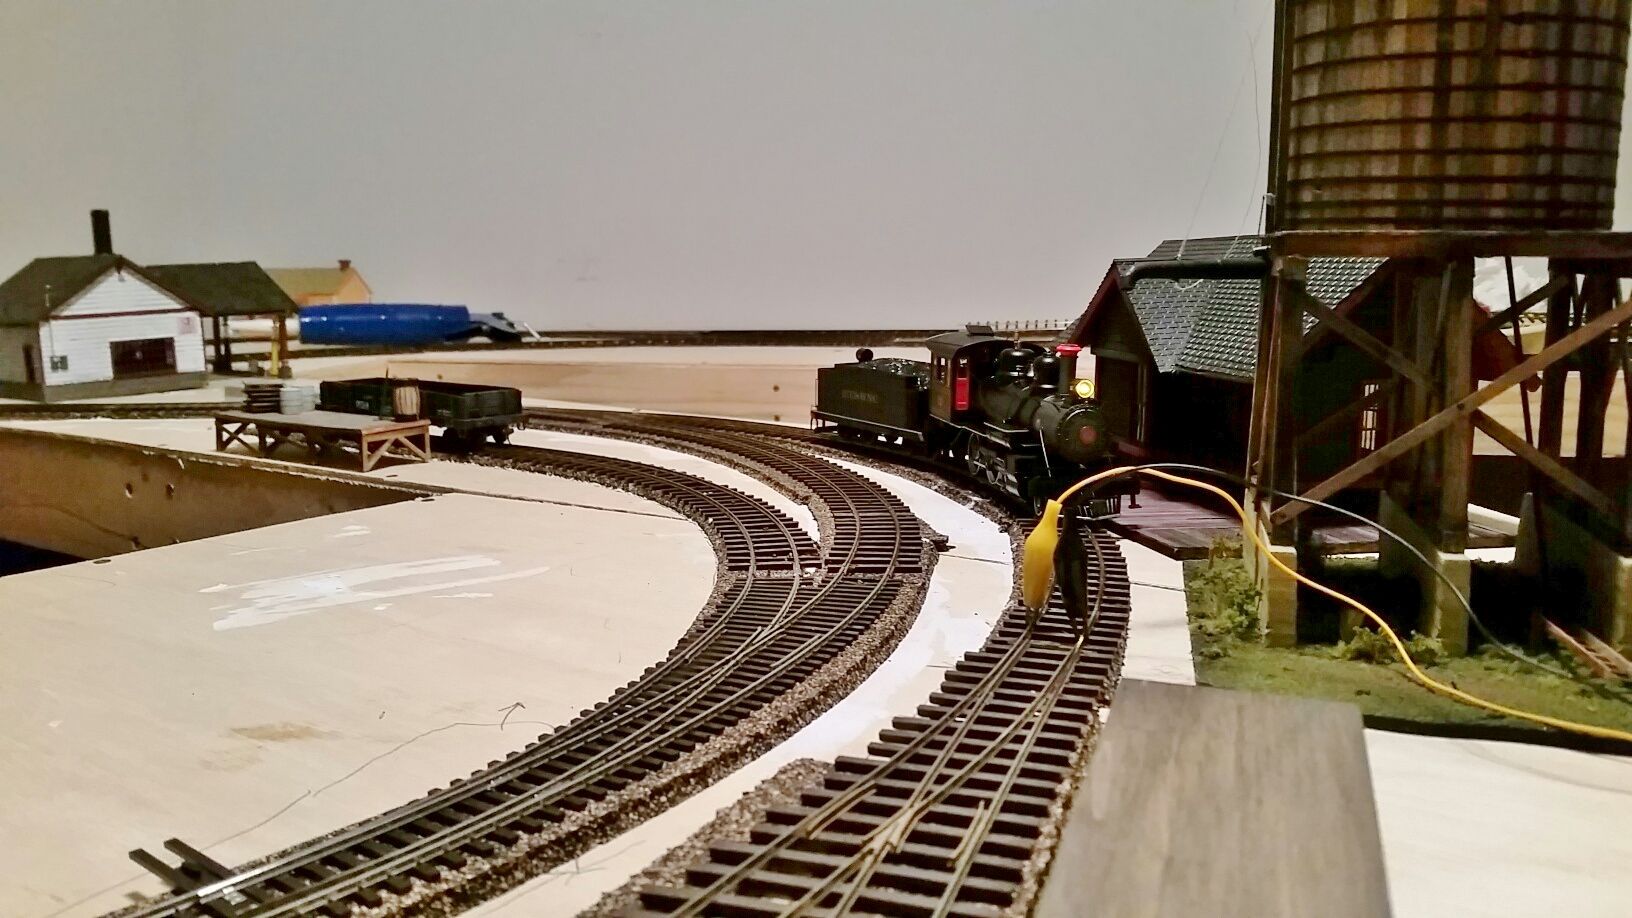
Yes, it's MTH Realtrax. As to the how is really a testimonial to all that share their ideas on this forum. I pre-painted the ties with Floquil brown and the rails with Floquil rust. Hot glued blue board on to the plywood and shaved it to level of track. Using an old sponge brush, I dry brushed Realtrax's with Floquil grimy black. Course ballast was next followed by fine ballast washed in ink. The picture is the main line in process.

and it looks like realtrax too I really like it explain how you did it.
I second that statement. It really looks great!
Thank you so much!
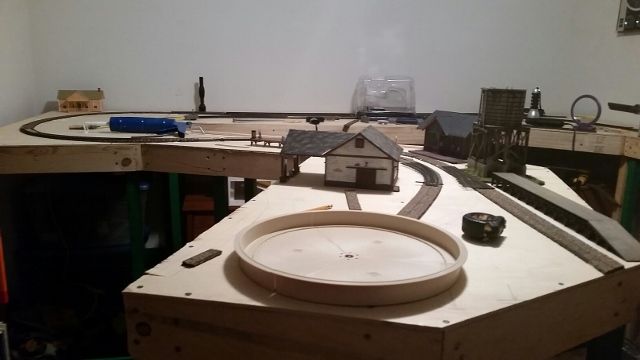
Made more great strides tonight. I have the roadbed figured out and cork laid for the rest of the layout except for two sidings at the end of the track. I placed some buildings to see how they'd fit. To my horror, I realize I have far more structures than will fit anywhere! My wife bought me the woodland scenic gas station for Christmas last year, and I really need to find a place for that.
Should have the track laid by the end of the weekend, at the rate we're going. I'm going to have some assistance with wiring it all up sometime next week.
Then, scenery begins.
and it looks like realtrax too I really like it explain how you did it.
Yes, it's MTH Realtrax. As to the how is really a testimonial to all that share their ideas on this forum. I pre-painted the ties with Floquil brown and the rails with Floquil rust. Hot glued blue board on to the plywood and shaved it to level of track. Using an old sponge brush, I dry brushed Realtrax's with Floquil grimy black. Course ballast was next followed by fine ballast washed in ink. The picture is the main line in process.
well I figured I would post a video of my transfer table working with fastrack. I still am having issues getting it to line up sometimes to get power and I get sparks of of the wheels of the table when it's moving but anyways here's the video.
The transfer table looks great. Nice job...now the fun begins. Tweaking can be extremely frustrating.....but extremely rewarding when you get it right. I seem to be one of those guys that nothing ever installs smoothly on the first go around. You will figure it out.
Good luck.
Pete
I know what the problem is when I got the table it was really ratty rusty and dirty. so what I did was clean it and then painted it not really knowing how everything worked I ended up painting both outside rails so then I had to clean them up to make it work. so it now works but I think it needs to have the 2 rails cleaned up alittle more. the shed light was broke when I got it so I need to fix that to give me a more positive way to tell when it is lined up.
Made more great strides tonight. I have the roadbed figured out and cork laid for the rest of the layout except for two sidings at the end of the track. I placed some buildings to see how they'd fit. To my horror, I realize I have far more structures than will fit anywhere! My wife bought me the woodland scenic gas station for Christmas last year, and I really need to find a place for that.
Should have the track laid by the end of the weekend, at the rate we're going. I'm going to have some assistance with wiring it all up sometime next week.
Then, scenery begins.
I really like your progress. The Woodland Scenics gas station is really nice. I bought one from a Forum member who was tearing down his layout in preparation for a move. I wanted it because it reminded me of him, his layout, and his hospitality. He invited me over twice.

 Hooked up the polar express operating billboard.
I really like your progress. The Woodland Scenics gas station is really nice. I bought one from a Forum member who was tearing down his layout in preparation for a move. I wanted it because it reminded me of him, his layout, and his hospitality. He invited me over twice.
Thanks, I had to remove a lot from the structure as my layout will take place in 1943, and a lot of that building is postwar...
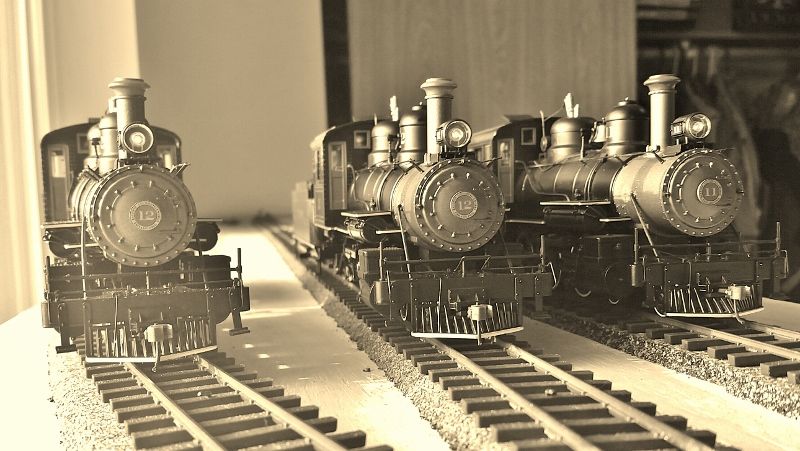
More, I got the first train at the other end of the layout, almost all the track is now in, only lacking one siding and the approaches to the 2 turntables, I cut out the cut for the last one last night...
Still have to wire all the track sections for the DCC to work, right now there's a dark section between the two ends, but that should be resolved tomorrow night...
I just got the first train over the entire mainline.
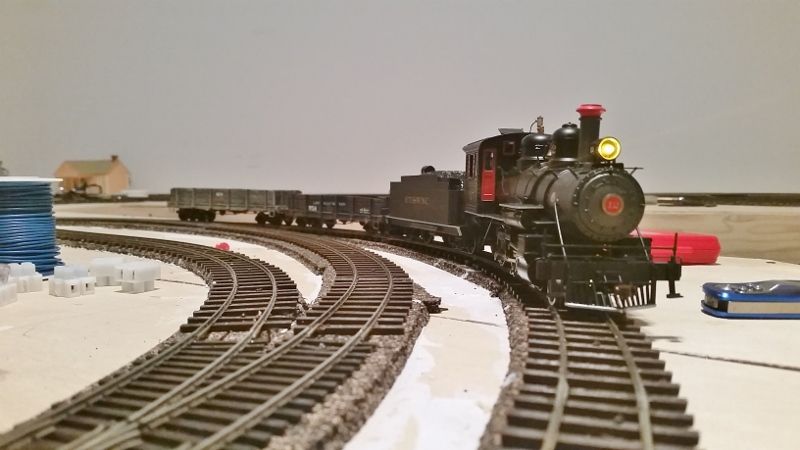
Then, I lined up all three of my locomotives, which were all just programmed into my DCC. Yes, I have two # 12,s one of them will be # 9 soon enough...
Today I modified a Lionel Canadian Pacific Bunk car into a White Pass and Yukon Route Bunk car. I'm not finished yet but It will work for now.
Nice masking job!
Mitch
not sure what is up with my camera phone changed a setting and now to me it looks fuzzy. oh well not going to go back up there to take new pics. I worked on a tunnel portal the last ones I had built and replaced them with commercial ones so that there the right height incase I get stack cars. the retaining wall is from a master casting I bought and made a mold out of this is the first 3 plaster castings from that mold ![]()
also picked up another yellow and silver B unit and another passenger car to match the ones I have now it is a duplicate of what I have but I figure one day I will renumber it..


after the back to basics video I tried a clamp to hold the camera and I put eh exposure to 2.0 on my s4 but I think I lowered the resolution the other day and forgot to turn it back up
just looked at my phone went from 12 megapixel to 6 with a setting change no wonder they looked fuzzy to me maybe I will reshot just to see what it looks like now. thank you Mark I Appreciate it. I also picked up another yellow and silver war bonnet but it is unlabeled no Santa fe graphics it actually is a Ronald McDonald House train from MTH the other photos are playing with the camera using the post about tripod and back to basics info I think the photos came out better that way . here they are.


My wife decided that I needed more room to display my White Pass collection, so she came up with this idea.
Tom,
That is very nice your wife came up with display idea.
I like "There's a right way, a wrong way, and the Skagway"
Jhainer,
More great photos. Your layout is really coming along nicely!
Looked at it and wished real hard.......didn't work![]() Maybe Ill try wishing a bit harder tomorrow
Maybe Ill try wishing a bit harder tomorrow![]() .
.
Ran the carpet central for about an hour entertaining my 7 month old grand-daughter.
She really loves it when I blow the PS3 Northern's Whistle as it comes towards her.
She sits up, bounces and squeals while grinning and drooling.
Ya, she's teething, so anything to keep her happy is a good thing..
Yup, She's got Grandpa wrapped tightly around her pinky for life.
Access to this requires an OGR Forum Supporting Membership


