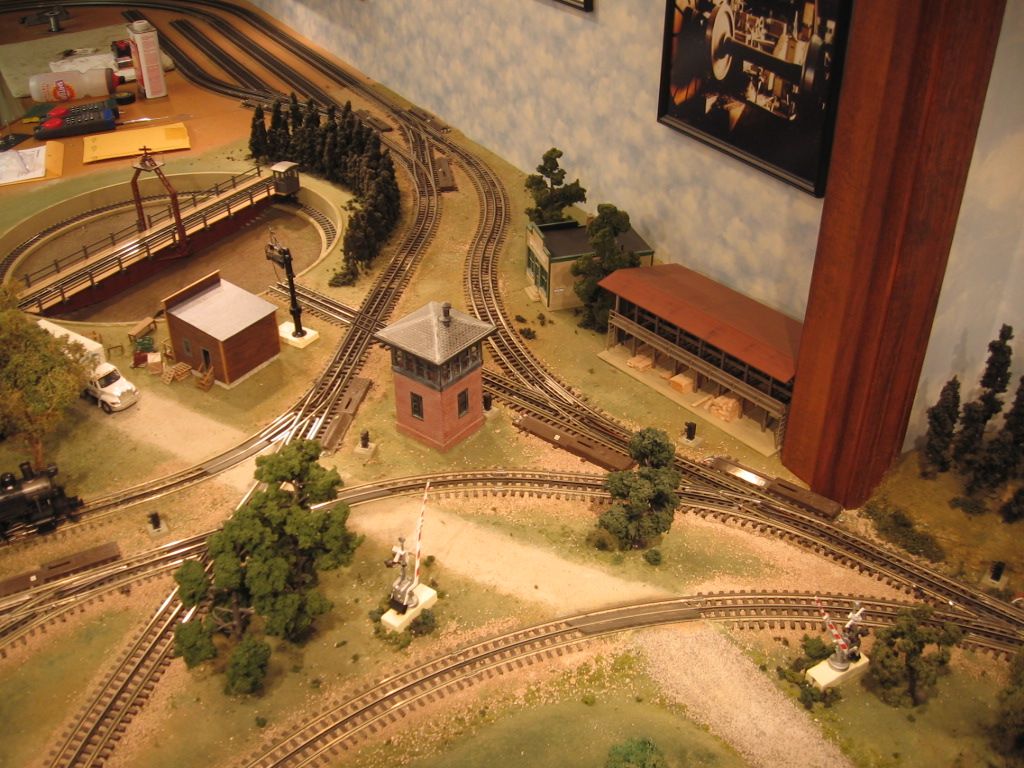
How many of you started out laying track with say 060 curves, then you decided you wanted a different look that the 060 curves didn't provide,so you throw in maybe 1 or 2 072 curves. I am doing just that which forces me to try & get the tracks to line up using small pieces & even making some custom pieces to try & complete the loop,{ I am using lionel fast track}. I have gotten it to work for me,although it tends to want to pull apart,but once you screw it down it stays put. I did it this way because i really liked the look i created,so i  said to myself why not try ,it was a little bit of a challenge,but i got it to work for me.


Original Post

Replies sorted oldest to newest

You're referring to compound curves.


The only trick is to make sure the curves selected have the same number of sections per complete circle. On my layout, I use 080-072-080 and 089-080-089 on my curves. Both of these have 12 sections per circle. It breaks up the symmetrical look to the curves.


While I was at it, I also super elevated the curves using 1/16 x 1/4" basswood strips. Not immediately apparent, but you can see the cars tilt as they go around the curves.


Gilly 

Last edited by Gilly@N&W

Real railroads try to ease trains into curves.  This means that the curve gradually gets sharper as you continue into it.


Scale model railroaders try to duplicate this practice by building easements in their curves.  


The best way to do it when using sectional 3 rail track is to start the curve with the largest possible radius and then decrease the radius toward the center.


I have done this on my home layout by using 0-90, 0-81, 0-72, 0-72, 0-81, 0-90.


You can do this with any combination of curves as long as you have the space.  


Joe

Originally Posted by rockstars1989:

I have to think that is going to throw things into a nightmare.If it is pulling apart then the geometry is off..Nick

That's why I mentioned you want to use curves that have the same number of sections per circle. Twelve sections per circle is 30 degrees per piece. Three pieces is 90 degrees even if you mix 072, 080, or 089.


Joe Barker is spot-on. You want to lead in and exit with the large radii and use the tighter sections in the center of the curve.


Gilly

Last edited by Gilly@N&W

You can cut and fit just about anything you want. I cut/fit and adjusted this O 54 S to compensate for not working full pieces.  I had to cut both pieces where they "best fit", over lapped.
Top left two track sections are modified to work.  There are other modifications in this picture.

Another photo.

Last edited by Mike CT

When i said that it wanted to pull apart,it did not actually come apart the joints would have a slight gap between them ,i would have to adjust the curve until they were in all the way,although you would sometimes see one part of the joint wasn't quite all the way in it would stay that way even without screws,  as long as i didn't try to move any of the tracks,if i did then i would have to adjust them all over again,& at no time was there any problem with currant flowing through the loop,i am not saying this is the best way to do things,but it does work .

Originally Posted by Joe Barker:

Real railroads try to ease trains into curves.  This means that the curve gradually gets sharper as you continue into it.


Scale model railroaders try to duplicate this practice by building easements in their curves.  


The best way to do it when using sectional 3 rail track is to start the curve with the largest possible radius and then decrease the radius toward the center.


I have done this on my home layout by using 0-90, 0-81, 0-72, 0-72, 0-81, 0-90.


You can do this with any combination of curves as long as you have the space.  


Joe

Actually I do the opposite.  the photo below is the 'display area' of my layout, designed so ever train comes around for a good view by those standing near the front of the layout.  It is a subtle point maybe but one I thought about a lot and decided was important when I rebuilt/re-tracked this portion of the layout about a year or two ago.   the sharpest curves are at both ends and the durve radii increases as one nears the middle.    The train gradually, slowly, nearly straightens out as it rounds this end of the layout, making for a good look at it.   

picture3

Attachments

Images (1)
  • picture3
Originally Posted by Gary Graves:

Have any of you ever slightly banked a curve, especially in the sharpest part of the curve to help keep it on track? 

...I also super elevated the curves using 1/16 x 1/4" basswood strips. Not immediately apparent, but you can see the cars tilt as they go around the curves."


Yes. The super elevation starts about 18" before the first curved section and continues to about 18" after the last curved section. The 1/16" basswood gives you a prototypical 3". The maximum for real track is about 6", so you could use 1/8" if you wanted to. It would be more difficult to bend, however.


Gilly

Last edited by Gilly@N&W

Well i started thinking about what Rockstars 1989 & moon man said about the possibility that the track could warp over time with all  the tension on the joints that don't line up properly,so i went down to the layout & tried to re-arrange the track to relieve the tension,but it didn't work so i was able to make a custom curved piece from an 072 curve to fit on the 060 loop that i was working on & now there is no tension at all,all the pieces fit perfectly & i checked the voltage through the entire loop & also on the custom piece with & without a load & it was the same all over the loop,good conductivity all around ,i didn't even think about the track warping until you guys mentioned it,thanks again for your help.

Yes, mixing curves is just fine.   One thing to avoid is mixing sharp curves and straights - the eye will see those as very toy-train like.   Its easier to mix wider radius/diameter curves.


I trim my Fastrack to meet at turnouts without the 1 3/8" spacers.


I am now "banking" my curves (superelevation) with two different sizes of cork roadbed:  N scale on the inside, HO on the outside of my Fastrack curves.   Looks good.


Originally Posted by Gerald Marafioti:

There were several mentions of ''banking curves'',could someone give me some more details about how to go about this & if possible post some pictures,i may want to give this a try it sounds like it would add more visual appeal to the layout.

Micromark Basswood strips


Gorilla Glue

Irwin Spring Clamps


I work short sections at a time. On the outside of the curve, apply very small dabs of Gorilla glue. Use the spring clamps to clamp the basswood in place. Let the glue dry. Apply more glue and bend/clamp the wood. Repeat. Glue/Clamp/Dry until the piece it done.


I have more curves to do, but it will be a while before I can work on them. I'll post some pics when I get around to it.


Gilly

Last edited by Gilly@N&W
Good deal Gerald have fun.Originally Posted by Gerald Marafioti:

Well i started thinking about what Rockstars 1989 & moon man said about the possibility that the track could warp over time with all  the tension on the joints that don't line up properly,so i went down to the layout & tried to re-arrange the track to relieve the tension,but it didn't work so i was able to make a custom curved piece from an 072 curve to fit on the 060 loop that i was working on & now there is no tension at all,all the pieces fit perfectly & i checked the voltage through the entire loop & also on the custom piece with & without a load & it was the same all over the loop,good conductivity all around ,i didn't even think about the track warping until you guys mentioned it,thanks again for your help.


I use RealTrax on a carpet central and it is amazing how you can mix and match track pieces to make things fit, maybe not perfectly but pretty darn close.  I just replaced an 042 switch with a 072 wye and of course had to readjust my inner loop.  I do all this on the fly with various pieces and after about an hour I managed to 'close' the loop again with very little fudging. This part of the inner loop has mostly 054, one o42 curve and few short pieces and a straight.  What is interesting is that a 4.25 short piece may not work at one end of the curve but works fine in the center or at another position!


I also discovered a bad joint and one non conductive straight piece.  Discovered it was one of the really early RealTrax pieces with non copper electrical connections.  Don't even know how it got in there, but it is now relegated to the end of a siding at best.  


So if you don't have about 10 extra pieces of short track, go and buy some so you can mix and match to make appropriate length sections to fit those strange geometries that can develop.  I like to use 1/2 curve pieces too if necessary. 

Last edited by pennsydave

Add Reply

Post

OGR Publishing, Inc., 1310 Eastside Centre Ct, Ste 6, Mountain Home, AR 72653
800-980-OGRR (6477)
www.ogaugerr.com

×
×
×
×
Link copied to your clipboard.
×
×