Originally Posted by seaboard streak:

I have gotten some atla o track to replace some gargreaves track And installed some gargreaves instalating pins.Worked on reducing a grade.Made a odd ball load for a new southern railway flatcar.And it turns out I have to cut some more track.I have to made a short peace track.Man some times this seems more like a job than a hobby.

maybe when you get that unhappy about it,its time to move on.-jim

  Tarps over the "Potbelly Swamp Transverse International Rail (Tm)" Rail Road   are holding fine through winds the last few days. Without the clamps too

 And the straights on the PST layout did change to "frosted orange" While the curves stayed nice...

  Turn out the dogs ate one too many pieces, of plastic G track. I used two brands, with adaption mods between them. But just the wrong pieces got left for it to be easy in any way.

I have one straight, one curve, and need the opposite brand of each

  I have enough metal G track, & trains, for a back burner basement project.

 But I want to leave everything outside, and have a few cheap holiday engines, I killed or softened the bells on, & repainted. Those cheap battery RC's are as "command" as I get. Lighting the passenger cars was fun.  

Originally Posted by Adriatic:

  Tarps over the "Potbelly Swamp Transverse International Rail (Tm)" Rail Road   are holding fine through winds the last few days. Without the clamps too

 And the straights on the PST layout did change to "frosted orange" While the curves stayed nice...

  Turn out the dogs ate one too many pieces, of plastic G track. I used two brands, with adaption mods between them. But just the wrong pieces got left for it to be easy in any way.

I have one straight, one curve, and need the opposite brand of each

  I have enough metal G track, & trains, for a back burner basement project.

 But I want to leave everything outside, and have a few cheap holiday engines, I killed or softened the bells on, & repainted. Those cheap battery RC's are as "command" as I get. Lighting the passenger cars was fun.  

Seems like your vandals knew enough about G track to give you the most aggravation!  Maybe you should invest in a guard dog. ;-)

The 'Bark 'n Spiders' outdoor railroad occupies a section of the backyard that was my vegetable garden. The drought here ended my vegetable garden two years ago, and my wife had the area filled with bark instead of lying fallow.  The spiders have taken over.  I am still laying retaining wall blocks for the elevated section of the folded over loop to loop layout.  My wife commented the other day that the O-81 curves looked rather sharp...I brought up the Atlas website and showed her how for a few hundred dollars and a bit more of a bite into the backyard acreage we could switch to even wider radius curves.  That ended that discussion. LOL

Disassembled a UP 50th Anniversary offset dome car, "Plainfield," to repaint it in NP North Coast Limited livery.  Finding this car means I won't have to cut an offset dome in a LIONEL 15" coach.


Neat car with full interiors in the dome and lower level, highly detailed truck side frames, stream lighting, antennas, and full diaphragms.


Haven't figured out how to remove the tinted "windows;" they appear to be glued in.  Worst case I'll ruin them and have to replace them with clear acetate or equivalent.


Ordered some more parts and supplies for ongoing projects. 

Originally Posted by Kerrigan:

Unpacked the newest addition to the CL&W, the Timken 1111 demonstrator from Sunset Models; another great job, Scott!

Four Aces

I didn't know they had trains for pimps!....


Gary, there over 300lbs of dogs here. If they were outside someone might have been looking for a new spot to wear their watch 

 Unless they brought Cheerio's 


THE GLACIER LINE UPDATE:

04-14-2015 I installed the turntable! I had to brace and cut the base and top layer into what had been an aisle space and then proceeded to install the turntable and roadbed. This was done in just under four hours which is really moving. I’m surprised I got this much done. There will be a ton of wiring to do in the lower staging yard

Attachments

Images (7)
  • 00709
  • 00710
  • 00711
  • 00712
  • 00713
  • 00714
  • 00715

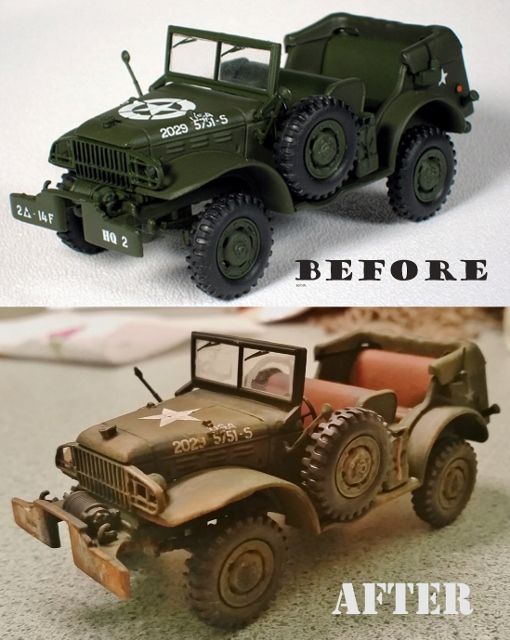
Scored a 1/43 scale WW2 Command Car made by Victoria off eBay for just $15 including postage.

I'm in the middle of making it look more correct, by doing the following:

  • Sanding off the 'invasion' surround star on the hood and replacing it with a simple star as the surround stars were never seen stateside
  • Painting the seats to look more like the leather-covered ones that really came on these vehicles (the model had the seat molded in OD green)
  • Painting the folded canvas to another shade of OD green as it obviously shouldn't be the exact same color as the metal body of the vehicle
  • Removing the markings from the bumpers (it comes marked as a 2nd Armored Division vehcle) and putting my own custom-made fictional RR operating units markings on it
  • Sanding off the markings from the rear that are ones you'd only see in England or on the continent, including the "right hand drive- no signals" marking and a load marking for a landing craft
  • Removing the extra gas can along the pass side running board
  • Painting the exsiting gas can bracket strap the correct color

I'll post shots when I'm done, probably tonight or tomorrow...

I think I might eventually put together a thread here with details on how WW2 vehicles should look on a model RR taking place in the USA during the war.

Last edited by p51

FINALLY found the root cause for my upper deck derailment issue. Has an issue with continuous but intermittent derailments at a Ross 054 wye. Tried shimming the lead track, screwing it down, using a level, all sorts of things. Got frustrated and pulled the track and was going to pull the wye to send to Ross and whatta ya know? It wasn't the wye. The Section of Gargraves leading into the wye was bent causing a slight bounce as the pilot trucks of my Lionel Scale K-4s 1361 hit the throat of the wye, they would pick the points of the turnout and that would put her on the ground as if 'Ole Scherbear was hanging on the deadman.  A quick replacement and WOW! What a difference. 2.5 hrs running and not a single derail.
Also replaced ANOTHER Z-1000 switch machine. I'm stacking these up like cordwood. I think I killed about 10 of these over the years. Something inside breaks and the motor runs continuously. Luckily I still have a couple of spares.
Miller Time.
  

Well, since I am lousy at soldering, it was a challenge to fabricate this extended pilot

for this Lionel engine (to convert it into a 2-8-0) but when I finally remembered I had

paste solder, and stopped trying with the spool stuff, I got it together.  It is strong, it

is painted, and I will put domes on the boiler tomorrow, paint that, and the end will

be in sight.  The space under the pilot platform does not allow for tight radii, like

0-27, but will work for wider radii.

Originally Posted by p51:

Scored a 1/43 scale WW2 Command Car made by Victoria off eBay for just $15 including postage.

I'm in the middle of making it look more correct, by doing the following:

  • Sanding off the 'invasion' surround star on the hood and replacing it with a simple star as the surround stars were never seen stateside
  • Painting the seats to look more like the leather-covered ones that really came on these vehicles (the model had the seat molded in OD green)
  • Painting the folded canvas to another shade of OD green as it obviously shouldn't be the exact same color as the metal body of the vehicle
  • Removing the markings from the bumpers (it comes marked as a 2nd Armored Division vehcle) and putting my own custom-made fictional RR operating units markings on it
  • Sanding off the markings from the rear that are ones you'd only see in England or on the continent, including the "right hand drive- no signals" marking and a load marking for a landing craft
  • Removing the extra gas can along the pass side running board
  • Painting the exsiting gas can bracket strap the correct color

I'll post shots when I'm done, probably tonight or tomorrow...

I think I might eventually put together a thread here with details on how WW2 vehicles should look on a model RR taking place in the USA during the war.

Here it is:

P51:  Is the prototype for that car built on a Dodge "Power Wagon" chassis?  That flat top hood looks like Dodge 3/4 ton trucks we had when I was in the Army in 1956 - '58.  It sure makes for an interesting variation in a mix of military vehicles.  I don't recall ever seeing one with the door openings left open and with a rear passenger seat.  Which, of course, is what makes this a "command car".  Your "mods" certainly add to the overall effect.


So, where can a similar model be obtained?


Paul Fischer

Originally Posted by fisch330:

P51:  Is the prototype for that car built on a Dodge "Power Wagon" chassis?  That flat top hood looks like Dodge 3/4 ton trucks we had when I was in the Army in 1956 - '58.  It sure makes for an interesting variation in a mix of military vehicles.  I don't recall ever seeing one with the door openings left open and with a rear passenger seat.  Which, of course, is what makes this a "command car".  Your "mods" certainly add to the overall effect.


So, where can a similar model be obtained?


Paul Fischer

The Power Wagon came from a postwar development of the Weapons Carrier frame and power train. They used some of the body styling initially.
The command car was a open-top passenger carrying version of the weapons carrier, all were on the same 3/4 ton frame:

http://en.wikipedia.org/wiki/D...ies#3.2F4_ton_series

Finished painting the edge of the where the new siding went in. When I put in a Lionel bumper at the end of the track it was not quite enough to store five hoppers. So I added a small piece of track and made a bumper out of ties. While doing that I ran trains. Some pics of the siding and one of my C-Liner smoking around the curve............Paul

DSCN1667

DSCN1668

DSCN1669

DSCN1665

Attachments

Images (4)
  • DSCN1667
  • DSCN1668
  • DSCN1669
  • DSCN1665

Completed lighting on Dennis Brennan and Roger Peterson buildings and ready to place on layout for final touch ups. My wife helped with interiors on both. Suffolk is the home of Planters Peanute and my grandad's trucking moved their freight thus the Planters sign.


Roger's building was Floyd's Barbershop of Mayberry. My wife's family knew Andy as he often was in their shop on the Outer Banks and one was a neighbor.

image

image

image

image

image

Attachments

Images (5)
  • image
  • image
  • image
  • image
  • image

Completed lighting on Dennis Brennan and Roger Peterson buildings and ready to place on layout for final touch ups. My wife helped with interiors on both. Suffolk is the home of Planters Peanute and my grandad's trucking moved their freight thus the Planters sign.


Roger's building was Floyd's Barbershop of Mayberry. My wife's family knew Andy as he often was in their shop on the Outer Banks and one was a neighbor.

image

image

image

image

imageThanks Mark. They were a lot of fun to put complete. Supposed to meet Dennis next week at York and pick up his roundhouse kit. That will be a challenge.


Originally Posted by Bill Webb:

Completed lighting on Dennis Brennan and Roger Peterson buildings and ready to place on layout for final touch ups. My wife helped with interiors on both. Suffolk is the home of Planters Peanute and my grandad's trucking moved their freight thus the Planters sign.


Bill, anyone... I cannot see these photos. It says "Image not found"...


Is it me or the photos?


Add Reply

Post

OGR Publishing, Inc., 1310 Eastside Centre Ct, Ste 6, Mountain Home, AR 72653
800-980-OGRR (6477)
www.ogaugerr.com

×
×
×
×
Link copied to your clipboard.
×
×