
Only lacking the barbed wire around the fence...

Repaired Operating Man inside the Madison Hardware Operating Boxcar • 6-19816 / He throws the UPS Package to fast, got him to slow down.


Attachments
Images (2)


I picked up an old vintage Great Northern Box car...all metal, I think it is American models?
Attachments
Images (7)


paul 2 posted:Got the last of the table legs for the tables done. A lot of pieces of wood cut for finishing off tables. And back supports for the back drop screwed to the table at one end. Tomorrow will be a longer day of getting things done ..........Paul
Paul, you better hurry up with that bench work. If it rains tonight I am starting mine and plan on having 2 tables built, you can't let me catch up.
Almost done with the mine headframe kit; just need to add cable and skip bucket AND power for the cable. Have almost completed a model of a primitive Hart Parr gasoline tractor as power, but think that would need some kind of safety winching mechanism, so skip would stop and not drop if engine quit. I think somewhere I have a steam boiler and equipt. I may use, instead. Will complete both and then decide.
Sure I can Bryan. The faster you get yours built the quicker I can bring my trains over and that way I don't have to finish my layout. If I had the time I would stay ahead of you but unfortunately all my time is taken up looking for a Z4000. LOL.................Paul.
PS I'll do a good rain dance for you so you can build right through the weekend.
look no further - Z4000's are on sale - $395 with free shipping!
http://www.mariostrains.com/in...id=33&Itemid=772
p51 posted:Added some ballast last night...


Ballasting is such a lot of work. Looking good here!
Bryan, instead of this Bud is for you this table is for you. Today I got table four all put together and ready to go in place after I get the Masonite backdrop painted. Two more tables to go then I can start to figure a track plan. Still trying to figure out that Swarm program. Couple of pics of work so far..................Paul

Attachments
Images (2)
Paul,
The tables are looking good. Well constructed
Thanks Mark it has gone better then anticipated. Not any cut short pieces this time around so far. Probably spoke too soon and jinxed myself with two more tables to go................Paul
This morning, Tom made a template and cut a long sloping curve on the 8'10" long mahogany front facing board for the Art Deco Std. Gauge layout table. I designed the curvature and spacing! Then Tom glued it in place. Can't see it well because several clamps and extra piece of wood are holding it on while the glue dries.


Attachments
Images (2)
working more on the repainting of a few vintage Barclays. Officer O'Malley got his uniform and cap touched up. Deanna and Trudy both got their hair freshly colored. Trudy's kid brother Buddy got his hair cut, and new grey suit and a new navy cap, and is seen carrying a red covered book he borrowed from the public library. Still more to be done.

Attachments
Images (1)
Clamps and glueing spacer boards off. Pic shows one edge of the front facing board, mahogany.
Oooh... purty![]()
![]()
![]() Good job, baby!
Good job, baby!
The other three facing boards get cut and glued on, and then staining.

Attachments
Images (1)
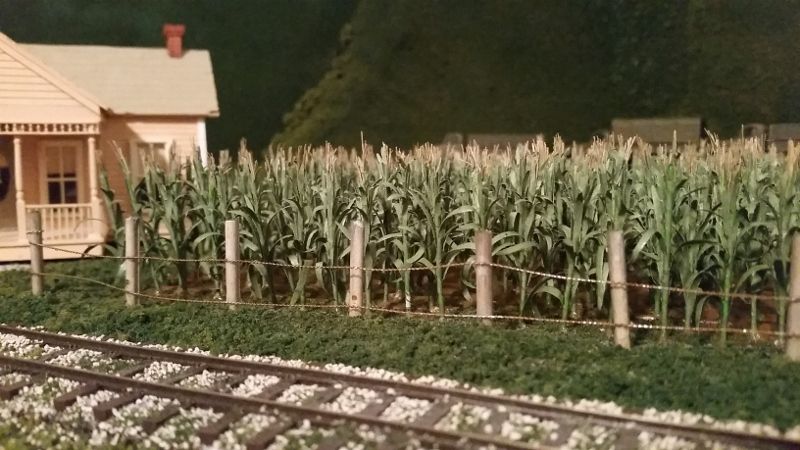
I added barbed wire to the cornfield fence and gave it some random rust as well.
Had to touch up the white on the Masonite. After it dries I'll apply the blue. I'll let it dry a bit then get the table in position, level it, then to bolt it to the last one table......................Paul
my best Buddy. Final repainting on "Buddy" the young man vintage Barclay is now done. My daughter Sarah painted his eyes and mouth. I did the rest, I'm quite satisfied with how he turned out. Left the stand original. Used acrylic and enamel paints on him. Just a gloss coat left to do. I think he came out rather well. The original grey paint shows through in places, creating shadow and highlights. He looks very sharp in his blue cap and new brown boots. He's carrying his camera, and a red covered book.


Attachments
Images (4)
Last night I cut some mountain profile-shaped 4-foot sections of ¼” MDF board for backdrops. I’d had a long sheet of Masonite already cut for that, and had some metal reinforcement channels to keep it from warping, but it warped along its long axis instead while it was waiting to be installed. The MDF is far more rigid and doesn’t weigh too much more. It won’t require nearly as many supports to the top of the bench work as the Masonite would have as the backdrop has to be free-standing. I should have used MDF from the start. This weekend, I hope to have the hardware installed, the paint work done, then light ground foam spread over the entire faces before installing them onto the layout. Once that’s done, then the backgrounds will be finished and I can get started on the trees and bushes (I have two big bags of green poly foam and a lot of ground foam in containers). I also have a hug bag full of small detail parts and I really am looking forward to getting all that stuff in place.
Well Bryan with my Z4000 coming today no more pressure for the two of us. Now we can focus on table building. Let the games or should I say let the table contest begin. LOL. After dinner going to get that table in place. Partial day of rest tomorrow. Going to go to the Strongsville Ohio show in the morning but then work will commence work again and go through the weekend.....................Paul
Tom trimmed to my design the first of the two side facing boards for the Art Deco layout table, then glued and clamped it to the table this morning. Unveiling later tonight.
Pic to follow.


Went to the Strongsville Ohio S spree show with one of the guys from the Tuesday night group. Even though it was pretty much S gauge the operating layouts were nice to view. There was some O gauge there but nothing I needed. Once I got home I got table four into place leaving just the cross braces to put on and paint the bottom black. Then I put table five together. But I have to get the back corner cleaned out and painted first. Pics of the tables........Paul

Attachments
Images (2)
Gave a couple armatures a polish and broke in some new motor brushes, for 30 min each direction, then re-cleaned with air. A cobbled up Marx E-7's motor with a three car limit, still didn't respond to the quick servicing at all. I dove in again, and it really woke up after pinching the barely loose armature plates mounting tabs down tighter. 5 minutes of brush setting and I have a double reduction A-B +5 car El Capitan that'll jump the tracks again now ![]()
![]() .
.
Published a You Tube Video
https://www.youtube.com/watch?v=9_655DJQuaE
Madison Hardware was located in New York City from 1909 to 1989. It was the premier Lionel Train dealer for decades.
A Lionel Train Collector, Richard P. Kughn was a real-estate developer from Dearborn, Michigan. He purchased Lionel Train Corp. in 1986 and moved the factory to Chesterfield, Michigan. He was Lionel’s (CEO) from 1986 to 1995. This video will tell the Madison Hardware story with rolling stock, road trucks and trailers.
Gary
Gary,
That's a real nice tribute video! Excellent!
p51 posted:I added barbed wire to the cornfield fence and gave it some random rust as well.
What did you use for your grass? It looks great

Just took this with my cell.
The backdrops are cut and hardware in place. I still have to paint, put ground foam on, and then install them.
David, I used several different color and texture types of ground foam, all from Woodland Scenics. Soon, I'll be hitting a lot of the layout with static grass, too.
Attachments
Images (1)
Lee wonderful looking outhouse, looks just like one I have been to a few times! I also think the cornfield and wire is great looking, just like the real thing!
Paul your table work is looking first class, I hope it all come together without a hitch!
And Gary thank you for the nice video, shows some real class!
mike g. posted:And Gary thank you for the nice video, shows some real class!
Agreed. Nice video, Gary.
Since my 19yo son is the ""Engineer" for the wedding cake diorama tomorrow, today he got to learn how to run everything. Then he got to do set-up in reverse- having to carefully wrap and pack each piece. Every item boxed for load-out to the venue in the morning.


Got the July issue of CTT today; some idiot named Marmel has a tip printed in it... ;-)
p51 posted:Got the two main grade crossings covered. Just need to weather them for the acceptable road wear from cars...
Lee,
It's been a while since I commented. You do exceptionally nice work! Very realistic! I should know you would place a Jeep in the photo. Very good. The upcoming Jeep rally will be in Butler, Pennsylvania soon.
For other's benefit, the Jeep was invented in Butler by the Bantam Car Company. They built about 2000 Jeeps for WWII. The bulk of the Jeeps were built by Ford and the famous Willys Overland. For the last few years thousands of Jeep owners from across the US and Canada bring Jeeps of all eras to Butler for a parade and other activities.
M. Mitchell Marmel posted:Got the July issue of CTT today; some idiot named Marmel has a tip printed in it... ;-)
I took a look Mitch! Not such an idiot as you may think! ![]() I love your humility, but willingness to share all the good ideas you come up with. I will take a look, as I do not know if I will be using tubular or other track for the childrens oriented part of my upcoming layout build.
I love your humility, but willingness to share all the good ideas you come up with. I will take a look, as I do not know if I will be using tubular or other track for the childrens oriented part of my upcoming layout build.
p51 posted:Got the two main grade crossings covered. Just need to weather them for the acceptable road wear from cars...
Lee
Layout coming together real nice. The weathered Bobed wire fence. Nice touch. The corn field as a whole has come out great. For the crossing you could lighten the color of the planks maybe a grayish brown color and Indian ink wash to give them that worn, been around awhile look. Perhaps use an eraser to rub in tire marks and slightly splinter the wood. The out house is a nice touch and necessary evil. Sure beats using an entrenching tool and of course the people in the house are saying about time. ![]() To bad about the back drop. Hopefully you could repurpose the sheet of Masonite
To bad about the back drop. Hopefully you could repurpose the sheet of Masonite
Nice work !! Coming together nicely. Mark-that is a Command Car, probably Dodge. I always liked our 3/4 ton trucks. Probably about Korean war vintage. The guys who used them said they were better than the jeeps.
M. Mitchell Marmel posted:Got the July issue of CTT today; some idiot named Marmel has a tip printed in it... ;-)
I saw that. I hear he has a real fetish for giraffes. ![]()
Parts arrived from Lionel this week.
Time to fix the Dreyfuss smoke unit. 
That charred bit is the sleeve that Mike R recommend removing in his Video on smoke unit upgrades. I can see why.

New smoke resistor installed.

New batting installed.

Test run. Wow so much better. Smoke even comes out of the cylinders. Which has never worked correctly.
Ether that or it's on fire!
Nick
Attachments
Images (4)
suzukovich posted:M. Mitchell Marmel posted:Got the July issue of CTT today; some idiot named Marmel has a tip printed in it... ;-)
I saw that. I hear he has a real fetish for giraffes.
It's true! ![]()
Paul,
The bench work battle is on. Got 2 of the modules done this weekend, just 8 more to build.


Attachments
Images (2)
Add Reply
Sign In To Reply
