Randy Harrison posted:
trumptrain posted:

A rainy and dreary day here in Maryland.   I ran trains and did some scenery work ... redoing some of the area on the " seedy" side of town.  The local freight dropped off a tank car on the siding adjacent to Ginny's Gentlmens Club. I thought it best to install a broken down chain link fence between the club and the grown over rail siding.... adding more bushes and also some male customers ( I mean gentleman ) getting out of a nice red Caddy�� 

I also removed some trailers so the above scene can open up for improved viewing.  

I also worked over the area around the Western Maryland switch tower   Placing a shed just north of the tower and a gentleman name Otto stands next to his BMW motorcycle with side car as a very dapper dude standing next to his Corvette looks on.  

I installed a sidewalk which now runs down the southwest side of Berthas restaurant.... and placing some folks walking on that sidewalk.   

Additionally I reworked the shotgun wedding scene making sure Pappy's gun was pointed at the groom and not the priest .  Sister Breunhilda has planted herself in front of the doors to Out Lady of Locomotion.  She will not allow "this" wedding to take place inside the church.  An accordion player provides the music ��

Well, that's the latest from Patsburg!  


Pat:

These photos are GREAT! I first saw them last evening when you sent me them individually by E-Mail. The stories that go with them really enhance the visual scene. Thank you for sharing them.

Thank you so very much Randy!!!  I also enjoyed seeing your layout progress this past Saturday night.  Your new ( old ) Lionel J class is awesome!!  I loved watching it run!  And  your building fronts are nothing short of spectacular!!  Bravo!!!!

HMorgan125 posted:

I decided on a green for the platform and completed the painting this morning.  I was a bit surprised that the "soap stir sticks" used for the planking took the acrylic paints so well...'Next step, get a few weathering powders for the station, add the lights and benches to the new platform and continue buying and placing the remaining buildings prior to ballasting and landscaping...

Stirrers are the best. I bought a box of 1000 birch coffee stirrers from Amazon and I think it's the best ten buck value I've ever had in the hobby as I've used them for a lot of stuff, and scratchbuilt an entire structure from them a while back...

p51 posted:
p51 posted:

Big updates coming soon.

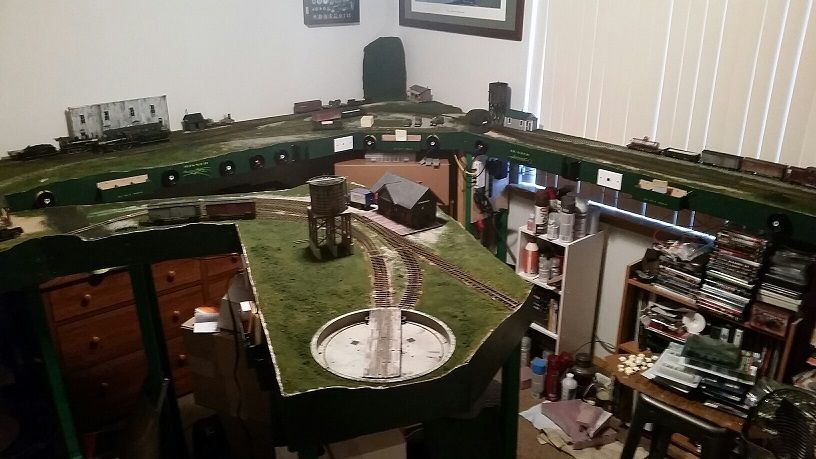
I didn't get to the backdrops, and a lift-out section of scenery in the back corner didn't get done, but I'm very close to having all the initial scenery done now. Next, comes the backdrops, then trees/bushes and scenery details, as well as completing the ballast (which I did most of the sidings already).

And, a panoramic of most of what I have done:

The first word that came to mind when I looked at each photo in your whole array was authentic. Each area of concentrated work really looks good and promises a heck-of-a good ride ahead!

FrankM.

Last edited by Moonson
Moonson posted:
p51 posted:

I didn't get to the backdrops, and a lift-out section of scenery in the back corner didn't get done, but I'm very close to having all the initial scenery done now. Next, comes the backdrops, then trees/bushes and scenery details, as well as completing the ballast (which I did most of the sidings already).

The first word that came to mind when I looked at each photo in your whole array was authentic. Each area of concentrated work really looks good and promises a heck-of-a good ride ahead!

FrankM.

Thank you very much, Frank. It looks sort of bare right now as there are no undergrowth, bushes or trees, but those are coming about the same time as the ballast gets put into the main line.

But compared to how it looked the previous week, you can understand why I've walked in that room several times since Saturday, just stood there and took it all in. I've wanted this concept of a layout since I was in my teens (but nobody made the prototype locos back then), and I can honestly say this is a dream that was about 30 years in the making.

I have been able to run trains for several months, but there was a 'meh' factor to doing so on plywood. I had to wait for the weather to get good as I needed to vent the room while working with some glues and other things to avoid stinking up the house.

A couple of structures, I'm still trying to see where they'd best fit in. You'll notice that a factor structure is totally gone now. It took of a crazy amount of room and just didn't look right for the extremely rural nature of where I'm modeling...

Compare to what it looked like only a few months ago:

This morning:

Oh, and if anyone is curious, no, those monolith formations in each corner aren't common to Eastern TN. They're to hide the corners for the backdrops. Once those are in place, they should be less obvious.

This is the general area I'm looking to recreate:

I have four containers of static grass I'm going to hit this layout with when I have the time!

I spent the early morning setting up my radial arm saw, then cut 4 legs for the new additon to the layout return loop. Unfortunately the batree went dead so I had to plug it in the recharge but I did get 1 attached on one end, tomorrow the batree should be full charged and I can move forward! I work the overnight/ midnite shift so I work on the layout after everyone is at work/ school.


p51 posted:

Added some ballast last night...20160502_234025_resized20160502_234014_resized20160502_234001_resized

The ballast and ground cover looks great.  I was wondering whether to ballast first and then add the ground cover or to put the ground cover down and then add the ballast.

Since my layout is all Lionel Fastrack I am assuming that I should ballast first and then follow up with grass, etc.

Your layout is really shaping up nicely.

HMorgan125 posted:

The ballast and ground cover looks great.  I was wondering whether to ballast first and then add the ground cover or to put the ground cover down and then add the ballast.

Since my layout is all Lionel Fastrack I am assuming that I should ballast first and then follow up with grass, etc.

Thanks!

I did ground cover first and left the right of way bare until I was done. I then did the ballast over that, then a little ground cover to hide those edges. I put some ground cover over the ballast to make it look like short grass growing through, and limited that mostly to the sidings. At the ends of spurs, I painted even the tops of the rails right at the very end of the rails with rust paint as freight cars won't likely be there and never locomotives that close to the end.

Can't wait to get the back corners done after the ballast is done, so I can then break out the static grass applicator and start spreading high grass all over the place.

I also have a cornfield in progress with over 350 corn stalks. I think that'll be a real focal point on the layout, even though it'll be in a back corner.

jmiller320 posted:

Lee your layout is looking great.  I like your oil tank car.  When I worked for the DPW at Aberdeen Proving Ground we had a fleet of old riveted tank cars were used for used oil storage.

Ah, APG. I was there as a kay-det for my post-camp 'act like a LT for 3 weeks' insanity and then a year later going through Ordnance OBC as a real LT. The training stunk, but I loved living there for 6 months! So much to see and do, I don't think I spent a single weekend in the BOQ the entire time I was there.

As for the tank car, they were used for gas, and the ET&WNC had two on the property by 1943.

The Bachmann ones are similar but not exact. But I think they made for a good (and affordable) stand-in until the day I have time to scratchbuild two. I made my own decals on my computer. At the NMRA convention I showed photos of this to a Bachmann rep, who said he wanted to make his own model of it to show the company to see if they could start producing them commercially.

I also used one to experiment with powdered chalks for rust and liked the results...

The tanks we used had riveted panels and held 10,000 gallons.  They were stored on an unused section of rail line, but because that line connected to a live line the Federal Rail Inspector would always want to write them up because of the trucks they were mounted on.  Once the government purchased double walled tanks the riveted tanks were cut up at the scrap yard or taken down to the superpond for water storage.


I solved a TMCC problem by trying out some advice I read on this Forum.  Although the advice, which made good sense to me, didn't work ... a fresh set of batteries did    I will keep this advice, from Spark Chaser, in mind for future problems with my TMCC Cab 1 remote if/when a problem arises.  

I also ran trains today for a brief while.  Always fun and entertaining!

Last edited by trumpettrain
Moonson posted:

Nicer and nicer, minute-by-minute, Lee! Take your time - you may be sorry when it's completed.

Maybe, Frank, but I kind of doubt it.

I had planned on this layout for a very long time before I started construction and once the benchwork was done, I started learning what I could about scenery. Still, not bad for a pile of lumber and track less than 2 years ago, huh? I hadn't cut the first 1X4 until August, 2014.

While I have found myself enjoying this scenery work, far more than I thought I would, I am really looking forward to the day where I can walk into the room and for the most part, it looks 'complete'. I will enjoy all the tweaking with things and adding details slowly after that's done.

p51 posted:
Moonson posted:

Nicer and nicer, minute-by-minute, Lee! Take your time - you may be sorry when it's completed.

Maybe, Frank, but I kind of doubt it.

I had planned on this layout for a very long time before I started construction and once the benchwork was done, I started learning what I could about scenery. Still, not bad for a pile of lumber and track less than 2 years ago, huh? I hadn't cut the first 1X4 until August, 2014.

While I have found myself enjoying this scenery work, far more than I thought I would, I am really looking forward to the day where I can walk into the room and for the most part, it looks 'complete'. I will enjoy all the tweaking with things and adding details slowly after that's done.

Good attitude and philosophy! However, if you look at Run285, you see that once mine was allegedly "done," complete with a fair amount of detailing, I walk by its finished-self and still get ideas. Would you believe me if I said it was done?

FrankM.photo 2g_edited-1

Attachments

Images (1)
  • photo 2g_edited-1
Last edited by Moonson
paul 2 posted:

Yard work and a package dropped off by Mr. Brown sort of kept me from working on the layout.  8 high cubes from the last catalog and two Kline vinegar cars. Tomorrow will be different. Weathermen is calling for rain.....Paul

I don't care if its raining or not.... get back to work since I am stopping by tomorrow to see the layout.

As for me got the door moved and the wall patched where the old door went.  Benchwork starts going up next week.


Last edited by Bryan in Ohio
Moonson posted:
However, if you look at Run285, you see once mine was allegedly "done," complete with a fair amount bit of detailing, I walk by its finished-self and still get ideas. Would you believe me if I said it was done?

photo 2g_edited-1

Yeah, I get what you mean. That's why in most cases, I'm referring to it as "the initial" version of whatever I'm doing. I know that plenty of tweaking will occur. For example, last night after the ballast was done, I looked at an open area of grass and thought it'd be the perfect spot for a flag stop I already had (I'd placed it on the opposite side of the track for the time being). I immediately laid in a gravel path, parking area and road that goes off the layout. I placed the flag stop directly where it now sits and graded the area around that. When I was done, I realized it was a perfect spot.

Heck, right before the scenery started, I got rid of a large factory structure that had been a dominant focal point. It just didn't look 'right' for an extremely rural Eastern Tennessee in the 40s. That's now an open gravel area with a big patch of prefab steel matting from WW2 that I intend on representing a military presence.

I have large amounts of small detail stuff as well that will be added soon enough (to include an exact scale civil war cannon barrel my Dad made on a lathe for me that'll be mounted on a display pedestal). Those are the kind of things that I'm really looking forward to.

Some months ago I bought a box of Lionel engines from a forum member and there were two seemingly derelict tenders in the box. I looked at them,decided to throw them away then thought of Mitch's motto of "Scrounge".  Have had them in a box so today I got them all fixed up with some wheels, a truck repaired, rust cleaned off and one whistle working great. THe other whistle is rusted tight so will look for a replacement.  Fun project and always feels good to save this stuff !!

jim pastorius posted:

Some months ago I bought a box of Lionel engines from a forum member and there were two seemingly derelict tenders in the box. I looked at them,decided to throw them away then thought of Mitch's motto of "Scrounge".  Have had them in a box so today I got them all fixed up with some wheels, a truck repaired, rust cleaned off and one whistle working great. THe other whistle is rusted tight so will look for a replacement.  Fun project and always feels good to save this stuff !!

Attaboy! 

As for the other whistle, it might be saved!  Try this: 

https://ogrforum.com/t...29#40989965973303029

Good luck! 

Mitch


Add Reply

Post

OGR Publishing, Inc., 1310 Eastside Centre Ct, Ste 6, Mountain Home, AR 72653
800-980-OGRR (6477)
www.ogaugerr.com

×
×
×
×
Link copied to your clipboard.
×
×