In the mode of my kids are driving me crazy. Thank God school starts next week. Today Just dropped everything for a mind dump and finished installing the back drops that arrived today via Fed EX. I need to order two more panels but this will work for now.

Before


1-DSCF3938-0021-DSCF5115

1-DSCF5121

After

1-DSCF5122

1-DSCF5123

1-DSCF5124

1-DSCF5130

and reused the old panels on this wall.

1-DSCF5125

1-DSCF5126


Attachments

Images (10)
  • 1-DSCF3938-002
  • 1-DSCF5115
  • 1-DSCF5121
  • 1-DSCF5122
  • 1-DSCF5123
  • 1-DSCF5124
  • 1-DSCF5125
  • 1-DSCF5126
  • 1-DSCF5128
  • 1-DSCF5130
Mark Boyce posted:

Suzukovich,

I took your advice and ordered two of those backdrops for our Christmas layout, my wife loves the opposite side for Christmas.

When I ordered from them , they had a village backdrop that was out of stock that I wanted to get. Its too bad that they couldn't have created that back drop to blend in with the winter mountain theme that I am using but, it will work where I want to put it..

suzukovich posted:
Mark Boyce posted:

Suzukovich,

I took your advice and ordered two of those backdrops for our Christmas layout, my wife loves the opposite side for Christmas.

When I ordered from them , they had a village backdrop that was out of stock that I wanted to get. Its too bad that they couldn't have created that back drop to blend in with the winter mountain theme that I am using but, it will work where I want to put it..

I agree.  

Mark Boyce posted:
suzukovich posted:
Mark Boyce posted:

Suzukovich,

I took your advice and ordered two of those backdrops for our Christmas layout, my wife loves the opposite side for Christmas.

When I ordered from them , they had a village backdrop that was out of stock that I wanted to get. Its too bad that they couldn't have created that back drop to blend in with the winter mountain theme that I am using but, it will work where I want to put it..

I agree.  

Mark, Thinking about it. I think for what we are using them for was not their intent when they came out with them..

Slow progress again on this American Model Builders "Laserkit" of a grain elevator.  It is too nice to sit at the workbench.  I am kitbashing it, eliminating the high loading ramp, which I have not seen in many prototypes,  and moving auxilliary buildings around to create a smaller footprint.  Although this one is smaller than probably all of my scratchbuilt ones.  I think the B.L.S. and Altoona elevator kits, which I don't own, build much larger models, too.

M. Mitchell Marmel posted:

Omni Models gets top marks for customer service! 

I'd ordered a 3/16" brass angle piece for the 3424 Brakeman on Fastrack experiments, but...

bent-angle

Dropped 'em a note on eBay, and had an answer within minutes offering a refund or a replacement!  The replacement will be winging to me shortly! 

Mitch

Well at least the brass at Omni isn't trying to work some kind of angle    on someone they haven't met......et all yet; they could have told you to get bent.  

Lee - The old timer (he looks old to me?) needs a bucket to kick, or did I miss put the horse before the coal cart....or lift...or is he digging to China????

The heels make the woman look very petite. The heels on the shoe and style says woman, I think a teens would be a tad lower(?). It makes the other girl look like a big frumpy teen being talked to by a teacher 

Lee - Great Northern  in the lead? 


I assembled wood and painted. The ladder to the water tower is done. I might separate it, cutting it to make two ladders

 The waterspout's frame is ready for details.. How large a diameter should a spout  really be?

Finished building my Scorpion Coaster from forum sponsor Coaster Dynamix.  Quick review of this project....I ordered from them on Monday night and received the kit on Thursday afternoon.  It does take awhile to finish this kit as I put in 7 hours last night and another 5 hours today.  Building the actually pieces doesn't take long and the directions are real easy to follow.  I was thinking this won't take long at all until the final couple of pages which took forever.  Of course this is the part that if you mess up the coaster won't make it around the track.  I did have to spend about an hour tweaking the angles until the coaster would make it all the way around but now that I have it locked in it runs smoothly and completely every time.  This will definitely be an eye catcher in my carnival area.

DSC_0952[1] 

Attachments

Images (1)
  • DSC_0952[1]
Adriatic posted:

Lee - The old timer (he looks old to me?) needs a bucket to kick, or did I miss put the horse before the coal cart....or lift...or is he digging to China????

Yeah, I'm looking for a good scale bucket, but they're not cheap as castings in that scale. That's a pile of cinders, not the spoils of him digging. Why he'd be digging a bunch of cinders for himself, well, maybe he's insane?

As for the female's heels, I have several books with civilian photos from the 40s, and the shoes look decent for a teen in the war era.


Bryan in Ohio posted:

Finished building my Scorpion Coaster from forum sponsor Coaster Dynamix.  Quick review of this project....I ordered from them on Monday night and received the kit on Thursday afternoon.  It does take awhile to finish this kit as I put in 7 hours last night and another 5 hours today.  Building the actually pieces doesn't take long and the directions are real easy to follow.  I was thinking this won't take long at all until the final couple of pages which took forever.  Of course this is the part that if you mess up the coaster won't make it around the track.  I did have to spend about an hour tweaking the angles until the coaster would make it all the way around but now that I have it locked in it runs smoothly and completely every time.  This will definitely be an eye catcher in my carnival area.


That's Cedar Point isn't it? On30 coming for the train?


Lee - If you can find a smooth thimble without the indentions it might work. I think with the size of that pile, a cart might be called for.

I got the Ye Old Huff N Puff, Old Log Brew reefer yesterday. (Thanks Mike)

I couldn't wait till I got the MO in the mail. It's nearly done already.

 I glued up the main framework, trimmed the details, and painted 90% of the parts in flat black down low and "rusty metal primer" for the roof and ends. ( Rusty metal primer dries to a semi gloss now ! ???  It's more brown, less red too) I tried all flat black, but I just didn't like it.

Fast dry paint and modern glues make this happen fast. I used Gorilla glue on the fat wood frame and gel super glue with an adhesion promoter on the little stuff.

  The kit had some minor issues with two eves boards being an inch short, the roofs angle was off (bad bevel cut; exacto-plane to the rescue), the brake wheel hole is much bigger that the thin wire shaft and the roofing was six, scored boards, short of the way it is on the instructions, which themselves aren't the greatest. I couldn't get over the gap in between the roof sections and seperated quite a few to scatter the gaps. The lack of any excess slats mentioned, meant I couldn't hide the gap under the top trim boards either. I'm thinking of giving the doors a frame with the extra wood from the eves. There will be an offset at the hinges; the doors are glued to the sides and the doors thickness will create an offset under the hinge, that a frame can fill. 

  I always wanted to try to build one, and now that I have; yes, I definitely would do another. At twenty bucks online retail, sans-trucks, it's hard to beat.

 Now if I could only find a model of the Casey Jones Cannonball!  

( Check your email Mike G)

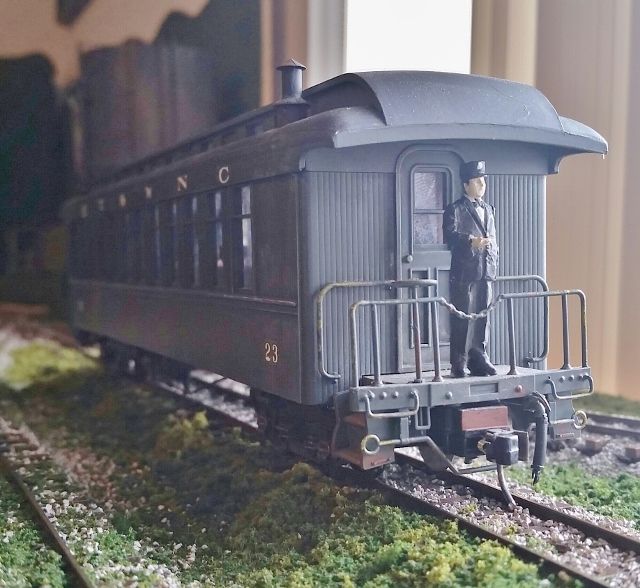
I found a vendor on eBay that had a bunch of those really good O scale pained figures from Arttista. They’re a little pricey but very good. I got a mother holding a little kid, two sitting women in housecoat/dress (typical for almost any era in the South), a shopkeeper with apron (for the gas station/general store), conductor in classic uniform (yes, the ET&WNC had them dressed like that), sailor in whites with a duffle bag (I have to begrudgingly acknowledge the war wasn’t only fought by soldiers) and a classic station worker with the sleeve covers and the bill on his head. They all will look right for the timeframe. I found that I had a decent amount of figures but one thing I’ve noticed is that many layouts looked deserted when they shouldn’t. I wanted to show a representation of enough people to make it look like people really lived there. Seven figures total and two will be standing on station platforms, the conductor is earmarked for the back platform of coach # 23 and the rest will be placed where they look best.


Went to Home Depot for one sheet of Homosote but it was $30 so I settled for 1/2" foam board. The FB sure isn't a sound killer-sounds like a drum head. Wanted some grey indoor/outdoor carpeting and found a remnant on sale the right size only $10.  So the top is down with the carpet on  top with a nice loop of track. The track is about 48" wide and 12-13 ft. long. Only thing to do is run another power lead to the back side and nail down the track. I will eventually put some litho buildings and vehicles on it. So now I have two standard gauge layouts.

Adriatic posted:


Bryan in Ohio posted:

Finished building my Scorpion Coaster from forum sponsor Coaster Dynamix.  Quick review of this project....I ordered from them on Monday night and received the kit on Thursday afternoon.  It does take awhile to finish this kit as I put in 7 hours last night and another 5 hours today.  Building the actually pieces doesn't take long and the directions are real easy to follow.  I was thinking this won't take long at all until the final couple of pages which took forever.  Of course this is the part that if you mess up the coaster won't make it around the track.  I did have to spend about an hour tweaking the angles until the coaster would make it all the way around but now that I have it locked in it runs smoothly and completely every time.  This will definitely be an eye catcher in my carnival area.


That's Cedar Point isn't it? On30 coming for the train?


Lee - If you can find a smooth thimble without the indentions it might work. I think with the size of that pile, a cart might be called for.

I got the Ye Old Huff N Puff, Old Log Brew reefer yesterday. (Thanks Mike)

I couldn't wait till I got the MO in the mail. It's nearly done already.

 I glued up the main framework, trimmed the details, and painted 90% of the parts in flat black down low and "rusty metal primer" for the roof and ends. ( Rusty metal primer dries to a semi gloss now ! ???  It's more brown, less red too) I tried all flat black, but I just didn't like it.

Fast dry paint and modern glues make this happen fast. I used Gorilla glue on the fat wood frame and gel super glue with an adhesion promoter on the little stuff.

  The kit had some minor issues with two eves boards being an inch short, the roofs angle was off (bad bevel cut; exacto-plane to the rescue), the brake wheel hole is much bigger that the thin wire shaft and the roofing was six, scored boards, short of the way it is on the instructions, which themselves aren't the greatest. I couldn't get over the gap in between the roof sections and seperated quite a few to scatter the gaps. The lack of any excess slats mentioned, meant I couldn't hide the gap under the top trim boards either. I'm thinking of giving the doors a frame with the extra wood from the eves. There will be an offset at the hinges; the doors are glued to the sides and the doors thickness will create an offset under the hinge, that a frame can fill. 

  I always wanted to try to build one, and now that I have; yes, I definitely would do another. At twenty bucks online retail, sans-trucks, it's hard to beat.

 Now if I could only find a model of the Casey Jones Cannonball!  

( Check your email Mike G)

Butch, Sounds like you had fun! I am glad, I know a guy that use to have a Casey Jones but not anymore!

p51 posted:

I found a vendor on eBay that had a bunch of those really good O scale pained figures from Arttista. They’re a little pricey but very good. I got a mother holding a little kid, two sitting women in housecoat/dress (typical for almost any era in the South), a shopkeeper with apron (for the gas station/general store), conductor in classic uniform (yes, the ET&WNC had them dressed like that), sailor in whites with a duffle bag (I have to begrudgingly acknowledge the war wasn’t only fought by soldiers) and a classic station worker with the sleeve covers and the bill on his head. They all will look right for the timeframe. I found that I had a decent amount of figures but one thing I’ve noticed is that many layouts looked deserted when they shouldn’t. I wanted to show a representation of enough people to make it look like people really lived there. Seven figures total and two will be standing on station platforms, the conductor is earmarked for the back platform of coach # 23 and the rest will be placed where they look best.


Great find Lee!

I started actually shaping my mountain. I covered my latticework with newspaper and spare adhesive. Then I started adding Great Stuff. 

The red box is where I have an access cut out, and I needed something to fill the hole so it would remain square. Underneath the box is one end of my removable access hatch. I covered both with plastic wrap so the foam won't stick to them. 

Two cans did not do as much as I thought!

imageimageimageimage

Attachments

Images (4)
  • image
  • image
  • image
  • image

Worked some more on the Bedroom Standard gauge layout and have it pretty much done-at least for now. want to put a few buildings on it and an old Ives semaphore. Did cut some indoor/outdoor carpeting in to strips and put it under the track on top of the carpeting covering the layout. removed the smaller piece of foam board at the one end when I discovered I had enough Homosote toput that down.  My poor O gauge layout has been neglected so will run it tonight. The high heat and humidity has let up so that makes it nice to run trains.

I got those figures really fast and added to he layout right away. Some are next o houses and such, but I really like how my main depot looks like it should, and I've bene wanting to put a conductor onto a coach for a long time now.

Not great cell shots, but it gives an idea.

As for the sailor, some of you might be surprised that an old Army officer would have that. I thought a sailor home on leave would really look the part. I plan to letter his sea bag with a fictional name and the ship name, Uss Indianapolis to illustrate the horrible costs of the war. When this young man hops on the train, his family will never see him again.


p51 posted:

I got those figures really fast and added to he layout right away. Some are next o houses and such, but I really like how my main depot looks like it should, and I've bene wanting to put a conductor onto a coach for a long time now.

Not great cell shots, but it gives an idea.

As for the sailor, some of you might be surprised that an old Army officer would have that. I thought a sailor home on leave would really look the part. I plan to letter his sea bag with a fictional name and the ship name, Uss Indianapolis to illustrate the horrible costs of the war. When this young man hops on the train, his family will never see him again.


Looking good Lee, its sad so many family's had to lose love ones. I know the young men and women wanted to be there for there country and family!

Mo985 posted:

I started actually shaping my mountain. I covered my latticework with newspaper and spare adhesive. Then I started adding Great Stuff. 

The red box is where I have an access cut out, and I needed something to fill the hole so it would remain square. Underneath the box is one end of my removable access hatch. I covered both with plastic wrap so the foam won't stick to them. 

Two cans did not do as much as I thought!

imageimageimageimage

Hey Chris, Looks like it going to be a cool looking mountain! Wondering if you have used the great stuff for this before and if so do you have any finished pictures? I was just filling some holes in the garage sheetrock with some and thought about using it for the same thing.

jim pastorius posted:

The figures really look good on your layout. Like the story on the sailor-who will know the story ?? 

Almost nobody, but I will.

FYI, see the load on the baggage cart to the far right in the same shot? On, that, I lettered the tarp with, "L. Riley Co" which is in honor of Lee Riley of Bachmann. He's the guy who urged them to get into On30 seriously, and pushed for the ET&WNC ten-wheelers that got me back into the hobby. But again, nobody will notice that but me.

mike g. posted:
Mo985 posted:

I started actually shaping my mountain. I covered my latticework with newspaper and spare adhesive. Then I started adding Great Stuff. 

The red box is where I have an access cut out, and I needed something to fill the hole so it would remain square. Underneath the box is one end of my removable access hatch. I covered both with plastic wrap so the foam won't stick to them. 

Two cans did not do as much as I thought!

imageimageimageimage

Hey Chris, Looks like it going to be a cool looking mountain! Wondering if you have used the great stuff for this before and if so do you have any finished pictures? I was just filling some holes in the garage sheetrock with some and thought about using it for the same thing.

Mike, 

I have not, but have been doing quite a bit of reading. This is uncharted territory for me. My big concern is the shaping and smoothing process. I had thought of using my wife's clay sculpting tools, however the foam is too rigid for that. 

Mo985 posted:
mike g. posted:
Mo985 posted:

I started actually shaping my mountain. I covered my latticework with newspaper and spare adhesive. Then I started adding Great Stuff. 

The red box is where I have an access cut out, and I needed something to fill the hole so it would remain square. Underneath the box is one end of my removable access hatch. I covered both with plastic wrap so the foam won't stick to them. 

Two cans did not do as much as I thought!

imageimageimageimage

Hey Chris, Looks like it going to be a cool looking mountain! Wondering if you have used the great stuff for this before and if so do you have any finished pictures? I was just filling some holes in the garage sheetrock with some and thought about using it for the same thing.

Mike, 

I have not, but have been doing quite a bit of reading. This is uncharted territory for me. My big concern is the shaping and smoothing process. I had thought of using my wife's clay sculpting tools, however the foam is too rigid for that. 

Hi Chris, I was trying to think about what I could use, and low and behold last night the wife broke out this thing I bought her to kinda sand the bottom of her feet to smooth them out. I think I might give that a try when the time comes! LOL

Have a vacuum handy, and maybe a can of static guard, carve with a knife or razor, sand with very coarse sandpaper  to make fast headway.

  I'd think about a dust mask too.

i didn't build a mountain, I used it as filler on some custom dunebugbodydy contouring, to support the new fiberglass over it. I'd suggest painting with water based craft acrylics as I had one paint react to it.

Well I was doing some searching for Ed and his light plant for the last 2 day and found it today. After seeing what they wanted for one, which blew my mind I thought I would try and build one. Well here is what I came up with so far. Parts from the old Scooby Doo van, a light tower with LED's, a plastic box cut into 4 pieces and glued back together. I hope you guys like it. All I need now is to build a layout to put it on and some BNSF logs!DSC00158DSC00162DSC00165DSC00168DSC00171DSC00173

Attachments

Images (6)
  • DSC00158
  • DSC00162
  • DSC00165
  • DSC00168
  • DSC00171
  • DSC00173
mike g. posted:

Well I was doing some searching for Ed and his light plant for the last 2 day and found it today. After seeing what they wanted for one, which blew my mind I thought I would try and build one. Well here is what I came up with so far. Parts from the old Scooby Doo van, a light tower with LED's, a plastic box cut into 4 pieces and glued back together. I hope you guys like it. All I need now is to build a layout to put it on and some BNSF logs!

Well scrounged! 

Mitch

Lot of great work.

Lee " I plan to letter his sea bag with a fictional name and the ship name, Uss Indianapolis to illustrate the horrible costs of the war. When this young man hops on the train, his family will never see him again." What a great touch of reality for your layout. The adding of the people really make the layout pop.

Mo985; The mountain is looking good so far. I like the way the foam settled it should look real good once you add foliage  and weathering.

mike g.  Sometimes building your own is fun, especially when everything is from the parts bin.  

For me. Layout is a mess,  Took delivery of Doug's O gauge hauler and started reorganizing and making room. What a great way to store rolling stock!  In the process I managed to bring back to life a 5v engine that had been left for dead months ago.  Of course have another pic for Mitch in the process. 

1-DSCF51361-DSCF5138 


Attachments

Images (2)
  • 1-DSCF5136
  • 1-DSCF5138

I finished laying down the foam, then took to shaping. A super sharp hobby knife worked well, and my hobby saw worked good too, however I was just removing all the character. 

I decided to lay plaster cloth over the keep the shape and add some angles instead of everything being rounded. 

Alas.... I ran out of cloth. I think maybe two more packages will get me finished. 

imageimageimage

I also decided to add in a 2x4' shelf to house my container yard, so I had to rearrange track and move other stuff around again!image

Attachments

Images (4)
  • image
  • image
  • image
  • image
Mo985 posted:

I finished laying down the foam, then took to shaping. A super sharp hobby knife worked well, and my hobby saw worked good too, however I was just removing all the character. 

I decided to lay plaster cloth over the keep the shape and add some angles instead of everything being rounded. 

Alas.... I ran out of cloth. I think maybe two more packages will get me finished. 

imageimageimage

I also decided to add in a 2x4' shelf to house my container yard, so I had to rearrange track and move other stuff around again!image

Looking good Chris, I like the container yard!

I worked on my railroad for about 7 and a half hours today.  Cleaned track using my track cleaning cars.  Detailed scenes especially the area around the brothel where I added a chain link fence which I painted rust and grimmy black. Also I added brush and lightly weathered the Hooker Chemical car which is parked on a siding just behind the brothel.

I also worked at improving the detailing of the industrial area scene.  Moving tractors and trailers to different positions.  Cleaning off the brick pavement with a paint brush.  Changing some vehicles in and out.  

Glued TV antennas to roofs of houses.

Planted 6 deciduous trees throughout the layout.  Wow!! These trees make a big difference!!  Also planted some pine trees in various locations on the layout.

Super detailed the house under construction.  Adding more skilled and unskilled labor.  Repositioning the Demarco Bros Roofing truck.  Clearing away some of the lichen. Sprinkling some Woodland Scenics Earth about.  Positioning a small bulldozer pushing up a pile of dirt as it grades the front of the building lot.   Added some stockpiles of lumber and a pile of bricks. 

Also super detailed area around the cabin on the lake.  Repositioned the black bears, firewood stock piles, flowers, pickup truck, planted two trees. 

Ran my new Pennsylvania caboose that I bought yesterday at Mercer Junction.

Ran two trains and got my elevated trolley line functioning consistently. 

Mercer Junction is a GREAT store!!! Met Dave who is a super nice guy!!!  He has a very nice BIG in store layout.   The store is well stocked, uncluttered, and well thought out.  If you are ever in the area of Mercer Pa., its just off I-79 about 5 minutes.  Well worth stopping in to see Dave!  

It was a good day's work on the railroad.  I didn't even stop for lunch.  I was having too much fun and time seemed to stop.

Last edited by trumpettrain

I had an op session on my layout this evening, two normal-sized people, a large guy, and myself all fit into the same room with minimal issues (which proved I provided enough aisle space, for the most part.

The first photo shows three trains running at the same time for the first time ever. The foreground is obvious, but a passenger turn is to the far left and a freight switching is going on past the cornfield in the upper left background, directly above the coach.

7AugOps17AugOps27AugOps37AugOps47AugOps6

Normally, I run one train and let whoever is handing the center section of the layout do the switching for outbound cars, which keeps that person busy. But with a third guy, I pulled out a third ten-wheeler (ET&WNC # 9, the first time it's ran with the new road number) and ran a passenger train from the opposite end than normal. I think everyone had a good time.

Attachments

Images (6)
  • 7AugOps1
  • 7AugOps2
  • 7AugOps3
  • 7AugOps4
  • 7AugOps5
  • 7AugOps6

I spent a good part of the day taking pictures of NS trains and observing.  Standing alongside the track at a downgrade  spot a train was drifting down hill at a pretty good clip with little engine noise. I noticed how noisey it was on welded track with all the wheels clattering and bumping and slack rattling, maybe  all the attention paid to make layouts quiet is misplaced. Another thing I paid attention to was "crew talk". On the weekends tere is a woman dispatcher who seems to do a smooth, very professional first rate job.  She even spoke to a woman engineer who sounded like a newbie so that was funny. Yesterday was busy again, the third Sunday in a row. Before Sunday would be quiet. Of course, lots of black & white NS locos. A few  bright colors.

p51 posted:

I had an op session on my layout this evening, two normal-sized people, a large guy, and myself all fit into the same room with minimal issues (which proved I provided enough aisle space, for the most part.

The first photo shows three trains running at the same time for the first time ever. The foreground is obvious, but a passenger turn is to the far left and a freight switching is going on past the cornfield in the upper left background, directly above the coach.

7AugOps17AugOps27AugOps37AugOps47AugOps6

Normally, I run one train and let whoever is handing the center section of the layout do the switching for outbound cars, which keeps that person busy. But with a third guy, I pulled out a third ten-wheeler (ET&WNC # 9, the first time it's ran with the new road number) and ran a passenger train from the opposite end than normal. I think everyone had a good time.

Hi Lee, Looks like a good time was had by all, it's nice to see that as this is what it is all about. Fun with FRIENDS!

trumptrain posted:

I worked on my railroad for about 7 and a half hours today.  Cleaned track using my track cleaning cars.  Detailed scenes especially the area around the brothel where I added a chain link fence which I painted rust and grimmy black. Also I added brush and lightly weathered the Hooker Chemical car which is parked on a siding just behind the brothel.

I also worked at improving the detailing of the industrial area scene.  Moving tractors and trailers to different positions.  Cleaning off the brick pavement with a paint brush.  Changing some vehicles in and out.  

Glued TV antennas to roofs of houses.

Planted 6 deciduous trees throughout the layout.  Wow!! These trees make a big difference!!  Also planted some pine trees in various locations on the layout.

Super detailed the house under construction.  Adding more skilled and unskilled labor.  Repositioning the Demarco Bros Roofing truck.  Clearing away some of the lichen. Sprinkling some Woodland Scenics Earth about.  Positioning a small bulldozer pushing up a pile of dirt as it grades the front of the building lot.   Added some stockpiles of lumber and a pile of bricks. 

Also super detailed area around the cabin on the lake.  Repositioned the black bears, firewood stock piles, flowers, pickup truck, planted two trees. 

Ran my new Pennsylvania caboose that I bought yesterday at Mercer Junction.

Ran two trains and got my elevated trolley line functioning consistently. 

Mercer Junction is a GREAT store!!! Met Dave who is a super nice guy!!!  He has a very nice BIG in store layout.   The store is well stocked, uncluttered, and well thought out.  If you are ever in the area of Mercer Pa., its just off I-79 about 5 minutes.  Well worth stopping in to see Dave!  

It was a good day's work on the railroad.  I didn't even stop for lunch.  I was having too much fun and time seemed to stop.

Wow!  You sure we're busy, Pat!  I'll look forward to seeing some photos later on.

Yes Dave has a very nice store.  Glad you stopped by.  It is nice it is only about a 45 minute drive for me.

Add Reply

Post
×
×
×
×
Link copied to your clipboard.
×
×