Patrick was here a couple of times last week, but had to cancel yesterday, so I've been on my own. Last week we did a bunch of wiring, not very exciting to look at, but still important.


I've quietly been working on a number of different projects: prepping Tortoises for Matt to install Wednesday, making control panels, assembling Hump Yard switch throws, making shields for coils on railsounds boards and starting to gather materials for LED passenger car lighting.


Keeps me out of trouble.

Well, last month my layout looked like this:


 LAYOUT BEFORE DISMANTLING


Then about 3 weeks ago, it looked like this:


LAST MONTH

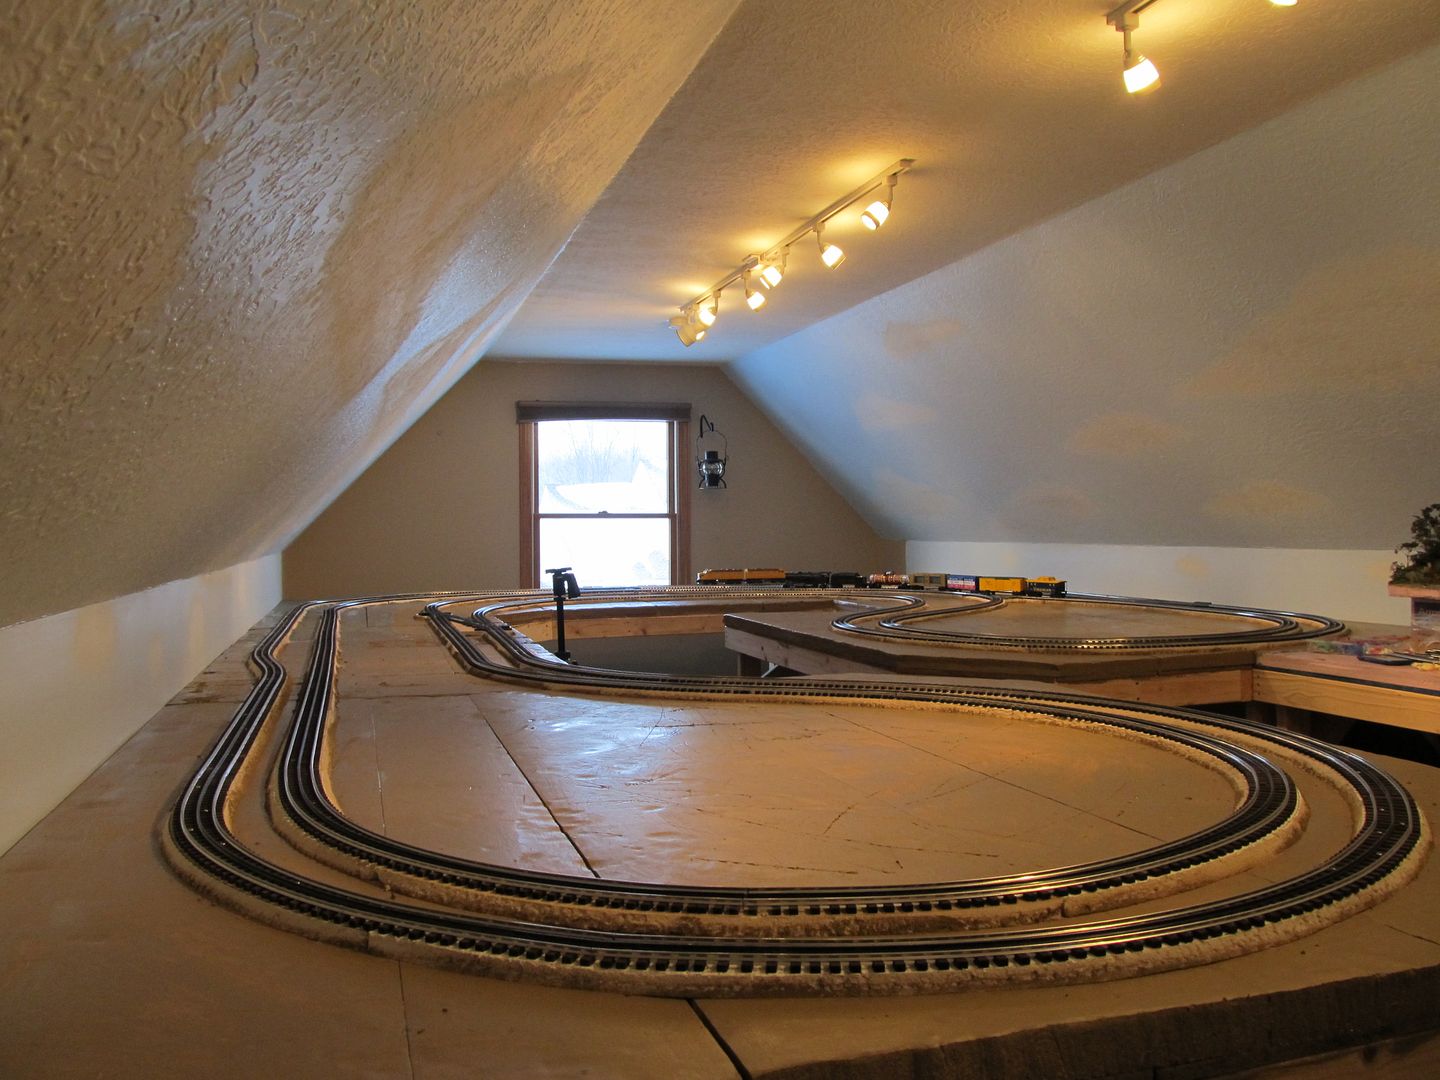
Then, there was an empty room.  But then a new layout, with a less complex track plan and the ability to walk around 3 sides to watch trains better, plus a holding yard behind the door, slowly emerged.  There is finally enough shelving to hold the rolling stock, it will be easier to wire because I'm not going to cover it with plywood so that I can do different terrain elevations.  There is plenty of access to the underside because I made some of the shelf cabinets on the right with wheels so that they can be unlatched and rolled out of the way.  The track is just sitting on the table in these pictures as I try out different configurations, although I have a design, but they're always subject to change.  I love snowy days, because I feel so cozy inside my train room working away.  Having fun again.   


LAYOUT LEFT SIDE & BACK WALL


LAYOUT RIGHT SIDE SHELVING

LAYOUT BEHIND DOOR

LAYOUT WALL SHELVES

LAYOUT SHELF UNDER ON LEFT

LAYOUT LEFT SIDE LOW


Attachments

Images (9)
  • LAYOUT BEFORE DISMANTLING
  • LAST MONTH
  • LAYOUT LEFT SIDE & BACK WALL
  • LAYOUT WALL SHELVES
  • LAYOUT RIGHT SIDE SHELVING
  • LAYOUT BEHIND DOOR
  • LAYOUT LEFT SIDE LOW
  • LAYOUT SHELF UNDER ON LEFT
  • LAYOUT WALL SHELVES
Originally Posted by MdMikey:

Well, last month my layout looked like this:


 LAYOUT BEFORE DISMANTLING


Then about 3 weeks ago, it looked like this:


LAST MONTH

Then, there was an empty room.  But then a new layout, with a less complex track plan and the ability to walk around 3 sides to watch trains better, plus a holding yard behind the door, slowly emerged.  There is finally enough shelving to hold the rolling stock, it will be easier to wire because I'm not going to cover it with plywood so that I can do different terrain elevations.  There is plenty of access to the underside because I made some of the shelf cabinets on the right with wheels so that they can be unlatched and rolled out of the way.  The track is just sitting on the table in these pictures as I try out different configurations, although I have a design, but they're always subject to change.  I love snowy days, because I feel so cozy inside my train room working away.  Having fun again.   


LAYOUT LEFT SIDE & BACK WALL


LAYOUT RIGHT SIDE SHELVING

LAYOUT BEHIND DOOR

LAYOUT WALL SHELVES

LAYOUT SHELF UNDER ON LEFT

LAYOUT LEFT SIDE LOW


This is a great layout plan. I like the idea of the storage cabinetry under the layout as well as on the walls. You have really done much in only a few weeks. Keep us posted with more photos.

A minor tremor occurred on my layout. It was named a DREMELQuake. Suddenly, a sinkhole appeared that caused the roadway to shift and several plasticville buildings to disappear beneath. As a result, several Scenic Structures mushroomed up in their place. The roadway is being repaired as I write this.


Sadly, there remains little hope for the Plasticville.

Last edited by AlanRail

Trying to get my "layout" running.  Right now basically carpet on top of plywood.  Goal is to get some trains running instead of wasting time trying to come up with a perfect track plan.  So far I have 1 loop in place around the room, behind the furnace, and over a homemade through plate girder bridge (liftout).  Yesterday started on real wiring and drops vs. temporary w/lock-ons.


Don

WOW really great setting tfor the Bridge, Nice work!!!!Originally Posted by Larry Sr.:

Since the He** Gate bridge had to go. I trying to fill that area with a more appropriate bridge for mountains. Took a few days to get the new bridge . It' going to take a while. First step start chopping some more mountain fill.

DSCN1566


Went to the local TCA semi-annual meet (where I meet many forum members and generally had a great time) and bought a bunch of things on my "get-when-you-can meet, including three small power supplies to independently run the odd small 'Streets loops I have on the layout, and a fourth to run more accessories and lighting.  Stopped by Lowe's on the way home for wire and connectors to start this week.  

Thanks guys, makes me feel like I'm doing something. This thread is like a library of outstanding work from members. It has been a real education on building. It's also enjoyable to see what others are accomplishing on a regular basis. 

Anyway, new bridge about done with basics. Added some LED's under it and some LED's in my little coal mines.

DSCN1583

DSCN1589

Attachments

Images (2)
  • DSCN1583
  • DSCN1589
Originally Posted by Larry Sr.:

Thanks guys, makes me feel like I'm doing something. This thread is like a library of outstanding work from members. It has been a real education on building. It's also enjoyable to see what others are accomplishing on a regular basis. 

Anyway, new bridge about done with basics. Added some LED's under it and some LED's in my little coal mines.

DSCN1583

DSCN1589

Great work, Larry. The bridge and the rest of your layout is really taking shape.

Last night I cut plywood for the decking on an industrial area that I am redoing.  I decided to put in another switch and siding and to move my potential Wonder Bread bakery.


Also cut more PVC pipe for additions, extensions, and additional locations of grain elevators and flour mills.


Art

Today on my layout I..................tore it up. Well at least one corner of it and a 18 " x 8 ft. section lost track and scenery today in order add for expansion. Been planning it for awhile, just didn't have the heart to rip into the scenery. I am adding a 48" x 19 ft. extension to one side and another 5 ft. x 9 ft. extension to the leg of the L. Will add pictures as work progresses.

Most recently I have been running trains for my youngest grandson, Aiden. He comes over and the first thing is we head for the train room, he sits on my lap and my good old PW 2020 makes it rounds as he calls for more. I do enjoy these times with him.


Today, I worked on the outdoor G layout, excavating more of the track bed and ordering the pea gravel base rock, 5 yards worth.

I think I found a more permanent place for a little tinplate station that has been floating around to several different locations ever since it was displaced by a new layout accessory about a month ago. Looks good, I'm happy with the new spot.


Also worked on putting lights in a 4-car Williams passenger set.  I think the lighting for these was an optional kit (they came out in 1979), because the wiring was different in each of the cars, and dubious in all of them.  Big improvement, all lit up now pulling into the station.


Just a very fun tinkering day.


I started working on the next section of track...

This is the Milwaukee Road Short Line hill.

IMG_4084
I have a couple pieces left to get to the switch and a couple more on the other side of it. When that's done, it's on to the Western Avenue yard (middle), and finally the Hiawatha lead (left).

IMG_4088

My goal is to have all this track down by the end of the week. Then it's on to the new hidden yard. Still shooting for that ultimate goal of all track complete by the end of the year.

Attachments

Images (2)
  • IMG_4084
  • IMG_4088

It's been a while since I last posted progress on the Mountain Division of the Free State Junction RR. The proverbial "light at the end of the tunne"l has been reached and I am happy to report that Mt. Randolph is completed.  I built this mountain with plaster cloth, chicken wire, 2x4 frame, and wadded up newspaper.... not necessarily in that order though  See attached photos of various views of Mt. Randolph with scenic background.


Mt. Randolph has a unique feature in that the automobile tunnel ( located mid mountain ) is actually a pull out drawer so that I can gain access to the track to fix derailments.  


Today I finished ballasting the track of the Mountain Division using Whitison Ballast, a great product, from Harrison Trains!  Unfortunately HT no longer carries this brand of ballast.  See the photos and check it out. After spreading the Whitison, I sprinkled on some Woodland Scenics fine black cinders and Woodland Scenics brown ballast to give a well used roadbed look.  


 I also used a brown ballast ( Woodland Scenics ) mixed with some fine black cinders, also WS, to give the effect of coal being spilled from hoppers,  for the spur.  Check out the photo of the two ballast types Whitison for the main line and the the brown for the spur.


At Patsburg West end ( actually located at the opposite end of the layout from Mt. Randolph ) I installed a photo backdrop.  See photo.


It's great to have this project pretty much completed.  I will tweek things as time advances.  Enjoy the photos.

east portal Mt. Randolph

Looking up Mt. Randolph

Scenic View of Mt. Randolph

Scenic View of Mt. Randolph

end of the line

Ballast contrast Mountian Diviision

end of the line

Scenic View of Mt. Randolph

Backdrop Patsburg West

Whitison Ballast

Mt Randolph west portal

Bollman Bridge & Mt. Randolph

Attachments

Images (10)
  • Bollman Bridge & Mt. Randolph: This Bollman Bridge lifts out so that I can service unreachable areas.
  • Mt. Randolph: Here is the wide view of the project.  I have gator board to cover the windows to which I will attach a backdrop
  • Looking up Mt. Randolph: I shot this looking up the mountains
  • east portal Mt. Randolph: I wanted to give a logging and coal branch line effect so I really let the weeds grow over this MTH portal.
  • Mt Randolph west portal: I used a wooden portal from Scenic Express for the west portal of MR.  I think it gives a low budget branch line look in my opinion.
  • Whitison Ballast: I got this ballast from Harrison Trains. HT no longer sells it.  I used Woodland Scenics black cinders and some brown ballast to dirty it up a bit.... it gives the well used look.d
  • Ballast contrast Mountian Diviision: Using two types of ballast.  Whitison Ballast, by Harrison Trains for the Mainline, and Woodland Scenics brown for the spur.
  • end of the line: I did a bit of scenicing at the end of the spur line.
  • Scenic View of Mt. Randolph: I thought this was a nice view.  Sort of if you were to look from a scenic overlook.
  • Backdrop Patsburg West: Located at the opposite end of layout from Mt. Randolph
Originally Posted by trumptrain:

It's been a while since I last posted progress on the Mountain Division of the Free State Junction RR. The proverbial "light at the end of the tunne"l has been reached and I am happy to report that Mt. Randolph is completed.  I built this mountain with plaster cloth, chicken wire, 2x4 frame, and wadded up newspaper.... not necessarily in that order though  See attached photos of various views of Mt. Randolph with scenic background.


Mt. Randolph has a unique feature in that the automobile tunnel ( located mid mountain ) is actually a pull out drawer so that I can gain access to the track to fix derailments.  


Today I finished ballasting the track of the Mountain Division using Whitison Ballast, a great product, from Harrison Trains!  Unfortunately HT no longer carries this brand of ballast.  See the photos and check it out. After spreading the Whitison, I sprinkled on some Woodland Scenics fine black cinders and Woodland Scenics brown ballast to give a well used roadbed look.  


 I also used a brown ballast ( Woodland Scenics ) mixed with some fine black cinders, also WS, to give the effect of coal being spilled from hoppers,  for the spur.  Check out the photo of the two ballast types Whitison for the main line and the the brown for the spur.


At Patsburg West end ( actually located at the opposite end of the layout from Mt. Randolph ) I installed a photo backdrop.  See photo.


It's great to have this project pretty much completed.  I will tweek things as time advances.  Enjoy the photos.

east portal Mt. Randolph

Looking up Mt. Randolph

Scenic View of Mt. Randolph

Scenic View of Mt. Randolph

end of the line

Ballast contrast Mountian Diviision

end of the line

Scenic View of Mt. Randolph

Backdrop Patsburg West

Whitison Ballast

Mt Randolph west portal

Bollman Bridge & Mt. Randolph

Pat: The photos look GREAT!!! But, in person, the mountain is breathtaking.

Forum Members: My wife and I visited Patsburg this past Saturday evening and we were dazzled by Pat's work.

trumptrain, nice photos and what a layout!  thanks for posting.


More futzing with little stuff today.  Had about a half dozen new people to plunk down.


On the workbench, working on my dad's old Ives 1134.  Got far enough into it to see what parts I need, and have been trying to get rods and crosshead guides ordered.


Originally Posted by Randy Harrison: Thanks for your kind words Randy. I'm delighted that you and Terry got to actually visit Patsburg to see it.   This mountain would not be possible were it not for all your work, ideas and skill in helping me with building the base.  This is why I named it Mount Randolph after you.
Originally Posted by trumptrain:

It's been a while since I last posted progress on the Mountain Division of the Free State Junction RR. The proverbial "light at the end of the tunne"l has been reached and I am happy to report that Mt. Randolph is completed.  I built this mountain with plaster cloth, chicken wire, 2x4 frame, and wadded up newspaper.... not necessarily in that order though  See attached photos of various views of Mt. Randolph with scenic background.


Mt. Randolph has a unique feature in that the automobile tunnel ( located mid mountain ) is actually a pull out drawer so that I can gain access to the track to fix derailments.  


Today I finished ballasting the track of the Mountain Division using Whitison Ballast, a great product, from Harrison Trains!  Unfortunately HT no longer carries this brand of ballast.  See the photos and check it out. After spreading the Whitison, I sprinkled on some Woodland Scenics fine black cinders and Woodland Scenics brown ballast to give a well used roadbed look.  


 I also used a brown ballast ( Woodland Scenics ) mixed with some fine black cinders, also WS, to give the effect of coal being spilled from hoppers,  for the spur.  Check out the photo of the two ballast types Whitison for the main line and the the brown for the spur.


At Patsburg West end ( actually located at the opposite end of the layout from Mt. Randolph ) I installed a photo backdrop.  See photo.


It's great to have this project pretty much completed.  I will tweek things as time advances.  Enjoy the photos.

east portal Mt. Randolph

Looking up Mt. Randolph

Scenic View of Mt. Randolph

Scenic View of Mt. Randolph

end of the line

Ballast contrast Mountian Diviision

end of the line

Scenic View of Mt. Randolph

Backdrop Patsburg West

Whitison Ballast

Mt Randolph west portal

Bollman Bridge & Mt. Randolph

Pat: The photos look GREAT!!! But, in person, the mountain is breathtaking.

Forum Members: My wife and I visited Patsburg this past Saturday evening and we were dazzled by Pat's work.


Originally Posted by hojack:

trumptrain, nice photos and what a layout!  thanks for posting.


More futzing with little stuff today.  Had about a half dozen new people to plunk down.


On the workbench, working on my dad's old Ives 1134.  Got far enough into it to see what parts I need, and have been trying to get rods and crosshead guides ordered.


Thanks so much hojack for your kind words and taking time to view the photos.  BTW Mount Randolph, which comprises my Mountain Division,  is about 25% of my total layout.  It's great to have this part completed so I can now direct my energies to the next portion.  Also best wishes for continuing success and fun with our layout building as well 

Thanks Patrick.  Keep us posted on the progress at Patsburg West.


Kinda down today, the divorce is grinding along...  poured myself a little drink, turned on all the layout lights, and just walked around appreciating it.  Didn't even run any trains, just poked and adjusted and ran the stories of the different scenes on the layout.  Did get out a little ground foam and repair a spot, but this was not a "doing" day.


In the Scottish Highlands where I visited once, at the top of a long steep climb over the mountains there's a little pub called "Rest and Be Thankful".  So this was a rest and be thankful day.


Today I only had time to work a few minutes.  I put a small barn, cows, and some fencing around the cows, near the base of Mt. Randolph.  Also a small weathered Plasticville log cabin.  I will leave all this in place for a few days and see how it looks.  I also want to put together the Ameritown flagstop station and use it on the Mountain Division.  Hopefully this coming weekend I will have a long block of time for doing this.  Again not much done today however progress continues on the Free State Junction Railway.

Add Reply

Post
×
×
×
×
Link copied to your clipboard.
×
×