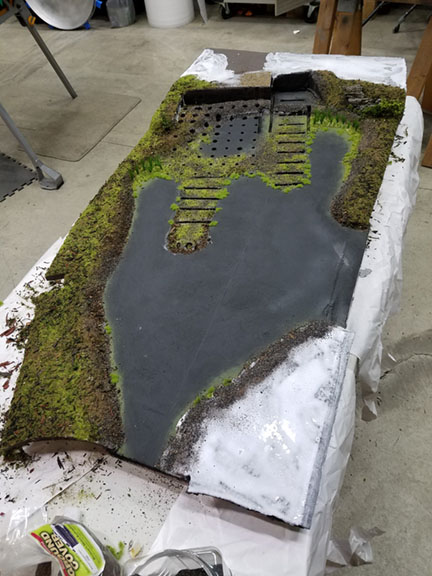
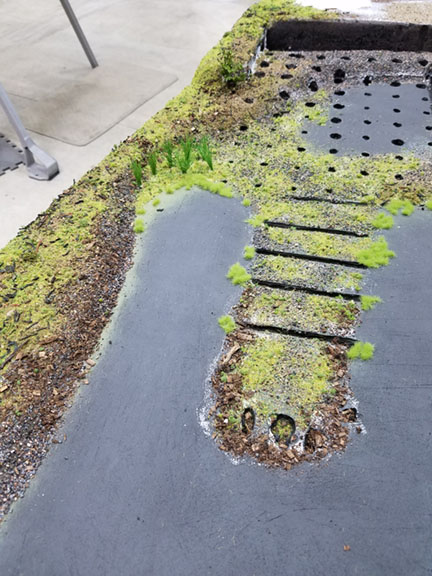
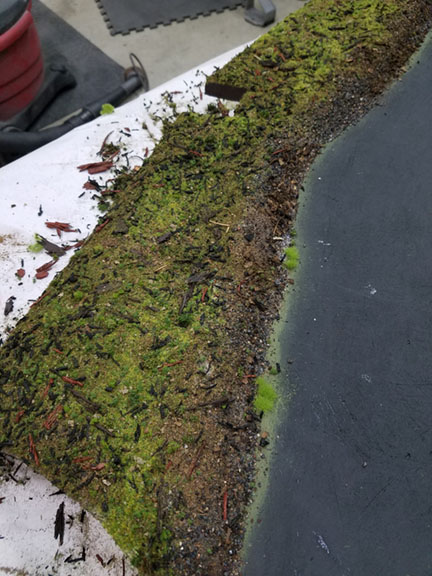
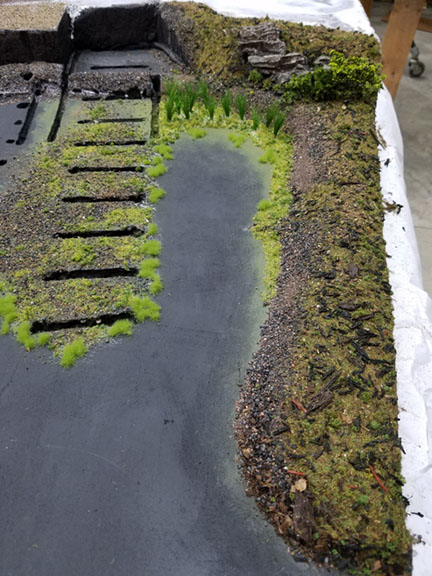
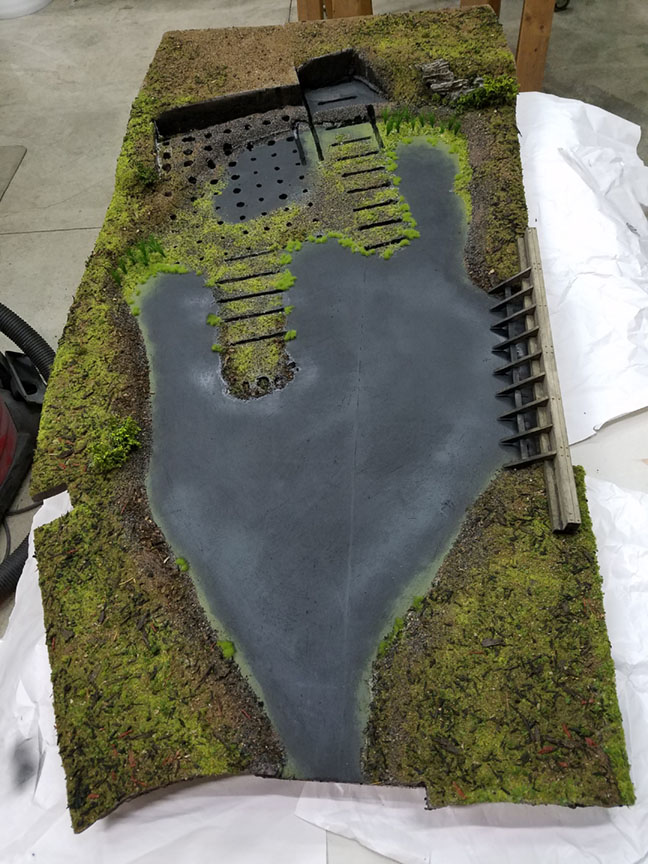
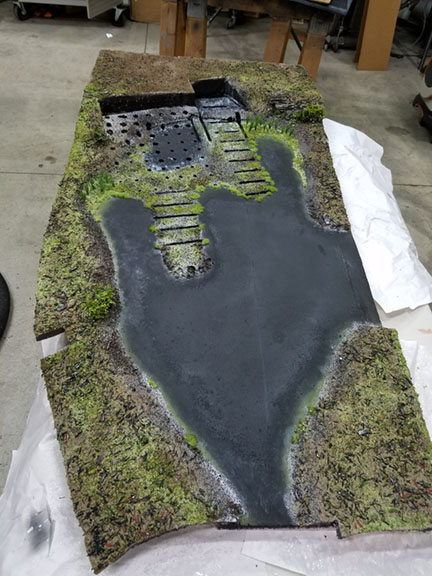
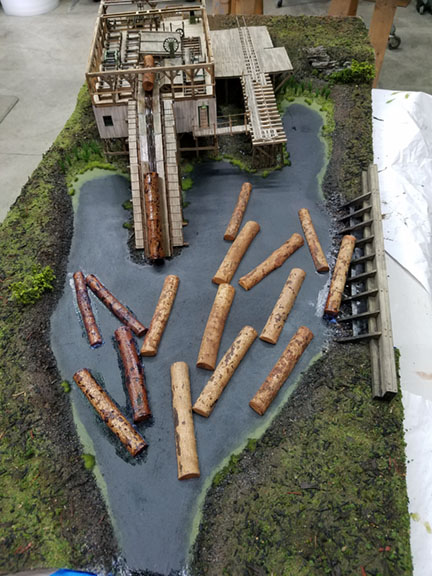
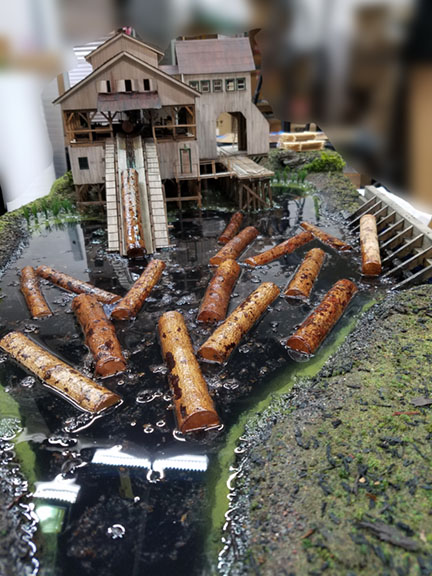
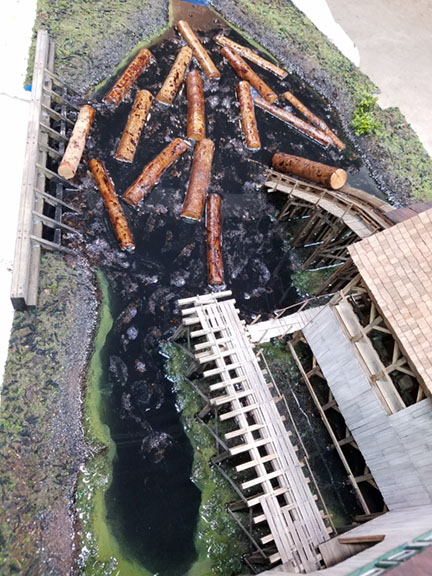
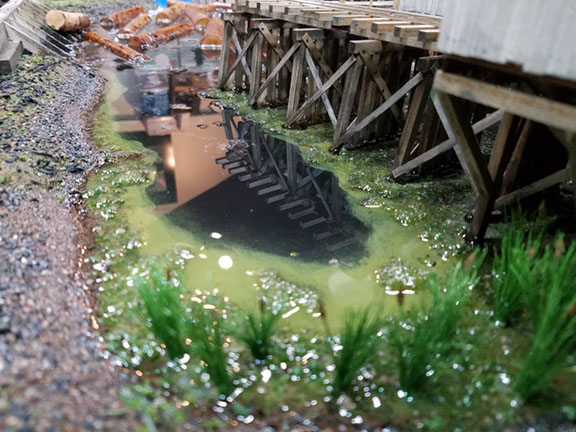
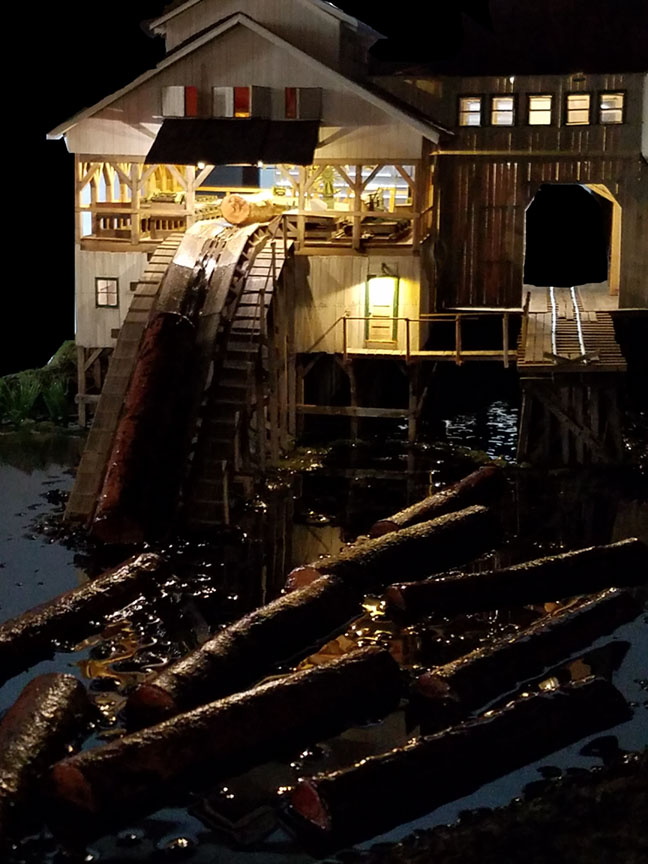
For tonight's adventure, my scenic supplies came in from Scenic Express so it was back to the sawmill log pond. I added cattails and some tufts of greenery in the shallow areas around trestle and jack slip etc. I think this ties in the green algae scum in areas on the pond.  I took photos along the way showing progress. It is all done with ground cover and I sprayed the wet water/ glue mixture over it all in the last photo. Tomorrow I will add the mill building, jack slip, trestle and log dump. I will also glue the half logs onto the pond surface. Then it will be time for Envirotech lite pour.


Dave, Thanks, I do have a bunch of the power supplies you showed as I too like you don't throw anything out! I will have to check later today after the honey do list is completed, Thanks for the information!

LEE D. Nice job on the figures and the gun! The build for the Nations cars sure looks like a neat project! Please let us know when your done!

CSX AL, The mill pond looks wonderful! That whole area is really going to a lot of life to your layout! Nice work!

Today, I have to go get the wife some topsoil for her garden, then I hope to have time to put down some 054 curves I got yesterday from Train World to pretty much finish all the track on the upper level! Then it will be back to the tortious switch machines! LOL

briansilvermustang posted:
Vincent Massi posted:
briansilvermustang posted:


Brian, that's a sharp-looking picture of a sharp-looking train! But I need to ask: Are those the actual colors of your lay-out?         

          NO...


Brian, both sets of pictures look great. That's an impressive train on an impressive lay-out.

John Rowlen posted:

RSJB18,  Here is my Painting process for the O-gauge seated people.

1. While still on the sprue (if possible), Paint the flesh color with minimum overlap into other color areas.  If possible trim the flesh color along the shirt collar since the figure is already white, a good color for a shirt.

2.  Apply the main clothing color (on or off sprue).  Some figures are fastened at the shoulder (most on the top of the head), which requires filing the sprue spur and touch-up with the clothing color.

3. Paint the tie or other thin stripes, then trim in on either side with the shirt color. By now the figures are all off the sprue.

4. Paint the shoes.   5. Paint the hair.   6. Inspect for errors.   7. Touch-up the individual people.

The Tamiya Paint bottles make a nice platform for resting wet figures while they dry. 

I work in batch process for each box of 24 people in pastel colors for the women: blue, pink, green, yellow and a lavender, then repeat sequence.  The men are painted in light gray, dark gray, tan, brown, and sometimes navy blue.  The pastels are also used for the shirts and sweaters.  As I repeat a sequence I may add white to the original paint mix to give me another lighter shade of the blue...lavender colors.

These people will be on the train for a long time.  I want them to look their best for the journey.

Sincerely, John Rowlen

DSCN5266

Thanks John- that is quite a process.....call it a labor of love

paul 2 posted:

All I did this morning was do a small experiment. On the backdrop where I started painting in the river I decided to try and apply a very thin amount of realistic water over the river color. I brushed on just enough to give it a water look. Would of taken a pick but somehow I have misplaced my camera so now I have to figure out where I put it....Paul

Paul thats the story of my work time.   More time looking for stuff than working lol

Lee those army dudes turned out really well! Did I miss what you planned to do with them?  

Al cant wait to see the log pond when its finished.  Some very fine modeling there!

Myself I spent all evening fooling with the spurs for the US power and Vetters building! Aint happy with with it really.   No room for my feed store.

Jim


mike g. posted:

Dave, Thanks, I do have a bunch of the power supplies you showed as I too like you don't throw anything out! I will have to check later today after the honey do list is completed, Thanks for the information!

LEE D. Nice job on the figures and the gun! The build for the Nations cars sure looks like a neat project! Please let us know when your done!

CSX AL, The mill pond looks wonderful! That whole area is really going to a lot of life to your layout! Nice work!

Today, I have to go get the wife some topsoil for her garden, then I hope to have time to put down some 054 curves I got yesterday from Train World to pretty much finish all the track on the upper level! Then it will be back to the tortious switch machines! LOL

Gee Mike- Trainworld is just a 10 minute car trip away for me....

I've been very busy the last few days, but I continued to research the web for ideas for building a "Little people inside a computer" display inside a computer case. SUNP0001SUNP0002SUNP0003SUNP0004

And then, yesterday, I found this lying on the sidewalk in front  of my house. It was dirty, the plastic case was broken, and I couldn't figure out what it was. But I could see wiring and computerized parts inside, and there was a place for batteries.

And it works! It is an old monochrome Computer game with a gray screen and black blocks for characters. It is actually a tank shooting game. And after some more clean-up work, it will be a mainframe computer used by little people.


Attachments

Images (4)
  • SUNP0001
  • SUNP0002
  • SUNP0003
  • SUNP0004

Mayor Magoo, nice job on the trackside tavern.

Mike G, Train room is progressing nicely. Your Dad's cards are a cool find.

Jim, Thanks for the kind words on the sawmill. It has been fun. I got the mill, trestle, jack slip and log dump glued in. Waiting on glue to set and going to install logs on pond.

Found my camera and back in business with that. I had left it in the attic when I was looking for trains to take to the show I am doing in Independence tomorrow. Today I found a few more items plus I found 3 of 6 South Buffalo hopper cars I knew I had. They were still in the shrink wrap. The experiment of using the Realistic water on a vertical area worked. It gave me just enough sheen without runs. I also redid where the river bends out of sight. No more time today to work on the layout. Have to load the truck and take what I am going to sell and setup tonight so I don't have to rush in the morning. This is a new show which started last year. Maybe see some of you there tomorrow. Pics......Paul

2019 March 2

 
Independence Train Show - KD Trains LLC
The Independence High School Fieldhouse
6001 Archwood Rd.
Independence, Oh 44131

  
10 am - 3 pm         Adm. $6.00


DSCN0314DSCN0316DSCN0315

Attachments

Images (3)
  • DSCN0314
  • DSCN0316
  • DSCN0315
RSJB18 posted:
mike g. posted:

Dave, Thanks, I do have a bunch of the power supplies you showed as I too like you don't throw anything out! I will have to check later today after the honey do list is completed, Thanks for the information!

LEE D. Nice job on the figures and the gun! The build for the Nations cars sure looks like a neat project! Please let us know when your done!

CSX AL, The mill pond looks wonderful! That whole area is really going to a lot of life to your layout! Nice work!

Today, I have to go get the wife some topsoil for her garden, then I hope to have time to put down some 054 curves I got yesterday from Train World to pretty much finish all the track on the upper level! Then it will be back to the tortious switch machines! LOL

Gee Mike- Trainworld is just a 10 minute car trip away for me....

Don’t rub it in Bob! 😄

Andy

Great work by all.  Paul the water and water fall look great ! 

Al,  the log pond scene is amazing.  Nice work.   

P51:  Love the military figures and the artillery.   

I am coming down the home stretch.  Been making downspouts, (never did this before !),  adding wall and roof vent details.  Took a while to fabricate and weather the exterior ductwork on the factory.   I will "mortar" the large brick chimney on the upper roof tonight, black out the chimney pipes and put in some random window shades, then it's going on the layout.  

Decided I'd try and take it outside for one more photo shoot before the next 2 snow storms forecast for this weekend...  Sun was already getting low in the sky, but that's ok, next photos I post will be on the layout. 

Went ahead and dropped in early photo (last one)  from Feb. 10th, time flies when you're having fun !    

DSC03396DSC03397DSC03398 [2)DSC03399DSC03400DSC03368

Attachments

Images (6)
  • DSC03396
  • DSC03397
  • DSC03398 (2)
  • DSC03399
  • DSC03400
  • DSC03368

Hey Andy,   thanks for the comments.  I used 12 gauge solid copper wire that I had around,  it's 0.080 diameter, roughly 4 inches in scale.   At the top I used 2 different size square tubes that I had in the scrap pile, maybe 1/8" and 3/16" to make the collection fitting at the top.   

After brainstorming for a while I remembered I had some fine safety wire maybe 28 gauge, maybe finer....   I wrapped the downspout then twisted it tight with some pliers and the twisted end mounts in a small hole I drilled in the wall.  Weathered it with primer gray, then dry brushed silver, then depot green, then india ink and then a light touch of silver again.  

I am probably going to see I can find some .080 steel wire for future projects,  the copper can bend an kink and it's a pain to straighten...

paul 2 posted:

Found my camera and back in business with that. I had left it in the attic when I was looking for trains to take to the show I am doing in Independence tomorrow. Today I found a few more items plus I found 3 of 6 South Buffalo hopper cars I knew I had. They were still in the shrink wrap. The experiment of using the Realistic water on a vertical area worked. It gave me just enough sheen without runs. I also redid where the river bends out of sight. No more time today to work on the layout. Have to load the truck and take what I am going to sell and setup tonight so I don't have to rush in the morning. This is a new show which started last year. Maybe see some of you there tomorrow. Pics......Paul

2019 March 2

 
Independence Train Show - KD Trains LLC
The Independence High School Fieldhouse
6001 Archwood Rd.
Independence, Oh 44131

  
10 am - 3 pm         Adm. $6.00


DSCN0314DSCN0316DSCN0315

The water came out great and the back ground buildings also look great.

Chris, beautiful job on your building. I to like the down spouts. Where did you get the HVAC?

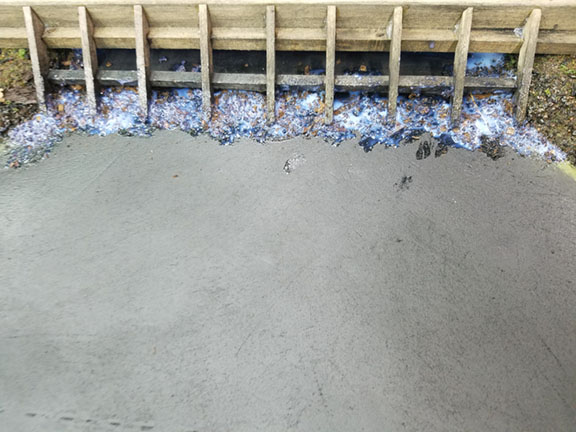
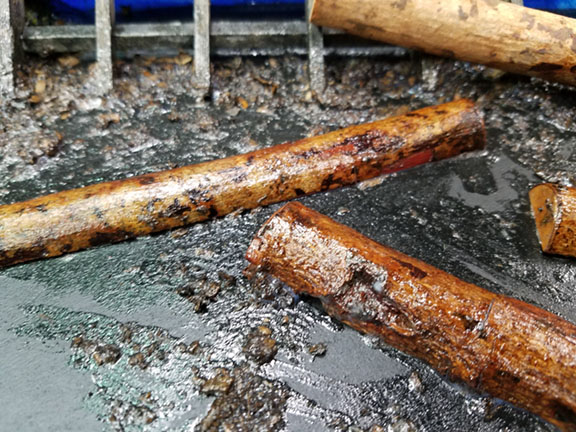
I did some more work on the sawmill pond & complex.

I added some wood chip debris around the log dump and glued in place with artist gloss medium. I also add around the pond surface, since there would be a lot of debris (hunks of bark etc.) floating around the pond.

After the gloss medium dried

I cut logs in half for the pond surface and hot glued them down, then coated them all with gloss medium, since they would be wet from rolling around the pond.  I also added gloss medium to the surface of the jack slip and the logs on the jack slip.

Then after everything dried I did the Envirotech lite pour. (Actually two pours 16oz each, totaling 32oz. )

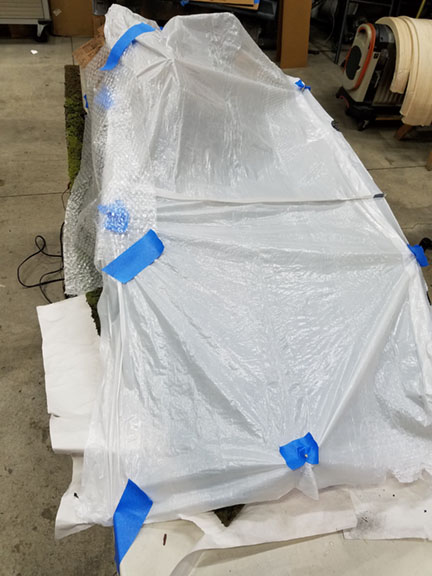
And now I wait with it covered, to protect it from dust for a day until it sets up.


CSX AL, The mill and the pond are just wonderful! Reminds me of some old ones we had around here. there use to be a set of tracks that went along the canal and the steal ramps that the logs would roll down are still in place! Great work Al!

Bob, my nearest train store is about a 2 hour drive! LOL

Pail 2, Nice job on the water! I would have never thought of putting water on the wall! Way to think out of the box!

Chris A. Your work is just AMAZING! Your building looks so real its hard to believe it's a model for a train layout! All I can say is GREAT WORK Chris!

carsntrains posted:
paul 2 posted:

All I did this morning was do a small experiment. On the backdrop where I started painting in the river I decided to try and apply a very thin amount of realistic water over the river color. I brushed on just enough to give it a water look. Would of taken a pick but somehow I have misplaced my camera so now I have to figure out where I put it....Paul

Paul thats the story of my work time.   More time looking for stuff than working lol

Lee those army dudes turned out really well! Did I miss what you planned to do with them?  

Al cant wait to see the log pond when its finished.  Some very fine modeling there!

Myself I spent all evening fooling with the spurs for the US power and Vetters building! Aint happy with with it really.   No room for my feed store.

Jim


 Jim Thanks I was just showing them to John to see what he thought and maybe give me some pointers on what I need to do to make them look better they are 1/72 to scale not O gauge I’ll might make a small dio but I’m not planning on doing it anymore in 1/72 to Scale it is way too

Paul, Chris, Al!!!   You guys are killing me!!!    I tried and tried to glue the roof on that the UPS folks broke off my Vetter's building and cant even get it to stick with a hot glue gun!  Looked down in the building and it looks like somebody over in China emptied their glue gun in it!!!     You guys  are doing tremendous work!  

Mike G I hope you are getting some work done!  

I'm going to take some pictures of the spurs and see what yall think.  May try to video but I have a hard time posting them here.  

Jim  

CSX Al posted:

Chris, beautiful job on your building. I to like the down spouts. Where did you get the HVAC?

I did some more work on the sawmill pond & complex.

I added some wood chip debris around the log dump and glued in place with artist gloss medium. I also add around the pond surface, since there would be a lot of debris (hunks of bark etc.) floating around the pond.

After the gloss medium dried

I cut logs in half for the pond surface and hot glued them down, then coated them all with gloss medium, since they would be wet from rolling around the pond.  I also added gloss medium to the surface of the jack slip and the logs on the jack slip.

Then after everything dried I did the Envirotech lite pour. (Actually two pours 16oz each, totaling 32oz. )

And now I wait with it covered, to protect it from dust for a day until it sets up.


Al.   Those logs and water are very  convincing and a very outstanding job!

So guys, you ever have a day when you wish you would have just stayed in bed!  Well today is that day for me!

First thing this morning the wife calls me to tell me someone drove off with the nozzle from one of our fuel pumps at the store! So I had to run down there to check it our make sure no leaks and put a new nozzle on.

Then I go to pick up the dump trailer a friend was loaning me to get the wife's topsoil. I had to spend 2 hours there to get everything working on the trailer!

Went and got the topsoil for the wife and things were looking good, got that done and was able to go to the train room to put down the 054 curves I got from train world. Man track went down so smooth and I was very happy. So I decided to do a test run and that's where I wish I was in bed again!

The ES44AC would enter the first part of the curve and lift the wheels on the car behind it but would come back down fast and in about 6 inches it was turning the other way and did it again enough to move the front of the car off and short! I pulled the short KD couplers out and put the longest ones I have in and it still happens! What a day! Here are a few pictures for you all so maybe someone can come up with a better idea then mine!20190301_14142120190301_14143120190301_15093420190301_151023

Attachments

Images (4)
  • 20190301_141421
  • 20190301_141431
  • 20190301_150934
  • 20190301_151023

Thanks to all for the likes and positive comments on the factory.  

Al,  I make the exterior duct work from scratch on the table saw.   I started making it on another building about a year ago, and it came out pretty good.     

I use poplar, it's stable, the grain doesn't show and it's strong,   I chamfer the corners, then on this building I rounded the 90 degree corners on the belt sander laying on its side on the work bench.  The joints are small plastruct sticks adhered with CA gel.   

After playing around with different sizes,  I finally arrived at 9/16" wide x 3/8" deep cross section for the main trunk lines,  the branch lines are smaller by about 1/16" to 1/8 " in each direction. 


Steamfan77 posted:
RSJB18 posted:
mike g. posted:

Dave, Thanks, I do have a bunch of the power supplies you showed as I too like you don't throw anything out! I will have to check later today after the honey do list is completed, Thanks for the information!

LEE D. Nice job on the figures and the gun! The build for the Nations cars sure looks like a neat project! Please let us know when your done!

CSX AL, The mill pond looks wonderful! That whole area is really going to a lot of life to your layout! Nice work!

Today, I have to go get the wife some topsoil for her garden, then I hope to have time to put down some 054 curves I got yesterday from Train World to pretty much finish all the track on the upper level! Then it will be back to the tortious switch machines! LOL

Gee Mike- Trainworld is just a 10 minute car trip away for me....

Don’t rub it in Bob! 😄

Andy

HE HE 🤣

Sorry Mike couldn't resist. 

mike g. posted:

So guys, you ever have a day when you wish you would have just stayed in bed!  Well today is that day for me!

First thing this morning the wife calls me to tell me someone drove off with the nozzle from one of our fuel pumps at the store! So I had to run down there to check it our make sure no leaks and put a new nozzle on.

Then I go to pick up the dump trailer a friend was loaning me to get the wife's topsoil. I had to spend 2 hours there to get everything working on the trailer!

Went and got the topsoil for the wife and things were looking good, got that done and was able to go to the train room to put down the 054 curves I got from train world. Man track went down so smooth and I was very happy. So I decided to do a test run and that's where I wish I was in bed again!

The ES44AC would enter the first part of the curve and lift the wheels on the car behind it but would come back down fast and in about 6 inches it was turning the other way and did it again enough to move the front of the car off and short! I pulled the short KD couplers out and put the longest ones I have in and it still happens! What a day! Here are a few pictures for you all so maybe someone can come up with a better idea then mine!20190301_14142120190301_14143120190301_15093420190301_151023

Mike that is rather odd.   I don't have anything that tight on my layout.  O60 minimum.   But sounds like what I had happening with my Menards boxcars ..  But I think I know what was up with them. The couplers are too tight!  If you lift one up it picks up the cars at both ends!  Never had a problem running them on O60 but then I switched them to the outside loop that is O72 minimum.   Every time the train made a loop a car would derail..  Pushed down on all the couplers and no more problems??   ODD.   I hope you get them fixed!!!    

Jim 

OK here are a few pictures guys!   Ive been slacking on pictures so I figured I'd show my mess!   BEARS!!!! 

53067844_394564141373142_6168376058501398528_n

This is the hill I'm fixing to work on. Still plotting a bit.   The big rock is just there to try to get the lump out of the piece of foam.  

52951154_283352565920357_509251248629743616_n

The spurs Ive been working on.  I've ran into two problems.  There is now no room for my feed store.   And I cant reach the switch that brings the passenger trains back onto the main line ..   It is behind the Vetter's building!  52947246_2021562841482860_8663785631236751360_n

Just a picture of my station and the platforms behind it.  52599295_298903494141194_5545393633491943424_n

This is the switch that I cant reach.   I already had an accident and broke the stand off of it before I got it installed.  The fuzzy stuff is insulation falling out of the ceiling.  Still trying to get my brother to come over and look over our electircal work ...

53402088_263252581233311_9103389844813381632_n

Took these pictures with my tablet.   The camera aint great lol  

Jim 

Attachments

Images (5)
  • 53067844_394564141373142_6168376058501398528_n
  • 52951154_283352565920357_509251248629743616_n
  • 52947246_2021562841482860_8663785631236751360_n
  • 52599295_298903494141194_5545393633491943424_n
  • 53402088_263252581233311_9103389844813381632_n

Hi Jim, I'll work a little more on the couplers tomorrow and see if I can shave enough off the sides of the Kd's, I did that on a few other cars on my old layout. I really don't want to have to go back to the drawing board and make my return loops 072! But if that is the fix better to find out now!

carsntrains posted:

OK here are a few pictures guys!   Ive been slacking on pictures so I figured I'd show my mess!   BEARS!!!! 

53067844_394564141373142_6168376058501398528_n

This is the hill I'm fixing to work on. Still plotting a bit.   The big rock is just there to try to get the lump out of the piece of foam.  

52951154_283352565920357_509251248629743616_n

The spurs Ive been working on.  I've ran into two problems.  There is now no room for my feed store.   And I cant reach the switch that brings the passenger trains back onto the main line ..   It is behind the Vetter's building!  52947246_2021562841482860_8663785631236751360_n

Just a picture of my station and the platforms behind it.  52599295_298903494141194_5545393633491943424_n

This is the switch that I cant reach.   I already had an accident and broke the stand off of it before I got it installed.  The fuzzy stuff is insulation falling out of the ceiling.  Still trying to get my brother to come over and look over our electircal work ...

53402088_263252581233311_9103389844813381632_n

Took these pictures with my tablet.   The camera aint great lol  

Jim 

Looking good Jim! I really like that vetter building! I have to wait to see how much room I will have when done laying track, if I ever get there! LOL

Jim,   The area pictured is progressing nicely !.   If you are going to, or need to, make any road or sidewalk surfaces directly on the rigid pink styrene insulation board, try rolling a wire wheel over it before you paint it.    It makes thousands of tiny pin holes in the insulation board which end up making a great simulated concrete, or black top road with some weathering.   I discovered this years ago, then forgot it, till I got out some old concrete retaining walls my son and I made 10 years ago and it had this great texture on it.... Then the light bulb went on and I remembered what  we did....   The two photos below are roads made directly on rigid pink insulation board. 

 DSCN4077 [2)DSCN4079 [2)

Attachments

Images (2)
  • DSCN4077 (2)
  • DSCN4079 (2)

John- that sucks. Lionel is trying really hard to drive their customer base away. Return it and ask for a full replacement or a refund.

Mike- sorry you had a rough day. Sounds like you managed though. Sounds like the couplers are binding. See if they can be loosened up at all. Did you try several different cars to see if it is a problem with all of them?

CSX Al- the mill pond looks great. Beautiful work.

Jim- Watch those bears- they can get into everything . The layout is looking good. If you can't reach the switch then try adding a extension rod under the table to the front of the layout. Many guys have done them using stiff wire from below the board. https://www.handlaidtrack.com/bf-0002

Mitch- Have fun at the show.

Lee- Wow 24 hours unplugged? My son can't go 24 seconds unplugged

It's actually snowing here today. Woke up to about 3" when we were supposed to get a slushy inch. Winter's not over just yet.

Bob

Last edited by RSJB18

Add Reply

Post

OGR Publishing, Inc., 1310 Eastside Centre Ct, Ste 6, Mountain Home, AR 72653
800-980-OGRR (6477)
CONTACT US
www.ogaugerr.com

×
×
×
×
Link copied to your clipboard.
×
×