
thanks Mike ! I will tell them you said HI after work tonight ... ![]()


a couple more of her pics...
|
|
thanks Mike ! I will tell them you said HI after work tonight ... ![]()
a couple more of her pics...


Another few days of great work. I've been so busy I haven't even had time to look.
I was going through the mail and paying bills last night ![]() - happens that my layout is next to my desk.....so since I was down there I glued the ground cover down and added some brush to the area.
- happens that my layout is next to my desk.....so since I was down there I glued the ground cover down and added some brush to the area.
Bob


RSJB18 posted:Another few days of great work. I've been so busy I haven't even had time to look.
I was going through the mail and paying bills last night
- happens that my layout is next to my desk.....so since I was down there I glued the ground cover down and added some brush to the area.
Bob
Bob thats proof that the little things make a huge difference! Looks great! Only thing next to my trains is... trains lol
Al that wall looks good. Gives me some good ideas also!
A lot happening here. Work is crazy. Time is flying by. Aint getting much done. Got a set of "earthen bumpers" last night but no time to install them. May get to that tonight. Thinking I may have to move the two sidings I had put in. They arent long enough. Or maybe I have too much rolling stock lol We will see.
Jim
Bob, looking good! Whats your next project?![]()
Don't know yet Mike. I have a few things in mind. We'll see.....
My dream is this....reality is a different story ![]()

mike g. posted:Morning Dave and everyone else! I got out of my Jammies and took some pictures for you all! Its quite a mess as I haven't been in there for a few days as you all know. But do me a favor and enjoy! LOL
I included a picture of the one Tortious switch machine I have installed and the next one waiting for cork!
Did you use your plexiglass device or is it mounted directly to the plywood? Train room looks like you are busy at work. Great to see it taking shape! Cheers, Dave
CSX Al posted:Paul 2, the waterfall is coming along nicely.
John Rowlen, great job on the painting those figures.
Chris A, I like your retaining walls. I am in the same boat, trying to change up the walls so it is not completely concrete.
On that note, I finished working on the arched wall and installing in on the layout. I know the back of my legs are going to be killing me tomorrow, since I can already feel them aching.
I installed the N scale Architect sheeting in the openings I wanted bricked in, then I cut a 3/4" plywood template to go into the arch. This allowed me something to hold the strip of brick sheet against while the hot glue cooled and keep the arch liners fairly straight.
I'll touch up any paint that has any hot glue around arch edges tomorrow.
Awesome job Al.


Al, the wall looks good. It makes the upper level and the scenery in front and below it is superb.
Bob, you really dressed up those edges. Nice job.
Brian, amazing the never ending pics.
This morning I went down to check on the water to see if it had dried. The lower portion still had a milky look so Iam hoping it will clear in another day or two. The upper portion dried clear. I think that the bottom may not have been level and since the water seeks its own level more went to the back and will probably need more time to cure. I got out the colors I used on the river and added them to the back of the upper falls. Now I have to get my acrylics togeter so I can start putting in trees and shrubs making it look like the river goes around a bend. Couple of pics....Paul


Paul, that looks an awful lot like water!
Lew
Bob, sure looks like a great plan! I bet if you sweet talk the CEO it will happen! LOL![]()
Dave, I did not use the Plexiglass, the hole turned out perfect! I am kind of saving th plexiglass for when and if I screw up!![]()
Pail 2, the water and the wall both look great! I cant believe it's not level! In almost every picture of the build there was a 6-8" level in it! If you ak me its just the water playing with you!![]()
looking GREAT Paul !!
paul 2 posted:Al, the wall looks good. It makes the upper level and the scenery in front and below it is superb.
Bob, you really dressed up those edges. Nice job.
Brian, amazing the never ending pics.
This morning I went down to check on the water to see if it had dried. The lower portion still had a milky look so Iam hoping it will clear in another day or two. The upper portion dried clear. I think that the bottom may not have been level and since the water seeks its own level more went to the back and will probably need more time to cure. I got out the colors I used on the river and added them to the back of the upper falls. Now I have to get my acrylics togeter so I can start putting in trees and shrubs making it look like the river goes around a bend. Couple of pics....Paul
Paul maybe put a fan down there near it if you havent already. May help it dry better??
Jim
Got other priorities this year Mike- kitchen, roof, siding......new cars..... ![]()
Paul- the water looks great.
Thanks for the compliments on my little project. Makes a huge difference.
Bob
briansilvermustang posted:
Brian, that's a sharp-looking picture of a sharp-looking train! But I need to ask: Are those the actual colors of your lay-out?
Vincent Massi posted:briansilvermustang posted:
Brian, that's a sharp-looking picture of a sharp-looking train! But I need to ask: Are those the actual colors of your lay-out?
NO...


RSJB18 posted:Got other priorities this year Mike- kitchen, roof, siding......new cars.....
Paul- the water looks great.
Thanks for the compliments on my little project. Makes a huge difference.
Bob
I understand Bob, were in the same boat kind of. New carpet, new glasses, and if I am lucky new teeth for me!![]()
Some cleanup for getting ready to lay more roadbed..... and ballasting later.
Seen and video'd just now on the Plywood Empire Route, the longest train our venerable Power can drag up the hill to Petrolia. Nine revenue cars and a crummy.
Lew

mike g. posted:Bob, sure looks like a great plan! I bet if you sweet talk the CEO it will happen! LOL
Dave, I did not use the Plexiglass, the hole turned out perfect! I am kind of saving th plexiglass for when and if I screw up!
Pail 2, the water and the wall both look great! I cant believe it's not level! In almost every picture of the build there was a 6-8" level in it! If you ak me its just the water playing with you!
Mike, I don't know how you could screw up installing a Tortoise switch machine. As you found out, the instillation is quite simple and forgiving. Looking forward to your continued progress.
Cheers, Dave
Al, the arches look great, and that scene is fantastic! Bob, nice work on the scenery, it really changes the look, well done. And I like your plan, that may become reality, who knows? Paul, the water in the gorge looks great, you can’t rush the process. The result is what counts, and by the look of the other water, it’s worth the wait.
Andy
darlander posted:mike g. posted:Bob, sure looks like a great plan! I bet if you sweet talk the CEO it will happen! LOL
Dave, I did not use the Plexiglass, the hole turned out perfect! I am kind of saving th plexiglass for when and if I screw up!
Pail 2, the water and the wall both look great! I cant believe it's not level! In almost every picture of the build there was a 6-8" level in it! If you ak me its just the water playing with you!
Mike, I don't know how you could screw up installing a Tortoise switch machine. As you found out, the instillation is quite simple and forgiving. Looking forward to your continued progress.
Cheers, Dave
Thanks Dave, I found it easier to use the template from the top side, I just mark where the throw bar is draw a straight line then match them up. I drill all the holes from the top and just crawl under and its ready! I also drill a hole in the center of the throw bar and it works great manually. Still have to get the right toggles for them!![]()

like father, like son... ![]()

Vincent Massi posted:briansilvermustang posted:
Brian, that's a sharp-looking picture of a sharp-looking train! But I need to ask: Are those the actual colors of your lay-out?
Intriguingly tempting idea 🤔
Maybe I need to convert my Admiral back into a black and white ? ")
")
GOOD ONE !!!
Work in Progress. Finished the painting of 36 Seated Figures from China. Preiser no longer makes these 1/50 seated figures. I bought two more bags of these 48 seated people to have for the final painting session in December 2019 when the new Santa Fe and UP cars arrive.
Tonight I will do final inspection of each figure and any touch-up necessary. Two sets of Preiser 65602 on the table are waiting to be finished.
Mom and I just finished a simple dinner and she is waiting for her small Dairy Queen Hot Fudge Sundae. I buy four sundaes at a time and put them in the freezer. Gotta go. Good night.
Sincerely, John Rowlen


John Rowlen posted:Work in Progress. Finished the painting of 36 Seated Figures from China. Preiser no longer makes these 1/50 seated figures. I bought two more bags of these 48 seated people to have for the final painting session in December 2019 when the new Santa Fe and UP cars arrive.
Tonight I will do final inspection of each figure and any touch-up necessary. Two sets of Preiser 65602 on the table are waiting to be finished.
Mom and I just finished a simple dinner and she is waiting for her small Dairy Queen Hot Fudge Sundae. I buy four sundaes at a time and put them in the freezer. Gotta go. Good night.
Sincerely, John Rowlen
John- how do you do it???? I am curious... do you paint them on the jars they way we see them or do you have a secret that you don't want to share for national security reasons....?????
Besides pics I have a bunch of my Dad's stuff in the train room and while going through some it today I ran across this:

Dad gave me this to carry on our Summer train trips. Self explanatory, right? But I flipped it over and found this on the back side:

And it all came back to me, the feeling of standing at the back door of the rear car with a stopwatch clocking the train as the sound of rail joints kept getting closer together until the individual clicks blended into a kind of medium tempo click-click-click-click. That happened somewhere around 80 per IIRC and then I would start clocking. At speeds over 90 it was real easy to miss a milepost marker because you only saw it for an instant before it was lost in the distance behind so....you clock every 2 miles and it's more accurate anyway because there is a 2 second difference between 97mph and 100mph.
Lew
John, that sure is some wonderful work! I just don't know how you do it! I would be burnt out by now! LOL![]()
geysergazer posted:Besides pics I have a bunch of my Dad's stuff in the train room and while going through some it today I ran across this:
Dad gave me this to carry on our Summer train trips. Self explanatory, right? But I flipped it over and found this on the back side:
And it all came back to me, the feeling of standing at the back door of the rear car with a stopwatch clocking the train as the sound of rail joints kept getting closer together until the individual clicks blended into a kind of medium tempo click-click-click-click. That happened somewhere around 80 per IIRC and then I would start clocking. At speeds over 90 it was real easy to miss a milepost marker because you only saw it for an instant before it was lost in the distance behind so....you clock every 2 miles and it's more accurate anyway because there is a 2 second difference between 97mph and 100mph.
Lew
Lew, that is so cool that you found something that brought you back to your kid days! Reading stuff like this I wish my folks would have taken me on trains or bought me a train . But oh well I am into it now!![]()
mike g. posted:darlander posted:mike g. posted:Bob, sure looks like a great plan! I bet if you sweet talk the CEO it will happen! LOL
Dave, I did not use the Plexiglass, the hole turned out perfect! I am kind of saving th plexiglass for when and if I screw up!
Pail 2, the water and the wall both look great! I cant believe it's not level! In almost every picture of the build there was a 6-8" level in it! If you ak me its just the water playing with you!
Mike, I don't know how you could screw up installing a Tortoise switch machine. As you found out, the instillation is quite simple and forgiving. Looking forward to your continued progress.
Cheers, Dave
Thanks Dave, I found it easier to use the template from the top side, I just mark where the throw bar is draw a straight line then match them up. I drill all the holes from the top and just crawl under and its ready! I also drill a hole in the center of the throw bar and it works great manually. Still have to get the right toggles for them!
Sounds like a good plan Mike. I agree, it is much simpler drilling from the top and sure beats crawling under and working from below. Glad it's working out for you. I assume that you will be using a plug in AC to DC 6-9volt output power source to power the T-switches. You also know that you need a DPDT rocker or toggle switch to control the switch points. When working with low DC voltage loads, I find it convenient to buy a cheap cat 5 cable from Menards/Home Depot, etc, and cut it up to extract the wires to use instead of buying large spools of wire. The cable will supply you with 4 pairs of color coded wire. They are easy to work with and solder, especially when wiring up a DPDT switch. Keep on trucking! Cheers, Dave
Thanks Dave, I have to buy the DPDT toggles, I have a box of indoor solid copper phone wire I have been using! It works great and keeps thing a little neater! To be honest I don't really understand the power requirements I am still picking my brain on that one. Electrical stuff and I are slow to come together! LOL![]()
mike g. posted:Thanks Dave, I have to buy the DPDT toggles, I have a box of indoor solid copper phone wire I have been using! It works great and keeps thing a little neater! To be honest I don't really understand the power requirements I am still picking my brain on that one. Electrical stuff and I are slow to come together! LOL
You must have a collection of old power sources from radios and other electronic devices laying around. I never throw them away and have found them a very good power source for T. Switches and LED lighting. Scavenge or buy one rated for 120volts AC input and 6-9volts DC output for your T-switches. They are not very expensive to buy but check your junk pile first. Cheers, Dave

P.S. The higher the voltage output, the faster the switch throw. Do not go any higher than 12 volts. I'm using one 9V DC output source to power 21 T-switch machines plus the signal lights that indicate the switch direction.

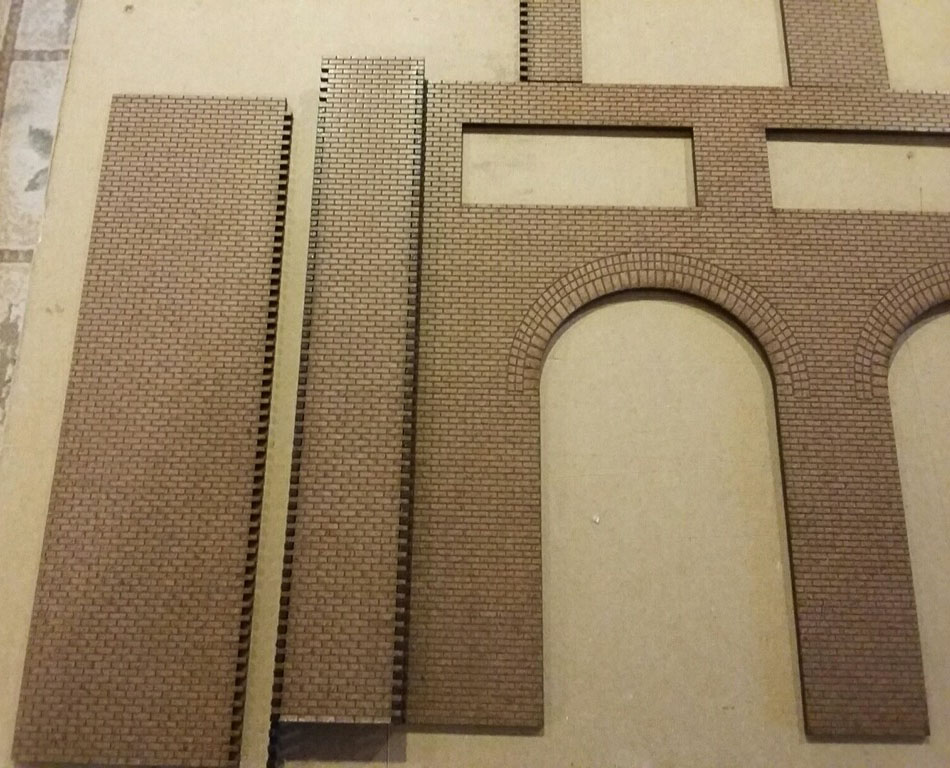
CSX Al posted:Paul 2, the waterfall is coming along nicely.
John Rowlen, great job on the painting those figures.
Chris A, I like your retaining walls. I am in the same boat, trying to change up the walls so it is not completely concrete.
On that note, I finished working on the arched wall and installing in on the layout. I know the back of my legs are going to be killing me tomorrow, since I can already feel them aching.
I installed the N scale Architect sheeting in the openings I wanted bricked in, then I cut a 3/4" plywood template to go into the arch. This allowed me something to hold the strip of brick sheet against while the hot glue cooled and keep the arch liners fairly straight.
I'll touch up any paint that has any hot glue around arch edges tomorrow.
Is that brick paper on the outside of the wall?
RSJB18, Here is my Painting process for the O-gauge seated people.
1. While still on the sprue (if possible), Paint the flesh color with minimum overlap into other color areas. If possible trim the flesh color along the shirt collar since the figure is already white, a good color for a shirt.
2. Apply the main clothing color (on or off sprue). Some figures are fastened at the shoulder (most on the top of the head), which requires filing the sprue spur and touch-up with the clothing color.
3. Paint the tie or other thin stripes, then trim in on either side with the shirt color. By now the figures are all off the sprue.
4. Paint the shoes. 5. Paint the hair. 6. Inspect for errors. 7. Touch-up the individual people.
The Tamiya Paint bottles make a nice platform for resting wet figures while they dry.
I work in batch process for each box of 24 people in pastel colors for the women: blue, pink, green, yellow and a lavender, then repeat sequence. The men are painted in light gray, dark gray, tan, brown, and sometimes navy blue. The pastels are also used for the shirts and sweaters. As I repeat a sequence I may add white to the original paint mix to give me another lighter shade of the blue...lavender colors.
These people will be on the train for a long time. I want them to look their best for the journey.
Sincerely, John Rowlen


 Bob. Paul. Al. Great bench work lots of progress
John. I paint my figures the same way flesh first it’s easier for me this way instead of painting there clothes first I tried that but always got flesh paint on there clothes. Here’s some 1/72 German soldiers painted this winter all hand painted including the gun I use to paint 1/72 military figures a lot but never 1/48 can’t hide much in this scale
 It’s to cold to go in the garage to mess with the layout or run trains and I’ve been getting home late besides all my power units are in the house where it’s warm so I decided on building these 3 All Nations cars and I have one in the garage to get it’s a 40’ double door and that’s it for this winter building these cars the rest will have to waiting
choff posted:
Please share with us what the road surface made from. Looks good from here.
John d.
Lou1985 posted:CSX Al posted:Paul 2, the waterfall is coming along nicely.
John Rowlen, great job on the painting those figures.
Chris A, I like your retaining walls. I am in the same boat, trying to change up the walls so it is not completely concrete.
On that note, I finished working on the arched wall and installing in on the layout. I know the back of my legs are going to be killing me tomorrow, since I can already feel them aching.
I installed the N scale Architect sheeting in the openings I wanted bricked in, then I cut a 3/4" plywood template to go into the arch. This allowed me something to hold the strip of brick sheet against while the hot glue cooled and keep the arch liners fairly straight.
I'll touch up any paint that has any hot glue around arch edges tomorrow.
Is that brick paper on the outside of the wall?
HI Lou, No the walls are laser etched 1/8" hardboard. I only added the styrene brick sheeting to the walls to give the more depth than the 1/8".
Here is a closeup of the unpainted wall section.
I’m the past week I’ve gotten in 2 more 1121 switches, the elevated trestle set, and today a whole mess of tubular track from the Tinman. Looks like a productive weekend is in store for me. After the Train-a-palooza in Grapevine, TX that is
Access to this requires an OGR Forum Supporting Membership


