Mike CT posted:

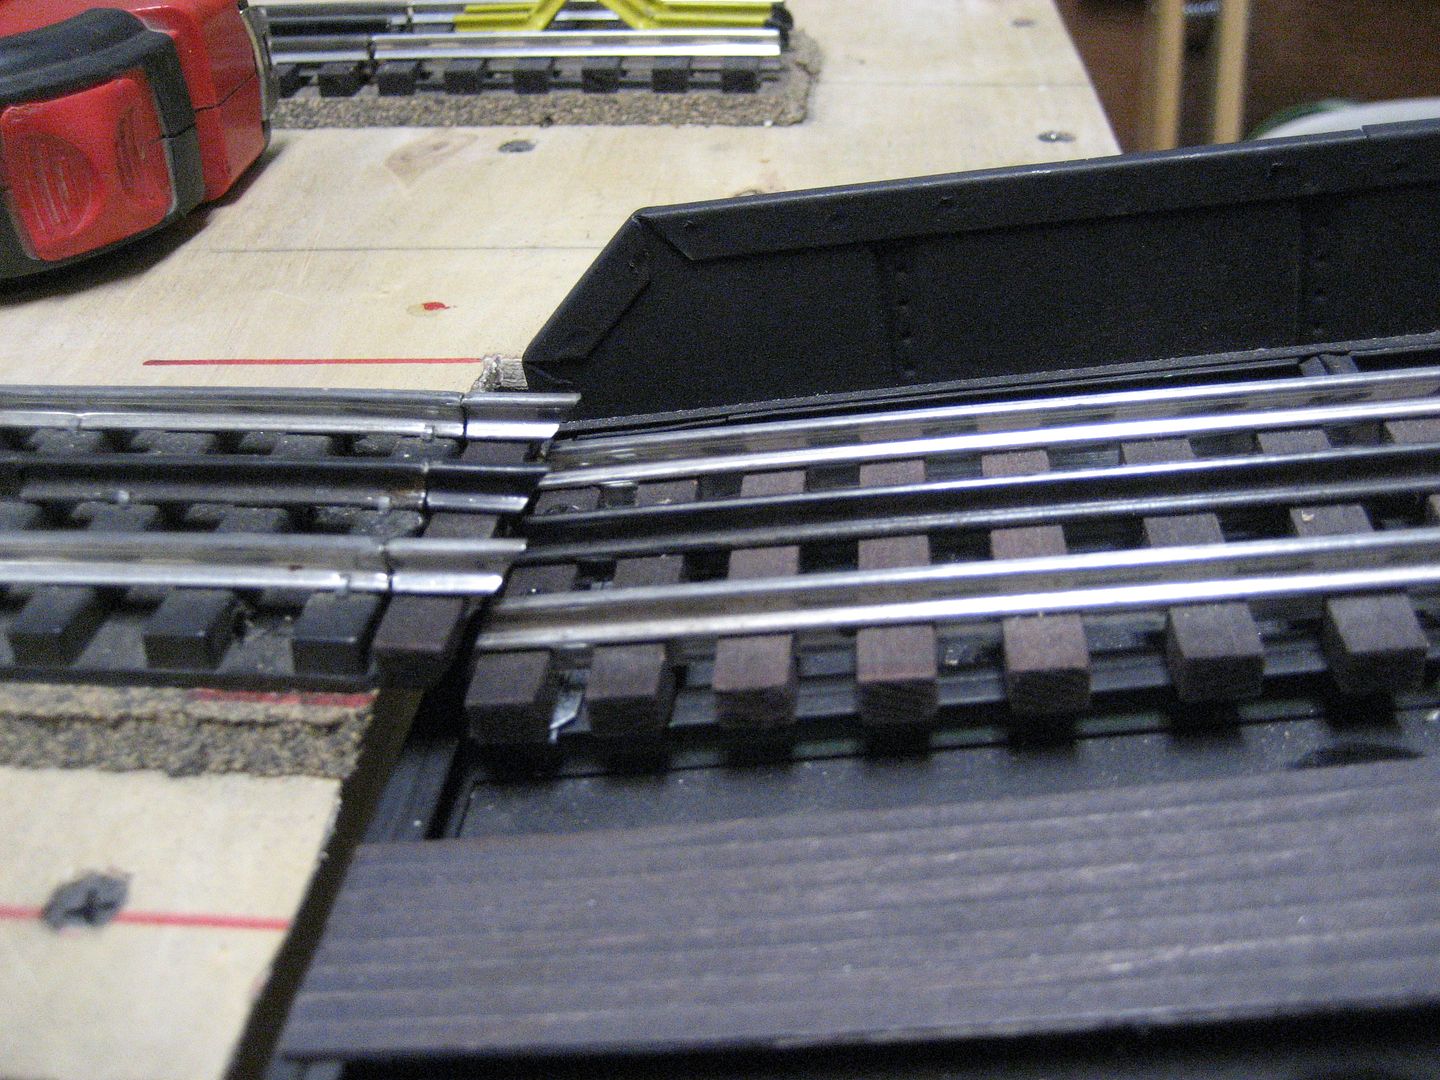
There is a fair amount of wobble in this hinge, note the attempts to tighten the end mounting(s) with a pair of vice-grips. A better quality hinge may be in order. 

Thanks. I see the hinge is mounted out from the end so when the bridge swings up, the tip swings down. Gives me some idea of how I might handle my bridge that will be up on pylons. I need to take some photos of a lift bridge on one of the causeways near Cape Canaveral when we visit later this month to see what I can come up with so it looks somewhat realistic, though I'm more interested in operation than appearance.

I'll work on this, mostly wiring over the weekend and post more pictures.  Original attempt, note mountings in the first picture/ (bottom of picture), was to use two screen door closers.  I should be able to get a couple of  hydraulic closer for the doors, similar to my truck cap.  My thought is:  The closer/opener(s), if the right size, should work better. We will see??  Project is to get the module functional, electrically,  then be concerned about automating the lift, with opener/closers.  

IMO,   Mike CT

Last edited by Mike CT

Had my son  with wife and son for visitors for the New Year so not much train activity. WE did go to the Carnegie Science Center in Pgh. on Thursday-glad he was paying. In all honesty and I know this is blasphemy, I was not overwhelmed by the train layout. nice-yes-but there are thousands around that are nice, too. Some beautiful buildings but the  scenery and rail operations were so-so. The trains were not that many and going way too fast so i told the guy to slow them down and I got a really dumb look.  We stayed at Station square and saw a bunch of CSX freights go by and a few NS but no photos. So back home with my very own layout and satisfied  !!   Happy New Year  !!

trumptrain posted:

Here's what I've done over the last few days.  

Tried unsuccessfully to get two "new" K line 027 switches to work.  These two switches the two crucial switches for my wye.   I hooked them up according to directions for track power.  Double, triple, and quadruple checked the instruction sheet but switches fail to work.  I will next try to connect them with independent power and see what happens.  I hope this way works.

Yesterday, my good friend Randy and his son Christopher came over to view the now completed Mt. Randolph and the rest of layout as well.   I totally enjoyed having them come visit!  They were both amazed!!  Of course  when I have visitors over to view the layout it seems that something ( thats been working great for years ) fails to go smoothly.  This time it was a switch failure off the main line.  Luckily it was only a wire that came loose. That switch is back functioning again after reconnection last night. 

Last night, after splicing the wiring for a remote control track,  I ran trains for a couple hours.  I'm still loving my 1990 Williams camelback ( an exceptional score from the bay )  She looked great pulling 3 scale passenger cars last night!  My logging train on the Mountain Division is running again ( had to remove the Bollman bridge to complete Mt. Randolph, install Lake Christopher, create the gorge walls, and do scenicing around the base of Mt. Randolph earlier this week ) and looks great coming out of the wooden portal tunnel opening and crossing Lake Christopher via the Bollman Bridge.  The Reading Trainmaster did the honors of pulling the beer train last night. It was fun to sit there and just watch em run!!!!

The guy who's painting the interior of my house wanted to photograph the layout this morning.  So I turned the trains on and let him have at it.  He was thrilled!!!

This afternoon I drove up to Cockeysville, Maryland to MB Kliens and picked up a repair, my MTH SW 9 B&O switcher.   Bought some smoke fluid for my Williams steamers and some glue for scenery work.

Its been a great week of making considerable progress on the Free State Junction Railway.  Now if only I can get those blasted K line switches to work!

Happy New Year to all forum members and to the OGR staff!!!


Pat:

Chris and I really enjoyed our visit to Patsburg last Wednesday. As well as your scenery looks in your forum posts, photos do not do it justice. In person it is absolutely stunning. Happy New Year.

My son Chris is on semester break during January. Chris and I have spent much time working on the layout. We have levels two and three running well with the elevated connection between levels 2 and 3 fully functional. Level one is also working well. We are now in the middle of trying to establish an elevated connection between levels one and two. We spent all day yesterday working on the connection. We are about 1/3 of the way finished. When this last trackage project is complete, trains will be able to travel from level one to level three.

Happy New Year to all!

I got the scenery in at other end of the lower backdrop. And started working my way out to the front of the layout in that area. I got a chance to use the new tool I bought for my drill to drill at a 90 degree under the upper mainlines and it worked out great. A couple of pics of the corner and the drill attachment.................PaulDSCN2116DSCN2117DSCN2118DSCN2120

Attachments

Images (4)
  • DSCN2116
  • DSCN2117
  • DSCN2118
  • DSCN2120
jim pastorius posted:

Had my son  with wife and son for visitors for the New Year so not much train activity. WE did go to the Carnegie Science Center in Pgh. on Thursday-glad he was paying. In all honesty and I know this is blasphemy, I was not overwhelmed by the train layout. nice-yes-but there are thousands around that are nice, too. Some beautiful buildings but the  scenery and rail operations were so-so. The trains were not that many and going way too fast so i told the guy to slow them down and I got a really dumb look.  We stayed at Station square and saw a bunch of CSX freights go by and a few NS but no photos. So back home with my very own layout and satisfied  !!   Happy New Year  !!

I know what you mean about the admission cost Jim.Besides the trains, there never was anything of much interest to me. But with the sub to go thru now, it makes it more worth while. When we were down at Oglebay this year, I was on my third or fourth trip around trying to catch a good pic of the trains, and kept getting a blurry mess. The gentleman running the trains asked me if I would like him to stop the train....sure! then he offered to stop any of the other trains if I'd like. great guy.

Mike CT posted:

An additional module for my friend Tom's layout.  A lift bridge module.  Tom supplied all the parts/track/switch. All parts pictured are used/recycled.  Solder work and wiring today.   Maybe functional next week.  

Best wishes  Mike CT.

 Looks good Moose!  I've see that diagonal cut and hinge mechanism somewhere before.


IMG_1059

Progress continues on the cut and planning the background landscape painting.  I wanted to visualize how the hills would lay out, but I didn't want to use a pencil to sketch them, so I used painters masking tape.  I figured I could move things and not foul up the existing sky background.  The thicker tape line is the foreground hills, the thinner tape line represents the background hills.


Attachments

Images (1)
  • IMG_1059
Randy Harrison posted:
trumptrain posted:

Here's what I've done over the last few days.  

Tried unsuccessfully to get two "new" K line 027 switches to work.  These two switches the two crucial switches for my wye.   I hooked them up according to directions for track power.  Double, triple, and quadruple checked the instruction sheet but switches fail to work.  I will next try to connect them with independent power and see what happens.  I hope this way works.

Yesterday, my good friend Randy and his son Christopher came over to view the now completed Mt. Randolph and the rest of layout as well.   I totally enjoyed having them come visit!  They were both amazed!!  Of course  when I have visitors over to view the layout it seems that something ( thats been working great for years ) fails to go smoothly.  This time it was a switch failure off the main line.  Luckily it was only a wire that came loose. That switch is back functioning again after reconnection last night. 

Last night, after splicing the wiring for a remote control track,  I ran trains for a couple hours.  I'm still loving my 1990 Williams camelback ( an exceptional score from the bay )  She looked great pulling 3 scale passenger cars last night!  My logging train on the Mountain Division is running again ( had to remove the Bollman bridge to complete Mt. Randolph, install Lake Christopher, create the gorge walls, and do scenicing around the base of Mt. Randolph earlier this week ) and looks great coming out of the wooden portal tunnel opening and crossing Lake Christopher via the Bollman Bridge.  The Reading Trainmaster did the honors of pulling the beer train last night. It was fun to sit there and just watch em run!!!!

The guy who's painting the interior of my house wanted to photograph the layout this morning.  So I turned the trains on and let him have at it.  He was thrilled!!!

This afternoon I drove up to Cockeysville, Maryland to MB Kliens and picked up a repair, my MTH SW 9 B&O switcher.   Bought some smoke fluid for my Williams steamers and some glue for scenery work.

Its been a great week of making considerable progress on the Free State Junction Railway.  Now if only I can get those blasted K line switches to work!

Happy New Year to all forum members and to the OGR staff!!!


Pat:

Chris and I really enjoyed our visit to Patsburg last Wednesday. As well as your scenery looks in your forum posts, photos do not do it justice. In person it is absolutely stunning. Happy New Year.

Thanks so much for your kind words Randy!

I decided that I don't have enough storage space for my powered & dummy locomotives.  To help resolve the problem, I slid a deep recessed bookcase under the layout to hold the rest of my locomotives.   I also ran trains while I was working on the project.  Nothing like hearing the trains run as I work and taking pause to just watch them run

While doing this reorganization, I took the time to separate out the locomotives that need to go to the repair shop and gave them an exclusive shelf in the bookcase.  

In taking inventory, I now have 32 powered locomotives, 9 dummies, a set of powered MU cars, a set of powered RDC cars, and two powered units ( street car and a speeder )..... post war 1946 - present day modern era models.  I have no idea how the heck I accumulated all these engines 

It has been a busy month but still found some time to work on the layout.  Bit by bit it seems to be coming together.  This post represents much of my December accomplishments.

I have ballasted most of my mainline track, with about 10 feet left to complete. Track and roadbed was painted with Rust-Oleum camouflage earth brown. Recently finished painting the track in the yard area.  Since I was using a gray blend ballast on the mainline, I painted the beveled side of the cork roadbed gray before spreading the ballast.  I am using Brennan’s Better Ballast and I’m very happy with the results.

Before I ballasted the passenger loading area, I fabricated some station platform extensions out of 1/2” pine. I discovered that RUST-OLEUM #2182 gray primer is almost a perfect color match to my MTH Country Train Station platform. Close enough anyway and after a weather wash, they will blend together nicely.  I also weather washed the ballasted track with a spray mixture of Indian ink and 90% isopropyl alcohol.

I have also been working on land forms, particular the mountain at the far end of the layout.  I am slowly converting the blocky sheets of styrofoam into hillside slopes, rocks and ledges using a kitchen knife to carve and the addition of some rock mold plaster casts.  I found out that you can get several different appearances out of just a few molds by varying the depth of plaster fill when making plaster casts.  In some areas, I have added actual rocks.  Ground foam greenery, shrubs & trees will be added at a later date.  All the painted styrofoam sections are glued in place but the pink and blue sections can be removed for ease of carving and painting.

In-between the work sessions, I have found time to run trains and even hosted a group of Cub Scouts and their fathers just before christmas.  I am trying to make my layout more interactive for little and big guests. Switch & accessary controls are located around the layout on the fascia board so guests can play a part in the running of the trains.

Also took time before Christmas to travel up to the Twin Cities to retrieve my MTH 227 Yellowstone which I had upgraded to DCS Proto-2.   Big improvement!

This past Wednesday, a friend brought over his new custom built Max 4-6-6-2 articulated steam engine.  He wanted to see it run on 072 track.  The engine runs and looks great!

This is a great forum topic and I really enjoy following all the layout and special project postings.  Happy New Year to all and I hope the new year will provide everyone with new opportunities and increased energy to accomplish all your desires and dreams.

Dave

Attachments

Images (13)
  • DSC07355: Painted track and roadbed before ballasting.
  • DSC07356: Yard track painted.
  • DSC07358: Painted beveled side of mainline roadbed gray before adding ballast.
  • DSC07359: Still at work.
  • DSC07362: New passenger platforms and ballast.
  • DSC07363: Mountain under construction.
  • DSC07364: Rock carved wall.
  • DSC07369: Yard lead through tunnel connects to mainline.
  • DSC07370: A mountain rising in the distance.
  • DSC07371: Controls for little and big helpers.
  • DSC07401: My up graded 227 Yellowstone to Proto-2 DCS ready to head out.
  • DSC07409: Friends custom built Max articulate 4-6-6-2 steam engine.
  • DSC07412: It looks and runs great!

Been a busy couple weeks, what with the holidays and all, but I finally got the Gi-raffe Express' new bobber caboose in order!  Stripped off the ATSF lettering, added GX heralds, put on a quicky scratchbuilt chimney and installed former GG1 marker lights (drilled holes at rear).  Here it is, being pulled by "Junior", who got oiled and checked over this weekend as well...

GEDC2084

Mitch

Attachments

Images (1)
  • GEDC2084

This morning I went up to the S gauge show in Parma, OH. Always figure that I may find something I want or need. I did. A couple of tractors for a flat car load. This afternoon after I got home I was back at work on scenery. Taking a coffee break (must be still a union guy)  then back up to do the other half of the curves. A couple of pics of the tractors and the next section between the curves. The white glue on the smaller foliage has not dried yet...........PaulDSCN2127DSCN2121DSCN2123DSCN2124

Attachments

Images (4)
  • DSCN2127
  • DSCN2121
  • DSCN2123
  • DSCN2124
trumptrain posted:
In taking inventory, I now have 32 powered locomotives, 9 dummies, a set of powered MU cars, a set of powered RDC cars, and two powered units ( street car and a speeder )..... post war 1946 - present day modern era models.  I have no idea how the heck I accumulated all these engines 

It's like coathangers and rusty O27 track:  They breed behind your back. 

Mitch

darlander posted:

I have ballasted most of my mainline track, with about 10 feet left to complete. Track and roadbed was painted with Rust-Oleum camouflage earth brown. Recently finished painting the track in the yard area.  Since I was using a gray blend ballast on the mainline, I painted the beveled side of the cork roadbed gray before spreading the ballast.  I am using Brennan’s Better Ballast and I’m very happy with the results.

Before I ballasted the passenger loading area, I fabricated some station platform extensions out of 1/2” pine. I discovered that RUST-OLEUM #2182 gray primer is almost a perfect color match to my MTH Country Train Station platform. Close enough anyway and after a weather wash, they will blend together nicely.  I also weather washed the ballasted track with a spray mixture of Indian ink and 90% isopropyl alcohol.

I have also been working on land forms, particular the mountain at the far end of the layout.  I am slowly converting the blocky sheets of styrofoam into hillside slopes, rocks and ledges using a kitchen knife to carve and the addition of some rock mold plaster casts.  I found out that you can get several different appearances out of just a few molds by varying the depth of plaster fill when making plaster casts.  In some areas, I have added actual rocks.  Ground foam greenery, shrubs & trees will be added at a later date.  All the painted styrofoam sections are glued in place but the pink and blue sections can be removed for ease of carving and painting.


This is a great forum topic and I really enjoy following all the layout and special project postings.  Happy New Year to all and I hope the new year will provide everyone with new opportunities and increased energy to accomplish all your desires and dreams.

Dave

Dave,

What should I say about your peninsula that I like?  Everything!!  The painted track, ballast, station area, highway, mountain, tunnel opening, and that 'tiny' locomotive all look great!!  I'll be glad to see more photos when you get more accomplished!

Jerry Sr posted:

Right now i am in process of removing my O gauge Atlas 3 rail layout. I am going back into HO ,  some reason i lost all ambition for O gauge. Will be selling all track & putting items up on Forum.

Well Jerry, since I left HO a few years ago, and sold or gave everything away; you are allowed to leave O gauge and model in HO.    I hope you will be sharing what you are doing in HO on the HONZ Forum!

While we will miss you in O gauge. However, I'm sure the bloodhounds, myself included, will be happy to help relieve you of your O gauge equipment. 

M. Mitchell Marmel posted:
trumptrain posted:
In taking inventory, I now have 32 powered locomotives, 9 dummies, a set of powered MU cars, a set of powered RDC cars, and two powered units ( street car and a speeder )..... post war 1946 - present day modern era models.  I have no idea how the heck I accumulated all these engines 

It's like coathangers and rusty O27 track:  They breed behind your back. 

Mitch

Hey Mitch -  I read your reply and could not help to LOL because you are right

darlander posted:

It has been a busy month but still found some time to work on the layout.  Bit by bit it seems to be coming together.  This post represents much of my December accomplishments.

I have ballasted most of my mainline track, with about 10 feet left to complete. Track and roadbed was painted with Rust-Oleum camouflage earth brown. Recently finished painting the track in the yard area.  Since I was using a gray blend ballast on the mainline, I painted the beveled side of the cork roadbed gray before spreading the ballast.  I am using Brennan’s Better Ballast and I’m very happy with the results.

Before I ballasted the passenger loading area, I fabricated some station platform extensions out of 1/2” pine. I discovered that RUST-OLEUM #2182 gray primer is almost a perfect color match to my MTH Country Train Station platform. Close enough anyway and after a weather wash, they will blend together nicely.  I also weather washed the ballasted track with a spray mixture of Indian ink and 90% isopropyl alcohol.

I have also been working on land forms, particular the mountain at the far end of the layout.  I am slowly converting the blocky sheets of styrofoam into hillside slopes, rocks and ledges using a kitchen knife to carve and the addition of some rock mold plaster casts.  I found out that you can get several different appearances out of just a few molds by varying the depth of plaster fill when making plaster casts.  In some areas, I have added actual rocks.  Ground foam greenery, shrubs & trees will be added at a later date.  All the painted styrofoam sections are glued in place but the pink and blue sections can be removed for ease of carving and painting.

In-between the work sessions, I have found time to run trains and even hosted a group of Cub Scouts and their fathers just before christmas.  I am trying to make my layout more interactive for little and big guests. Switch & accessary controls are located around the layout on the fascia board so guests can play a part in the running of the trains.

Also took time before Christmas to travel up to the Twin Cities to retrieve my MTH 227 Yellowstone which I had upgraded to DCS Proto-2.   Big improvement!

This past Wednesday, a friend brought over his new custom built Max 4-6-6-2 articulated steam engine.  He wanted to see it run on 072 track.  The engine runs and looks great!

This is a great forum topic and I really enjoy following all the layout and special project postings.  Happy New Year to all and I hope the new year will provide everyone with new opportunities and increased energy to accomplish all your desires and dreams.

Dave

Do you have a track plan from your layout?

here's what I did today. reworked one corner of the layout and that was in preparation for a lift out bridge or duck under. the reason for it is I was missing the ability to run 2 trains on the main level. purple route is one and the green route is the second.  I haven't been feeling to good so I haven't been getting a lot done. had bronchitis thensome dental work done then took granddaughter to the hospital for the same as me she was coughing and running a fever next day had bronchitis back. so back on the antibiotics. I hadn't gotton completely over it the first time still had the cough well it's back again . so it has been slow going on the trains. I did hang the 3 pictures I got for x-mas up and ran trains the whole time working on this corner had to stop when I got the switches out but once the 072 ones were back in started running again tested it all out and everything worked fine. the reason I reworked this corner is I had 2 left hand 072 switches laying around but needed one more right hand switch to do the bridge so replacing a left and a right in this corner with 2 072 lefts freed up the switch needed. so now I have everything to build the bridge.


 Final2ver220160102_19053120160102_19054020160102_190548

Attachments

Images (4)
  • Final2ver2
  • 20160102_190531
  • 20160102_190540
  • 20160102_190548
Last edited by Jhainer

Jeff Waldman and I configured and installed all five Dcs Wifi modules today while other members were running. Jeff had installed the new REV-L TIUs we had configured earlier this week for version 5.0 and their addresses. We decided to put all of them into the club layout router for now until we see how the "professional" version of the software operates. So far, it seems that the application only wants to lock in on one of the modules -- appears to be the one with the lowest IP address for now. We plan on further testing, though intermittently the app seems to be able to operate the locomotive outside the zone of the one it locks in on.

chester7 posted:
darlander posted:

It has been a busy month but still found some time to work on the layout.  Bit by bit it seems to be coming together.  This post represents much of my December accomplishments.

I have ballasted most of my mainline track, with about 10 feet left to complete. Track and roadbed was painted with Rust-Oleum camouflage earth brown. Recently finished painting the track in the yard area.  Since I was using a gray blend ballast on the mainline, I painted the beveled side of the cork roadbed gray before spreading the ballast.  I am using Brennan’s Better Ballast and I’m very happy with the results.

Before I ballasted the passenger loading area, I fabricated some station platform extensions out of 1/2” pine. I discovered that RUST-OLEUM #2182 gray primer is almost a perfect color match to my MTH Country Train Station platform. Close enough anyway and after a weather wash, they will blend together nicely.  I also weather washed the ballasted track with a spray mixture of Indian ink and 90% isopropyl alcohol.

I have also been working on land forms, particular the mountain at the far end of the layout.  I am slowly converting the blocky sheets of styrofoam into hillside slopes, rocks and ledges using a kitchen knife to carve and the addition of some rock mold plaster casts.  I found out that you can get several different appearances out of just a few molds by varying the depth of plaster fill when making plaster casts.  In some areas, I have added actual rocks.  Ground foam greenery, shrubs & trees will be added at a later date.  All the painted styrofoam sections are glued in place but the pink and blue sections can be removed for ease of carving and painting.

In-between the work sessions, I have found time to run trains and even hosted a group of Cub Scouts and their fathers just before christmas.  I am trying to make my layout more interactive for little and big guests. Switch & accessary controls are located around the layout on the fascia board so guests can play a part in the running of the trains.

Also took time before Christmas to travel up to the Twin Cities to retrieve my MTH 227 Yellowstone which I had upgraded to DCS Proto-2.   Big improvement!

This past Wednesday, a friend brought over his new custom built Max 4-6-6-2 articulated steam engine.  He wanted to see it run on 072 track.  The engine runs and looks great!

This is a great forum topic and I really enjoy following all the layout and special project postings.  Happy New Year to all and I hope the new year will provide everyone with new opportunities and increased energy to accomplish all your desires and dreams.

Dave

Do you have a track plan from your layout?

Check out my reply on 8/13/15 - 9:58 AM  to: "Anyone still design layouts by pencil?"  page 2. 

Dave

Interesting Coinkydink Dept:

A couple hours after I posted this: 

I got a call from the chap who'd given me the caboose in the first place.  He'd found the factory chimney, and I bopped over to his work and picked it up...

GEDC2086

Turns out the scratchbuilt chimney (which I'd simply cut from aluminum tube randomly) was a nearly perfect match in size with the factory chimney! 

This goes into the "Dang, I'm GOOD!"  category...

Mitch

Attachments

Images (1)
  • GEDC2086

Sounds like it's wiring season around here. That's how I spent my last two days.

Friday, I picked up where Joe and I left off Wednesday, and made the last few connections from the rail feeders to the bus. Then it was time to make it "live" by tying it to the power supply. I also started to tie down all the loose wires on the switch relay panel.

IMG_6198

There's still more work to be done here, but it looks a whole lot better than it did on Thursday.

IMG_6197

Saturday was spent filling in "electrical holes". The curved leg of the switch, through the diamond and all the way around the top turn of the helix...

IMG_6200

including both bridge spans had no power.

IMG_6199

I set up camp inside the small helix...

IMG_6196

and got it all connected.

IMG_6195

Amtrak train #8, the Empire Builder, service to Milwaukee and Chicago arriving at Midway depot (some imagination required)

IMG_6194

It was only 12 years late.


Attachments

Images (7)
  • IMG_6198
  • IMG_6197
  • IMG_6200
  • IMG_6199
  • IMG_6196
  • IMG_6195
  • IMG_6194

Mark, thank you for the compliment and also to all the others who have like my postings. I really enjoy this topic because it gives me a chance to see what others are doing and giving me new ideas to work with.  I  just enjoy working on the layout. Today I took the generic evergreens, which I pulled off to replace them with better ones and cut off the bottom of the base leaving just enough trunk to glue into place. The trees will be on the ground which I think will look better then with the trunks. So this morning I just worked on adding foliage to each one. I think they will look much better but I am open to suggestions. Here are a couple of pics. One showing the original tree against the first two I redid, soDSCN2131DSCN2134DSCN2135rry the pic is a bit blurry, and the rest are of the trees I got done. They are a bit too symmetrical  but I think adding the foliage tones them down somewhat...........Paul

Attachments

Images (3)
  • DSCN2131
  • DSCN2134
  • DSCN2135

Add Reply

Post

OGR Publishing, Inc., 1310 Eastside Centre Ct, Ste 6, Mountain Home, AR 72653
800-980-OGRR (6477)
www.ogaugerr.com

×
×
×
×
Link copied to your clipboard.
×
×