
Found out the diecast tender is quite a load for a Marx engine !! Probably weighs as much as 3 cars.
Ran trains and did a little urban renewal project in downtown Patsburg today. I had a most rewarding and creative time. Big fun!!!
jim pastorius posted:Found out the diecast tender is quite a load for a Marx engine !! Probably weighs as much as 3 cars.
I was wanting a die cast tender for my Marx 333. In the meantime I picked up a Senco tender. It is very heavy, and made me rethink getting the Marx tender.
I find Marx 666es are quite happy with Lionel Scout and MPC tenders...

![]()
Mitch
Attachments
Images (1)


I was going to buy an 90 degree drill but I found an attachment that fits into a regular drill making it a 90 degree. I had to buy drill bits with hex ends but it was still better buying a whole new drill. I only need it in the areas on the layout where I can't get the drill into. I can now start adding more trees and evergreens now. Since I got back home I just enjoyed running some trains...................Paul
Ran trains and did work on the layout until 3 am ... what can I say the muse hit me ![]() Took videos and photos today ... much of which is posted in the OGR forum thread ... Switcher Saturday. Here is a tour video of Patsburg.... includes downtown, Mt. Randolph and the Mountain Division over Bollman Bridge, Brew town neighborhood with brewery and wholesale outlet, and Patsburg West End with Tucker dealership and other assorted businesses. I hope you like it!
Took videos and photos today ... much of which is posted in the OGR forum thread ... Switcher Saturday. Here is a tour video of Patsburg.... includes downtown, Mt. Randolph and the Mountain Division over Bollman Bridge, Brew town neighborhood with brewery and wholesale outlet, and Patsburg West End with Tucker dealership and other assorted businesses. I hope you like it!
Attachments
Videos (1)

Besides making a handsome, sturdy work bench, my old oak desk has an interesting feature. Behind this faux front lurks a heavy duty shelf where an ancient typewriter could be stored.

The ample cubic footage inside was just enough space to house 3 ZW's plus associated command control components and a power bar. Remotes and the Legacy base will be stored in the open for easy access.

The cover on top is purely for safety's sake, to prevent metal objects from falling in between the ZW's and causing a major short. It's hinged for easy access to wiring. If need be, there's room for 4 TIU sized components underneath.

The whole affair raises to desk top height so it's convenient to work on. Since the shelf was designed to handle a lot of weight, it's easiest to deploy and retract when fully loaded. Finally, a central point is established from which all major power will radiate.

Bruce
trumptrain posted:Ran trains and did work on the layout until 3 am ... what can I say the muse hit me
Took videos and photos today ... much of which is posted in the OGR forum thread ... Switcher Saturday. Here is a tour video of Patsburg.... includes downtown, Mt. Randolph and the Mountain Division over Bollman Bridge, Brew town neighborhood with brewery and wholesale outlet, and Patsburg West End with Tucker dealership and other assorted businesses. I hope you like it!
Pat:
Thank you for the great video tour of Patsburg. As always, your scenery is breathtaking!
Christmas open house, ran trains for 5 hours. Had 48 visitors today.
Karl
That's pretty slick Bruce. So do you plan to operate with it in the closed position? If so do you have enough ventilation? All those ZW's can get warm. If the back is open, a small fan should do the job.
12-26-2015 Click on photo to enlarge.

Attachments
Images (1)

 Matt,
Matt,
Today I put the newly acquired 2004 Lionel operating Ornament on our Bear Christmas Tree on the layout.
PCRR/Dave
Attachments
Images (2)
Nice video
Finished repairing ANOTHER "dead" Atlas O turnout (5th one now). Yes, they are all the older versions, but it still is a pain drilling a hole through the layout, running a jumper wire, and then soldering both ends in place, especially the the end that is underneath the layout (soldering up-side-down is becoming more of an issue for my knees & back).
Pine Creek Railroad posted:
Matt,
Today I put the newly acquired 2004 Lionel operating Ornament on our Bear Christmas Tree on the layout.
PCRR/Dave
I also kinda like that Chessie ornament off to the right... Really nice display overall.
Steamer,
David I do believe you need a keeper!
Great Video buddy!
PCRR/Dave
Len B,
Thank you for the kind words, I appreciate it!
PCRR/Dave
Dave,
Congratulations! You got THE Lionel Christmas Ornament! You'll love it. People will ask about it. Some will ask to BUY it. They'll never get mine, I know.
Ron L,
Mine must have been a very early one, it has no Caboose on the right side work Train & the Instructions said nothing about directional control of the trains, from the ZW handles, however it did note the "L" on top of the ZW as the sound button. It lights, sounds and runs perfectly and I love it! It will never be resold, it is now a permanent part of the Christmas Bear tree. I started a thread and thanked you, a little while ago, please check it out.
PCRR/Dave
Big_Boy_4005 posted:That's pretty slick Bruce. So do you plan to operate with it in the closed position? If so do you have enough ventilation? All those ZW's can get warm. If the back is open, a small fan should do the job.
Thanks Eliot. The compartment is deeper than the sliding shelf and open at the bottom. If propping the door open isn't sufficient then there's plenty of room in back for a couple of computer type cooling fans. If I also fire up a few of my tube radios I'll be toasty all winter...whenever it ever arrives.
Bruce
Today, after finishing a Hallmark truck I showed in my last photo posting (I glued body to frame and put the spare back on after the repaint), I cut some scribed basswood and painted it, to cover one of the Menard flatcar's floors, and those truck rivets and their holes. I started to weather that added floor. Also, I managed to glom another pickle vat car, which will be repainted, probably for the Von Allmen Co. of Louisville, Ky., as per a couple of HO kits for same. This means the second flatcar will not be used as a base to scratchbuild a vat car.
Been working hard on my tunnel! While most of it is still "raw," I could not resist "finishing" a small section.

Attachments
Images (1)

Took a close look at the old, cruddy Marx passenger cars that I bought yesterday. Wow !! Sprayed the underneath with PB-Blaster penetrating oil and that loosened everything up. Cleaned them a little and found the tabs that hold them together-4 at each end. Hate to bend tabs but these cars have to be opened up to be fixed up. No other way. A long term project that will wait for another day. Did some rail photography yesterday although it was drab and dark. Found a consist sitting at a red signal in Beaver Falls, Pa. that had a really old CP SD-40 in the lead, and two NS units trailing then a CSX train blasted past on the other track so that made an interesting photo.
Beaver Falls is where my family is from.wouldn't have a pic of the would you Jim?
I still haven't figured out the photo thing on OGR so will e-mail you several. I do a lot of photography there. Two main lines, lots of old buildings, like the people.
when I picked up my Uncle's trains a few weeks ago, I came across a book of his on short line trains in and around Beaver Falls. I can't remember the name, lent it to Dad to read. showed lots of good pics, where the tracks were, pics today where they were. Lots of industries that used to be there.


jim pastorius posted:I still haven't figured out the photo thing on OGR so will e-mail you several. I do a lot of photography there. Two main lines, lots of old buildings, like the people.
Jim, the photo function hasn't really changed. Just click on "add attachments" lower right. A window will open and allow you to select your pics from your computer, like it always has. Once you choose, it will upload to the forum. Repeat. There is a small check box that you need to select if you want the photos to appear in your post, otherwise it defaults to thumbs at the bottom of your post.
Steamer-is that a recent book ?? Wayne Cole has brought some out in the last few years similar to that.
I'll have to ask Dad about it Jim.
Today while I ran a train I started to fill in with foliage in front of the backdrop I just put in. I was going to attach it to the window frame but I decided I had enough support on each end to keep it from falling over. I started at the one end. Tomorrow I put in more time on scenery. A pic of the area so far..................Paul
Attachments
Images (1)
jim pastorius posted:Steamer-is that a recent book ?? Wayne Cole has brought some out in the last few years similar to that.
I have several of the Wayne Cole books. Great for Western Pennsylvania and Eastern Ohio railroads that are no longer intact and ones that other writers have passed by.
Terry Danks posted:Been working hard on my tunnel! While most of it is still "raw," I could not resist "finishing" a small section.
Terry,
Great looking start! I agree, it is good to get a little scenery done at a time, so you can enjoy your finished work.
Worked on the the Intermodal section of the NJHirailes layout. Began to build the templates
Christmas open house, ran trains for 4 hours. Had 41 visitors today/
Karl
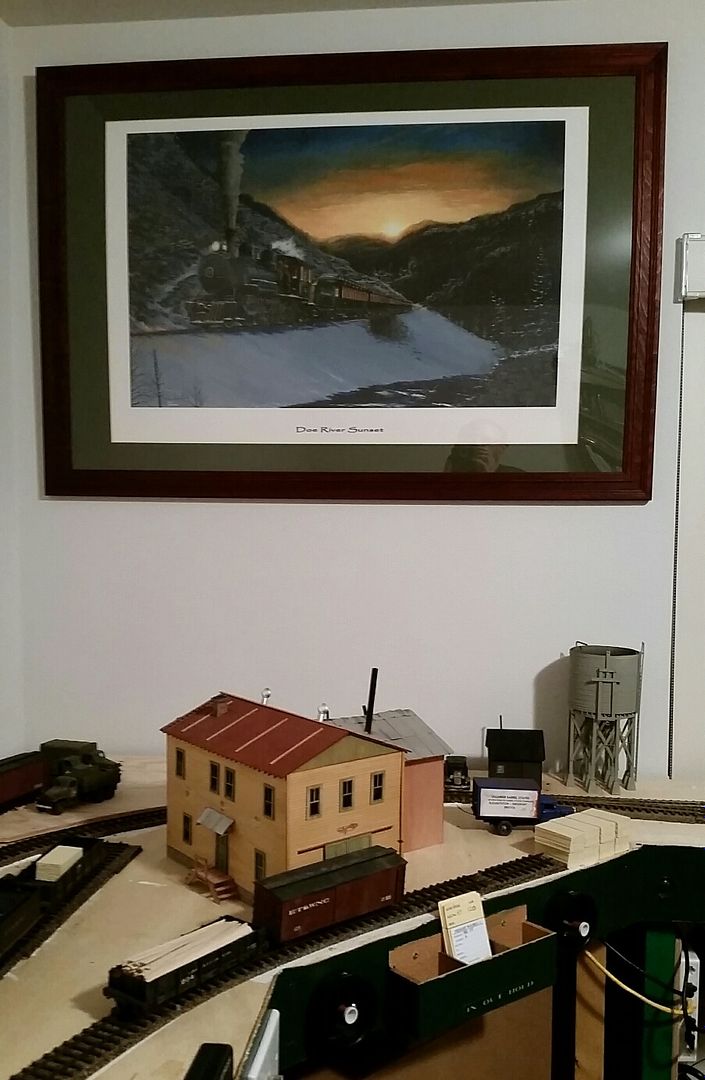
I got a neat print from my loving wife for Christmas and while thinking of how was going to frame it, I started thinking about another framed print I had that I knew wasn't going back up on the wall of the 'toy room' now that I have a layout in it. That print was a Jim Dietz print called, "Come in Fighting" which I'm actually in as a model ('m in a few of his WW2 prints). Anyway, that got rolled up as soon as I found not only did the color of the frame and mat look good for the print, it exactly matched the hole I needed. How lucky was that?
I mounted it very high on the wall of the room:
Today I worked on creating the cliff that forms a gorge down to Lake Christopher. This morning, after reading an article in the latest edition of OGR, I decided to go forth with creating the walls to the gorge.
The material I used was heavy gauge aluminum foil. Since the gorge is within the whole of Mt. Randolph and two main lines pass under MR ... just behind the gorge walls, I thought it best to test my Lionel TMCC locos before going on with the project.... making sure the foil didn't disrupt the TMCC signal.
I first put up the tin foil walls to the gorge and rain each TMCC locomotive thru the tunnel several times. Every TMCC engine ran smoothly with no problems what so ever.
After the TMCC/loco testing was completed, I attached the crinkled heavy gauge foil, using staples. Next step was to spray paint the foil with flat black spray paint. Waited a short while for the paint to dry .... and when dry I hit the foil with a second coat of flat black ... after second coat dried I sprayed a third coat of flat black ... waited for the third coat to dry ... the hit it with Floquil Light Earth in various patches. After the Floguil patch work paint job dried, I hit the painted foil walls with spray glue .... then through a batch of scenic mix at the walls .... whatever stuck did so and the result is stunning IMHO!! Given the geometry of this gorge wall ( an odd shaped half circle ) the foil was the best way for me to go. I'm very happy with the results and will post photos soon.
I also tried hooking up a K line automatic switch and could not get it working properly. Tomorrow I shall try again and see how my luck goes. I have three K line automatic switches to get operational ... hopefully tomorrow.
Getting the wall to the gorge completed is a major step in my layout completion and certainly in completing Mt. Randolph.
Tomorrow I may also use Knoch brick paper to cover the pier supports for the Bollman bridge which crosses over the gorge and Lake Christopher. Next after that will to be installation of the water for Lake Christopher, which is rippled plexiglas attached to plywood. The plywood lies underneath the plexiglass and is painted in various dark shades of black which simulate deeper and shallower water... its very effective btw!
My good friend Randy Harrison ( of Harrison Trains and Scenes OGR magazine advertiser ) helped me a lot with this project and was responsible for doing the water for Lake Christopher. He also helped me tons with my over all layout as well. I'm most grateful for his assistance, input, advice, and friendship. Hence I named Mt. Randolph after Randy. Mt. Randolph is the overwhelming focal point of my layout since it almost reaches the ceiling of my train room. Everyone seeing my layout for the first time have big eyes and mouths drop wide open when entering the train room and view Mt. Randolph for the first time. I get a lot of "OMG this is incredible!!!" I know all of you guys get that sort of reaction too when folks see your layouts for the first time. It makes our time and efforts worth it!

Add Reply
Sign In To Reply
