A common problem with postwar Pullmor motors is a sclerotic wiring harness.  The wires harden and then break as the power truck rotates:  GEDC2041

(the aluminum tubing at top holds a 12v bulb, and slides over the headlight lens inside the shell)

The Train Tender and other fine parts places have nice fresh replacement wire, but if it's the weekend and you don't want to wait for a shipment, why not splice a piece of speaker wire in place?  This loco already has some Radio Shack wire in place as an extra ground wire! 

GEDC2043

Here's the completed splices, with shrink tubing courtesy of Harbor Freight.

GEDC2044

And here's the Gi-raffe Express GX-1 trundling along with its nice shiny splices!

GEDC2045

Mitch

Attachments

Images (5)
  • GEDC2041
  • GEDC2042
  • GEDC2043
  • GEDC2044
  • GEDC2045
redball342 posted:

Mark,

Just like when I was young the lay-out one day like this, the next completely changed. Governed by the carpet space or in my chase the size of the Ping Pong Table top. But as we age we tend to go for permancy. Will we see a new lay-out for Easter? Thanks for sharing! May it change!

Redball,

I agree I would like permanency too.    The plan will be to remove the snow and ceramic buildings sometime in January and go back to some form of a 'regular' layout.  That said, I am sure a few Easter related items will find their way onto the layout when my back is turned, just as happened last Easter!  

I am hoping the long-time boyfriend of our last daughter at home, pops the question soon and we can get them both out on their own this coming year.  His dad would like him out of their house too.   Then I can take over the 12x12 room for nothing but trains and start on the 'real' permanent layout.  

Reminds me of a story my dad's fishing buddy told on his father-in-law.  Dad's friend was in his 30s dating his wife-to-be.  Both he and her father loved to fish.  One day when he went over to see her, her dad said to him, "When are you going to marry that girl so we can get down to some serious fishing?"  If he doesn't propose to her soon, I'm going to ask him, "When is he going to marry that girl, so I can build my layout?"  

Last edited by Mark Boyce
suzukovich posted:
Mark Boyce posted:

Here is the latest on my 4' 4"x8' Christmas layout.  I planned to convert it to Christmas since I don't have room for any trains in the living room except right under the tree.  There is certainly no room for the winter buildings there.


Mark

The reconfiguration of your layout is a good idea and is looking good. I guess having a simple track plan and layout has its advantages. My case although the tree goes up on the layout, the tree raising has been delayed due to troubleshooting the cause of the weak DCS signal and replacing some worn track and rewiring. Looking forward to seeing the reconfiguration completed.

jjames9641 posted:

Mark, looks great!! Where did you find the RR emblems used on your roads before your grade crossings?

Thanks, Jeff

Suzukovich,

Thank you, I had trouble with a bad track joint that didn't show up with DCS, but gave me trouble when I put the conventional engines on the track.  Found a fastrack connector was loose.

Jeff,

Thank you!!.  I was looking for the package label I saved, but things got mixed up in my switcheroo!  It's here somewhere.  I bought them at Hobby Express in Cranberry Township, Pennsylvania.  When I find the label, I'll report back.  I should find it as I clean up all the boxes, etc from the switch.


I know I said I was putting the brass Mikado away for now.  So I lied!  Truth is, the improper positioning of so many of the boiler details bothered me.  Another dip in thinner and I commenced to removing everything short of the cab, steam dome and stack.  Here, the reshaped sand box, aligned grab rails, boiler jacket straps and a few tiny details are installed.


Over on the right, pretty much all the major details have been reshaped or refashioned to suit.  Little accents like adding a whistle throttle help make the model more believable, especially once a lanyard is hung.  Sorry about the poor photography...but it at least documents the progress.  I'll take some better quality shots after paint is applied.

This shot shows evidence of the previous hand rail alignment, with the 5 front stanchions repositioned and the remaining holes filled with solder.  Still to be installed are a few running board supports, sand pipes and a generator stack


Bruce

Last edited by brwebster

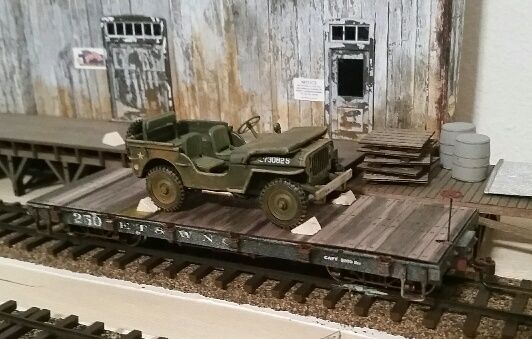
I bought some laser wood decking for my On30 flats, and hit the first one with a series of different shade grey inks to show wear. I'll be weathering the deck with paints for rust, oil stains and such but I like how it looks so far with the (new wood) wheel chocks I glued into place so I can place a WW2 Jeep onto one easily....

This morning I did two more areas with foliage. One pic is scenery going down the side and the other is of a track going by the grade. On the top I am working my way down to the end. Probably have another 8 feet or so to go. I'll work my way around the grade eventually but I have to put in a small backdrop across the front windows first on the lower level. Got my measurements for that. Just have to get a sheet of thin Masonite to glue the back drops to............PaulDSCN2094DSCN2095

Attachments

Images (2)
  • DSCN2094
  • DSCN2095
jim pastorius posted:

p51- looks good, nothing like a WW II jeep !!  Yesterday at the Pgh. TCA show they were running a train of flat cars with model WW II vehicles on them which really looked good.

Thanks, I am a stickler for historical accuracy and I rail-loaded plenty of (modern)  military vehicles to flatcars when I was an Army officer. The Jeep has white bumpers with my own custom-made (fictional) Army RR Operating Battalion markings. The windshield cover was made to show how a Jeep was normally shipped. I looked into removing the shovel/ax as well as the spare tire and jerry can (as stateside Jeeps often were lacking those things), but most of those details are molded into the body. I changed a lot of stuff on the Jeep to reflect more what a real GPW/MB would look like. It's easy for me as I have a 1:1 scale 1944 Willys MB in my garage:

I'm trying to figure out how to make chains that can be easily removed if I want at this time.

C.C. Wally,  I'm getting better adhesion than I have any right to expect.  That 9117 weighs almost twice what the prototype would in "Proto-Pounds".  For me, the joy of O Gauge railroading is the railroading - replicating the real-life railroad issues without the real-life costs or consequences.  To paraphrase my hero, SIRT, "I've done real, now I'm ready of O Gauge."

This Forum page is ever my ready reference for weight calculations:

https://ogrforum.com/topic/scale-wieght

The church I belong to has several families that are into model trains. So several years ago, we got together and formed a church Train Tour where each family has an open house for church members to come and see the trains. We run almost the whole gamete with N, S, HO, HO Marklin, and O. No G, or Standard gauge yet.

I usually theme my display around a specific railroad or engine type. This year I thought I would go "retro". I 've spent the last week or so digging out a bunch of postwar and MPC I had squirreled away. Most (all?) of the stuff has not been on the rails in 30 years. Talk about dry and dirty! So tonight was clean and lube night for the cars. I got through about 15 or so. Lubed all the wheels and axles and cleaned tons of crud off the wheel treads. We are looking good! Tomorrow night it is the engines turn.


Chris

LVHR

I ordered Lionel parts specifically for the S-2 directly from their website - under Customer Service:

QuantityPart NumberPart NamePriceSub-Total
26208530054AXLE ASSEMBLY W/O TIRES / ALCO S-2 / S-4$8.50$17.00


I cleaned Western Depot out of their supply of MTH hi-rail replacement wheels & axles but upon investigation I find that MTH actually sells them!  There's a shock!  Make sure that whatever model you intend to modify has the provision for the modification:

http://mthtrains.com/20-89005

Unfortunately, MTH sells the steel wheels in a kit along with an equal number of rubber tired wheel-axle sets.  Once I've modified my MTH equipment, I'll be offering the rubber tired junk to anyone on the Forum who wants it - just pay the postage.

lehighline posted:

The church I belong to has several families that are into model trains. So several years ago, we got together and formed a church Train Tour where each family has an open house for church members to come and see the trains. We run almost the whole gamete with N, S, HO, HO Marklin, and O. No G, or Standard gauge yet.

I usually theme my display around a specific railroad or engine type. This year I thought I would go "retro". I 've spent the last week or so digging out a bunch of postwar and MPC I had squirreled away. Most (all?) of the stuff has not been on the rails in 30 years. Talk about dry and dirty! So tonight was clean and lube night for the cars. I got through about 15 or so. Lubed all the wheels and axles and cleaned tons of crud off the wheel treads. We are looking good! Tomorrow night it is the engines turn.


Chris

LVHR

Chris,

The church train tour sounds like a great idea.  I do not know anyone at my church who has trains.  There must be someone.

I just connected a few wires, and then I RAN TRAINS.

I think Murphy was a model railroader. Didn't he say that a dropped metal object will land on the track? Also that you can look and look and never see it, but the train will find it.  A couple days ago, I dropped two small screws which fell into the hidden yard. Yesterday, I lost a drywall screw, near the helix, while installing a new control panel. I'm clueless as to where a piece of chicken wire came from, but it got me twice, as did the screws.

If you want to sneak a peek, click on Youtube in my signature.


Nah Gary, I cleaned up after Murphy prior to shooting the videos. There were still some minor glitches during the shoots. It will be interesting to see if some of the other engines make it around as well as that one did. I've always had TMCC signal issues. The next task is to get reliable operation from all of my engines. Tall order.

Norm,

Take it easy for now, get well, and only then get cracking on the layout. Your hobbies can wait for you to be better.

A guy I knew years ago permanently messed up his back because he got impatient after surgery, ignored the Doctor's advice and decided he was 'good enough' to go work on his Hot Rod. Now he can't drive because of the damage he did to himself.

Just get better, that's your job for now. And good luck to you!

Last edited by p51

Today was a good news/bad news sort of day. The good news is I got thru cleaning and lubing 3 engines, and they work! I hate cleaning the treads of pilot wheels on steamers, though! And these were BAD!!!

The bad news is I found out that both variable channels on one of my TIUs are dead. Volts go in, nada comes out. I put in a spare TIU for the moment. I'll trouble shoot the other one as time permits.


Chris

LVHR

Pingman posted:

Elliot, a nearly 12 minute video reinforces the scale of your mega-layout--thanks for taking the time to produce it; and, Gary, thanks for embedding it here.

Thanks Carl, that day was a long time in the making. It was about 6 years of actual construction over a 12 year period. The planning began about 17 years ago. Still lots to do! There's still a little track that needs power, and one small section of track that needs to be laid. Got a handful of Tortoises left to do. Control panels to rewire, manual switch throws to install, detection wires to locate and tie down. Then there's all the computer stuff and the scenery. I have just over two and a half years to get it done.

Last edited by Big_Boy_4005

Rough day today. Yesterday I started to move trains from the big hidden yard, over to the small one. The first train made it up the big helix OK, but then the TMCC signal trouble reared its ugly head. Half way around the main level, I gave up and yanked the engine off the track. I started in again this afternoon. I've come to the conclusion that it has something to do with can motors, and they no longer like the main level. They used to work.

The signal issues started to subside once I crossed over into the zone that was on the other power supply, and by the time it reached the small helix, which is lined with foil, it was running fine. I just wanted to park it on track 6, but for some reason the switches were all mixed up. So I had to run the train all the way up the small helix, which is also fully functional, through a reverse loop on the upper deck and back down for another try at parking it on 6. No signal issues on the upper deck.

I thought I had the yard switches connected to the right relays on the panel, but I guess not. What a pain!!! I had to make changes on the panel, then run around the peninsula to see what the switches were doing. Back and forth, back and forth... On one trip, I managed to snag a wire with my foot, and ripped all the crimp connectors off. I replaced those, and a few minutes later while testing again, everything quit. Grab my meter, and my little MPC transformer was dead. Found another one, hooked it up and finished testing. I finally got it right.

Yesterday I made this chip holder. I have a different version of this over by the big hidden yard. This is how I keep track of which engine is where. So engine 88 is on track 6 (the blue track).

IMG_6165

This is the panel I finished on Sunday. It is really the key to the layout because it connects all the levels.

IMG_6164

This is my new GoPro car. I used a cheap gondola with plastic wheels in the hopes of cutting down the noise. Then I goofed and used an engine with pulmor motors. I also had to replace that thumb screw after it struck one of my angle iron supports along the south wall. The support will have to be trimmed off as soon as I can find the right saw to do the job.

IMG_6160

After all that, I need a couple days off, and I'm going to get them. My son is graduating from college on Friday.

Attachments

Images (3)
  • IMG_6165
  • IMG_6164
  • IMG_6160
Last edited by Big_Boy_4005

Today, I actually got back to working on the model, of the pickle packing house, after a lot of time devoted to  decorating and shopping.  And I have the main roof sections of the main building roofed with "tar paper", and part of the side sections, with them to do and then deciding whether to use "tar paper" or corrugated sheet on the attached office....I think the latter.   While doing that, I forgot to pursue an item on the bay, and it is gone.


here is what I worked on today a little scenery need some thing to cheer me up I loaned out my old daily driver to my step brother. me and my son built this car. well a mile from the house this happened to it ! all I can say is in what world do you pass a car turning left on the left I owned this car for 9 years it was for my daughter.  2001 Roush Stage 2 Clone. the car started off as a v6 car.  

20151217_01233120151217_01234120151217_01234820151217_01264120151215_09485420151215_09492220151215_094941

Attachments

Images (7)
  • 20151217_012331
  • 20151217_012341
  • 20151217_012348
  • 20151217_012641
  • 20151215_094854
  • 20151215_094922
  • 20151215_094941
Jhainer posted:

 all I can say is in what world do you pass a car turning left on the left

I had something similar happen many years ago. Driving down a one way street in the far left lane, a teenage girl turned left in front of me. I hit her. Her fault all the way. Her parents were none too pleased.

That was the first of three accidents in a period of 6 weeks with that car, none of which were my fault. The second I was rear ended by a semi tractor, when the traffic light malfunctioned. The third I was sitting at a stop light. The third one totaled the car. The insurance hadn't even settled on the first one, and the car was in the junkyard.

I WILL NEVER OWN ANOTHER RED CAR!!!

Add Reply

Post
×
×
×
×
Link copied to your clipboard.
×
×