I had previously cobbled this A-B-A unit together using a batch of A units. However, there was no horn in any of them. I recently bought an A unit with a horn and thought that I could swap shells or repaint but the sheet metal framed units don't match up with the alternate die-cast/plastic unit, there is about 3/16 of an inch difference in height. So instead of making the changes that I had planned on I had to swap out the electronics into the B unit. Since my B unit was made from an A unit the pick-up truck was already being used so it was a simple matter to make the installation. I just now have a non-matching dummy A unit with no horn to do something with!
More wiring...AAAAHHHHH! it never ends. I should have known better when the hobby described it self as ELECTRIC TRAINS!
![]()
John Pignatelli JR. posted:More wiring...AAAAHHHHH! it never ends. I should have known better when the hobby described it self as ELECTRIC TRAINS!
Yes, but remember, it used to be a simple matter of connecting TWO wires to a transformer; then, connecting those wires to a very simple clip-on device, which was, in its turn, able to be affixed to track by aiming a shiny metal clip to the proper rail, and finally, turning a shiny metal lever of the clip-on to tighten the whole device onto the track. Maybe, that whole procedure took 3 minutes. I used to do it for my father when I was still in the single digits age-wise.
But nowadays, sheesh! And oivey!
Oh well.
FrankM.
You can still do it that way !!
John Pignatelli JR. posted:More wiring...AAAAHHHHH! it never ends. I should have known better when the hobby described it self as ELECTRIC TRAINS!
I hear ya. More wiring for me as well today. Ran the buss wire and made connections to all the power drops.
Hooked up 2 of those (can't remember what they're called) MTH DCS track power thingys that come with the starter kit. They are for the left and right engine shed tracks which will be powered by toggle switch and AIU. When wired passively as shown in the pics it will send the watchdog signal upon power up. No need to have a bunch of noisy locomotives start up just to have to shut them back down.
I can't begin to explain how happy I am. Since getting back into the hobby a year ago (before that it was my young teens) and never having anything more than a single loop it's just great. Loving all the new technology and being able to kick back and throw 13 turnouts with a remote control. Have found easiest control of the layout to be using the tablet via wifi to run the trains and my DCS handheld has become my turnout control
Attachments
jim pastorius posted:You can still do it that way !!
Yes, indeed, I have - the whole layout.
I sanded off the lettering on an AMS On30 coach to make into Linville River # 4... Photos soon!
SPARKY74,
What is the radius of the curves in that diagram? Am I reading it right, it says 6' x 10'?
Today I made up some legs and glued together the third table frame work. I'll let the glue set up and after dinner I'll start attaching the legs. This table is 8' X 30". A couple of pics ......Paul
Attachments
I received and installed the green carpeting. Pictures as things progress.
Nice looking rock formation. What did you use for the casting plaster?
It came as a kit from Bragdon with 2 part resin and 2 part foam. I thought I messed it up by not using enough resin or enough foam but it turned out OK. I need 4 more of these and I can see because the mold is so large it's going to take a lot of resin and foam. You're supposed to coat it with Gesso after it's dry and I went thru almost 1/2 of a 4oz bottle. The kit also comes with some powders and paint but again only enough for a much smaller rock. Detail doesn't really show in the photo but it's going to look real good when finished I'm sure. First time to work with resin so I spent 15 minutes in panic mode.
Attachments
Mr Union Pacific posted:SPARKY74,
What is the radius of the curves in that diagram? Am I reading it right, it says 6' x 10'?
The outer loop is 072 easement into 054. Inner loop is all 054 curves. Mix of 054 and 072 turnouts. All track is MTH Scaletrax.
Almost forgot. At the top of the layout was an add on. That section is roughly 16" wide X 70 something inches long. It's where the engin shed sits and the outer loop straight section in the back is raised 4" to meet that height. It's something to get me back in the hobby and going again until I start a larger layout in the garage.
Hopefully the videos paint a better picture
Attachments
p51 posted:I sanded off the lettering on an AMS On30 coach to make into Linville River # 4... Photos soon!
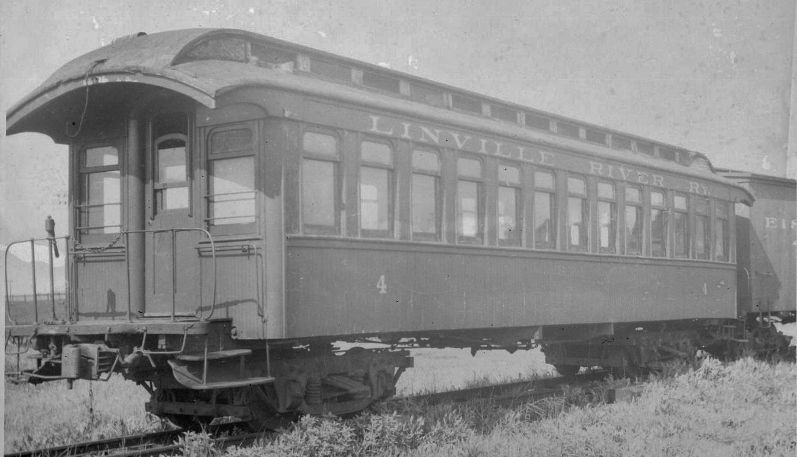
This is the real Linville River #4, the last remaining Laconia coach on the property during WW2. I can't find anything concrete on it being used for passenger runs in 1943, but I do have another photo of it apparently not being used, parked at the Johnson City TN shops of the ET&WNC. Here it is in 1942:

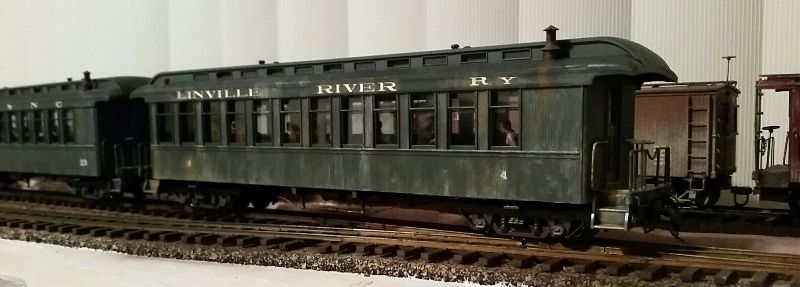
I stripped an AMS D&RGW coach, blasted it with some Pullman Green, decalled and weathered it more strongly than my ET&WNC-marked coach.

It's by no means perfect, but I think it's a halfway decent representation of this coach. And my passenger runs can finally have more than one car!
This is what it looked like before I took it apart:

Starting this layout in the basement has gotten me to actually start addressing the issue of cleaning up the basement. The wife and I have used it as a catch all for things that we never have used. So in order to install the next table I have to take a shelve down and go through stuff to put the new table up. That's what I will doing today on the layout. Tomorrow I plan a day trip to Springfield Ohio to a train show there...........No pics just a cloud of dust today.........Paul
took the tarp off the outside track lay out to see how much cleaning would have to be done - fortunately to day it is going to be 20 degrees Celsius ( 68 -70 F)
and it does not look like there is too much work to be done .... so if weather holds I should be able to run trains this coming week
Attachments
Thursday and yesterday, Tom cut and sanded the plywood, and together we staple gunned fabric and set up and screwed down a circle of 42 curve Standard gauge USATrack. This will be used atop the 60" round table for our wedding cake at our upcoming wedding and reception. We'll add a bussbar (sp?) underneath for the accessory pieces wiring. A 318E engine, these litho buildings, and Barclay people, and fresh flowers around the base and atop the small cake .
Attachments
Prepped the entire layout for a full fledged rewiring
Moonson posted:
Well, the real #4 coach hadn't been painted since the 20s at the earliest, probably. It doubtfully was used much (if at all) since the late 30s and there's no reason for me to think much had been done with it, if anything, by the time my layout takes place.
I have a photo of this coach with all its windows busted out a year later, in 1944.
In other words, nothing this railroad had would have been pristine in that timeframe. Anything new-looking would look very out of place for the time and location.
P51, Thanks for the conversation of your reply. I had figured something like that was the reason. Older coaches like that somehow look more suitable weathered, IMHO, unless, of course, a hobbyists is modeling that circa on a layout, when its things were new.
I had some coaches like that a few years ago, new, and figured even just having them sitting idle in a yard did not look right, given the more contemporary general time period of my layout, so I weathered them and offered them for sale at my booth at the TCA Meet @ York. I had no idea if they would sell or be a loss but wanted the adventure of it all. They sold on the first day, a pleasant surprise. Weathering seems to be a particular taste some hobbyists have; some do not. Variety is the spice...isn't it. I've weathered buildings, vehicles, construction, logging, and farm equipment, but have not ventured far into the realm of trains being weathered, except for a very few pieces, nothing like your bold and expert moves.
FrankM.
I put a ZW-C on my layout yesterday. I picked it up at I Love Toy Trains-The Country Store. I traded my PW-ZW for it and some cash. I was going to try and get this at York in October, but now I can scratch it off my list along with the CAB1-L too. Now I have more money to buy trains.![]()
Attachments
I started wiring today. I pulled the cap off a red paint marker to mark a block under the table. The whole insides of the paint marker came out with it. Bright red paint all over my hands, my shirt, the benchwork, track and a really nice 5165 switch. It looked like a scene from a horror movie. Of course I was standing in the center access and couldn't crawl out without getting more paint everywhere. My hubby came running and only laughed a little. On a brighter note lacquer thinner did not mess up the plastic on the switch and it looks pretty good. What a mess!
pwrwgn posted:I started wiring today. I pulled the cap off a red paint marker to mark a block under the table. The whole insides of the paint marker came out with it. Bright red paint all over ... What a mess!
What brand paint marker?![]() Inquiring minds need to know.
Inquiring minds need to know.![]()
Thanks for giving me a good laugh. Happy the switch was ok.
Cutting wood for the SG layout table top. The finished size will be 5'6" x 8'6", the main piece is 4'x7' with 9" framing edges. The corners of 9"x9" will have some trick design. The facing boards are 3-1/2" mahogany.
Moonson posted:P51, Thanks for the conversation of your reply. I had figured something like that was the reason. Older coaches like that somehow look more suitable weathered, IMHO, unless, of course, a hobbyists is modeling that circa on a layout, when its things were new.
Weathering seems to be a particular taste some hobbyists have; some do not. Variety is the spice...isn't it. I've weathered buildings, vehicles, construction, logging, and farm equipment, but have not ventured far into the realm of trains being weathered, except for a very few pieces, nothing like your bold and expert moves.
Thanks for the kind words.
I'm not sure I'd call my weathering or painting efforts, "expert" by any stretch, but I do feel comfortable by doing so. MUCH more so than wiring or scenery, anyway.
O scale has a broader spectrum between "out of the box" and weathered to the point of collapse. I think this spectrum is broader in O than in other scales...
Today I finished section 2 go 6 track wiring and building wiring . I toke some photos of night and day shots.
I hope you enjoy them.
 John
John
The next set is #2 industrial row.

the following are SEC2
some buildings down industry row.


And now some night shots and why all the wiring!


Inspector Jesse says it time to rap it up for the night and go to bed.
Once I got my second (and last) coach done before the weekend, I had a sales table at a local model train show. Got rid of some books but didn't sell an awful lot (picked up a neat AMS boxcar for cheap, though).
That said, I was busy on Sunday:
- Cut some Plexiglas sheet for areas I didn’t want hands or trains to pass by/through, such as a point on each turntable where the train could roll right off to the floor. The other spots cover the end of the track at the end of the mainline run and a siding where the track runs right alongside the fascia and would be way too easy to knock cars sideways off to the floor*. Once the scenery is done, I’ll be screwing them to the fascia.
- Screwed aluminum reinforcement channels (from a shelving unit I bought) to the back of an 8-foot section of Masonite that will be the backdrop along the back wall, with a profile of undulating mountains. That way, it shouldn’t sag once it’s mounted vertically with L-shaped supports to secure it to the benchwork.
I had a sinus headache for most of Sunday, so I never got started with painting to get ground foam in place. Hopefully, I will habve time this coming weekend for that.
* you can see how close it is, at the bottom of this photo:

Moonson posted:John Pignatelli JR. posted:More wiring...AAAAHHHHH! it never ends. I should have known better when the hobby described it self as ELECTRIC TRAINS!
Yes, but remember, it used to be a simple matter of connecting TWO wires to a transformer; then, connecting those wires to a very simple clip-on device, which was, in its turn, able to be affixed to track by aiming a shiny metal clip to the proper rail, and finally, turning a shiny metal lever of the clip-on to tighten the whole device onto the track. Maybe, that whole procedure took 3 minutes. I used to do it for my father when I was still in the single digits age-wise.
But nowadays, sheesh! And oivey!
Oh well.
FrankM.
I love wiring even though it can make me crazy (not a far stretch). I going to get under my table and clean up some wires I left hanging.
John Pignatelli JR. posted:Today I finished section 2 go 6 track wiring and building wiring . I toke some photos of night and day shots.
I hope you enjoy them.
John
The next set is #2 industrial row.
the following are SEC2
some buildings down industry row.
And now some night shots and why all the wiring!
Inspector Jesse says it time to rap it up for the night and go to bed.
I really like your layout. I'm turning green with envy looking at it. ![]()
![]()
Yesterday I took a day trip down to Springfield Ohio to a train show at the fairgrounds. Got a couple of things. Today I got busy taking out the partial wall. Now I just have to haul it to the street for garbage pickup. At first I was going to leave the wall and build small modules on both sides of it. But decided to just build a slightly larger one in its place. I have some pics but last night windows 10 did a number on me and I lost desktop icons, a bunch of favorites and my Nikon programs to download photos and no way, that I found so far, to go back and recover to an earlier date. I would rather be putting more time on the layouts then trying to figure out how to get everything back.................Paul
Moonson posted:pwrwgn posted:I started wiring today. I pulled the cap off a red paint marker to mark a block under the table. The whole insides of the paint marker came out with it. Bright red paint all over ... What a mess!
What brand paint marker?
Inquiring minds need to know.


