Finally found the material I had been thinking of for the corners of my Std. Gauge Art Deco-style layout table. I bought four 12"x12" pieces of black with heavy white veining marble, that will be wet-saw cut down and then laid and glued in at the 9"x11" table's now-open corners.

These on a 42" high, 5'6" wide, x 8'10" long layout table- with fluted (routered), castered table legs, that are to be painted and finished with a black lacquer look.

Pics shows two of the marble pieces mocked-up in situ. The 4'x9'" wood end pieces seen herewill be replaced with 4'x11" wood end pieces.

IMG_1346IMG_1345

Attachments

Images (2)
  • IMG_1346
  • IMG_1345
Apples55 posted:

But remember Mitch, the ASPCA would take a very dim view of using giraffes as pantographs   

Oh, yeah?  Then why do they have trolley poles on their heads?  HA!  I've run rings around you logically. 

But since you've piqued my curiosity, here are a gi-raffe, a New Haven rectifier and a Western Hobbycraft trolley, all fully extended...

GEDC2259

Plenty of clearance with the catenary up high like that! 

Mitch

Attachments

Images (1)
  • GEDC2259

Ordered latching relays so I can move all the tortoise units to the SW ports on the AIU. This will stop all my turnouts from changing direction when powering up from and off state.  I will also be able to take advantage of the straight/curved selection on the DCS remote and make routes. This is not possible when wired to the ACC ports.  Plus I want to use the DZ-1002 remote buttons with LED as well as the DCS remote.  Ordered a bunch of MTH remote commanders so that all non powered tracks will receive a watchdog signal upon power up.

Just spent 3.5 hours taking happy snaps for a friend of a friend who picked up a buncha Lionel, Marx, AF, HO and N scale stuffs at an auction and is planning to eBay 'em! 

Some highlights: 

GEDC2260

This Geep runs smoothly, E-unit works fine, horn unknown as a bottom battery holder is needed.

GEDC2264GEDC2266GEDC2269

A veddy clean Marx Pacemaker boxcar!

GEDC2282GEDC2288GEDC2294GEDC2299GEDC2306GEDC2320

If the HO loco in the back looks European, that's 'cos it's a Fleischmann! 

GEDC2334GEDC2345GEDC2347

A complete oval of prewar Marx windup track:

GEDC2355

I'll let y'all know when the auctions go online! 

Mitch

Attachments

Images (14)
  • GEDC2260
  • GEDC2264
  • GEDC2266
  • GEDC2269
  • GEDC2282
  • GEDC2288
  • GEDC2294
  • GEDC2299
  • GEDC2306
  • GEDC2320
  • GEDC2334
  • GEDC2345
  • GEDC2347
  • GEDC2355

Yesterday I got the  rest of the blue done and I repainted the paneling where I had some water discoloring by the floor. Today I painted the exposed basement wall with some drylok. While that was drying I added the legs to the table. Then I screwed down the plywood. I have got it almost in place where it is going to go. I still have to level it and put the cross braces on. Once I do that I can secure it to the wall and the preceding table. Pics of the progress.......Paul

DSCN2361DSCN2362DSCN2363DSCN2364DSCN2365

Attachments

Images (5)
  • DSCN2361
  • DSCN2362
  • DSCN2363
  • DSCN2364
  • DSCN2365

Good news / bad news... Good first, I finished cleaning up after the helix rebuild, and ran a Lionel auto rack all the way from top to bottom on the BNSF (inside) track. That was perfect, all clear. The bad news is, the CP (outside) track, where I wasn't able to get to easily, still has the old problem with the ladders hitting the supports.

Two choices, either operate with restrictions, or get in there and fix them. That's something like 48 posts. I did buy one of those oscillating saws to get in there, but I'm not sure what to put back in for support.

Tendercoal_zps3jl7reydAfter a LOT of yard work my wife sprung on me at the last second and filled most of the weekend (which I had intended on using to start laying down ground cover on the layout), I used the remaining time today for trains.

I cut 2 pieces of MDF for an army parking/unit area and a cornfield. Then, I put real coal in the tenders of all my wartime black ten-wheelers. The plastic "coal" never looked right to me.

So my scenery work will start next weekend.

Attachments

Images (1)
  • Tendercoal_zps3jl7reyd
Last edited by p51

Sunday was a "let's get creative with wire lugs" day for me.   

First, a temporary battery holder for the waif Alco I picked up on my birthday:

GEDC2362

The other bit is an MPC era center rail shoe, inverted.  Once I cleaned the contact on the horn relay, it beeped around most cheerfully! 

Second, I used a couple of small wire lugs as jumpers on a 1033 transformer with both coil wires broken off to 1/4" stubs during an attempt to change the wall plug by a previous owner:

GEDC2363

The 1033 now works flawlessly! 

Remember, folks, those little wires are delicate!  Be careful when changing the power cord, or, better, leave it to a pro! 

Mitch

Attachments

Images (2)
  • GEDC2362
  • GEDC2363
Big_Boy_4005 posted:

Good news / bad news... Good first, I finished cleaning up after the helix rebuild, and ran a Lionel auto rack all the way from top to bottom on the BNSF (inside) track. That was perfect, all clear. The bad news is, the CP (outside) track, where I wasn't able to get to easily, still has the old problem with the ladders hitting the supports.

Two choices, either operate with restrictions, or get in there and fix them. That's something like 48 posts. I did buy one of those oscillating saws to get in there, but I'm not sure what to put back in for support.

Elliott it looks like only one choice to me with the quality of your layout. Gotta fix it or you will never be satisfied.

Today I finished up table three. Got it painted, leveled and bolted to table two and the wall. I had to make up a couple of blocks to go under two legs. Old basement I did not realize how bad the floor dropped toward the drain. Once the paint dries on them I'll place them under the legs. I made them long enough so the next tables legs will rest on them too. Right now I am hoping the floor goes back to level floor when I build table four. For me this is my stopping point. Heading for York on Thursday so for the rest of the week I'll run trains and make my wish list, actually my gotta have it list for York. Couple of pics of table three...........Paul

DSCN2366DSCN2367DSCN2368

Attachments

Images (3)
  • DSCN2366
  • DSCN2367
  • DSCN2368
Bill Webb posted:

Elliott it looks like only one choice to me with the quality of your layout. Gotta fix it or you will never be satisfied.

Bill, that may be where I end up with this. I still have to check the Atlas 89' flat, a 21" passenger car,  and the 86' boxcars but I think they're all good. It's just those dang ladders on the auto racks that I have found, that are hitting. The Challenger will have a problem too, but it won't be taking that route and will use the small helix and small hidden yard, which it clears.

There is one more critical test that I haven't been able to perform as of yet, and it may be a while before I can, and that is will those cars go through the big hidden yard? There is one spot in particular, and that is the big hairpin turn seen here, in this very old photo.

2014-08-29 001 2003-12-12 007

The curve diameters are 092, 084, 076, 068 and 060.  There was no choice in this design and it cannot be changed. It is what it is. The curves at the far end should be fine, because the tightest is 072 and they go up to 0104.

Attachments

Images (1)
  • 2014-08-29 001 2003-12-12 007
Last edited by Big_Boy_4005
mike g. posted:

WOW Elliot, now that I see all the rolling stock you have. Now I knw why you have suck a big layout. I think it all looks great! Quick question. do you have any Atlas Pratt Bridges on your layout?

Oh Mike, what you are seeing there is just the tip of the iceberg. There are way more cars still in boxes.

There will only be 3 train bridges on the entire layout. Two will be lift bridges, and the third will be a multi-span box truss, which I have to do on a curve even though the real one is straight.

This is the CP (ex Milw) lift bridge over the Mississippi at Hastings MN.

261_0915

The BNSF (ex CB&Q) lift bridge over the mouth of the St Croix River at Prescott WI.

TRAINS_1275

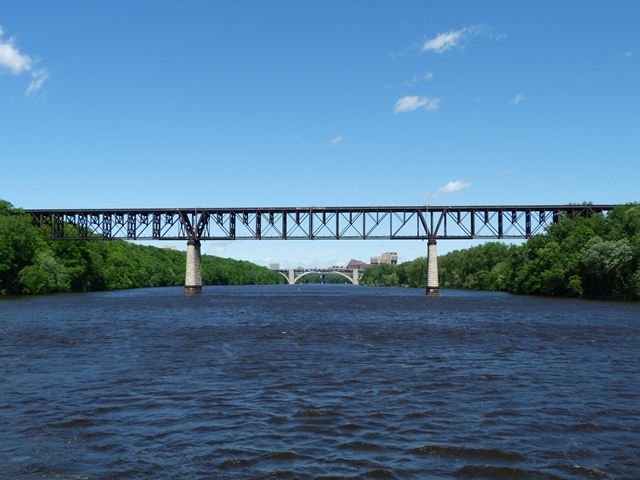
This is the Milwaukee Road Short Line Bridge over the Mississippi in Minneapolis.

Short Line Bridge

I might be able to use a Lionel lift bridge at Prescott, but I need to know if the MTH double stacks will go through before I invest. The other two will be scratch built.

Attachments

Images (2)
  • 261_0915
  • TRAINS_1275

Nice looking bridges there Elliot, I can't wait to see your full layout, I hope you put together a video! Everytime I see pictures I am just scratching my head wondering how you do all that. Do you know anyone who has a Pratt Bridge, I know the length, width, and height. But I have been looking for measurements of the deck side rails and the top rails, then the angle sizes. I can't afford one right now, but I think I can build one out of a bunch of wood I have.

;
paul 2 posted:

Today I finished up table three. Got it painted, leveled and bolted to table two and the wall. I had to make up a couple of blocks to go under two legs. Old basement I did not realize how bad the floor dropped toward the drain. Once the paint dries on them I'll place them under the legs. I made them long enough so the next tables legs will rest on them too. Right now I am hoping the floor goes back to level floor when I build table four. For me this is my stopping point. Heading for York on Thursday so for the rest of the week I'll run trains and make my wish list, actually my gotta have it list for York. Couple of pics of table three...........Paul


Paul:

Your bench work looks GREAT! Taking the time to carefully level the tables now will save you a lot of headaches in the future.

Randy, once again thanks for the compliment. I learned early that level is better especially where the tables meet. With longer ridged engine frames bad track work shows up more so. Still have a few tables to do. On a humorous note I am building the tables like the movie Field of Dreams. By that I am hoping a track plan will come to me like a light bulb going off.  It's not that I don't know what I want other then a switching layout. I just have not laid anything out.....................Paul

imageI recently purchased the small Lionel Grand Central terminal and I love it! The light inside is nice, but I felt that the outside of the station needed some more light on it. So I purchased some mini led spot lights from Wehonest on Ebay. The lights all work off of two AA batteries. Everything looks good except for one light that is dim. I have ordered some more lights and contacted Wehonest about the one dim light. I think the effect with the lights looks great. What do you think?


IMG_0643

Attachments

Images (2)
  • IMG_0643
  • image
Last edited by N5CJonny
Carey TeaRose posted:

Finally found the material I had been thinking of for the corners of my Std. Gauge Art Deco-style layout table. I bought four 12"x12" pieces of black with heavy white veining marble, that will be wet-saw cut down and then laid and glued in at the 9"x11" table's now-open corners.

These on a 42" high, 5'6" wide, x 8'10" long layout table- with fluted (routered), castered table legs, that are to be painted and finished with a black lacquer look.

Pics shows two of the marble pieces mocked-up in situ. The 4'x9'" wood end pieces seen herewill be replaced with 4'x11" wood end pieces.

IMG_1346IMG_1345

Looks to me like a gale blown sea from above!

I finished setting the ballast in the yard area.  My next project is to build and install dwarf signals for indicating switch direction. Found some target heads supplied with red & green LEDs and resister on ebay.  Package of 10 included free shipping for $12.99. You can bid on them and get them even cheaper.  I felt the buy now price was a bargain already.  Great service and prompt delivery all the way from China.   Arrived within 10 days of order.   They are a perfect size for what I want to use them for.   Check it out:  JTD23 10 sets Target Faces - eBay

I will post more when I get them installed.
Dave

DSC07556DSC07557DSC07558DSC07559DSC07563

Attachments

Images (5)
  • DSC07556
  • DSC07557
  • DSC07558
  • DSC07559
  • DSC07563
Last edited by darlander

Moving right along with my layout.  I'm using any spare time I have now, because the upstairs renovation is coming in June. Still doesn't look like much.  I placed most of the accessories on the layout for fit and ease of use.  Now they need to be wired.  I also have to complete the wiring of the remainder of O22 switches.  I bought some building photos and mounted them to quarter inch birch plywood.  The catenary section in the front is removed for ease of working on the platform.  You can fit alot of stuff on a 4'x12' platform.    IMG_3091IMG_3092IMG_3093IMG_3090

Attachments

Images (4)
  • IMG_3091
  • IMG_3092
  • IMG_3093
  • IMG_3090

Add Reply

Post

OGR Publishing, Inc., 1310 Eastside Centre Ct, Ste 6, Mountain Home, AR 72653
800-980-OGRR (6477)
www.ogaugerr.com

×
×
×
×
Link copied to your clipboard.
×
×