
Some really nice weather in NY today and home from work early so I set up shop next to the deck with some music and started chopping away at the tortoise connectors. 1 down, 12 to go.


With a late start because the wife asked me to help her with the taxes I didn't get started till late afternoon. The funny thing is that something you think will be a simple start forward project to work on isn't. I have a plug up high on the wall and decided to put one in down below it under the height of the table. That way I could continue the backdrop down to the electrical panel. Well got the hole cut for the new box. Opened up the box on the wall and I was able to poke out the plug on the bottom of the box. I started to feed new wire through it and every time I hit a snag. Took me forever to figure out what was wrong. Come to find out there is a cross brace running behind the paneling. With a flat blade bit I made a slot in the paneling and was able to get the wire through down to the new box. So after dinner I'll get that hooked up.........Paul
I had the Best Birthday Ever yesterday!
brwebster posted:On the weekend I added Cruise Commander to my faithful old E6 Atlantic. I took advantage of all those extra pinouts to add an LED headlight.
In celebration, it was an all Pennsy steam night on the new layout. I swapped out several engines but always had 2 trains running simultaneously on the single mainline. For added excitement, one train would be diverted onto a reversing loop line which would require manually throwing 4 or 5 switches.
Bruce


Bruce,
I really like your long runs and sweeping curves. I envy your space. What are the dimensions of your room?
Dave
Made a template for the Menards American Power and Light building:

Then I got my foundation done from my upper cityscape/ lower passenger station:
I moved my mock buildings to the upper level to get an idea of what it will look like Not too shabby, if I do say so myself!
Attachments
Images (3)
Looking good Chris, I like the upper building area, never thought of something like that. I take it the over hang will be part of your passenger station area?
Congratulations gang! Page 200
Frankly, I'm surprised that nobody mentioned it until now. I saw it roll over the other night. That's quite the milestone, and it's been over 3 years in the making. There's another one coming up quick, and that's a quarter million views! I still say this is the best topic on the forum, and it's because of all of you!
Back to the business at hand.
My layout continues to be neglected, in favor of putting the club layout back together. Up until today, it has been about getting the pieces off the floor and up on their legs. Kind of like turning all the pieces up when you do a puzzle.

Today we started to bolt things back together after verifying the positioning. We only get one chance to get it right. There's no moving it once pieces are connected. The trestle corner is the anchor section to the whole layout.

The day ended with the Stone Arch Bridge propped up on boxes on top of dollies. Nobody breathe!!! It still needs to go up a little to connect up.


We'll be back at it Monday. Maybe I'll actually get something done on my own layout over the weekend.
Attachments
Images (4)
I have spread this project out over a long period, working at it when the mood hits me. This is a pair of 2RS Pennsy B1 switchers in brass. Basically, today's session started by roughing in a wiring harness that connects 4 roller pickups to a reverse/lighting board. Then came mounting the board and dressing the harness. The rear B1 took some manipulating to insure the shell would install without interference. The tether required 2 sets of 4 pin connectors which I admit is far from invisible. I might look around for alternatives, but for now they work to transmit power from track to motors and lights.

After putting the chassis' through multiple trials, the bodies were fitted. The black paint is simply a base coating, to be covered with Brunswick Green later on. I'm far from done here.

Bruce
I took photos of the six cars I have created for my pickle plant branch....and will probably post those next week....the last two new ones are a shorty RPO and a weird combine coach/caboose. I want a unique loco to work this branch, and I am having no good ideas...if there was a scale three rail Porter available, or a small double-ender similar to the K-Line version, or ???? I have a Marx-based steam dummy, but it is lettered for the main road, and not for the pickle company.
Big_Boy_4005 posted:Congratulations gang! Page 200
Frankly, I'm surprised that nobody mentioned it until now. I saw it roll over the other night. That's quite the milestone, and it's been over 3 years in the making. There's another one coming up quick, and that's a quarter million views! I still say this is the best topic on the forum, and it's because of all of you!
Back to the business at hand.
My layout continues to be neglected, in favor of putting the club layout back together. Up until today, it has been about getting the pieces off the floor and up on their legs. Kind of like turning all the pieces up when you do a puzzle.
Today we started to bolt things back together after verifying the positioning. We only get one chance to get it right. There's no moving it once pieces are connected. The trestle corner is the anchor section to the whole layout.
The day ended with the Stone Arch Bridge propped up on boxes on top of dollies. Nobody breathe!!! It still needs to go up a little to connect up.
We'll be back at it Monday. Maybe I'll actually get something done on my own layout over the weekend.
Elliot,
What is the status of the toy train division? Will everyone be in the same room?
Dave
Dave, there are still some of the toy division layouts over at the chimneys building, and they'll probably stay there until the big layout is fully assembled. Right now the new place is all one big open space, but there are plans to put up a few partition walls. Key layouts from the toy division and other displays will be located around the walls.
darlander posted:I really like your long runs and sweeping curves. I envy your space. What are the dimensions of your room?
Dave
Dave,
Thanks for your compliments. The room is T shaped, roughly 30' by 24'. The hip walls intrude a lot, cutting room width to 11' and 9'. There wasn't the configuration for anything but an around the wall layout, which suits me just fine. Even with the board curves, there are still elements of the layout that will need compression if I intend to shoot for realism. So far, it's been a really fun build.
Bruce
Over the past few days I got a bit accomplished. Moving the plug took a bit more time then I had thought. Plus these old houses do not leave you a lot of wire to work with either. Had to drill through the paneling halfway down because of an unexpected cross brace behind the paneling (don't know what happened rest of my words ended up at the bottom of the pics)


so I could thread the wire down to the new plug. Once I did that I got the final piece of Masonite on the wall. Had to cover the old box with a solid plate cover and it stuck up a bit so I added some spackling to the edge to make it a bit smoother where the edge was. Got paint on which I let dry over night. After I did that I put the plywood on the second table. Pics of the progress.......Paul
Attachments
Images (7)

Today I finished moving my sump pump. When the previous owner added a pit, they put it 6 ft from bottom of the steps. I moved it to under the steps and sealed the old one.
Now I can continue finishing the sub floor and new landing.
Schnucks posted:Today I finished moving my sump pump. When the previous owner added a pit, they put it 6 ft from bottom of the steps. I moved it to under the steps and sealed the old one.
Now I can continue finishing the sub floor and new landing.
Yes, but did you move it on a depressed-center flatcar? Enquiring minds want to know! ![]()
Mitch
I made the front support wall for the upper street. My inspiration came after seeing Ingenerio's build thread! I also added some internal bracing for the street pieces, and put a coat of primer on the station wall.

I'm still not sure what to do with this corner? I scribed a line for possible trimming, but haven't set anything in concrete yet. Any suggestions?
Attachments
Images (2)
not a layout, but more like a diorama scene for our upcoming wedding reception. We will have a only small two tier cake on the round 60" cake table, so we are adding a 42 curve circle of Std. Gauge track, an engine and two Blue&Silver 300 series passenger cars, plus some Barclay folks including a Bride, Groom and Preacher, a litho station, whistle station and litho church.
Chalked a 48" circle sitting in a 48" square on the ping pong table and set up the pieces.
After seeing this mockup, I decided it would be better to have a square instead of a circle.
With the four corners now available, one front corner can have the whistle station accessible for guests to try with a Barclay policeman, "Officer O' Doul" with his hand raised next to printed instructions. The other corner is for the RailKing RR Crossing double light, and maybe a seated Barclay couple. The two back corners can hold the needed two transformers.
 Scenery has begun on my layout. I have been putting this off, but dang, I actually enjoyed it. Granted I am no master like some of you, but it looks ok to me. The abandoned cabin belonged to my dad when he was a boy. The post war Lionel switcher runs like a top, on a separate loop, it's just posing for the pic.
Attachments
Images (1)
I have a question. I need trees, suggestions on where and what brand? I live here in North West Florida, we have oak trees and pine trees. I would like to use those two species.
What a great idea , Carey ! I absolutely love it !!!!
Mike


Because it's Easter it was a short day but I got the backdrop done, After it dried I pushed the second table into place and doing the final leveling. I have them clamped together and once I get some more bolts I'll bolt them together so they don't move and run some screws along the back side into the paneling to hold them against the wall. This gives me for my first area 16' X 42 ". A couple of pics.............Paul


Attachments
Images (3)
I decided to switch one conventional loop on my layout to DCS. Also ran trains and if I have time I'm going to I'm going to post a video on YouTube!
Bruce, Great job on the B1s. One of my favorite engines. Keep us posted on your progress.
Mr Union Pacific posted:I have a question. I need trees, suggestions on where and what brand? I live here in North West Florida, we have oak trees and pine trees. I would like to use those two species.
Any brand of tree should work fine (e.g., Woodland Scenics, Scenic Express, etc.); they all look okay. You can either buy their finished trees or tree-making kits.
When it comes to deciduous trees like oaks, I prefer to make my own because it is much cheaper than buying, it is easy to do and results in a more distinctive looking tree or stand of trees. I tend to buy my pine trees because I don't need many and think it is harder to make homemade creations look good.
There are lots of "how to" videos on YouTube and elsewhere. I happen to use Dave Frary's methods, but I have seen great results from other people as well. If you are set on buying, the videos are still useful because they offer great pointers on how to use size and placement to create the right perspective and a great looking scene.
Mr Union Pacific the one source of hardwood trees is Scenic Express and they carry Super Sage tree kits. As far as I am concerned these are the most realistic looking hardwood trees I have ever seen. My other source for pine trees is The Scenic Factory http://www.thescenicfactory.com/ These pine trees are made with a tapered wooden dow rod with a treated fern leaf structure that look amazing. Check them out on You Tube and decide four self. I know they are a little pricy but compared to plastic tree structures of the other tree kits I think they are worth the money. I have a lot of the plastic tree structure trees left from my old layout and they will be put on the back of the layout for fill in so they can't be seen as well. I buy the kits vs. buying pre made trees and I asked the owner at The Scenic Factory and he sell just the fern leaf in bulk. You could taper some dow rod yourself on a belt sander paint them brown and press in the holes to glue in the fern structures and you have made your own very realistic pine trees.  Choo Choo Kenny
 ![]()
At this phase I've learned that getting back into the hobby has brought my soldering skills back up to par if nothing else. Making an AIU common wire is sooooo much fun
Hopefully get the tortoise motors fully wired today. Have a second AIU coming this week.
Attachments
Images (3)


It was a very busy week for me, last week, to say the least! Lots of rehearsals and gigs on top of my private teaching load. No work on the layout at all. I think I ran trains last Monday for about 10 minutes.
I did manage to pick up my Williams by Bachman Virginian Trainmaster from my repair guy this past Saturday after one of my rehearsals. Even though this engine was bought new ( from a Forum sponsor ) and a motor burned out after a couple years with very little run time, I didn't want to go through the hassle of sending it back to WbB for repair or replacement. As it is, I only paid 20 bucks for the repair ( by a real original Williams tech and designer ) and got to see an astounding collection of locomotives. My repair guy, Frank Vacek, is the guy who designed the Williams scale hudsons. He worked for Jerry Williams for many years. He has a lot of Williams prototype models in his collection and it was a thrill to see them! Frank does great work!!! AND he's a very nice guy!!!
I did test the Trainmaster as it pulled a 15 car freight around the layout a few times .... which is all I had time for. It was great to see her run again!!![]()
![]()
Mr Union Pacific posted:I have a question. I need trees, suggestions on where and what brand? I live here in North West Florida, we have oak trees and pine trees. I would like to use those two species.
Mr. UP - Trees are expensive new. Although I have bought new ones, I get some great deals on used trees at train shows .... especially smaller community train shows. I've bought a bag of 10 pine trees for as little as $2.00. I have also bought trees at thrift stores such as Salvation Army .... actually I bought about what I estimate to be $250 - $300 worth of Woodland Scenic and Knoch ( sp ) trees, pines - fall - and shade trees, for $30.00 brand new.... bags/boxes never opened. I have a friend who checks thrift stores regularly and texts me when he finds something train related. I have gotten some great deals on scenery items this way. You might check into your local thrift stores or community trains shows. Used trees can look as good as new depending on where you place them on your layout.
IMHO - Woodland Scenics has some great trees as does Knoch. Scenic Express also has great trees.
Got some bench work done for the expansion.
First picture is the control panel which needed expansion to accommodate the Right of Way transformer which replaced a couple of Z-1000 bricks.

This is looking along the long side of the expansion. If you look on the floor you see some bridges and green tape that mark where the entrance corridor is and where the rest of the framing needs to be done. I will span the opening with a double and single bridge not the ones pictured.

From the stairway side entrance.


Attachments
Images (4)


Been waiting on that pic to see all of those Miller signs for along time, very Nice, Paul,
I like the orderly , crisp looking town!!!!!!!!!!!!
Today I anchored the tables to the walls so there is no movement. Brought somethings down and placed them on the table. Wife was happy because some were in the living room. So now with two tables up I can start to figure out my track plan in that area. I made the table height at 42". Gives me more headroom to work under there when I start stringing wires.......................Paul
arrsd90 posted:Been waiting on that pic to see all of those Miller signs for along time, very Nice, Paul,
I like the orderly , crisp looking town!!!!!!!!!!!!
Wait to the expansion gets along, I have at least 15 -20 more Miller Signs to go up.
The section that abuts the mountain will be three levels filling in the 9' x 66" area. The long leg is 16' x 42".
 Sitting back and relaxing just watching trains run after a long day of turnout wiring. Have my Lionel BNSF ES44AC pulling some coal cars and a couple tankers.
This might be the first time since starting the layout last year that I'm actually sitting down and enjoying everything instead of a quick 15 minute run. The new chair helps a ton vs standing.
Attachments
Images (1)
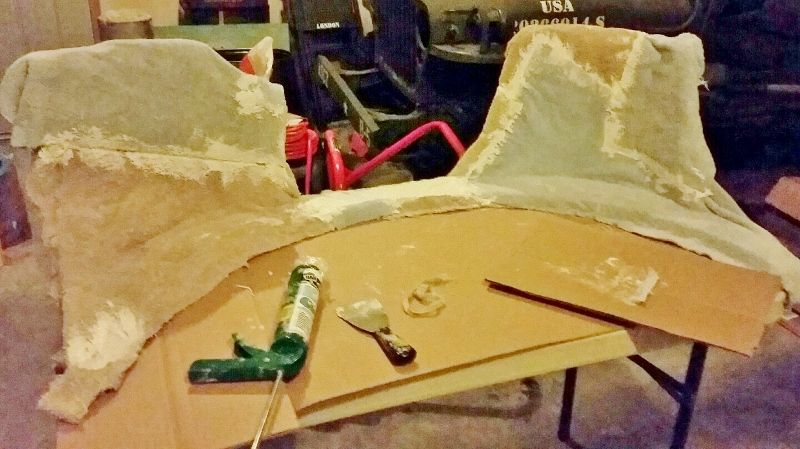
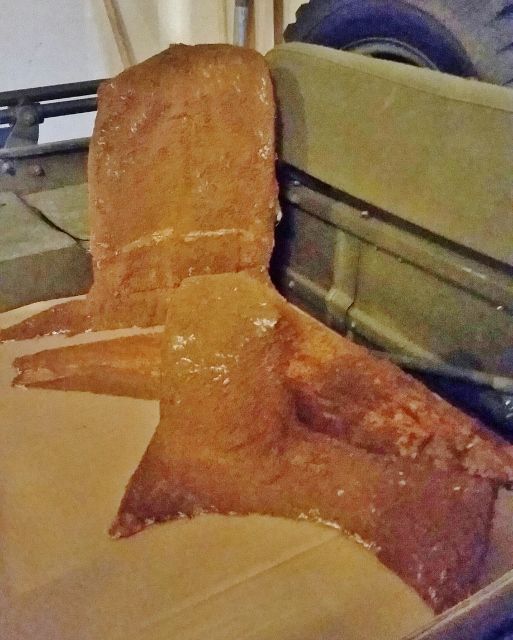
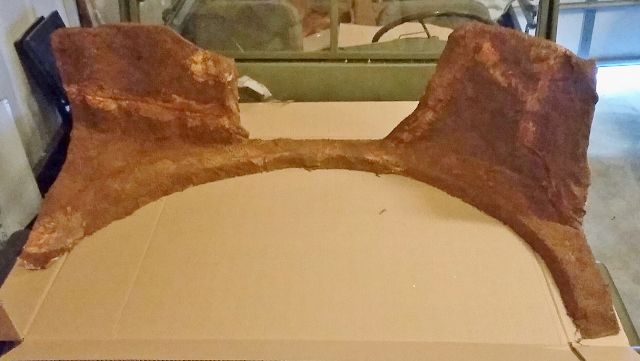
I have been busy with some terrain forms for the back corners. They're actually to hide the actual right angles for the inside of the room, and will all be covered in ground foam, trees and puff poly balls with ground foam as well. You won't easily be able to make out the shapes Once they're complete and installed on the layout.
I tried to do a new technique I wanted to try from a 2013 Model Railroader article on using old towels coated in household caulk. It didn't turn out exactly as easy as the author said it would and old towels of course soak up a lot of paint.
These will have to sit in the garage for another day or do while they dry as it's not exactly hot around here right now..
A lot of back shop work was completed today by the Great Northeastern Railway shop staff. My son Chris is working on masking and painting further cars for the circus train. I made some progress on some LED light stanchions for the Mt. Randolph yard area. Chris also installed a lighted drumhead on "Hayes", the Blue Comet observation car. More photos will follow as projects are completed.
Attachments
Images (1)

So far, I have only repaired, by riveting in place a new part, the valve motion on a Marx #1829 Hudson that arrived damaged in a set. I then looked for and found a Lionel 0-8-0 engine I'd misplaced and that I had thought about kitbashing into an inspection engine or a Mikado. I'd really rather use an "American", 4-4-0, for an inspection engine so am mulling that over. The inspection engine will involve mounting a large clerestoried passenger body over the front of the boiler, with a widened, stepped passenger compartment down to the pilot.

This morning I took measurements for tables 3 and 4. So off to the depot to get the wood and bolts, nuts and washers.............................Paul
Enjoyed listening to 4 chuffs as I ran my PRR M1a with 12 reefers and N6b cabin, and then my Decapod with mixed freight and a N5 cabin. I also decided to experiment again making evergreen trees basically using a drill to twist wire to incorporate various things to form a basic evergreen. Here are a few pics of my attempts before I add some green foam to flock. I need to experiment more and practice. I can always hide the goofs in the background, and a little squinting might help as well. I tried a poly green twine for a couple. One of those was done pulling the twine fragments apart a little and another with aggresively combing with wire brush. I tried using traditional twine that has stiffer branch appearance and when colored and flocked might look ok. The light green version is furnace filter and that might be better suited to back ground filler. Needless to say, this part of rr modeling is not my strong suit, but I enjoy experimenting.


Attachments
Images (6)
Add Reply
Sign In To Reply
