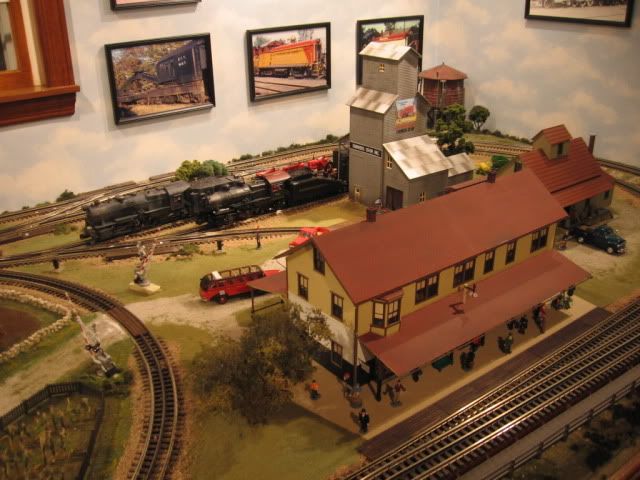
Apples55 posted:
mike g. posted:

Apples Nice looking freight yard, I think the tower and parking lot look just wonderful!

Mark Boyce posted:

Paul, I'm glad you got the wiring corrected!  The tower looks mighty good!

Mike & Mark;

Thanks for the kind compliments. The switch tower is really something - I got it from Crescent Locomotive Works at one of the Yorks last year. I originally intended it for the entrance to my engine yard, but it ended up in the freight yard, so I had to order another one from Dave at October York!!! It is very detailed. One of my favorite features is that there are moving switch levers in the tower and a sample board that actually lights up. This isn't the greatest picture, but you can get the idea.

IMG_0950

that looks great,  That is the tower I asked Dave to make for me about a year before he brought it to York  The tower is the B&O tower in Halethorpe MD I was looking for a tower and he made 4 of them for me and he started to sell them I think he does a awesome job

Last edited by fl9turbo2

When I get home from my law office this evening, I'm going to work on some scenery on my layout and tinker with my various Lionel post-war accessories. I want to get them running well to entertain my grandchildren and other relatives and friends for the upcoming holidays.

Does anyone know a good and economical way to take videos from the train engineer's point of view as trains run through a layout? Do you strap or tape a Go Pro camera to the front of a locomotive?

I re-aligned the spurs on the agricultural section of my layout to accommodate the Woodland Scenics H&H Feeds that arrived yesterday.  As they were, the structure would have had to face the other way and all of the neat details on the front would have been hidden.  This required moving my dwarf signals and the drops that power the spurs.  Just when you think you're done with the hidden stuff... Now all three structures can be seen to good advantage.  I find it curious that the light in the loading area of the feed store looks bright yellow in the image, as it looks decidedly orange to my eyes.  Yet the other colors are rendered well.

Now my grain elevator and granary look rather bare.  At a minimum I need some dry transfers on them and probably weathering on the roofs.

IMG_3807

Attachments

Images (1)
  • IMG_3807
Arnold D. Cribari posted:

When I get home from my law office this evening, I'm going to work on some scenery on my layout and tinker with my various Lionel post-war accessories. I want to get them running well to entertain my grandchildren and other relatives and friends for the upcoming holidays.

Does anyone know a good and economical way to take videos from the train engineer's point of view as trains run through a layout? Do you strap or tape a Go Pro camera to the front of a locomotive?

Velco is a common way to attach a camera or phone. You might want to choose a car without a lot of play in the trucks. I guess a fish belly flat's low center of gravity might help stability too, but there are also apps now that can recreate a "steady-cam's" look. 

I think go pro uses a fisheye lens already, but you can buy them cheap, like "dollar store cheap". Not to bad from what I saw; worth a buck for sure because just strapping one on top doesn't pan it.

 Without a fisheye, you lose the track in curves.  To get fancy, attaching to a truck would pan better as the truck turns more, and attaching to pan by linkage arm to a truck that's ahead of the camera would pan best as it would move sooner. You could even work throw ratios into the linkage if you wanted.

Al Galli posted:
Mike & Mark;

Thanks for the kind compliments. The switch tower is really something - I got it from Crescent Locomotive Works at one of the Yorks last year. I originally intended it for the entrance to my engine yard, but it ended up in the freight yard, so I had to order another one from Dave at October York!!! It is very detailed. One of my favorite features is that there are moving switch levers in the tower and a sample board that actually lights up. This isn't the greatest picture, but you can get the idea

When I try to access the web site I get "bad key"  Is there an active web site?

Al;

Here is the web address - it works for me...

http://www.locomotiveworksinc.com

Just an FYI, the switch tower doesn't appear on Dave's website. I saw it at his York display, and made sure I had a picture of it when I saw him to order a second. fl9turbo apparently was the person who requested the model and gave some helpful info on the inspiration.

fl9turbo2 posted

That is the tower I asked Dave to make for me about a year before he brought it to York  The tower is the B&O tower in Halethorpe MD I was looking for a tower and he made 4 of them for me and he started to sell them I think he does a awesome job


fl9turbo2 posted:
Apples55 posted:

IMG_0950

that looks great,  That is the tower I asked Dave to make for me about a year before he brought it to York  The tower is the B&O tower in Halethorpe MD I was looking for a tower and he made 4 of them for me and he started to sell them I think he does a awesome job

fl9turbo2... thanks for the background on the tower. I agree, Dave does wonderful work. I also have his O-72 curved station/platforms and he is making me a pair of O-84 platforms to go on the other side of my tracks.

RETINPA posted:

I re-aligned the spurs on the agricultural section of my layout to accommodate the Woodland Scenics H&H Feeds that arrived yesterday.  As they were, the structure would have had to face the other way and all of the neat details on the front would have been hidden.  This required moving my dwarf signals and the drops that power the spurs.  Just when you think you're done with the hidden stuff... Now all three structures can be seen to good advantage.  I find it curious that the light in the loading area of the feed store looks bright yellow in the image, as it looks decidedly orange to my eyes.  Yet the other colors are rendered well.

Now my grain elevator and granary look rather bare.  At a minimum I need some dry transfers on them and probably weathering on the roofs.

IMG_3807

As noted the Grain elevator can be made look a bit more friendly.  I used Walther's decals from another kit and fabricated a paste-on billboard.

TedW posted:

Can’t wait to see that thing chasing NBK down the track!  

With her eyes closed all the way!   

RSJB18 posted:

Might be a bit top heavy.....No???????

Yeah, it doesn't work when pushed by a train.  Here's some brief test footage pushed by hand:

For video, something lightweight like a small GoPro would be ideal.   I'll do an "Under the Hood" on the Trainpod later on...   

Mitch 

Attachments

Videos (1)
GEDC0011

                                                       slowly getting there....

   will be starting to rough in the upper level next, from the black boards to the ceiling....

  in spring, the 4 panels between the shelves and the black boards get cut out to the   12'x30'addition,  a 25' x5 ' wide yard goes in this area.......                            

                                    the upper level views from the upper level....

   from the black boards up will be all mountainous mainline...some what like this.....

Attachments

Images (16)
  • mceclip0
  • mceclip0
  • mceclip1
  • mceclip2
  • mceclip3
  • mceclip0
  • mceclip0
  • mceclip1
  • mceclip1
  • mceclip2
  • mceclip3
  • mceclip4
  • mceclip5
  • mceclip6
  • mceclip7
  • mceclip8
Last edited by briansilvermustang
Mark Boyce posted:

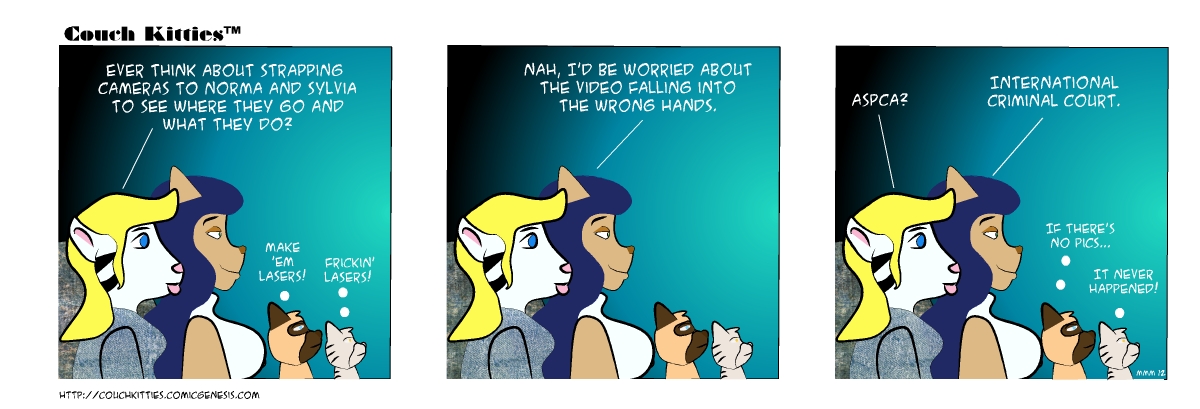
Oh now I get it!  I had no idea what that thing was hanging from the cat's neck in the photograph Bob first posted!  Still, it seems an odd shape for a camera to me.  Shows I don't keep up with the latest items, or maybe this thing isn't the latest, and I'm a couple decades behind.

Kinda lost some of the meaning with the post falling on the top of a new page. Just havin' fun with Mitch.

           here is a general idea of this part of the layout, the mountain level is from the

    black boards up to the ceiling.  the supports for this level will be hidden in the mountains.

       the floor level is not shown....the upstairs level will not have that wall framed in.....


            you will see the mountain level from the raised floor on the upper level....

          you will also be able to see portions of the mountains from the floor level...

                          the floor is raised 36" down the center of the upper level......

                          the mountain level will wrap around these 3 walls....

               hopefully will get basic mountain level framed in by this weekend....

Attachments

Images (5)
  • mceclip0
  • mceclip1
  • mceclip2
  • mceclip3
  • mceclip4
Last edited by briansilvermustang

It took me a second to stop wondering why the cat had a "Life Alert" button

If you would just mount it on a slightly heavier solid metal truck instead of stamped metal it would have worked  

  I see you've found out how stable a single truck can be after the micro-stage coach flatcar and decided to push the envelope That might not have worked here, but it's really amazing how well they stay planted isn't it. I built a mini crane and was surprised how well it works. Other than boom swinging accidents (just like all of them) it never tips, stringlines, or climbs rails. I just added a plate type electro coupler onto a riveted coupler shanks truck to get two couplers on one truck.

Hey, that's a way to get a slightly lower center of gravity; PW plate couplers they hold the axle; or four wheel pilot trucks whos's wheel sets could lower the C.G....& the camera, more. Early wheels are not Fast Angle and neither are most pilot wheels. They will ride with less axle twisting. With no sideframe on plate couplers, holding the wheels on?????  A tiny "toy wagon" spring nut & a thrust washer?

Even with a go pro I think you'll need the stability of a car and at least one more truck. A Schnabel? 

Or better, since this is not bound by looking like a rail car: a heavy pilot wheel and trailing wheel set, hinged off a center camera truck. In a curve, as an articulated unit, the pilot/ trailers would serve as outrigger weights (and there is near room for 2 lbs of stacked flat wheel weights). So, in a curve both guide trucks moving inboard and in relation to the center truck would help counter the  ( Ex-) centrifugal force tipping the camera to the outside in curves; as well as fore and aft stability.  You still have to lick staying upright in straights. Hmmmm... a metal bar and an L-bracket?

th-120

..Too bad we dont run "Outside 3rd rail" that fence would come in handy for Mitch's Brownie ..Bet that lens weighs more than a phone or go-pro  

Attachments

Images (1)
  • th-120
RSJB18 posted:
Mark Boyce posted:

Oh now I get it!  I had no idea what that thing was hanging from the cat's neck in the photograph Bob first posted!  Still, it seems an odd shape for a camera to me.  Shows I don't keep up with the latest items, or maybe this thing isn't the latest, and I'm a couple decades behind.

Kinda lost some of the meaning with the post falling on the top of a new page. Just havin' fun with Mitch.

No it wasn't that, I was following along message by message.  I just never saw one of those (cameras?) before.  What is it called?

Got my needed supplies from Home Depot. Paint I was running low on, drywall screws, foam applicators and a few 1X4X8's. Also my package from Scenic Express arrived today. I added a few things to just getting the earth color I needed. Now I have pretty much what I need to get a number of things started and completed. Pics.......Paul

DSCN0963DSCN0964

Attachments

Images (2)
  • DSCN0963
  • DSCN0964


               hopefully will get basic mountain level framed in by this weekend....

Brian, that sure is going to be a lot of work for a weekend project. I sure hope you get it framed in as I cant wait to see it in some pictures! I hope you don't to forget to take care of the GF and inspector! LOL

mike g. posted:


               hopefully will get basic mountain level framed in by this weekend....

Brian, that sure is going to be a lot of work for a weekend project. I sure hope you get it framed in as I cant wait to see it in some pictures! I hope you don't to forget to take care of the GF and inspector! LOL

Mike, Mike; Brian is up to the challenge!!  He has to do it to keep the GF and Inspector happy!!!  

Mark Boyce posted:
mike g. posted:


               hopefully will get basic mountain level framed in by this weekend....

Brian, that sure is going to be a lot of work for a weekend project. I sure hope you get it framed in as I cant wait to see it in some pictures! I hope you don't to forget to take care of the GF and inspector! LOL

Mike, Mike; Brian is up to the challenge!!  He has to do it to keep the GF and Inspector happy!!!  

Mark, I guess your right, as Brian did already buy the beer and Lumber!

Yesterday, I worked on a few construction projects. One project has me filling in the deck openings on the lower level. I still have work to do in aisles 2 and 3, but I'm concentrating on aisle 1 right now. Because the hidden yard is directly below, I want to have all the holes closed up, so I can paint the rails and ballast without worrying about the trains parked down there.

The area with the clamp on it is about 2" lower than the track. I'll be using foam to fill in the vertical gaps and create the river bank.

IMG_7736

I put in the last section of backdrop on the south wall. There will be a second layer of backdrop in front of the siding in the back which will start behind the grain elevator (those two 1x4's sticking up), and continue to the right where it will wrap around the big helix. I have to prime and paint the new section before I can do that.

IMG_7734

Behind the loose piece of Masonite is another track. That track will be in what will amount to a tunnel. I have to secure this piece, and then there will be a road and a bluff that will blend it together.

IMG_7735

I have a similar situation over in aisle 2. This is what it looks like now...

IMG_7737

here it is with the Masonite wall standing. Again, there will a road (US 61) and a hillside covering these tracks. I'll have it so I can lift the road off and get in there if I have to.

IMG_7738

Today I spent my dialysis time working on naming signal heads for JMRI and more reading on it. Time to head downstairs to keep working.

Attachments

Images (5)
  • IMG_7736
  • IMG_7734
  • IMG_7735
  • IMG_7737
  • IMG_7738
mike g. posted:

Elliot, you sure are a go getter! First you do Dialysis, and working on train stuff at the same time. I get that I did the same thing during chemo. But then you get home and your still going. You are what most of us could keep up with. Thanks for being you and sharing!

You are right Mike!  I'm supposed to be healthy for early 60s, but I'm too tired from raking, blowing, and hauling leaves today to do anything.

Thanks Mike and Mark.

I spent a couple hours downstairs after that post. I got the other two (1 & 2) backdrop supports in, and finished securing the other two (3 & 4). They had just been hanging there with only their top ends screwed to the upper benchwork. 5 & 6 have been in place since I rebuilt the helix supports more than a year ago. Clearance is going to be tight for the front track. I took out a couple track screws and realigned the track slightly, and that's why I wasn't in a hurry to ballast that section.

IMG_7739a

In all honesty, my health has been more of a motivating factor than a hindrance. I want to see this thing more or less finished and have a chance to host operating sessions.

Attachments

Images (1)
  • IMG_7739a
Last edited by Big_Boy_4005

Add Reply

Post

OGR Publishing, Inc., 1310 Eastside Centre Ct, Ste 6, Mountain Home, AR 72653
800-980-OGRR (6477)
www.ogaugerr.com

×
×
×
×
Link copied to your clipboard.
×
×