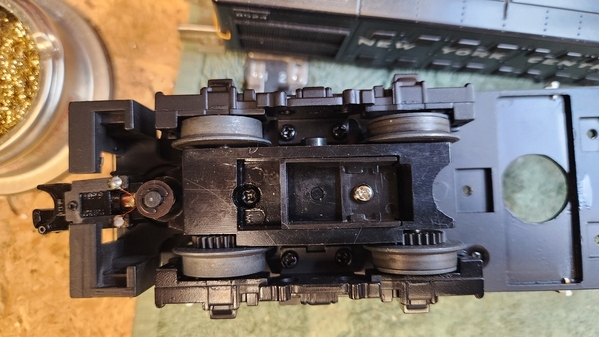
Inspired by @Sitka's #41 US Army switcher project, I just finished lighting this MPC-era Lionel Marines bunk car from 1984:

20240814_181139

20240815_021022

I used Evan Designs 3mm universal 7-19v "bulb" LED kits recommended by @WesternPacific2217. I mounted them "slip-fit" using sections of spray bottle tubing so they can be replaced. The tubes also allow for some diffused light inside the car. Fortunately, the arch-bar trucks were designed to accommodate a standard "snap-in" pickup plate. To reduce flicker, I added some car weights over the "pickup truck" end of the car.

20240815_171303

As Tom Bodett says at the end of his Motel 6 spots, "We'll leave the light on for ya'."

Attachments

Images (3)
  • 20240814_181139
  • 20240815_021022
  • 20240815_171303
@Bill Swatos posted:

Inspired by @Sitka's #41 US Army switcher project, I just finished lighting this MPC-era Lionel Marines bunk car from 1984:

20240814_181139

20240815_021022

I used Evan Designs 3mm universal 7-19v "bulb" LED kits recommended by @WesternPacific2217. I mounted them "slip-fit" using sections of spray bottle tubing so they can be replaced. The tubes also allow for some diffused light inside the car. Fortunately, the arch-bar trucks were designed to accommodate a standard "snap-in" pickup plate. To reduce flicker, I added some car weights over the "pickup truck" end of the car.

20240815_171303

As Tom Bodett says at the end of his Motel 6 spots, "We'll leave the light on for ya'."

Nice job Bill that is a much better look then the interior, a job well done Mark

Ceramic lighthouse from a friend's estate. A "model" I guess of a large, offshore structure. Scale....? Waterfront/coastal things always appeal to me.

DSCN7358

I wanted to re-detail it to represent a smaller lighthouse, such as can be seen around estuarial and riverine environments - here, at "The Gullet" of Dusty Bayou. The story is that it is actually disused, as the bayou was bypassed by a canal project, off-camera (trust me).

I'm not sure that the alligator at the door is not, uh, overkill. I may add some "keep out" signs and fencing one day. It's getting pretty crowded in Dusty Bayou.

I "re-scaled" the structure by getting rid of the little windows and adding a couple of 1:48 Grandt Line window frames, this side and the other. This resembles a larger lighthouse offshore in the Gulf south of Mobile.

DSCN7515

The door frame/door unit is also 1:48 Grandt Line, so I guess I have sufficiently re-scaled this to O or so. Ceramic is great to paint - porous and a natural-feeling substance. The entrance way is scratch built from HobLob basswood. My door knob looks more like a door blob. But, oh, well.

DSCN7492

Attachments

Images (3)
  • DSCN7358
  • DSCN7515
  • DSCN7492
@D500 posted:

Ceramic lighthouse from a friend's estate. A "model" I guess of a large, offshore structure. Scale....? Waterfront/coastal things always appeal to me.

DSCN7358

I wanted to re-detail it to represent a smaller lighthouse, such as can be seen around estuarial and riverine environments - here, at "The Gullet" of Dusty Bayou. The story is that it is actually disused, as the bayou was bypassed by a canal project, off-camera (trust me).

I'm not sure that the alligator at the door is not, uh, overkill. I may add some "keep out" signs and fencing one day. It's getting pretty crowded in Dusty Bayou.

I "re-scaled" the structure by getting rid of the little windows and adding a couple of 1:48 Grandt Line window frames, this side and the other. This resembles a larger lighthouse offshore in the Gulf south of Mobile.

DSCN7515

The door frame/door unit is also 1:48 Grandt Line, so I guess I have sufficiently re-scaled this to O or so. Ceramic is great to paint - porous and a natural-feeling substance. The entrance way is scratch built from HobLob basswood. My door knob looks more like a door blob. But, oh, well.

DSCN7492

Nice! Now you need a foghorn...

@coach joe posted:

@D500

How'd you get rid of the original windows?  My wife had gotten me this light house that may need some re-scaling and a solid rock base to add some height.

IMG_3613

Notice on the picture below of the original that the small windows are actually holes (this isn't really a bad model, as such ceramic things go); I stuffed them with heavy-duty aluminum foil wadded up, added some CA, then filled the remaining shallow hole with Bondo, then sanded smooth once everything was cured. I actually left the mid-height window hole on each side, then added a new larger window frame centered over it. Before that I painted the area around the original hole/window flat black to trick the eye.

Your windows appear to be a raised surface treatment. You could still use new window frames of appropriate 1:48 size, and also paint the area behind them to trick the eye, as I did. Removing some of your windows may be trickier, as ceramic is, by definition, really hard. A Dremel and abrasive bits (sandpaper type?) might slowly knock them down. You also might just "board them up" with basswood or styrene, just to change the look.

Filler (Bondo) may be needed. Then spray paint the walls with several coats of flat paint. That's what I did. It was really a fairly fun project that turned out better than I expected it to.

DSCN7358

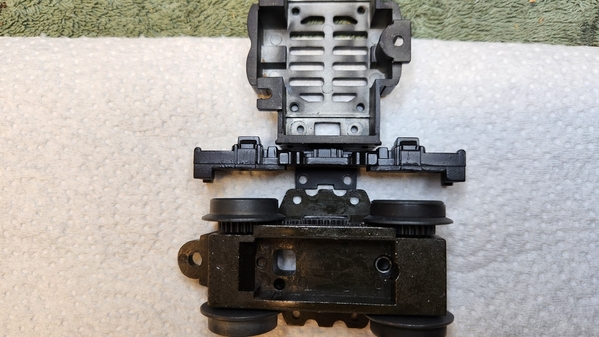
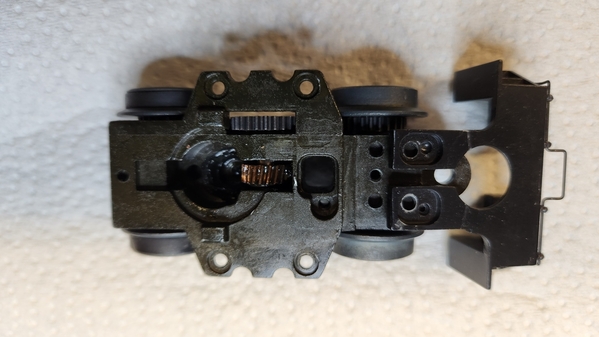
Started digging into my S2 switcher build. First up is to put sideframes and the pilot onto the rear truck. The engine was a Premier dummy that I'm repowering. The dummy trucks didn't have the worm drive and idler gears.

I sourced a Railking parts engine that happened to have one complete truck, and one without the frames. Easy right? I'll just use the Premier frames and pilot. NOT! The mounting holes are different on the two models.
The holes are close but don't match, and the Premier are top-mount, Railking bottom.

Not sure if I want to try and drill the truck out or just find another truck. And of course, MTH doesn't have the parts list for any of these on the website yet.

2024-08-18 10.09.49

The pilot has the matching holes but the holes in the truck are not tapped.

2024-08-18 10.10.39

This is the complete RK truck

2024-08-18 10.10.14

I also ordered jst-eh wiring harnesses from Ali-express for the ERR upgrade.

Bob

Attachments

Images (3)
  • 2024-08-18 10.09.49
  • 2024-08-18 10.10.14
  • 2024-08-18 10.10.39
Last edited by RSJB18

IMG_0945After having disassembled and modified dozens of passenger cars in my collection, I feel like an idiot for not figuring this out sooner.  Near the ends of most passenger cars there is an aisleway to one side and the windows will often have a handrail.  From now on, I plan to add this railing where appropriate because everything I buy is going to get “dinked with”.  I can’t help it.

Attachments

Images (1)
  • IMG_0945
@RSJB18 posted:

Started digging into my S2 switcher build. First up is to put sideframes and the pilot onto the rear truck. The engine was a Premier dummy that I'm repowering. The dummy trucks didn't have the worm drive and idler gears.

I sourced a Railking parts engine that happened to have one complete truck, and one without the frames. Easy right? I'll just use the Premier frames and pilot. NOT! The mounting holes are different on the two models.
The holes are close but don't match, and the Premier are top-mount, Railking bottom.

Not sure if I want to try and drill the truck out or just find another truck. And of course, MTH doesn't have the parts list for any of these on the website yet.

The pilot has the matching holes but the holes in the truck are not tapped.

This is the complete RK truck

I also ordered jst-eh wiring harnesses from Ali-express for the ERR upgrade.

Bob

Bob, what a bummer.  Some here have the skills to make this work.  I do not.  I think I would have to shelve it until parts are available or I found the proper engine to cannibalize.

@Mark Boyce posted:

Bob, what a bummer.  Some here have the skills to make this work.  I do not.  I think I would have to shelve it until parts are available or I found the proper engine to cannibalize.

I could too Mark, I just need to have the Harmon Shops at my disposal......

I was able to tap the hole for the pilot yesterday, easy stuff. The trucks are a different story. I'd have to butcher one or both sets of holes (frame and truck), to get screw holes that will work. Biggest issue is that the existing holes are just close enough that I can't drill new holes without the bit walking off into the existing. The tolerance left to right of the wheels is only about a 1/16" too so if I'm off just a little the brake shoes will hit the wheel.

Coupled with the fact that the frames have a different appearance from most 2-axel diesels. I'd wind up replacing them on both trucks if I mess one up. All of my 2-axel diesels have Bloomberg AAR style trucks. Alco used a truck designed by one of their engineers James Blunt, which is what MTH modeled.

So I'm searching for the correct truck that I can use instead.

Bob

@RSJB18 posted:

I could too Mark, I just need to have the Harmon Shops at my disposal......

Biggest issue is that the existing holes are just close enough that I can't drill new holes without the bit walking off into the existing. The tolerance left to right of the wheels is only about a 1/16" too so if I'm off just a little the brake shoes will

So I'm searching for the correct truck that I can use instead.

Bob

Yes, I thought of Harmon Shops! 😊

I hate that where the hole is too close to drill another.  🤦‍♂️

Last edited by Mark Boyce
@RSJB18 posted:

The trucks are a different story. I'd have to butcher one or both sets of holes (frame and truck), to get screw holes that will work. Biggest issue is that the existing holes are just close enough that I can't drill new holes without the bit walking off into the existing.

  • My possible solution to your aforementioned dilemma is as follows.
  • Buy a 4:40 tap and some 4:40, brass machine screws that are longer than the thickness of the material into which the existing hole is drilled (or 6:32 brass machine screws if the existing hole is larger than a threaded 4:40 hole). The drill size for a 4:40 is a #43 drill and a 6:32 is a #36 drill.
  • Enlarge your existing hole with the appropriately sized drill and tap the hole for the threads.
  • Using a small amount of Epoxy on the threads of your brass machine screw (I recommend brass for the softness of the metal which will become obvious in the next paragraph) and carefully screw the Epoxy-laden screw into the newly drilled hole unit the bottom of the screw is exactly flush with the surface of the material into which it is being screwed.
  • Let the Epoxy THOUROGHLY dry.
  • Once the Epoxy is dry, cut off the top of the screw as close to the surface of the material into which the screw was inserted. The brass screw is the best for a easier cut.
  • Using a fine-toothed file, file any part of the screw protruding the surface of the material into which the screw was inserted, so the cut screw is now even with that surface (again, the brass screw will be less resistant to the file.
  • You are now left with a surface into which to drill your new hole that no longer has an existing, encroaching hole in the way. The brass screw plugging the existing hole is also less resistant to the drill for your new hole.

Thanks Randy. Makes perfect sense. I'm going to try and find the right truck from MTH first. If not, I may give this  a shot.

Bob

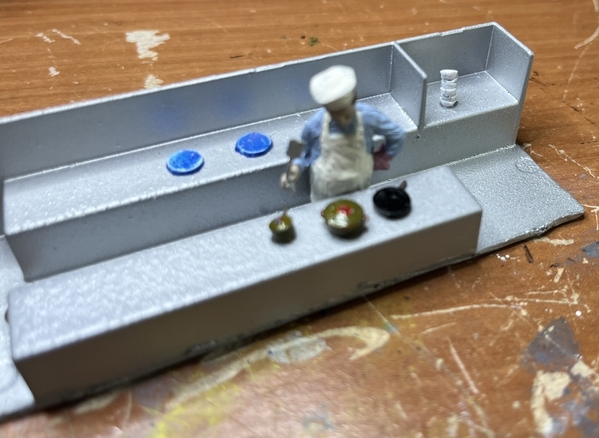
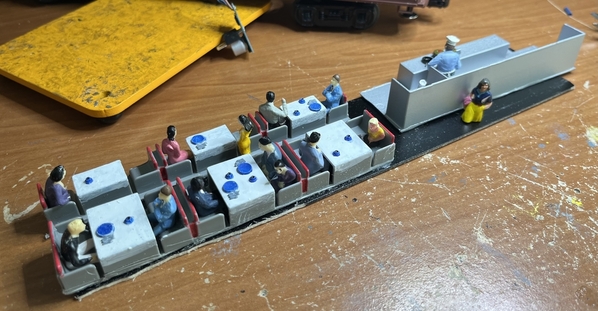
I’m still adding to the little passenger train consist that is led by my recently purchased PRR Doodlebug from Lionel’s 2024 Catalog.  Several weeks ago I showed my updates to my Lionel 9510 PRR Combo Mail/Passenger car.  I then purchased a NIB 19002 PRR Dining Car.   I bought a MTH dining car insert (all I could find) and did a lot of surgery to it. I cut out the cooking area, added an Arrista cook sans legs, and some pots/pans bought from Etsy. All of the pots/pans needed painted.  For the dining area I had to cut off half the tables on one side in order to get them to fit. I painted on white tablecloths, added painted dishes and coffee cups, and then legless seated passengers.  I bought an Arrista waiter, but decided not to add him since he’s much larger than the diners. The chef is by himself so he’s okay.  I added a lady walking behind the kitchen area to ‘show’ that you can get to that car from the Doodlebug that’s in front of it.  I put an LED light strip with a lighting regulator on the ceiling, some clear ‘glass’ and voila!

It looks decent when viewed at arms length  I’ll readily admit it pales in comparison to some of the dining car upgrades posted here.  My next project will be to populate a yet-to-buy PRR Passenger Car.

Update: I just bought a NIB Lionel 9515 Passenger Car on the bay.  I'll be starting that project in mid-September.


IMG_5481IMG_5483IMG_5486IMG_5484

Attachments

Images (4)
  • IMG_5481
  • IMG_5483
  • IMG_5486
  • IMG_5484
Last edited by texgeekboy
@texgeekboy posted:

I’m still adding to the little passenger train consist that is led by my recently purchased PRR Doodlebug from Lionel’s 2024 Catalog.  Several weeks ago I showed my updates to my Lionel 9510 PRR Combo Mail/Passenger car.  I then purchased a NIB 19002 PRR Dining Car.   I bought a MTH dining car insert (all I could find) and did a lot of surgery to it. I cut out the cooking area, added an Arrista cook sans legs, and some pots/pans bought from Etsy. All of the pots/pans needed painted.  For the dining area I had to cut off half the tables on one side in order to get them to fit. I painted on white tablecloths, added painted dishes and coffee cups, and then legless seated passengers.  I bought an Arrista waiter, but decided not to add him since he’s much larger than the diners. The chef is by himself so he’s okay.  I added a lady walking behind the kitchen area to ‘show’ that you can get to that car from the Doodlebug that’s in front of it.  I put an LED light strip with a lighting regulator on the ceiling, some clear ‘glass’ and voila!

it looks decent when viewed at arms length  I’ll readily admit it pales in comparison to some of the dining car upgrades posted here.  My next project will be to populate a yet-to-buy PRR Passenger Car.


IMG_5484

Nice work. I think it looks great.

Bob

Add Reply

Post
×
×
×
×
Link copied to your clipboard.
×
×