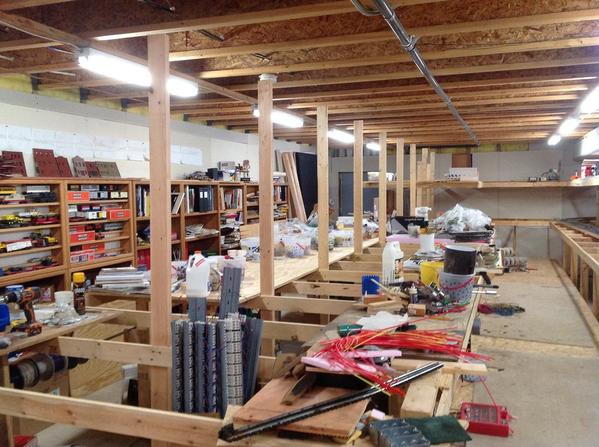
I am tired!! I seem to work hardest when Patrick comes over to help. What happens is, he does most of the assembly, while I run around cutting lumber and grabbing tools. It's a great arrangement, and the progress has been spectacular.
Just four weeks ago, there was no helix. Today it is about 2/3 done. Another half turn was added.
The flyover is now connected to the helix.
The 25' incline was also done today.
The new yard is taking shape.
Patrick is back again Friday. I've got to work fast.![]()
Thanks Rich.
As the scenes get a little further along, I'll post pictures of the real world locations that are being represented.
Thanks Rich.
As the scenes get a little further along, I'll post pictures of the real world locations that are being represented.
lease do! That is a very fun and interesting thing to be doing. I will look forward to it!
Elliott,
I was fortunate to visit enterTrainment in the Mall of America on my only trip to Minneapolis. In fact, I still have the flyer that I picked up. Your layout was a pleasant find and a good place to relax as I walked all 3 1/2 floors of the Mall.
Jan
Elliot,
Great job, can't wait to see the trains run on it!
PCRR/Dave
Lee, I haven't forgotten about posting pics of real locations. I just got a new computer and need to move my pics over, plus there's a bit of a learning curve with a new operating system and browser.
Jan, I'm glad you enjoyed your visit. Somewhere buried in all the junk is the guest book. It would be fun to see if you signed.
Dave, trains do run. The big problem is I don't have any working switches right now. That will be one of my priorities this summer. I took a count, and there will be over 130 on the lower level alone. I think the upper level will have around 70. Not all will be powered, most industries will have Caboose ground throws.
In the meantime, here is a video that was shot last summer. It isn't great, but it will give you an idea of the layout's size.
. . . I took a count, and there will be over 130 on the lower level alone. I think the upper level will have around 70.
Wow. I love people with ambition! 200 switches - Oh Golly Miss Molly!
At one time, I had maybe 25 of so switches on my layout (all remote - I figured with the effort required to put them in well I might as well wire them for remote control, too). But now I have only two, both operating only in anti-derail mode on reversing loops.
Elliot
Thanks again for the update, lots of progress. The helix has me intrigued as my club is planning one. If you are ever in Chicago come on by. Despite the flurries, spring has arrived here.
Best
Ray Marion
Yes Lee, sometimes simplicity is bliss, and there is part of me that wishes I has gone that route. But long ago the decision was made to go down this "track", hence the word nightmare in the topic title.![]() I've quietly been following your battles and triumphs.
I've quietly been following your battles and triumphs.
Ray, my wife and I have a trip planned for this fall, but in the opposite direction. Seattle, Portland, San Francisco, Salt Lake and Denver, a 3 week road trip. We may still go to Chicago though.
Below are some of the promised pics of the layout and the real world. This is Dayton's Bluff. Use your imagination to fill in the scenery. The bluff will cover the tracks where all those engines are sitting. It will be made of foam and easily lift off for access.
Some fresh pics of the progress. The Helix is almost at the top level. One more turn and it's done. The subroadbed is now connected to the working section of the layout. Patrick will be here in a few minutes. I'll post new pics tonight.
Attachments
No, Patrick is not laying down on the job.
I've got to get back to laying track on the helix, so we can finish construction when Patrick comes back on Friday. Still shooting for completion by the end of the month. Gonna be close.
Attachments
Patrick was here again today, and the helix has finally reached the second level. One more half turn and it's done.
From this shot it is actually difficult to see what was done today. The helix is getting too tall.
The two tracks had been running parallel up to this point where they begin to separate.
When the helix reached the fourth level, it became clear that in order to make the jump across the aisle to the top of the bookshelf, the outer track was going to have to make another 3/4 turn. That extension meant that there would have to be a crossing involved.
Here the inside track will go straight through the diamond, and pass between the 2x4's which make up the backdrop support. The straight leg of the switch leads to the Ford plant, which will run the length of the upper deck on the near side of the backdrop. The curved leg will lead to the Amtrak depot on top of the bookshelves.
The helix will end here, 8" higher than the deck that was just installed today.
My goal of finishing by the end of March looks like it will come up a few days short, but all in all not bad.
Attachments
Well, 54 days after we started, the helix is done. The last piece of track and all of the rough wiring is complete. Just for fun, I took an MTH Superliner car and turned it loose and let gravity take over. Pretty smooth run, top to bottom no problems.
The helix is topped out and the connection to the bookshelf is in.
The junction that allows the Empire Builder to get to the depot on the bookshelf.
The view from the inside.
Tomorrow construction moves to the section between the helix and the working section of the railroad. I have to cut the switch (middle right in the photo) into an existing track, and get the wye done.
Attachments
Wow! Impressive as anything I've seen here. Less than two months for all that. You should call it the Too Tall Helix. With two tracks, too. Excellent!!!
Thanks Mike, the more I look at that picture, the more it reminds me of jail cell. It did get a little "confined" in there toward the end.
Thanks Lee, that's quite the compliment. It is almost too tall.
Keep in mind that I did have help. Without Patrick it would have taken much longer. Having him do much of the assembly from the inside saved me a lot of crawling under.
Thanks Chad, nobody has ever asked about that before. That is a technique that I came up with many years ago, for use in areas that will be hidden. It serves as a bending form for Gargraves, and also provides for perfect and consistent spacing of multiple tracks. It is made up of two layers of Luan plywood and locks the track in place without screws. It is a little labor intensive to do all that kerf cutting for the curves, but the material isn't that expensive.
Thanks Chad, nobody has ever asked about that before. That is a technique that I came up with many years ago, for use in areas that will be hidden. It serves as a bending form for Gargraves, and also provides for perfect and consistent spacing of multiple tracks. It is made up of two layers of Luan plywood and locks the track in place without screws. It is a little labor intensive to do all that kerf cutting for the curves, but the material isn't that expensive.
WOW! That thing is a beast! Can't wait to see it filled up with 2 trains rolling through it. That luan form looks like a really great idea.
WOW! That thing is a beast! Can't wait to see it filled up with 2 trains rolling through it. That luan form looks like a really great idea.
Thanks, I make those strips on the table saw, then bundle 4' lengths together with duct tape and cut the slots on the radial arm saw. They could be used with screws as temporary bending and spacing forms.
Yes, it is a bit of a beast isn't it. As I was taking pictures last night, I was beginning to wonder if the drywall screws that attach the legs to the frame would hold over the long term. I'm guessing there's about 30 - 40 pounds resting on each leg.
Elliot,
That looks awesome, well done!!!!!!!!!
Alex
Patrick has been coming over once a week for four months now. Since we finished the helix a few weeks ago, the focus has shifted to cleaning up some old unfinished business. We have been working on finishing the support system for the upper deck, and all the lower deck backdrops. I estimate that the benchwork is now 90% complete, and we are nearly done with dimensional lumber.
It has actually been a bit of an engineering challenge, to provide totally hidden cantilever support, able to carry something on the order of 50 pounds per sqft. A few different techniques have been used to to accomplish this.
Starting at the new helix, we now have 122' of continuous backdrop. The first 32' are painted.
The trains will disappear under a bridge here as they pass through the backdrop.
Patrick the pretzel, hard at work.![]()
In this area, the curve of the backdrop provides the stability for the upper deck. The support column for the house will have a cement plant built around it.
The other side of the curve.
The backdrop ends down at the other end of the room, but on Friday that will change.
I've taken a piece of 3" PVC pipe and cut it in half. It will be blended into the butt end of the backdrop using bondo.
This next pair of photos is a before and after. This is the section we worked on today.
Note the two scraps of plywood being used to tie the upper deck to the floor joists.
They are gone forever! There are also twice the number of supports.
We used 5 of my bench brackets to stabilize this section.
In order to fix the problem of sagging joints, a second layer of 1x4 was added with the joints staggered. Huge improvement!
This will look very different after Friday when the backdrop goes up. No more seeing through to the next aisle.
Our next major project will probably be installing the track for the suspended ceiling.
Attachments
Another busy day with Patrick, 68 more feet of backdrop hung. It is amazing how something so simple defines spaces and scenes.
This aisle just needs to have the Pigs Eye yard added on the left, and the track is done.
There are 9 cab-1's, each with a different color band of electrical tape. At some point in the future, I'm expecting company.
This is the only spot so far where the backdrop is attached directly to the wall. The piece of plywood is being used as a clamp, as it was necessary to glue it down.
Looking the other direction.
The industrial spurs on the left were the final tracks in this aisle. They were finished today too.
This is going to be 3M's Chemolite plant.
A long view toward Chemolite.
There will be structures on both sides of the tracks.
Next week we'll fill and sand the screw heads and seams. Then it's on to the suspended ceiling.
Attachments
WOW! I have been following along and... WOW...![]()
Can you put JDaddy's name on one of those remotes!
Love it, keep up the great work.
I have been working on my double deck since 2007. My lower deck is complete, upper deck still in the infancy stage.... if only I had more room.
If only I lived closer you would have another helper...Keep us posted
BTW I like how you stored your bridges so they will not get damaged during the build.
Thanks J Daddy, you and everyone else are welcome anytime you're in the neighborhood. You can choose whichever remote you like from all the colors of the rainbow. I use the color, symbol for number, that they use to mark the values of resistors.
Unfortunately, those bridges aren't just stored up in the rafters, now they're buried since Patrick and I put up the drop ceiling. I have no use for them on this layout. They are leftover from 20 years ago, when I had the layout at the mall. The real problem with them is they don't have enough vertical clearance for the tall scale cars like double stacks.
I have slacked off posting to this topic over the six week stretch while Patrick and I put up the ceiling. I was posting regularly over on the "What did you do on your layout today?" topic.
https://ogrforum.com/t...91#18887627712770991
Now that we are back onto actual layout work, I'll chronicle it here again.
Patrick will be here tomorrow, and the plan is to continue to putty and sand backdrops so they can be painted.
Attachments
Elliot are you using rubber cement for the backdrop?
Mike, at this stage, we're just trying to get the masonite hung and the screw heads and seams smoothed over. Then I'll paint all of it blue. Eventually clouds, trees and whatnot will be painted on. There is one spot where I'd like to do a photo backdrop of downtown St Paul. I think it will depend on the type of paper it gets printed on and how large it is, as to what type of adhesive I use. It could be spray adhesive. The nice thing about rubber cement is that it is more forgiving than spray adhesive.
that is looking really goo ! I get tired just thinking of all the work, though.
that is looking really goo ! I get tired just thinking of all the work, though.
Well if it makes you feel any better Lee, I get tired doing it. Even if Patrick is doing most of the heavy work.
I'm actually downstairs poking away at that layout lighting. I hope to have lights on both sides of this peninsula top and bottom functional by next week. It will be a lot easier working on the track when I can see.![]()
![]()
Patrick may not make it tomorrow.![]() We'll have to reschedule if he doesn't.
We'll have to reschedule if he doesn't.
Mike
Elliot,
Thank you for chronicling this journey from paper to reality. There is so much experience and knowledge displayed in the photographs.
I really enjoy it.
They say an artist must suffer for his art. I applaud your vision, courage, and perseverance. Thanks for sharing this herculean effort.
Thanks Guys! A lot of the credit has to go to Patrick, without his help over the last 7 months, I might have thrown in the towel. Now I can see the light at the end of the tunnel, but in this case it is a good thing that it is the train.![]()
Track laying will resume soon, probably in October. My wife and I are taking a 3 week road trip to the west coast in September. I'm worried that Patrick will suffer from withdrawal while we are gone.![]()
In an earlier post I had mentioned the idea of having all the track on the lower level done by the end of this year. In light of the fact that we took time to do the drop ceiling, and the lighting (which was never in the original plan), the timetable has been pushed back slightly this year. I still hope to have all the track on both levels laid and powered by the end of 2014.
I think we will have the last of the heavy construction done by the first part of next year, with one last material delivery coming before the snow flies.
I told Patrick yesterday that scenery should start in 2015, although in a way, it has already started with the blue sky.
Attachments
Its looking really good! The backdrop seems to be working out very well for you: nothing but "blue skies" ahead for you!
Its looking really good! The backdrop seems to be working out very well for you: nothing but "blue skies" ahead for you!
Indeed! ![]() And those light bulbs keep me looking on the bright side too.
And those light bulbs keep me looking on the bright side too.![]()
A lot of hard work and dedication, looks great, it's amazes what can be done in the toy Train hobby![]()
Well, it's been a couple of months since I have done any updates to this topic. My wife and I took a 20 day western road trip, so there hasn't been as much progress to report as there would normally have been. We did see a lot of cool train related things though.
About a year ago I was building a rack to hold all the sheet goods for the layout. There were two problems with it. First, while I was trying to get it into the proper position, I kicked it, and ended up breaking my toe. Second, and I'm still not sure how this happened, I built it 8' tall, but the sheets didn't fit without binding.
Menards delivered a 2' high bale of materials on Wednesday. Patrick came over today, so the first order of business was to correct the design flaw to the rack, and get everything put away. That project took about half the afternoon, but boy was it worth it.
The delivery guy's donkey is too tall to fit in the garage, but we've done this a few times, and he can drop the bale just inside the door by extending the forks and giving it a little extra push.
Ready for a long winter of construction.
Patrick picks up where he left off, securing more decking on the second peninsula.
By the end of next week, I hope to have some backdrop on the upper deck, and close off this half of the room, once and for all.
It was necessary to do some impromptu engineering, with the addition of some 2x4's to help counter balance the weight of the plywood.
We'll be trimming that corner off into a nice smooth curve.
Next Wednesday and Friday with Patrick and maybe Sunday with Matt. Making up for lost time.![]()


