@RSJB18 posted:

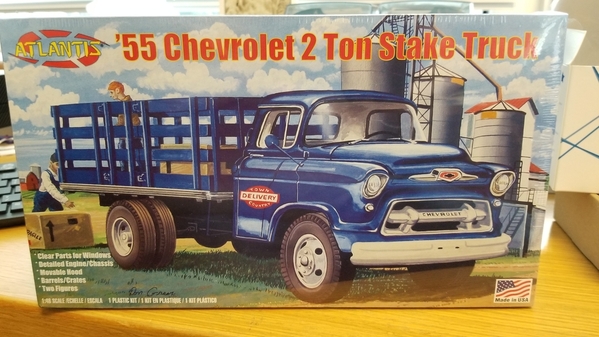
Let me know how that goes......I've heard that Atlantis models don't go together well. I have a Chevy rack-body truck to do one day.

2022-01-10 13.14.25

That’s the flatbed I have as well, although I mistakenly called it a Ford. My plan is to paint it olive drab and slap on some US Army decals before mounting on a flatbed.  I’ve built a few of their other models, the most recent being a Patton tank, and I’ve had no problems with assembly. I did notice that, unlike a tamiya model, you need to clean up the spruces a little  with a file or cutter to remove excess plastic, but other than that, they are fine and a great value, particularly if you can get them from hobby lobby when they run one of their sales. Here’s the Patton mounted on a flatbed. I need to chain it up but it’s otherwise complete. Great kit that included the figures as well -


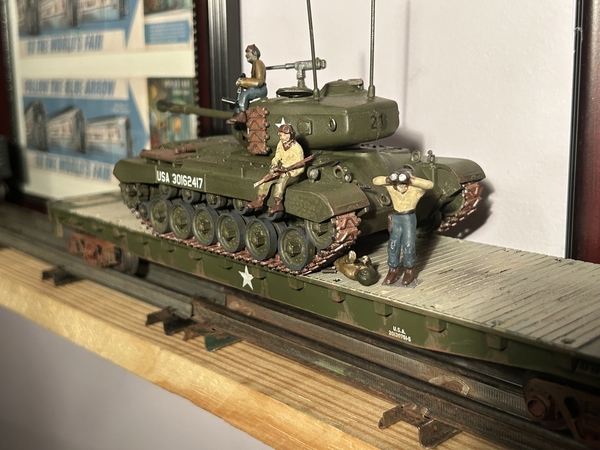
IMG_2965

Attachments

Images (1)
  • IMG_2965

That’s the flatbed I have as well, although I mistakenly called it a Ford. My plan is to paint it olive drab and slap on some US Army decals before mounting on a flatbed.  I’ve built a few of their other models, the most recent being a Patton tank, and I’ve had no problems with assembly. I did notice that, unlike a tamiya model, you need to clean up the spruces a little  with a file or cutter to remove excess plastic, but other than that, they are fine and a great value, particularly if you can get them from hobby lobby when they run one of their sales. Here’s the Patton mounted on a flatbed. I need to chain it up but it’s otherwise complete. Great kit that included the figures as well -


IMG_2965

I haven't built a model kit since doing Revell cars back in the 70's.....I figure there would be parts clean up so it's good to know they go together well.

Thanks

@ScoutingDad posted:

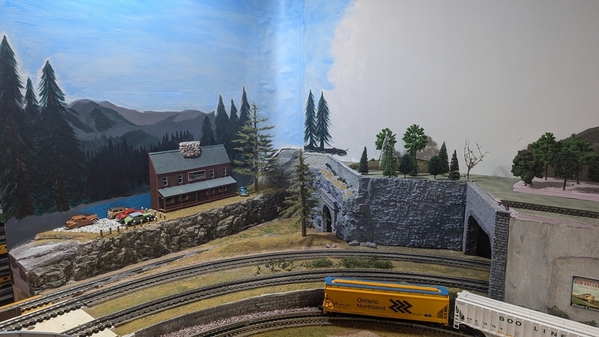
Posted a more detailed version on TPRR2.  This is an update of the Resort area covered earlier in this thread. Added the gravel parking lot, bollards and painted a bit of blue around the corner. This section separates at the rock wall and vertically just left of the lower tunnel entrance.

TPrr Octa

Jeff things are really coming together for you up at the resort! I bet the folks with the nice cars really like the new gravel and bollards to keep them from driving off the edge after a couple of those overpriced cocktails! LOL

@RSJB18 posted:

I haven't built a model kit since doing Revell cars back in the 70's.....I figure there would be parts clean up so it's good to know they go together well.

Thanks

I haven't build an vehicle kit since the '70s as well, part cleanup and all.  I still have a dozen cars in individual plastic cases.  I bought the stake bed truck and tanker.  Who knows when I will get to them however! 

Morning folks its been a week since my last visit but I see things haven't changed and everyone is doing wonderful things on there layouts!

@farmerjohn John the piers look great, do you plan on doing the same on the curve in the background?

@Ross Looks like you did a really nice job on the flatbed, you did a wonderful job on the painting!

@GojirasTrains outstanding weathering job! Something I am going to have to learn down the road!

As for me I really didn't get much done in the train room, I was able to get the door installed and next will be the new beam since I was able to remove the post that was in the middle if a walkway.

20241020_112343

I know don't everyone jump up and down at the same time, but for me it's exciting because it is still one step forward! LOL

I hope you all have a great weekend and find time to have fun with your layouts and trains!

Attachments

Images (1)
  • 20241020_112343
@darlander posted:

I have been working on tunnel walls this past week.  Using a kitchen knife, I split a one inch piece of styrofoam.  As I work the knife around and through the panel, I cut and twist the blade causing the styrofoam to fracture and break apart.  

The results produces two 1/2" panels that resemble a rough rocky structure.  The panels are then painted a dark earthy color.  Spray with "wet" water (add drop or two of soap) helps to bleed paint into cracks and crevices.

The panels are easily bent to follow the curve of the track in the tunnel area.  

Note the pink styrofoam blocks in the last picture.  They are glued in place the day before I set the wall panels.  After a day to cure, a dab of adhesive is added to the face of the blocks and the panels wall is pushed into place.  I use push pins and small c-clamps to hold them in place during cure.  I'm using Loctite PL 200 construction adhesive purchased from Menards.  It's cheap, provides a good strong bond and is compatible with styrofoam.  

DSC05305

DSC05306

DSC05308

DSC07321

DSC07323

Morning Dave I got a link to this post from another post and looked and realized I have been hanging around this place since 2012! The best part is I am still learning!

@mike g. posted:

Looks good, I bet its a nice feeling having it up and running again!

Yes it is!  The way it’s constructed the only strength adhering the bridge to the all thread from below is two part epoxy. The bridge clearance from the “floor” of turntable to bottom of bridge was tight. Errand pieces of ballast could interfere and end up breaking bridge loose. This last time I sanded off the bottom a bit. So far it’s holding🤞. By the way my buddy Pat help me build this about 20 years ago.

@mike g. posted:


As for me I really didn't get much done in the train room, I was able to get the door installed and next will be the new beam since I was able to remove the post that was in the middle if a walkway.

20241020_112343

I know don't everyone jump up and down at the same time, but for me it's exciting because it is still one step forward! LOL

Mike, I can at least confirm that one person is jumping up and down.  Me!  I'm glad for your progress!!!! 

@mike g. posted:

Morning folks its been a week since my last visit but I see things haven't changed and everyone is doing wonderful things on there layouts!

@farmerjohn John the piers look great, do you plan on doing the same on the curve in the background?

@Ross Looks like you did a really nice job on the flatbed, you did a wonderful job on the painting!

@GojirasTrains outstanding weathering job! Something I am going to have to learn down the road!

As for me I really didn't get much done in the train room, I was able to get the door installed and next will be the new beam since I was able to remove the post that was in the middle if a walkway.

20241020_112343

I know don't everyone jump up and down at the same time, but for me it's exciting because it is still one step forward! LOL

I hope you all have a great weekend and find time to have fun with your layouts and trains!

That’s progress Mike. It’s important to get those less fun projects out of the way before getting to the fun projects.

Jay

@mike g. posted:

As for me I really didn't get much done in the train room, I was able to get the door installed and next will be the new beam since I was able to remove the post that was in the middle if a walkway.

I know don't everyone jump up and down at the same time, but for me it's exciting because it is still one step forward! LOL

I hope you all have a great weekend and find time to have fun with your layouts and trains!

Mike, it takes many small steps to accomplish your goal, keep up the great progress!

Gene

@obxtrainman posted:

Yes it is!  The way it’s constructed the only strength adhering the bridge to the all thread from below is two part epoxy. The bridge clearance from the “floor” of turntable to bottom of bridge was tight. Errand pieces of ballast could interfere and end up breaking bridge loose. This last time I sanded off the bottom a bit. So far it’s holding🤞. By the way my buddy Pat help me build this about 20 years ago.

Good morning, I just have to say WOW that sure looks Amazing for being 20 years old! Back then things were made to last longer then today!

Morning guys and gals, thanks for all the comments and likes for my post! It really means a lot to me and helps keep me motivated. Sometimes it gets hard but the good thing is every time I go into the shop there is a big stack of train stuff that will never move till I get the inside of the train room done. So that too is a motivator!

@Seth Thomas Seth thanks and you got yourself one wonderful looking trains there! Heck also probably one of the cleanest layout I have seen in a long time! LOL

@87smokemetalic Nice work on the lift out section it looks like it should work great!

I hope your all having a great weekend and finding time to have fun with your trains and layouts!

@mike g. posted:

Morning guys and gals, thanks for all the comments and likes for my post! It really means a lot to me and helps keep me motivated. Sometimes it gets hard but the good thing is every time I go into the shop there is a big stack of train stuff that will never move till I get the inside of the train room done. So that too is a motivator!

I hope your all having a great weekend and finding time to have fun with your trains and layouts!

Mike- Glad you are able to remove the post. It was really in the middle of everything. Hang in there, you will get some trains running before you know it.

Bob

I never have been a fan of “dated” cars. However, this 1999 car for $10 (at York) drew me in because I had a plan to cover the numbers…..

IMG_2402

Some stickers from Michael’s…….

IMG_2403

The numbers are now hidden…..

IMG_2404

Now, I have a car I can use this season for a great price…..

Have a great and safe week, folks!

Peter

Attachments

Images (3)
  • IMG_2404
  • IMG_2403
  • IMG_2402
Last edited by Putnam Division

Started tackling the switching area of my layout, which is in a 4X8' closet. After about 5 months or more of deliberation, I removed a really well done backdrop I installed a couple of years ago. The backdrop was installed using two-sided tape and there was some damage done to the wall even as I carefully removed it. I used a very thin layer of drywall mud on the damaged area. Once dried I will see if a second layer is needed due to shrinking, then I can lightly sand and paint. It's always been interesting to me how resourceful and creative we are as modelers. I used the same drywall mud for the wall, its intended use, for some previously made roads.

Additionally, I installed a strand of dimmable LEDS which really is a nice touch. Once the area is painted the fun can begin with adding buildings, mostly flats and low relief structures,  and more scenery. More to come...

Dave


JNwaPyjGRO6hVei8NuLTWQszTKTlFHQf6MF+n+tk44cg4Pr112V5RvS1cz7ri4ZYJg

Attachments

Images (3)
  • Use of joint compound after removing backdrop #1
  • Use of joint compound after removing backdrop #2
  • Use of joint compound after removing backdrop #3

Some 3/16" O gauge trains.

First photo is a Flyer 478 boxcar repainted as Soo Line and a retrucked Marx plastic Great Northern boxcar.  The Marx car  is the same length and width as the Flyer car but 1/8" higher.

Second photo is a retrucked Marx Santa Fe stock car and a Flyer tank car.

Third photo is a retrucked Marx Allstate gondola and a retrucked Flyer Virginian hopper car.  The hopper is the postwar version that came with S gauge trucks; the body is the same as the prewar 508 hopper.  The gondola finally gets some respect.

DSC_0923DSC_0926DSC_0930

Attachments

Images (3)
  • DSC_0923: Soo and Great Northern boxcars.
  • DSC_0926: Santa Fe stock car and American Flyer tank car.
  • DSC_0930: Allstate gondola and Virginian hopper.

Add Reply

Post

OGR Publishing, Inc., 1310 Eastside Centre Ct, Ste 6, Mountain Home, AR 72653
800-980-OGRR (6477)
CONTACT US
www.ogaugerr.com

×
×
×
×
Link copied to your clipboard.
×
×