Hi @AlanRail,

This is really impressive work you are doing. I just recently got hooked on the Big Boy Tour Trains and when looking closely at the cars in a typical train there are 5 "baggage" modified cars, usually one if not two with some form of POWER for electricity to the passenger cars or to the engine itself in backup. Youi would think Lionel would have attempted cars like that for tjhosd of us wanting models closer to prototypical form Big Boy consists.

Great work - looking forward to seeing your progress.

Does it take a huge learning curve to do this printing? Wow though what you can do with that skill.

- Ken Gillig

Ken

With Chinese and other 3D resin printers being realatively cheap, these printers are more affordable now than ever.  There are FREE 3D modeling software programs available, so that's not an expense, too.

There are on-line tutorials to use these programs and printers most of which are free.

Most of my designs use 2D models made off of photos then extruded into the 3rd dimension to form a 3D model.

For example, Gunrunner John, OGR's resident electronics expert told me, not too long ago, that designing and making 3D models was "way-out-of-his wheelhouse. He bought a 3D printer, got into some 3D modeling software and look at the 3D jeeps and other things he is now making!!

He is not the only one here.

Join us!

My wait is almost over! The 3D printed Hump from Alan  is in the mail as I type this. I'm hoping it'll be here by the weekend.  I'm so excited.
I'm still waiting on my Railsounds card to return from Lionel. Seems the card was never "flashed" with the sound file.
I returned from York with a whole bunch of Fastrack for the layout, and also the 2327270 UP Excursion Pack 4 from Brady's Trains.
This Excursion Pack gives me the last 2 cars I need for the Bush Funeral Train. The "City of San Fransisco" Dome car and a car to build the Sleeper car "Portola".
More to follow in the future.

Until next time....

UPP #2066 HUMP Update

I received a very beautiful laser cut and labeled box from Alan containing the pieces/parts of the Hump.
When I first saw this, I was totally surprised, floored even.

DSCN0049

Inside the box was a laser cut insert containing the cutouts for the side vents and fans.
The fans are with the main parts of the hump which is underneath.

DSCN0050

Remove the insert and this is what you see. Well, what you would have seen is the side vents in the body, and the 3 main parts of the body inserted in the insert.

DSCN0051

As I said, I was very impressed with the box! There was NO WAY the USPS would have destroyed the parts without destroying the box.

So moving on. After close examination of all the parts, I couldn't wait to start trimming and cleaning up the hump. I glued the 3 sections together and allowed them to dry before doing any manhandling. I then placed the hump on top of the car to get some sort of perspective of what I had.  I'm totally liking what Alan has pulled off. This is going to be sooooo cool when it's finished.

DSCN0054
DSCN0053

This afternoon I sanded the ends to get a better fit to the roof. I still have some forming and fitting to do. But with any first time project, there's a huge learning curve that goes into this. I will be detailing the build of the HUMP so others will have the opportunity to see how I put this car together, if Alan is so inclined to put this out for others.

DSCN0055DSCN0057


I'd like to say...Alan and I have sent LOTS of emails back and forth and it's still a work in progress. Alan has been very accommodating to my OCD. This is going to be a one off, at least for me and I'd like it to be as Prototypical as possible.
Alan does awesome 3D work as many of you folks know. I am completely and totally impressed with this "Hump". It was well worth the wait!

I just can't say this enough, Thank You Alan!

Until next time...Stay tuned, More to follow throughout the winter.

Attachments

Images (7)
  • DSCN0049
  • DSCN0050
  • DSCN0051
  • DSCN0053
  • DSCN0054
  • DSCN0055
  • DSCN0057

Please do not ask to purchase here in this thread. It is against OGRR Rules.

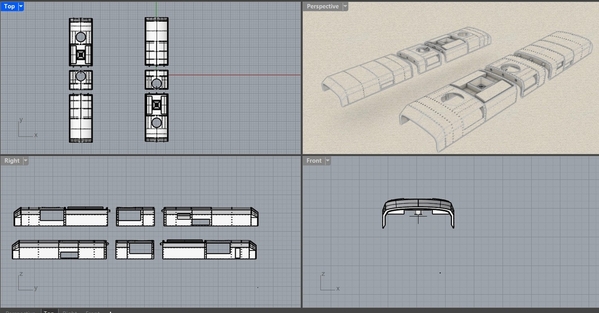
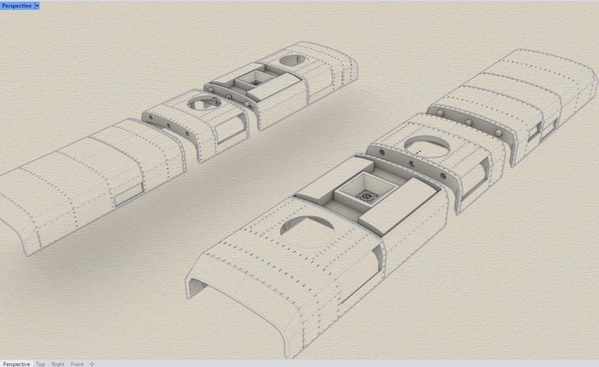
So after several revisions and many more rivet details per Chris, the model was printed and will be shipped to Chris (Jayhawk500). The model as Chris has said will have two rotating fans and a smoke unit.

The hump has 3 main sections, 4 large in-take vents, 4 more smaller vents and two sets of grill and fan blades. And plenty of scaled and positioned rivets!!  Thanks to Chris.

The fan blades have a D-shaped notched shafts to fit the small electric motor shafts.

hump v9

After about 9 hours of printing; here are the three main section printed pieces in the 2nd post-processing wash.

post

Attachments

Images (2)
  • hump v9
  • post

Am I aloud to say, "Hot D*** Skippy!" Where's Snoopy doing his happy dance!
Alan has done an awesome job on this 3D print. I can't wait for it to show up! Just so everyone knows, this isn't going to be a rush job to get it finished. I'll be taking my time assembling this car. If you noticed, The areas under a couple of the vents is a bit warped. This is a VERY thin area and VERY delicate. It's hard to maneuver the hump around with out breaking those strips. I broke the prototype ones without even knowing it.

I will be posting  the build on this thread, so Stay Tuned "O" Gaugers.

Last edited by Jayhawk500

Just a quick update on the Hump. As you can see from the above posts Alan has completed the hump. It's been delivered to the Post Office and is in route to me. According to the tracking number it should be here hopefully on Friday.

With that being said, one other thing I've been wanting to do is get the proper drumhead on the back of the Kenefick car. When purchased, it comes with the "Union Pacific" drumhead. For Bush's Funeral Train the drumhead was the Presidential Seal. I went to Tomar and asked about getting one made and that's still in the works. Hopefully that comes to fruition. But in the mean time, I was able to make a Presidential Seal. It's not as clear as I would have liked since I had to shrink it down so much, but it'll do until Tomar decides if they're going to make one.

DSCN0088

More to come after Friday's delivery.
Until next time....

Attachments

Images (1)
  • DSCN0088
Last edited by Jayhawk500
@Will Ebbert posted:

Looking good! Since you're doing the train up right, you may want to swap the trucks on the observation cars to 6 wheel versions. The truck swap itself is super easy, just have to trim the skirts on the non observation emd of the car. I did a post about it a couple years ago.

I saw that post. I removed the scale coupler and put a dummy  locomotive coupler in it's place. It does the job and I didn't have to remove the skirts. But only time will tell.

UPP 2066 Hump Build Update

I finally received the "hump" last Saturday. As always, Alan has done a fantastic job. So I'm going to forego the unpacking photos. They're the same as I last posted.
So we move into testing and fitting the parts. Lots of printing nibs that need to be remove, but an X-acto knife makes short work of those.
I test fitted the cooling fans to the gearmotor shafts and they also fit very well. I won't have to glue them in place. There's enough of a friction fit to hold them. Plus, once the grill are installed they won't come off.

I started this morning on cleaning up the cooling fan openings, and deciding how and where the gearmotors will be installed. Since there's not a lot of clearance on the gearmotor shaft, I wanted to ensure I got the shaft centered in the hole, so I placed a piece of heatshrink over the shaft to help center it.
DSCN0099

Using this clamp I found on line, I was then able to locate where the holes needed to be for the clamp. These clamps came from across the pond and took about 10-12 days to get here.
DSCN0107
Once I got the hole locations, I drilled a .120" hole. Using my soldering iron, I inserted a M2x4x3.2 nut into the resin. These nuts are .125" in diameter.

DSCN0102
U
sing my Weller soldering iron with the temp set at 2.
DSCN0101
DSCN0103
The nut just sits on the irons adapter, wait a minute to heat up then insert. I inserted the nuts until they were flush with the body.

DSCN0100
Utilizing the M2*8mm screw I mounted the gearmotor to the body.
DSCN0104
The gearmotors I'm using are 12 volt 138 RPM motors. Everything I have shown and listed has come from Amazon. These also came from overseas.
DSCN0105
Mounted and centered. Dont overtighten the screws. Use just enough pressure to hold the motor. Too much pressure, you'll pull out the inserted nut. Or worse yet, spin it.
DSCN0106
Remove the heatshrink and place the fan on the shaft. The fan is centered in the hole very nicely.
DSCN0109


Attachments

Images (10)
  • DSCN0099
  • DSCN0107
  • DSCN0102
  • DSCN0100
  • DSCN0101
  • DSCN0104
  • DSCN0103
  • DSCN0105
  • DSCN0106
  • DSCN0109
Last edited by Jayhawk500

I've had to reconfigure the inside of the car 4 times. Everytime I added something it would interfere with something else. But I think I finally have it figured out. Going from left to right: Speaker, Mini-EX, diesel smoke unit, RailSounds Lite, Buck converter for the cooling fans. If I had known it was going to be such a nightmare adding everything in I would have waited on installing the detailed interior.

DSCN0111

The smoke unit originally had an 8 ohm element in it and really smoked heavily on full track power. I removed that and installed a 30 ohm element. This produces a better column of smoke, but it's still a bit heavy. I think I may go to a 33 ohm element and see if that's any better.

Attachments

Images (1)
  • DSCN0111
Last edited by Jayhawk500

I snapped a few pictures after I had gotten the hump sections glued together. Lots of sanding and scraping to get a flush tight fit. I also glued in the vent grills to prevent breaking of the very thin materal under the vents.
DSCN0117DSCN0118
I followed that up with some body filler from my 70 Chevelle. To prevent lots of sanding and damaging the hump body. I wiped off the excess filler and then wiped down the area with rubbing alcohol.

DSCN0119

The next step will be to lightly sand down the back side of the vents so the lower edge of the hump body will sit flush against the car body.
DSCN0120
Now, one must realize the area indicated inside the blue box is a best guess. Since there are no overhead photos of the real 2066. Alan and I did our best to make this work. So I'll be doing some creative modeling to make it look like the real McCoy.
DSCN0119.1


Until next time....

Attachments

Images (5)
  • DSCN0117
  • DSCN0118
  • DSCN0119
  • DSCN0120
  • DSCN0119.1
Last edited by Jayhawk500

Another quick assemby update.  The "Hump" is now permanently secured to the top of the donor car.
I know it doesn't look like much from the last photo, but here they are anyway.
DSCN0124DSCN0125
The sides have been glued down also. Now begins the tedious job of appling filler to smooth out the sides where the hump attaches to the body.
I'm pretty pleased with how this is turning out. Baby steps, lots of baby steps.

Until next time...

Attachments

Images (2)
  • DSCN0124
  • DSCN0125

After all the changes and rivet placements (there are a heck of a lot of rivets for all the rivet-counters out there), the model came together extremely well.

Still Chris isn't done yet there several more pieces to place, fills and painting. And of course, the electrification of the smoke unit, the two rotating exhaust fans and controller.

Look forward to the final car!! 

Another Quick Update...

I spent the morning sanding the body filler. It's not perfect and needs some more sanding and more filler. I ended up sanding off some of the rivets, and they will be replaced just prior to painting. I'm going to use the rivets from Micro-Mark.
I had to put a coat of primer on the body to show me the imperfections that need to be addressed. I'll allow the rest of the day to let the paint cure.  So here's a couple of pictures to allow your imagination to run away with you. This is turning out awesome!

DSCN0127DSCN0128

Until Next Time.....

Attachments

Images (2)
  • DSCN0127
  • DSCN0128
Last edited by Jayhawk500
@C&O Allan posted:

Chris,

This is outstanding work - I'm jealous of the meticulous work you are doing.

What did you use as the filler?  I need some for my 4-4-0 project (which is slowly ongoing).

Thank you Allan!

This is what I'm using. It's made to be used on plastics, metal and will go over paint and stick.17342039447318257723648719273347

Attachments

Images (1)
  • 17342039447318257723648719273347
Last edited by Jayhawk500

Another quickie update...

Just completed the right side of the car. It's hard to see and differences from before, but using a flat piece of styrene, 320, and 400 grit sandpaper, I was able to get the joints pretty flat. I'm going to go out and put another coat of primer over that area to look for more imperfections.
DSCN0130DSCN0131

Attachments

Images (2)
  • DSCN0130
  • DSCN0131
Last edited by Jayhawk500

Weekly Update on the UPP 2066 Progress...

Good afternoon everyone! Hope everybody is ready for Christmas!
I have spent this past week filling and sanding, filling and sanding, (you get the idea) the body to get a consistent smooth body. I have the body and portions of the roof (that are without rivets)  sanded down to 600 grit. I am very leary of sanding anywhere where there is rivets in the fear of sanding them off. So they'll stay the way they are. I did receive the rivet decal sheets from Micro-Mark and their setting solutions. Looks to be pretty good stuff. It's been a lot of years since I applied decals, so we're going to see how this all goes.
DSCN0132

After reading the decal instructions, I've marked out on the body where the rivet decals will go as per the instructions. The lines are hard to see in the second picture.
DSCN0133
DSCN0134
I'm hoping to get these applied by the end of the week.
More to come...
Until next time.....Merry Christmas! Hohohoho

Attachments

Images (3)
  • DSCN0132
  • DSCN0133
  • DSCN0134
Last edited by Jayhawk500

I sure hope everyone had a wonderful Christmas.
I did finish the decal application of the rivets on the hump this morning. Once I got the hang of appling the decals, It went pretty quick.
The adhesive that holds the rivets will get dissolved using the solvent in the red bottle just before I paint the car. Several applications of the solvent may be necessary to get it completely dissolved. A few photos of the rivet application and an interior shot of the fan motors. Because of the size of the "rivets" that Lionel uses on the car body, I had to order HO sized rivets from Micro-Mark. Those have been shipped and should be here any day.

DSCN0139DSCN0140DSCN0141DSCN0142

Until Next Time...

Attachments

Images (4)
  • DSCN0139
  • DSCN0140
  • DSCN0141
  • DSCN0142
Last edited by Jayhawk500

The Chassis is Complete!

As I wait on the HO rivet sheets to arrive, I was able to get the R4LC receiver installed with GRJ's Dummy Eng Board. I opted for the R4LC receiver after I wasn't able to get the Mini-EX programmed. So other than adjusting the voltage for the fan motors, the chassis is now complete. Here's a short video of that completion.

Until next time...

Attachments

Videos (1)
DSCN0144
Last edited by Jayhawk500

Rivet Detail Update

While I was taking a much needed break (waiting on the HO riverts to show up) from appling the rivet decals. I decided to take some action shots of the car sitting on my turntable. All of the O scale rivets are applied and I re-installed the ends of the car.
DSCN0145
DSCN0147

DSCN0148

DSCN0153

DSCN0152
T
he HO riverts arrived on Christmas eve, and I started to apply them right away. Appling all the rivet decals has taken me about 5 days total. I did just apply one coat of solvent to one of the decal sections just to see how well this will work. It's currently drying and I'll post up a photo after its completely dry. Once all of the decal adhesive has been removed this car can not be handled too much. It'll have to be painted right away, to secure the rivets or I'll be doing it all over again. Due to the glare it's hard to see the lower rivet line between the hump and car body.

DSCN0154DSCN0155DSCN0156DSCN0157DSCN0158DSCN0159

Until next time...Happy New Year!

Attachments

Images (11)
  • DSCN0145
  • DSCN0147
  • DSCN0148
  • DSCN0153
  • DSCN0152
  • DSCN0154
  • DSCN0155
  • DSCN0156
  • DSCN0157
  • DSCN0158
  • DSCN0159
Last edited by Jayhawk500

Add Reply

Post
×
×
×
×
Link copied to your clipboard.
×
×